VeloCloud SD-WAN 6.0 - Configuration Guide - Set up Production Orchestrator
Print
Set up Production Orchestrator
Discusses the pre-configuration steps to be completed in the Production Orchestrator to activate a SD-WAN Edge against a Bastion Orchestrator and then promote it to the Production Orchestrator.
In the Production Orchestrator, ensure that you have completed the following minimum pre-configuration steps:
In the Operator portal, you can add new users and configure the user settings. Only Operator Superusers and Operator Standard Admins can add a new user.
To add a new user, perform the following steps:
In the Operator portal, select Administration from the top menu.
From the left menu, select User Management.
The Users tab is displayed by default.
Select New User.
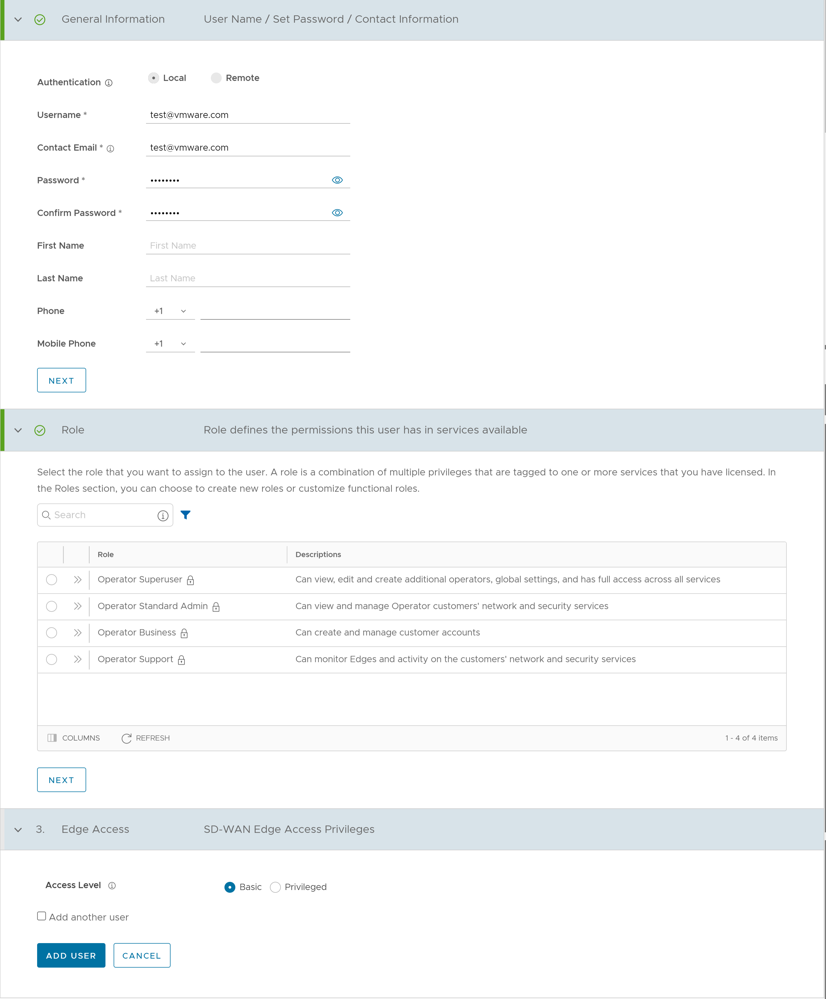
The following screen appears:
Figure 1. New User
Enter the following details for the new user:
Table 1. New User- Options and Descriptions
Option
Description
General Information
Enter the required personal details of the user.
Role
Select a role that you want to assign to the user. For information on roles, see the Roles section in the Arista VeloCloud SD-WAN Operator Guide.
Edge Access
Ensure that you have Operator Super User role to modify the Access Level for the user. Choose one of the following options:
Basic: Allows you to perform certain basic debug operations such as ping, tcpdump, PCAP, remote diagnostics, and so on.
Privileged: Grants you the root-level access to perform all basic debug operations along with Edge actions such as restart, deactivate, reboot, hard reset, and shutdown. In addition, you can access Linux shell.
The default value is Basic.
Note: Only Operator Super Users can modify the default value to Privileged.
Note: The Next button is activated only when you enter all the mandatory details in each section.
Select the Add another user check box if you wish to create another user, and then select Add User.
The new user appears on the User Management > Users page. Select the link to the user to view or modify the details.
Create Gateways for Bastion Orchestrator Setup
In the Bastion Orchestrator setup, there are two Gateways, one paired with the Bastion Orchestrator, and the other paired with Production Orchestrator and functions as a Partner Gateway.
To create a Gateway paired with Bastion Orchestrator, see Create New Gateway.
In the Orchestrator UI, select the Gateway Management tab and go to Gateways in the left navigation pane.
The Gateways page appears.
Select New Gateway.
The New Gateway dialog appears.
In the New Gateway dialog, configure the following details:
Table 2. New Gateway- Options and Descriptions
Option
Description
Name
Enter a name for the new Gateway.
IPv4 Address
Enter the IPv4 address of the Gateway.
IPv6 Address
Enter the IPv6 address of the Gateway.
Service State
Select the service state of the Gateway from the drop-down list. The following options are available:
In Service- The Gateway is connected and available.
Out of Service- The Gateway is not connected.
Quiesced- The Gateway service is quiesced or paused. Select this state for backup or maintenance purposes.
Note: The Quiesced and Out of Service states are only applicable for Cloud Gateway deployment.
Gateway Pool
Select the Gateway Pool from the drop-down list, to which the Gateway would be assigned.
Authentication Mode
Select the authentication mode of the Gateway from the following available options:
Certificate Not Required- Gateway uses a pre-shared key mode of authentication.
Certificate Acquire- This option is selected by default and instructs the Gateway to acquire a certificate from the certificate authority of the Orchestrator, by generating a key pair and sending a certificate signing request to the Orchestrator. Once acquired, the Gateway uses the certificate for authentication to the Orchestrator and for establishment of VCMP tunnels.
Note: After acquiring the certificate, the option can be updated to Certificate Required.
Certificate Required- Gateway uses the PKI certificate.
Contact Name
Enter the name of the Site Contact.
Contact Email
Enter the Email ID of the Site Contact.
Note:
Once you have created a Gateway, you cannot modify the IP addresses.
Release 4.3.x and 4.4.x support Greenfield deployment of Gateways for IPv6. If you have upgraded a Gateway from a previous version earlier than 4.3.0, you cannot configure the upgraded Gateway with the IPv6 address.
Release 4.5.0 supports both the Greenfield and Brownfield deployment of Gateways for IPv6. If you have upgraded a Gateway from a previous version earlier than 4.5.0, you can dynamically configure IPv6 address for the Gateway.
IPv4/IPv6 dual-stack mode is not supported for Bastion Orchestrator configuration.
Once you create a new Gateway, you are redirected to the Configure Gateways page, where you can configure additional settings for the newly created Gateway.
Configure Partner Hand Off
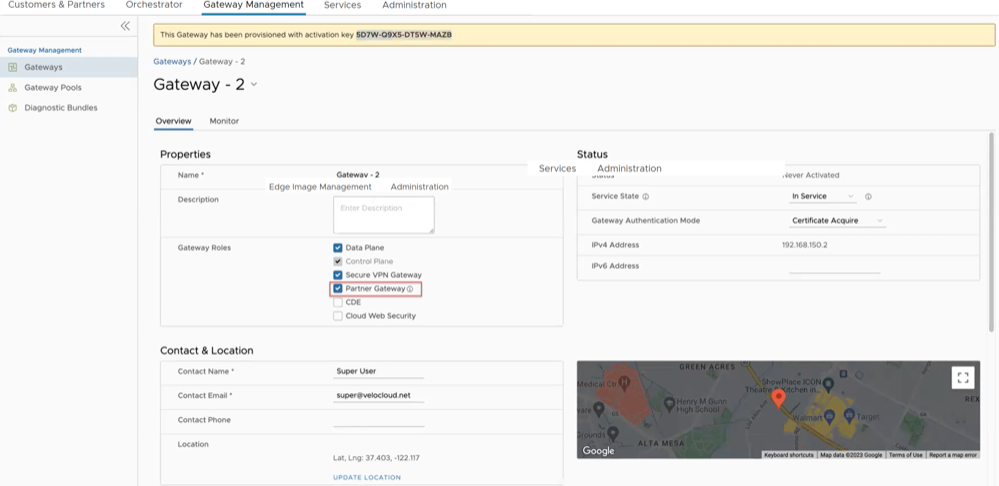
Ensure that the Gateway to be handed off is assigned with Partner Gateway Role. In the Orchestrator portal (Operator or Partner), select Gateways and select the link to an existing Gateway. In the Properties section of the selected Gateway's Overview page, you can enable the Partner Gateway role as shown in the following screenshot.
Figure 2. Gateway Properties
You can configure a Gateway to hand off to Partners. The Gateway acts as a Partner Gateway that enables you to configure the Hand off Interface, Static Routes, BGP, and other settings.
To configure the handoff settings, perform the following steps:
Navigate to Customers & Partners > Manage Customers.
In the Manage Customerswindow, select the link of the desired customer.
Go to Global Settings > Customer Configuration.
In the Customer Configuration window, scroll down to Additional Configuration and expand the Gateway Pool area.
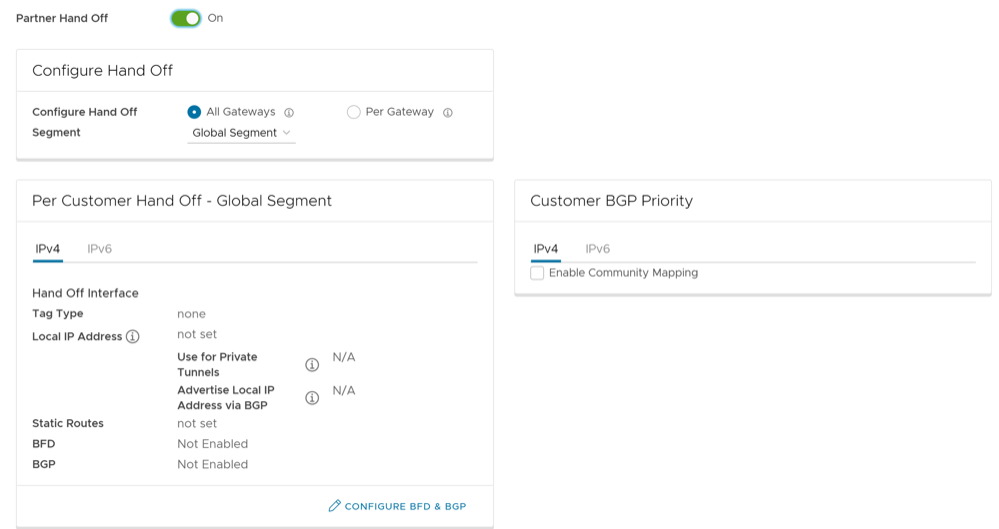
Turn on the Partner Hand Off toggle button.
In the Configure Hand Off area, configure the following settings:
Figure 3. Configure Hand Off
Table 3. Configure Hand Off- Options and Descriptions
Option
Description
Configure Hand Off
By default, the hand off configuration is applied to all the Gateways. If you want to configure a specific Gateway, choose Per Gateway, and then select the Gateway from the drop-down list.
Segment
By default, Global Segment is selected, which means that the hand off configuration is applied to all the segments. If you want to configure a specific segment, select the segment from the drop-down menu.
Hand Off Interface
This section displays the values that are configured on the Configure BGP and BFD page.
Customer BGP Priority
Select the check box and configure the Community Mapping details.
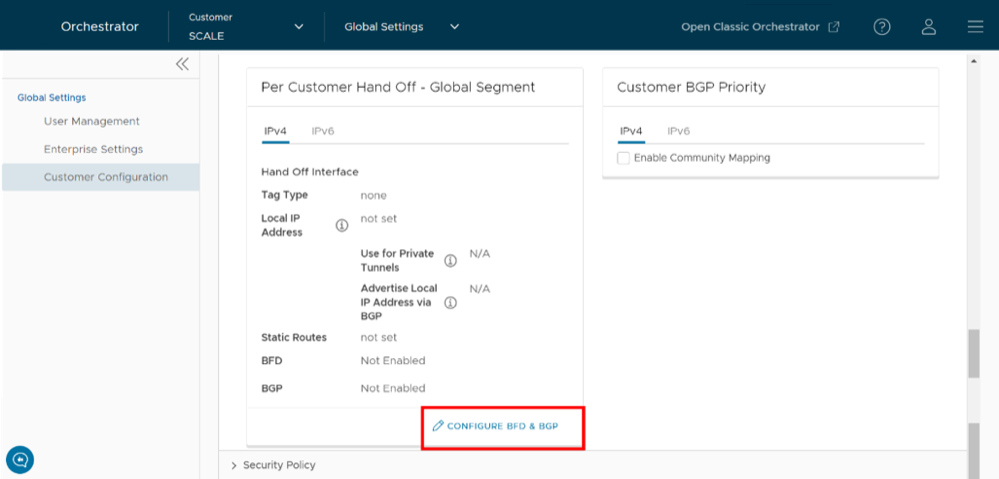
At the bottom of the Per Customer Hand Off – Global Segment area, select the Configure BFD & BGP link, as shown in the image below.
Figure 4. Select "Configure BFD & BGP" Link
The Configure BGP and BFD screen appears.
Figure 5. Configure BGP and BFD
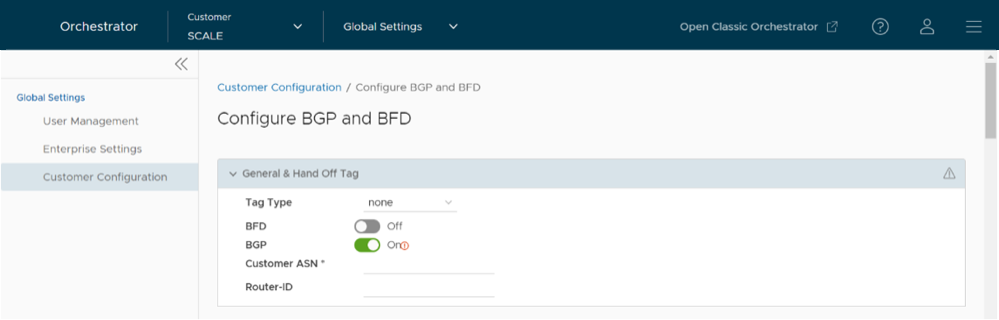
Open the General & Hand Off Tag section and turn the BGP option to the On position. See figure below.
Figure 6. General & Hand Off Tag
Scroll down to the BGP section and select the arrow to display the BGP section.
Configure the following settings:
Table 4. Configure BGP and BFD- Options and Descriptions
Option
Description
Hand Off Tag
Tag Type
Choose the tag type, which is the encapsulation, in which the Gateway hands off customer traffic to the Router. The following are the types of tags available:
None: Untagged. Choose this during single tenant hand off or a hand off towards shared services VRF.
802.1Q: Single VLAN tag
802.1ad / QinQ(0x8100) / QinQ(0x9100): Dual VLAN tag
Customer ASN
Enter the Customer Autonomous System Number.
Hand Off Interface: You can configure the following settings for IPv4 and IPv6.
Local IP Address
Enter the Local IP address for the logical Hand Off interface.
Use for Private Tunnels
Select the check box so that private WAN links connect to the private IP address of the Partner Gateway. If private WAN connectivity is activated on a Gateway, the Orchestrator audits to ensure that the local IP address is unique for each Gateway within an Enterprise.
Advertise Local IP Address via BGP
Select the check box to automatically advertise the private WAN IP of the Partner Gateway through BGP. The connectivity is provided using the existing Local IP address.
Static Routes: You can add, delete, or clone a static route.
Subnets
Enter the IP address of the Static Route Subnet that the Gateway should advertise to the Edge.
Cost
Enter the cost to apply weightage on the routes. The range is from 0 to 255.
Encrypt
Select the check box to encrypt the traffic between Edge and Gateway.
Hand off
Select the hand off type as either VLAN or NAT.
Description
Enter a descriptive text for the static route. This field is optional.
BFD: Turn the toggle button to On to activate this section.
Peer Address
Enter the IP address of the remote peer to initiate a BFD session.
Detect Multiplier
Enter the detection time multiplier. The remote transmission interval is multiplied by this value to determine the detection timer for connection loss. The range is from 3 to 50.
Receive Interval
Enter the minimum time interval, in milliseconds, at which the system can receive the control packets from the BFD peer. The range is from 300 to 60000 milliseconds.
Local Address
Enter a locally configured IP address for the peer listener. This address is used to send the packets.
Transmit Interval
Enter the minimum time interval, in milliseconds, at which the system can send the control packets from the BFD peer. The range is from 300 to 60000 milliseconds.
BGP: Turn the toggle button to On to activate this section.
Neighbor IP
Enter the IP address of the configured BGP neighbor network.
Secure BGP Routes
Select the check box to allow encryption for data-forwarding over BGP routes.
Max-hop
Enter the number of maximum hops to allow multi-hop for the BGP peers. The range for Max-hop is from 1 to 255, and the default value is 1.
Note: This field is available only for eBGP neighbors, when the local ASN and the neighboring ASN are different.
Next Hop IP
Enter the next-hop IP address to be used by BGP to reach the multi-hop BGP peer.
Note: This option is available only for multi-hop eBGP with Max-hop count greater than 1.
Neighbor-ASN
Enter the Autonomous System Number of the Neighbor network.
BGP Local IP
Local IP address is the equivalent of a loopback IP address. Enter an IP address that the BGP neighborships can use as the source IP address for the outgoing BGP packets.
Note: The BGP Local IP address must be from a different subnet than a handoff IP address.
If you do not enter any value, the IP address of the Hand Off Interface is used as the source IP address.
BGP Inbound Filters
Displays the BGP inbound filters.
BGP Outbound Filters
Displays the BGP outbound filters.
BGP Optional Settings
BFD
Select the check box to subscribe to the BFD session.
Router-ID
Enter the Router ID to identify the BGP Router.
Keep Alive
Enter the BGP Keep Alive time in seconds. The default timer is 60 seconds.
Hold Timers
Enter the BGP Hold time in seconds. The default timer is 180 seconds.
Turn off AS-PATH Carry Over
Select the check box to turn off AS-PATH carry over, which influences the outbound AS-PATH to make the L3-routers prefer a path towards a PE. If you select this option, ensure to tune your network to avoid routing loops. It is recommended not to select this check box.
MD5 Auth
Select the check box to activate BGP MD5 authentication. This option is used in a legacy network or federal network, and is used as a security guard for BGP peering.
MD5 Password
Enter a password for MD5 authentication.
Note: Starting from the 4.5 release, the use of the special character "<" in the password is no longer supported. In cases where users have already used "<" in their passwords in previous releases, they must remove it to save any changes on the page.
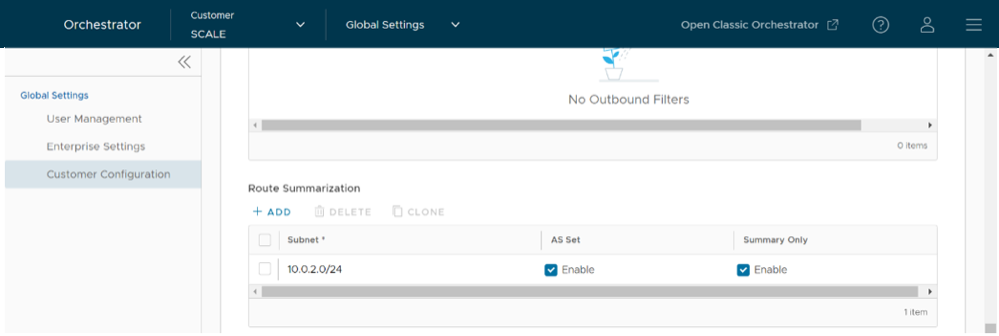
Route Summarization is new for the 5.2 release. For an overview, use case, and black hole routing details for Route Summarization, see the section titled, Route Summarization in the Arista VeloCloud SD-WAN Administration Guide. For Route Summarization configuration details, follow the steps below:
If applicable, configure for Route Summarization.
Scroll down to the Route Summarization area in the BGP section.
Figure 7. Route Summarization
Configure the Route Summarization settings, as described in the table below:
Table 5. Route Summarization- Options and Descriptions
Option
Description
+Add
Click +Add to add a new row in the Route Summarization area.
Note: To add additional rows to configure Route Summarization, select +Add. To Clone or Delete a route summarization, use the appropriate buttons, located next to +Add.
Subnet column
Under the Subnet column, enter the IP subnet.
AS Set column
Generate AS set path information from the summarized routes (while advertising the summarized route to the peer). Under the AS Set column, select the Yes check box if applicable.
Summary Only column
Under the Summary Only column, select the Yes check box to allow only the summarized route to be sent.
Select Update to save the settings.
Create New Customer
In the Operator portal, you can create Customers and configure the Customer settings. Only Operator Super Users and Operator Standard Admins can create a new Customer. As an Operator Super User, you can temporarily deactivate creating new Customers, by setting the system property session.options.disableCreateEnterprise to True. You can use this option when Orchestrator exceeds the usage capacity.
In the Operator portal, go to Customers & Partners > Manage Customers, and then select New Customer.
The New Customer page displays the following sections:
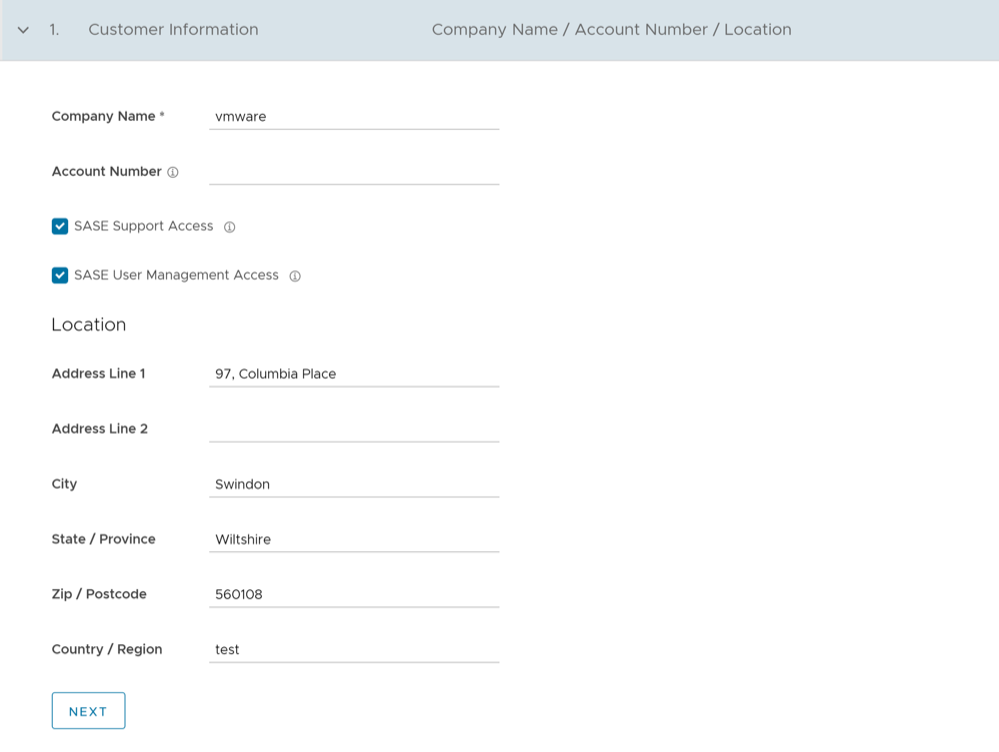
Customer Information:Figure 8. Customer Information
Enter the details in the following fields and select Next.
Note: The Next button is activated only when you enter all the mandatory details.
Table 6. Customer Information- Options and Descriptions
Option
Description
Company Name
Enter your company name.
Account Number
Enter a unique identifier for the Customer.
Support Access
This check box is selected by default, and grants access to the Arista Support to view, configure, and troubleshoot the Edges connected to the Customer.
For security reasons, the Support cannot access or view the user identifiable information.
User Management Access
Select the check box to allow the Arista Support to assist in User Management. The User Management includes options to create users, reset password, and configure other settings. In this case, the Support has access to user identifiable information.
Location
Enter relevant address details in the respective fields.
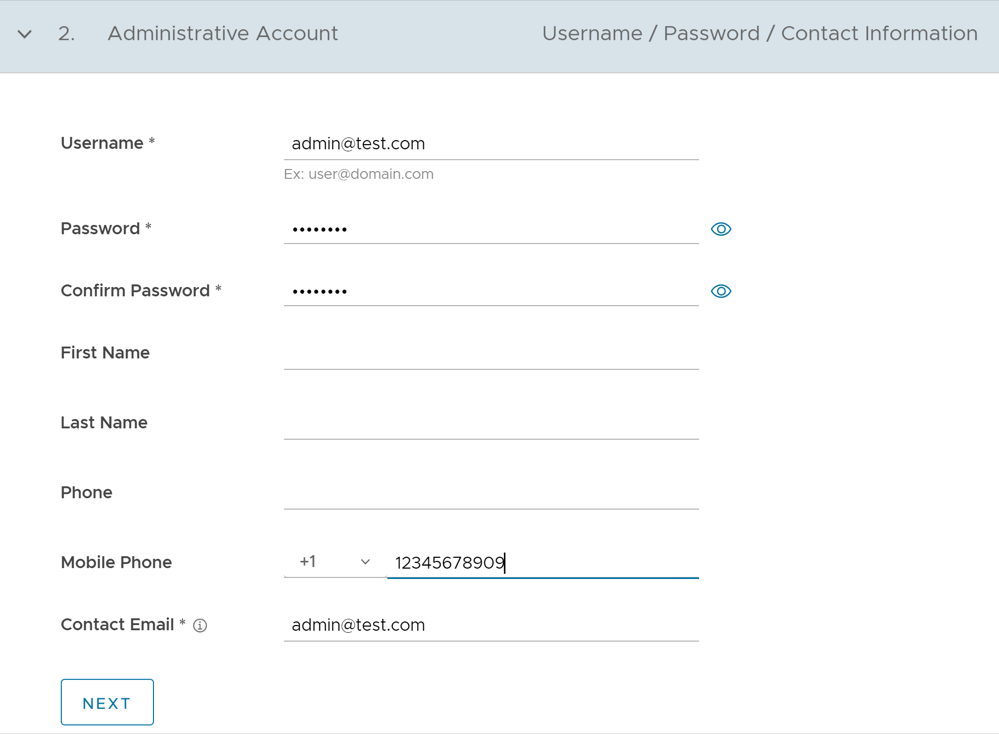
Enter the details in the following fields and select Next.
Note: The Next button is activated only when you enter all the mandatory details.
Table 7. Administrative Account- Options and Descriptions
Option
Description
Username
Enter the username in the This email address is being protected from spambots. You need JavaScript enabled to view it. format.
Password
Enter a password for the Administrator.
Note: Starting from the 4.5 release, the use of the special character "<" in the password is no longer supported. In cases where users have already used "<" in their passwords in previous releases, they must remove it to save any changes on the page.
Confirm Password
Re-enter the password.
First Name
Enter the first name.
Last Name
Enter the last name.
Phone
Enter a valid phone number.
Mobile Phone
Enter a valid mobile number.
Contact Email
Enter the email address. The alerts on service status are sent to this email address.
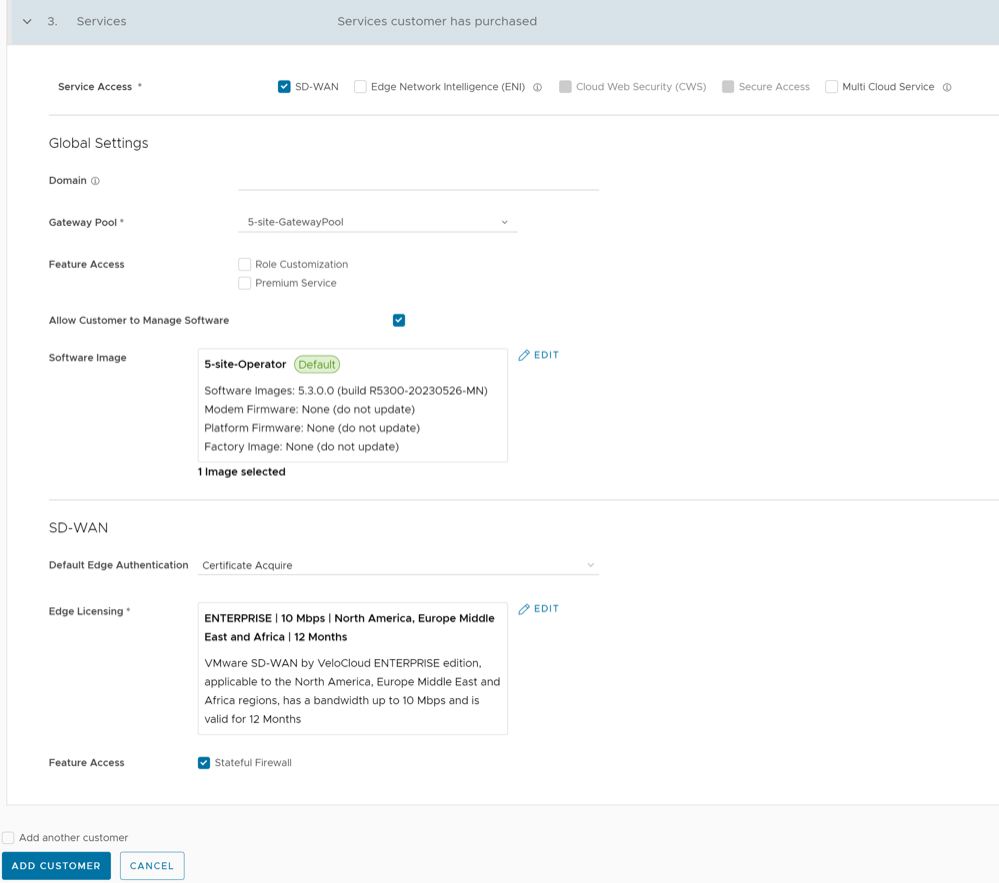
Services:Figure 10. Services
Configure the following global settings:
Table 8. Services- Options and Descriptions
Option
Description
Domain
Enter the domain name to be used to activate Single Sign On (SSO) authentication for the Orchestrator. This field is required when Edge Intelligence is activated for the Customer.
Gateway Pool
Select an existing Gateway pool from the drop-down list.
Feature Access
You can select either Role Customization or Premium Service, or both the check boxes.
Allow Customer to Manage Software
Select the check box if you want to allow an Enterprise Super User to manage the software images available for the Enterprise. Once selected, the Software Image field is displayed. Select Add and in the Select Software/Firmware Images pop-up window, select and assign the software/firmware images from the available list for the Enterprise. Select Done to add the selected images to the Software Image list.
Note: You can remove an assigned image from an Enterprise, only if the image is not currently used by any Edge within the Enterprise.
Operator Profile
Select an Operator profile to be associated with the Customer from the available drop-down list. This field is not available if Allow Customer to Manage Software is selected.
Service Access: This option is available above the Global Settings section. You can choose the services that the Customer can access along with the roles and permissions available for the selected service.
Note: This option is available only when the system property session.options.enableServiceLicenses is set as True.
SD-WAN: When you select this service, the following options are available:
Table 9. SD-WAN Service- Options and Descriptions
Option
Description
Default Edge Authentication
Choose the default option to authenticate the Edges associated with the Customer, from the drop-down list.
Certificate Deactivated: Edge uses a pre-shared key mode of authentication.
Certificate Acquire: This option is selected by default and instructs the Edge to acquire a certificate from the certificate authority of the Orchestrator, by generating a key pair and sending a certificate signing request to the Orchestrator. Once acquired, the Edge uses the certificate for authentication to the Orchestrator and for establishment of VCMP tunnels.
Note: After acquiring the certificate, the option can be updated to Certificate Required.
Certificate Required: Edge uses the PKI certificate. Operators can change the certificate renewal time window for Edges using the system property
edge.certificate.renewal.window.
Edge Licensing
Select Add and in the Select Edge Licenses pop-up window, select and assign the Edge licenses from the available list for the Enterprise.
Note: The license types can be used on multiple Edges. It is recommended to provide your customers with access to all types of licenses to match their edition and region.
Feature Access
Select the Stateful Firewall check box to override the Stateful Firewall settings activated on the Enterprise Edge.
After entering all the details, select the Add Customer button. If you want to add another customer, you can select the Add another Customer check box before selecting Add Customer.
The new Customer name is displayed on the Customers page. You can select the Customer name to navigate to the Enterprise portal and add configurations to the Customer.
Create New Profile
One of the prerequisites for Bastion configuration is to create a new Enterprise profile with a minimum configuration for the purpose of staging an Enterprise customer to a Bastion Orchestrator.
To create a Profile, perform the following steps:
In the SD-WAN service of the Enterprise portal, select the Configure tab.
From the left menu, select Profiles.
The Profiles page appears.
In the Profiles page, select New Profile.
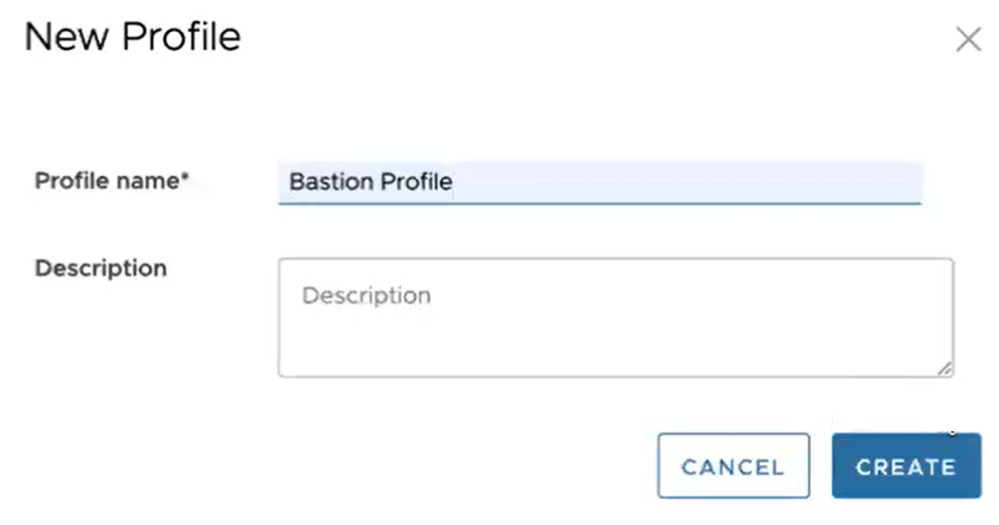
Figure 11. New Profile
Enter a name and description for the new Profile and select Create.
The new profile with minimum configuration is created and it appears in the Profiles page.
Provision a New Edge
Enterprise Administrators can provision a single Edge or multiple Edges for Enterprise Customers.
To create a new Edge, perform the following steps:
In the SD-WAN service of the Enterprise portal, select Configure > Edges.
In the Edges screen, select Add Edge.
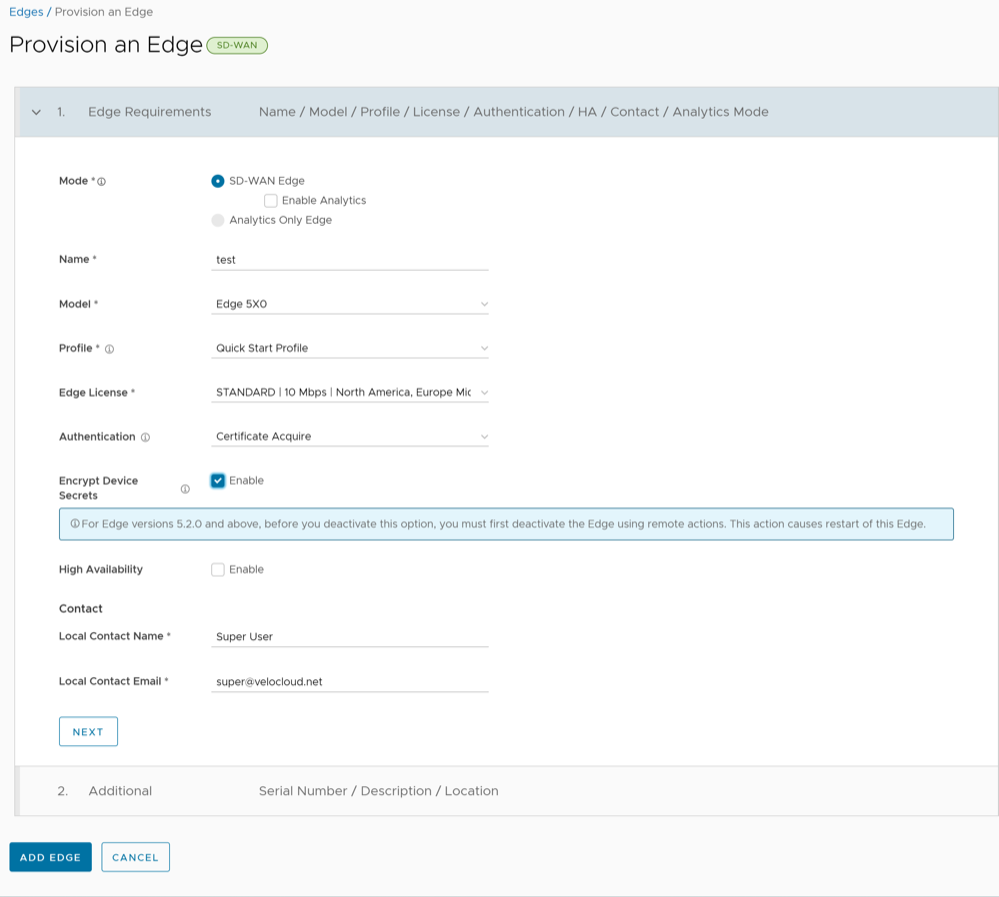
The Provision an Edge screen appears.
Figure 12. Provision an Edge
You can configure the following options:
Table 10. Provision an Edge- Options and Descriptions
Option
Description
Mode
By default, SD-WAN Edge mode is selected.
Name
Enter a unique name for the Edge.
Model
Select an Edge model from the drop-down menu.
Profile
Select a Profile to be assigned to the Edge, from the drop-down menu.
Note: If an Edge Staging Profile is displayed as an option due to Edge Auto-activation, it indicates that this Profile is used by a newly assigned Edge, but has not been configured with a production Profile.
Edge License
Select an Edge license from the drop-down menu. The list displays the licenses assigned to the Enterprise, by the Operator.
Authentication
Choose the mode of authentication from the drop-down menu:
Certificate Deactivated: Edge uses a pre-shared key mode of authentication.
Warning: This mode is not recommended for any customer deployments.
Certificate Acquire: This mode is selected by default and is recommended for all customer deployments. With Certificate Acquire mode, certificates are issued at the time of Edge activation and renewed automatically. The Orchestrator instructs the Edge to acquire a certificate from the certificate authority of the Orchestrator by generating a key pair and sending a certificate signing request to the Orchestrator. Once acquired, the Edge uses the certificate for authentication to the Orchestrator and for establishment of VCMP tunnels.
Note: After acquiring the certificate, the option can be updated to Certificate Required, if needed.
Certificate Required: This mode is only appropriate for customer enterprises that are "static". A static enterprise is defined as one where no more than a few new Edges are likely to be deployed and no new PKI oriented changes are anticipated.
Important:Certificate Required has no security advantages over Certificate Acquire. Both modes are equally secure and a customer using Certificate Required should do so only for the reasons outlined in this section.
Certificate Required mode means that no Edge heartbeats are accepted without a valid certificate.
CAUTION: Using this mode can cause Edge failures in cases where a customer is unaware of this strict enforcement.
With this mode, the Edge uses the PKI certificate. Operators can change the certificate renewal time window for Edges by editing the Orchestrator's System Properties. For additional information, contact your Operator.
Note:
With the Bastion Orchestrator feature enabled, the Edges that are to be staged to Bastion Orchestrator should have the authentication mode set to either Certificate Acquire or Certificate Required.
When an Edge certificate is revoked, the Edge is deactivated and needs to go through the activation process. The current QuickSec design checks certificate revocation list (CRL) time validity. The CRL time validity must match the current time of Edges for the CRL to have impact on new established connection. To implement this, ensure the Orchestrator time is updated properly to match with the date and time of the Edges.
Encrypt Device Secrets
Select the Enable check box to allow the Edge to encrypt the sensitive data across all platforms. This option is also available on the Edge Overview page.
Note: For Edge versions 5.2.0 and above, before you deactivate this option, you must first deactivate the Edge using remote actions. This causes restart of the Edge.
High Availability
Select the Enable check box to apply High Availability (HA). Edges can be installed as a single standalone device or paired with another Edge to provide High Availability (HA) support.
Local Contact Name
Enter the name of the site contact for the Edge.
Local Contact Email
Enter the email address of the site contact for the Edge.
Enter all the required details and select Next to configure the following additional options:
Note: The Next button is activated only when you enter all the required details.
Table 11. Additional Options
Option
Description
Serial Number
Enter the serial number of the Edge. If specified, the Edge must display this serial number on activation.
Note: When deploying virtual VeloCloud Edges on AWS Edges, make sure to use the instance ID as the serial number for the Edge.
Description
Enter an appropriate description.
Location
Select the Set Location link to set the location of the Edge. If not specified, the location is auto-detected from the IP address when the Edge is activated.
Select Add Edge.
The Edge gets provisioned with an activation key.
Note: The activation key expires in one month if the Edge device is not activated against it.
After you have provisioned an Edge, the Edge appears in the Edges screen.
 The Configure BGP and BFD screen appears.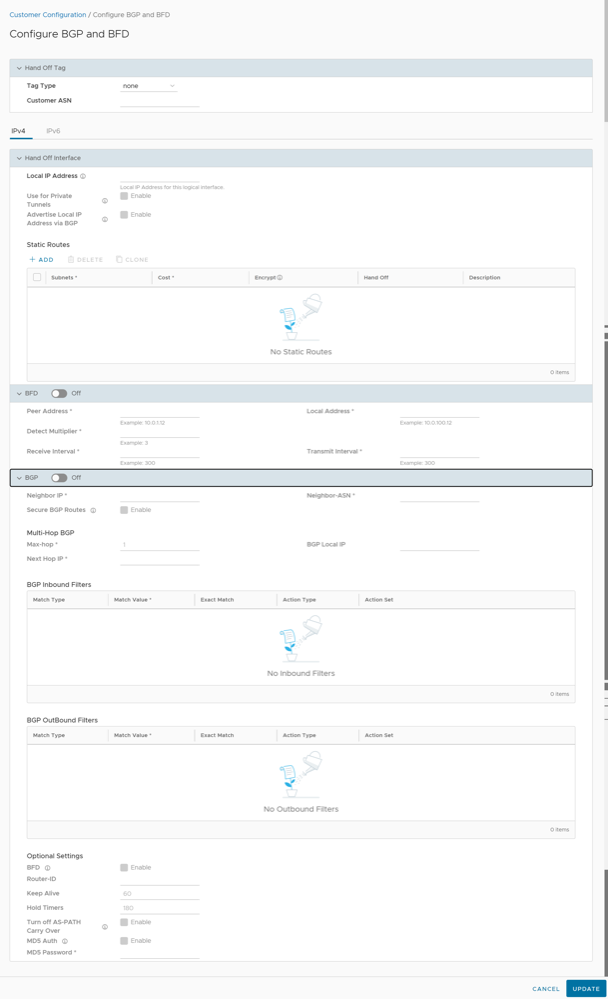
 Enter the details in the following fields and select Next.Note: The Next button is activated only when you enter all the mandatory details.
 Enter the details in the following fields and select Next.Note: The Next button is activated only when you enter all the mandatory details.
 Configure the following global settings: