Configure Policy Manager to define, manage, and enforce network security and access rules across the infrastructure.
The ETM Security configuration process starts with analyzing network flows to ensure the firewall has clear visibility into each flow's context. Next, users can create objects and templates, which serve as the foundation for policy rules. After these objects and templates are defined, the next step is to configure the policies. These policies specify the rules that determine what is permitted on the network. After the policies are configured, users can compile them into a Security Profile. This Security Profile organizes all the rules and templates that constitute the complete security configuration. The final step involves associating Edges with the Security Profile and provisioning them according to the established configuration.
A Security Profile is a grouping of one or more Policy Objects, including Policies, Rules, and Templates. A Security Profile is configured entirely in the ETM Dashboard and enables the Enterprise Admin to configure Security Profiles to assign Policies and Templates to one or more Edges.
Note: An Edge device can belong to only one Security Profile.
Security Profiles bring together all the security configurations provisioned for all Edges associated with the Profile. Users must add a Security Profile to provision any ETM configuration to Edges. For more information, see Provision Edge Threat Management.
Security Profiles enable users to:
Add policies
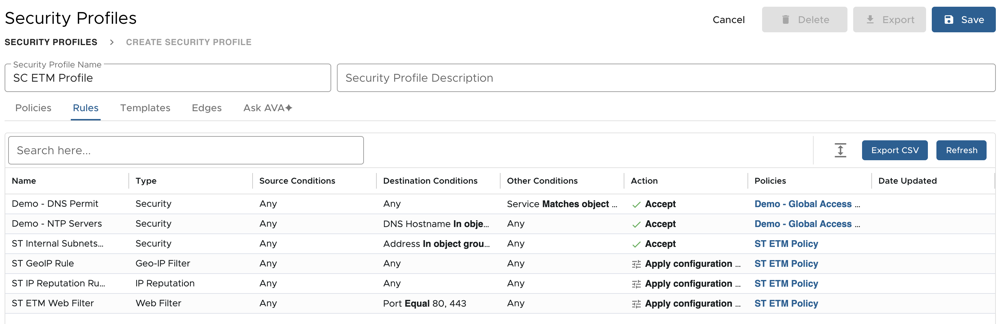
View the complete collection and order of rules
Assign Security Profile templates
Confirm all Edges that the Profile provisions
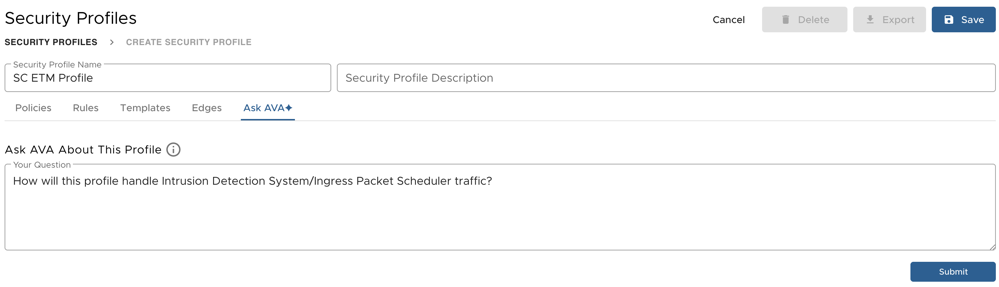
Obtain answers about the profile using the Ask AVA AI assistant
Create a Security Profile
To create a Security Profile, perform the following steps:
Log in to the VeloCloud Orchestrator as an Enterprise User.
To access the ETM application from the VeloCloud Orchestrator, go to the Enterprise Applications drop-down menu and select ETM Nex-Gen Firewall.
Navigate to Configure > Security Profiles.
The Security Profiles page appears.
The Security Profiles page displays a listing of all Security Profiles and details which policies and templates each contains, and the Edges the Profile is assigned to, and its last edited date. Users can also create a new Security Profile using the Create New button. The table's contents can be refreshed or exported as a comma-separated (CSV) file using the buttons along the top.
In the Security Profile Name field, enter a unique name for the Profile.
In the Security Profile Description field, describe the Security Profile.
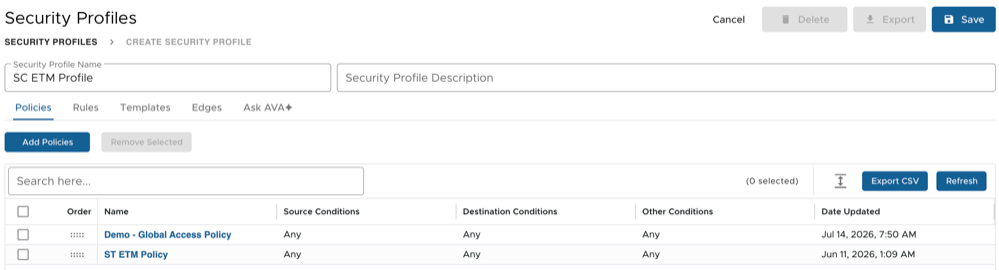
The Policies tab enables users to view, add, reorder, or remove policies in the Profile. In the Policies tab, click Add Policies to choose one or more policies to associate with this Profile. When combining multiple policies in a Profile, the order of the policies is important because the rules are evaluated from top to bottom, and users can confirm this when viewing rules.
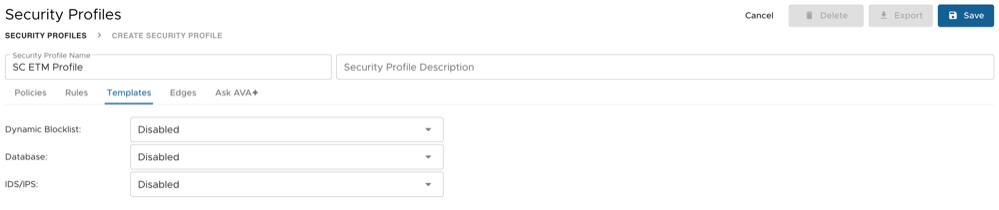
The Templates tab enables users to assign Security Profile templates. This includes Dynamic Blocklist, Database, and IDS/IPS templates configuration. By default, Disabled is selected. If users have configured any custom templates, they appear as options in the respective Templates drop-down.
These types of Profile templates apply unconditionally to all traffic. For example, if users apply an IPS template, it will affect all traffic.
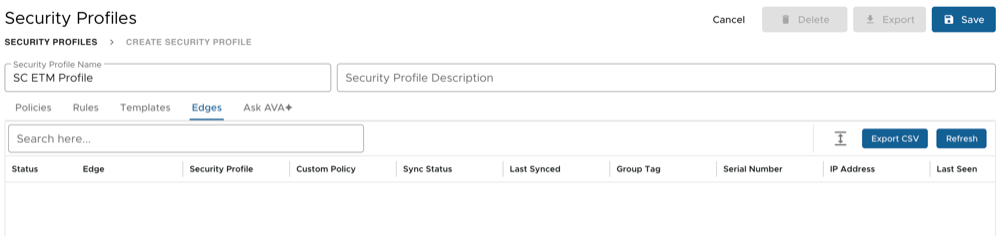
The Edges tab displays all Edges assigned to the Security Profile. The grid provides details about each Edge, including the online status, the last time the Security Profile was updated, and the status of the most recent Profile push. The Search here field enables to find specific Edges assigned to the Security Profile.
Figure 5. Create Security Profile - Edges Tab
Click Ask AVA to ask any questions about this Profile. The Ask AVA feature enables the admin to ask questions about the Security Profile to quickly obtain information about the Profile, rather than attempting to interpret the Policy from a list of rules.
Profiles can be exported via the Export button in the configuration screen for the desired Profile, creating a JavaScript Object Notation (JSON) configuration file that can be imported via the Import button in the main Profiles tab.
Configure Policies
Create and manage policies in the ETM Dashboard to maintain consistent configurations across multiple Edge deployments. Apply these policies to synchronize network settings and minimize initial setup time.
A Policy can be used to apply or synchronize network or service settings; to ensure new deployments are activated with minimal initial configuration time; and to enforce consistency across an environment with multiple Edge deployments.
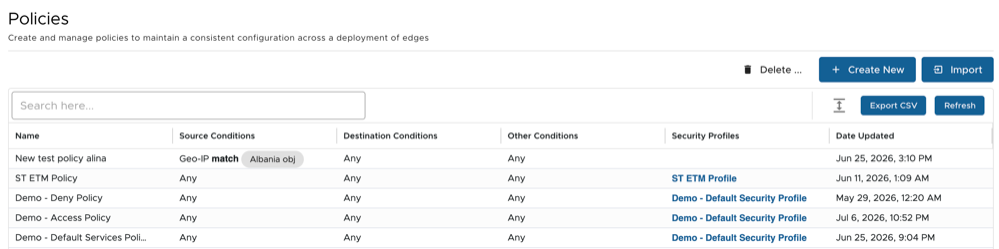
The Policies page displays a listing of all current Policies and the Create New option. The table's contents can be refreshed or exported as a comma-separated (CSV) file using the buttons at the top.
Figure 7. Policies
Create New Policy
Admin users can create a new Policy to create exceptions, Policies specific to certain deployments or situations, or other instances.
To create a Security Policy, perform the following steps:
Log in to the VeloCloud Orchestrator as an Enterprise User.
To access the ETM application from the VeloCloud Orchestrator, go to the Enterprise Applications drop-down menu and select ETM Nex-Gen Firewall.
Navigate to Configure > Policies.
The Policies page appears.
To create a new Security Policy, click Create New.
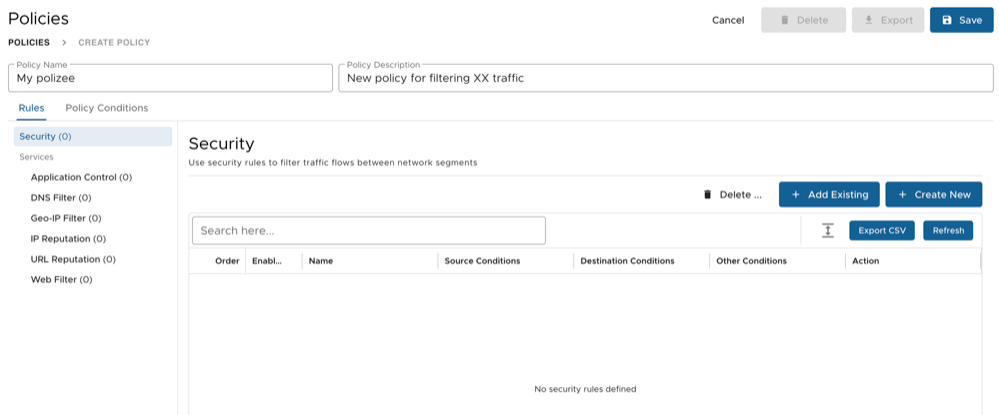
The Create Policy page appears.
Figure 8. Create Policy
In the Policy Name field, enter a unique name for the Policy.
In the Policy Description field, describe the Security Policy.
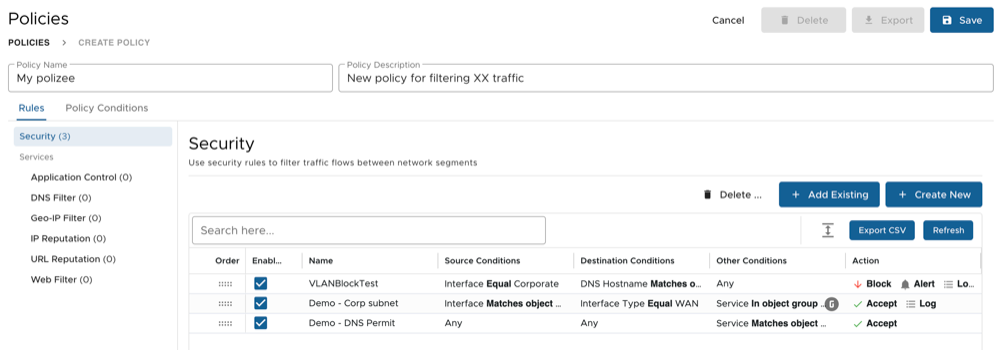
In the Rules tab, users can add Security and Services rules to the Policy to filter traffic flows between network segments.
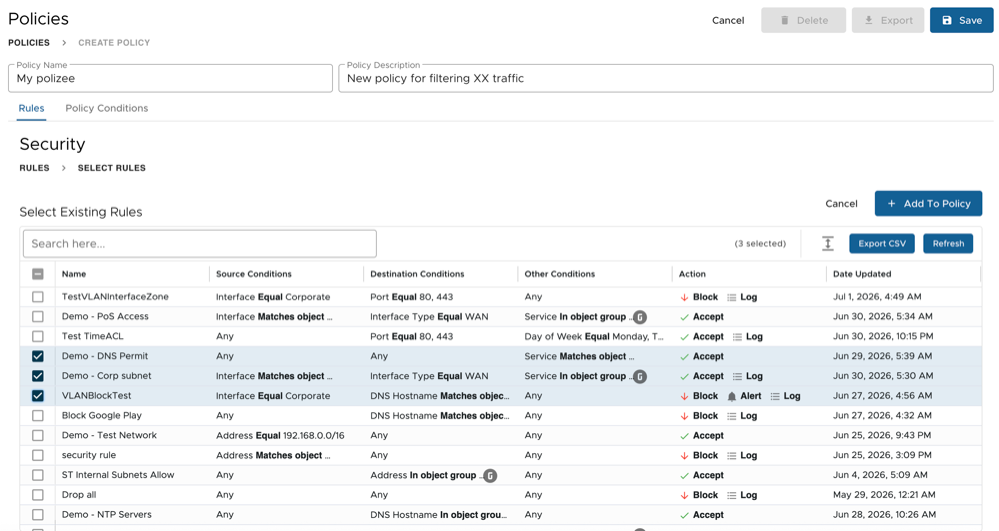
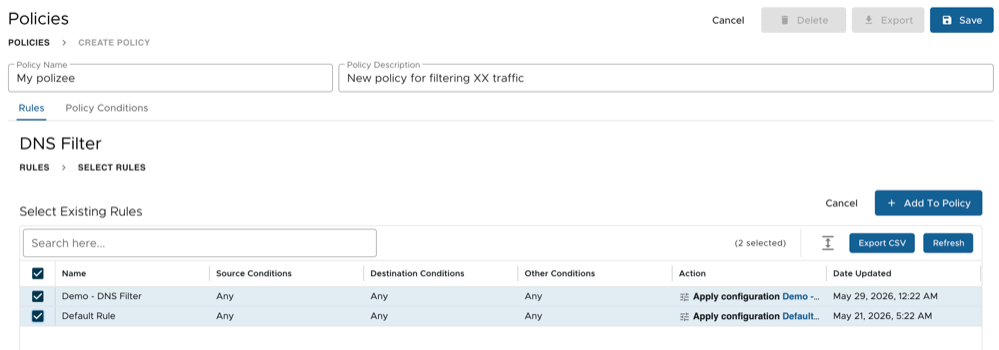
To add Security rules to the Policy, click Security and then select Add Existing. The Select Existing Rules page appears.
Figure 9. Select Existing Security Rules
Select one or more existing Security rules and click Add To Policy to associate the rules with the Policy. You can also choose to create a new Security rule. For more information, see Configure Rules and Conditions.
The selected rules get added to the Security Rules grid.
Figure 10. Security Rules Grid
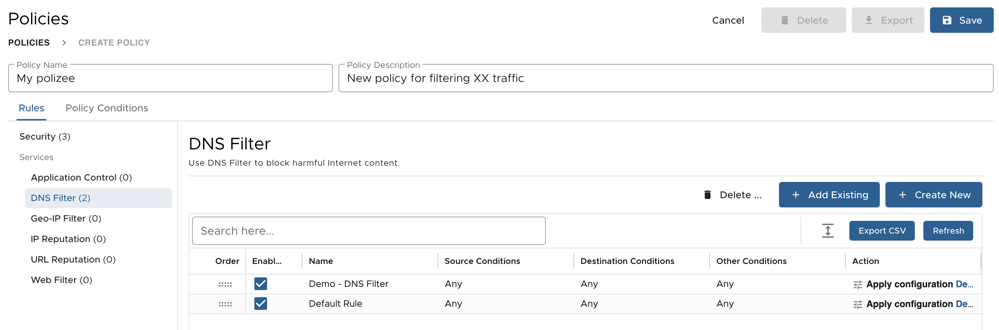
Users can also add Service rules to the Policy. Service rules apply policy templates to Policies. To add Service rules to the Policy, under Services click the Service filter (for example, DNS Filter) and then select Add Existing. The Select Existing Rules page appears.
Figure 11. Select Existing Services Rules
Select one or more existing Service rules and click Add To Policy to associate the rules with the Policy. You can also choose to create a new Service rule. For more information, see Configure Rules and Conditions.
The selected rules get added to the Services Rules grid.
Figure 12. DNS Filter Rules Grid
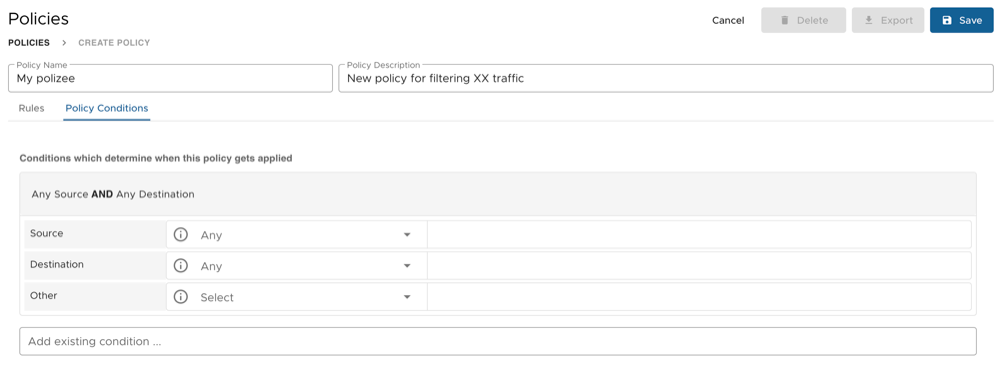
Click the Policy Conditions tab to define a global condition that the firewall engine evaluates before any rules in the Policy are evaluated. This adds a layer of flexibility, allowing users to exclude an entire Policy if a specific condition is not met.
ETM supports many conditions that may be applied to either the source or destination of a session, or generally to both. Users can add multiple types of conditions to a Policy rule, and the summary at the top of the Policy provides a simplified explanation of the rule logic.
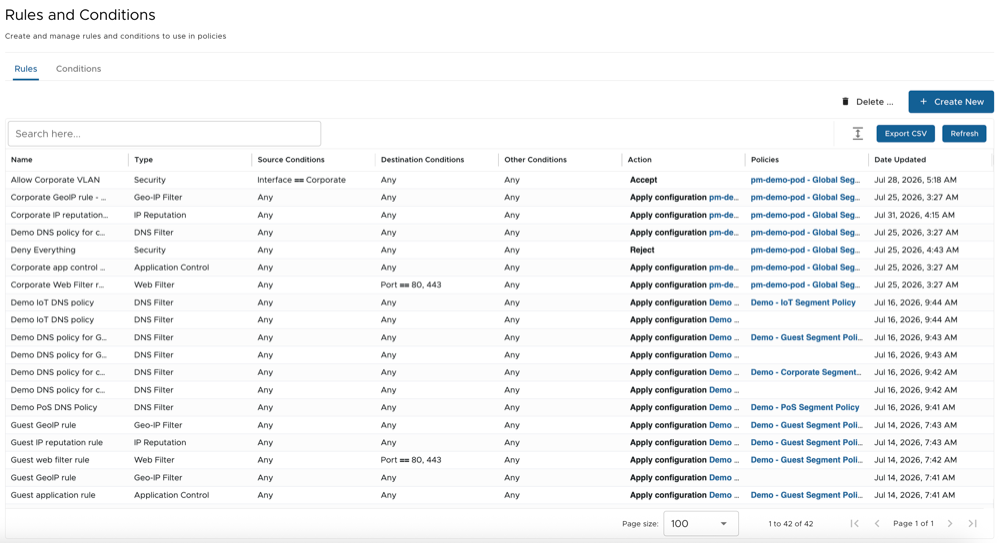
The Edge Thread Management (ETM) Dashboard enables the Admin to create and manage rules and conditions to use in policies.
There are two types of rules:
Security Rule - Determines what traffic is permitted across the user's network based on rule conditions and corresponding actions.
Service Rule - Processes traffic that is permitted by Security rules and maintains its own set of conditions. For example, to block malicious web content based on URL categories, users need to add a Web Filter service rule in their policy.
Note: Service rules apply policy templates as actions into policies.
Create Rules
Users can create a Security and Services rules to use in a policy to filter traffic flows between network segments.
To create a new rule, perform the following steps:
Log in to the VeloCloud Orchestrator as an Enterprise User.
To access the ETM application from the VeloCloud Orchestrator, go to the Enterprise Applications drop-down menu and select ETM Nex-Gen Firewall.
Navigate to Configure > Rules and Conditions.
The Rules and Conditions screen appears.
Figure 14. Rules and Conditions - Rules Tab
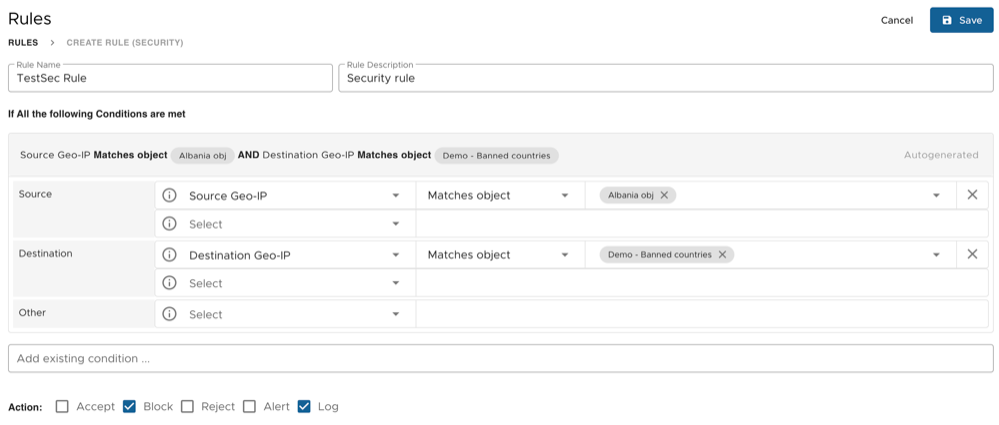
To create a new Security Rule, click Create New > Security Rule.
In the Rule Name field, enter a unique name for the rule.
In the Rule Description field, describe the rule.
Define the rule's conditions and actions. ETM supports many conditions that may be applied to either the source or destination of a session, or generally to both. Users can add multiple types of conditions to a policy rule, and the summary at the top of the policy provides a simplified explanation of the rule logic.
The following table describes each condition type.
Table 1. Policy Condition Types and Descriptions
Type
Description
Source/Destination
Address
A custom list of IPs, ranges, or CIDR notated subnets or a defined IP address object.
Custom Application
A selection from the defined Custom application objects.
DNS
A single hostname or a defined hostname object.
Geo-IP
A selection from the list of built-in countries or a Geo-IP object.
Interface
A specific physical/virtual interface by name or a defined interface zone object.
Interface Type
A selection from the list of built-in interface types.
Port
A custom list of ports or ranges.
Service
A selection from a defined service object.
VLAN Id
A comma separated list of VLAN IDs.
VLAN Type
A selection of built-in options (Local or Remote).
Other
Application Category
An application category from the list of built-in classifications.
Application Name
An application from the list of built-in classifications.
Custom Application
A selection from the defined Custom application objects.
Day of Week
A selection of days of the week.
DSCP
A selection from the list of built-in Differentiated Services Code Point (DSCP) values.
IP Protocol
A selection from the list of built-in protocols (e.g. ICMP, GRE, L2TP, and so on).
MAC Address
A single MAC address.
Segment
A segment name or defined segment object.
Service
A selection from a defined service object.
Time of Day
A selection of the time of day.
Users can also select and add an existing condition to the rule by clicking Add existing condition.
Figure 16. Add Existing Conditions
The action depends on the type of rule (Security or Service). Service rules apply a policy template as the action. When assigning a policy template, users can edit the selected template or create a new one. The following actions apply to Security rules.
Table 2. Security Rule Actions
Action
Description
Accept
Permit the session.
Block
Drop the session without sending any denial response. This causes the client application to time out.
Reject
Deny the session by sending an ICMP “Port Unreachable” message. This causes the client application to report a connection error to the user immediately.
Alert
Include the session event as an alert.
Log
Record the session event in the reports.
Users can also create Service Rules. Service rules process traffic permitted by Security rules and maintain their own set of conditions.
The Edge Threat Management (ETM) feature supports the following Service filter templates:
Application Control - Use an Application Control template to define which applications the policy permits or denies.
DNS Filter - Use DNS Filter to block harmful Internet content.
Geo-IP Filter - Use a Geo-IP Filter template to define which countries to block or allow by the policy.
IP Reputation - Use IP Reputation to block high-risk IPs with a poor reputation.
URL Reputation - Use URL Reputation to block high-risk sites with a poor reputation.
Web Filter - Use a Web Filter template to define which URL categories to permit or deny by the policy.
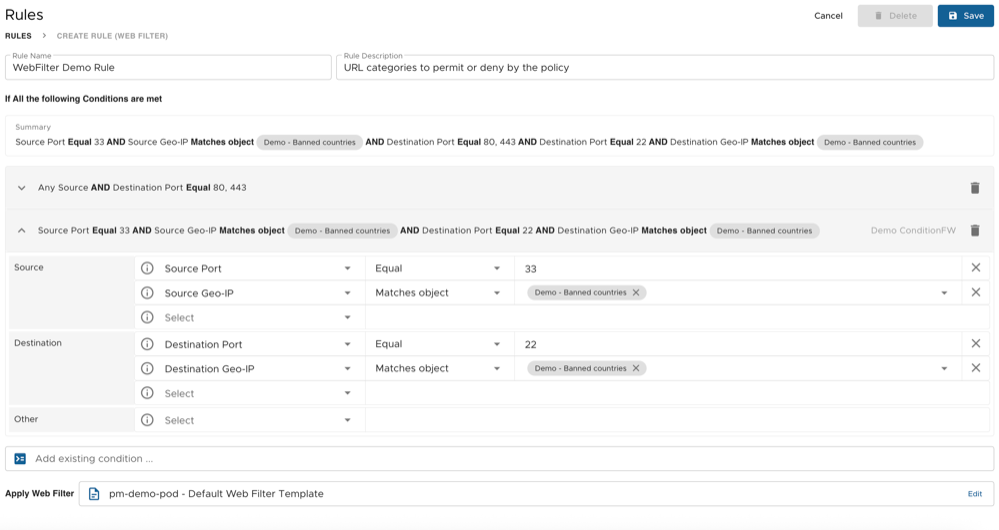
For example, to create a new Web Filter Service rule, click Create New > Services > Web Filter.
The Create Rule - Web Filter page appears.
Figure 17. Create Rule - Web Filter
Enter a rule name and description, and define the rule conditions for the source or destination of a session, or both, that must be met to apply a specified filter.
Optionally, users can select and apply an existing condition to the rule by clicking Add existing condition. To apply a Web Filter Template to the rule, click Apply Web Filter and from the list of available templates select a filter template to associate to the rule.
Click Save.
Create Conditions
Users can create conditions to use across multiple policy rules.
To create a new Condition, perform the following steps:
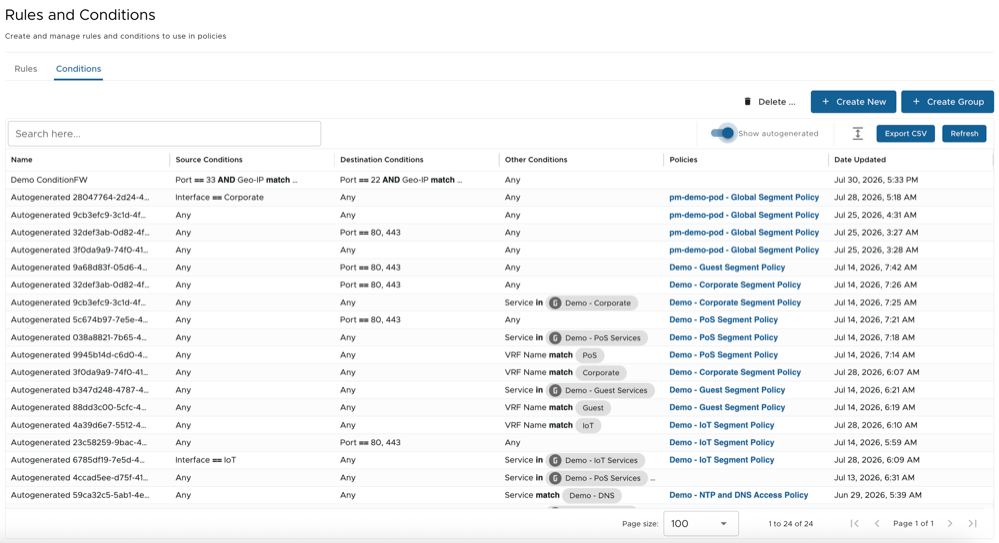
Navigate to Configure > Rules and Conditions > > Conditions. The Conditions screen displays a list of all current conditions and the Create New option.
Figure 18. Rules and Conditions - Conditions Tab
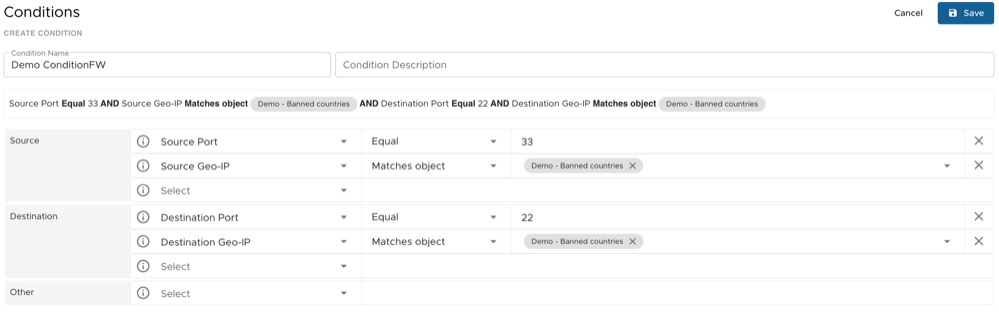
To create a new Condition, click Create New.
Figure 19. Create Conditions
Provide a Name and Description for the Condition and configure the following required parameters:
From the Source drop-down menu, select the Source parameters and define the conditions to use in policy rules.
From the Destination drop-down menu, select the Destination parameters and define the conditions to use in policy rules.
From the Other drop-down menu, select the other parameters and define the conditions to use in policy rules.
After configuring all the necessary conditions to use in policy rules, click Save.
To create a new Condition Group, click Create Group. Provide a Name and Description for the Condition Group and click Save.
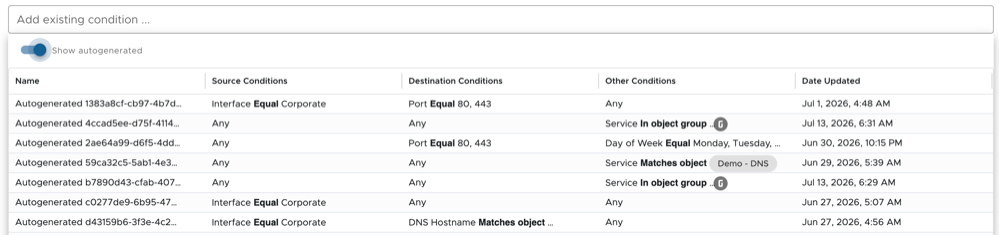
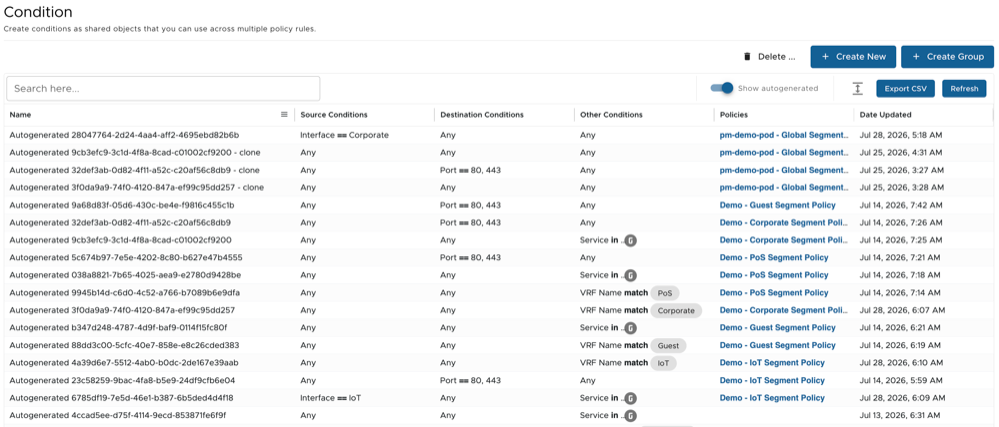
To view the auto-generated conditions, turn on the Show autogenerated button.
Note: The autogenerated conditions are created each time a new rule is created.
Figure 20. Show Autogenerated Conditions
Configure Templates
A Template is a complete set of configuration options for a specific service or feature. Templates are useful when deploying an identical configuration across multiple Edge devices, such as branch offices or backup units.
The ETM Dashboard enables the Admin to create and manage service configuration templates to use in policies. There are two types of templates:
Policy Template - Policy templates include Application Control Filter, DNS Filter, Geo-IP Filter, IP Reputation, URL Reputation, and Web Filter. This type of configuration typically includes a large set of categories or individual items that are easier to maintain as a collection. Policy templates are effective only when applied by a Policy Service rule. The Edge Threat Management (ETM) supports the following Policy templates:
Application Control - Use an Application Control template to define which applications the policy permits or denies.
DNS Filter - Use DNS Filter to block harmful Internet content.
Geo-IP Filter - Use a Geo-IP Filter template to define which countries to block or allow by the policy.
IP Reputation - Use IP Reputation to block high-risk IPs with a poor reputation.
URL Reputation - Use URL Reputation to block high-risk sites with a poor reputation.
Web Filter - Use a Web Filter template to define which URL categories to permit or deny by the policy.
Security Profile Template - Security Profile templates include External Databases, Dynamic Blocklists, and Intrusion Detection and Prevention (IDS/IPS). These templates are applied to Security Profiles and do not support any condition. After applying the template to a profile, it is unconditionally applicable to all sessions. The ETM supports the following Security Profile templates:
Database - Use the Database template to persist reporting events.
Dynamic Blocklists - Add an IP/FQDN block list source to block IP/FQDN addresses listed in it.
IDS/IPS - Use Intrusion Prevention to scan, detect, and block attacks and suspicious traffic using signatures
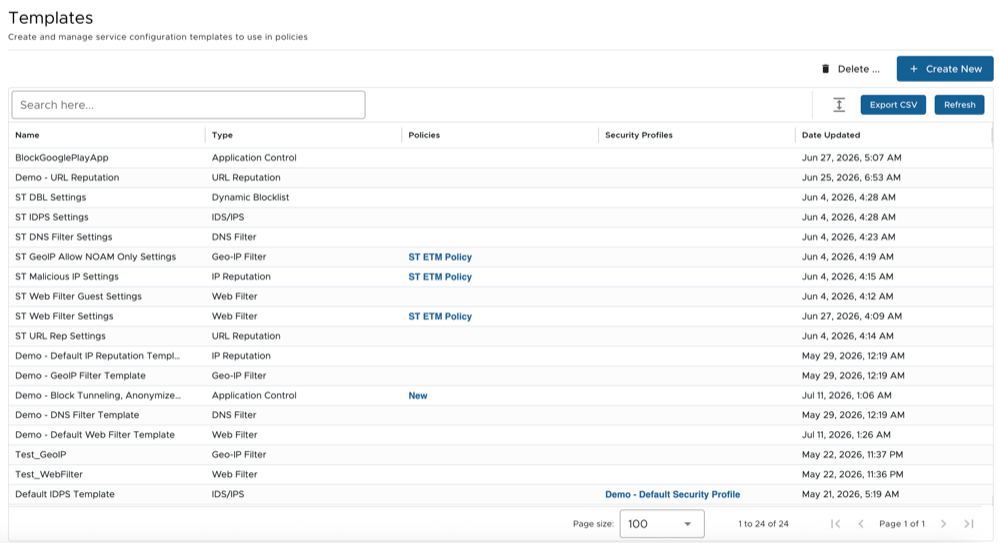
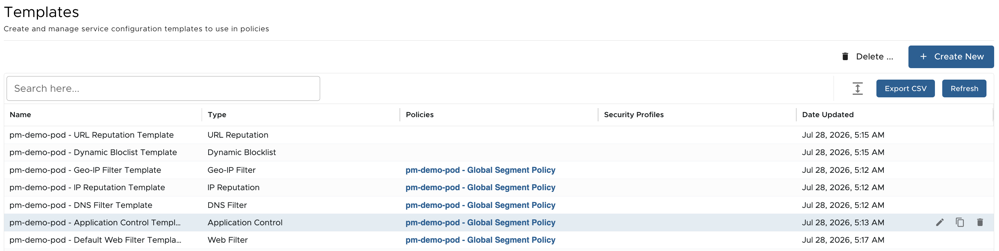
The Templates page displays a list of all current templates and the Create New option. The table's contents can be refreshed or exported as a comma-separated (CSV) file using the buttons at the top.
Figure 21. Templates
Create New Template
To create a new template, perform the following steps:
Log in to the VeloCloud Orchestrator as an Enterprise User.
To access the ETM application from the VeloCloud Orchestrator, go to the Enterprise Applications drop-down menu and select ETM Nex-Gen Firewall.
Navigate to Configure > Templates.
The Templates page appears.
To create a new template, click Create New and select the appropriate type of template from the drop-down list that appears.
Each template will have its own options and configuration settings, configured as you would in an individual Edge.
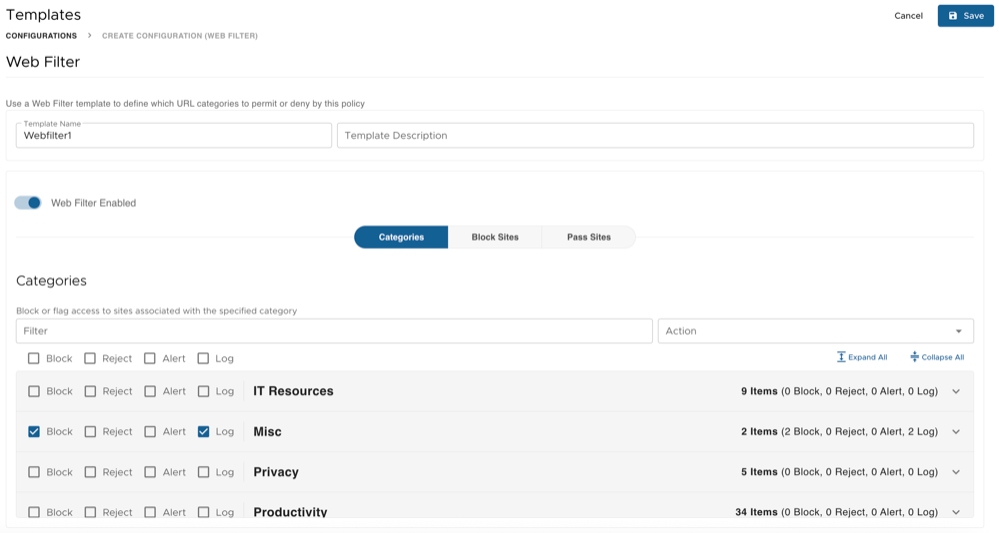
To configure a Policy Template (for example, Web Filter), provide a Name and Description for the template, configure settings to block or flag access to sites associated with the specified Categories, and configure Block Sites and Pass Sites.
Figure 22. Templates - Web Filter
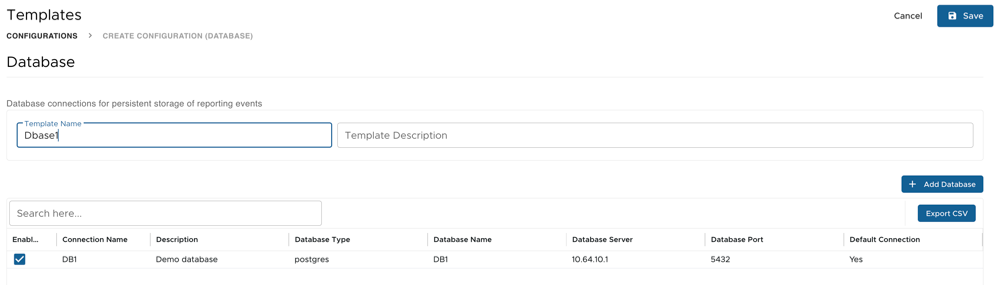
To configure a Security Profile Template (for example, Database), provide a Name and Description for the template, add database connections, and configure the database to persist reporting events.
Figure 23. Templates - Database
After configuring all the necessary configuration settings, click Save to finish creating a template.
From the main table of templates, click any template to open its settings. Hovering over the template will reveal additional option buttons in the Policies column:
The pencil icon opens the policy settings for editing.
The duplicate icon creates a copy of the highlighted policy and opens it for editing.
The trash can icon deletes the highlighted policy.
Figure 24. Manage Templates
The table also provides the following global option buttons:
Export CSV exports a comma-separated list of rules.
Refresh refreshes the list of templates.
Delete … enables bulk deletion of templates.
Template Configuration Examples
The ETM Dashboard enables the Admin to create and manage service configuration Templates to use in policies. This topic provides details about configuring the various policies and Security Profile Templates with examples.
Configure Application Control Template
Application Control defines which applications to permit or deny by the policy.
To create a new Application Control Template, perform the following steps:
In the Templates screen, click Create New > Application Control.
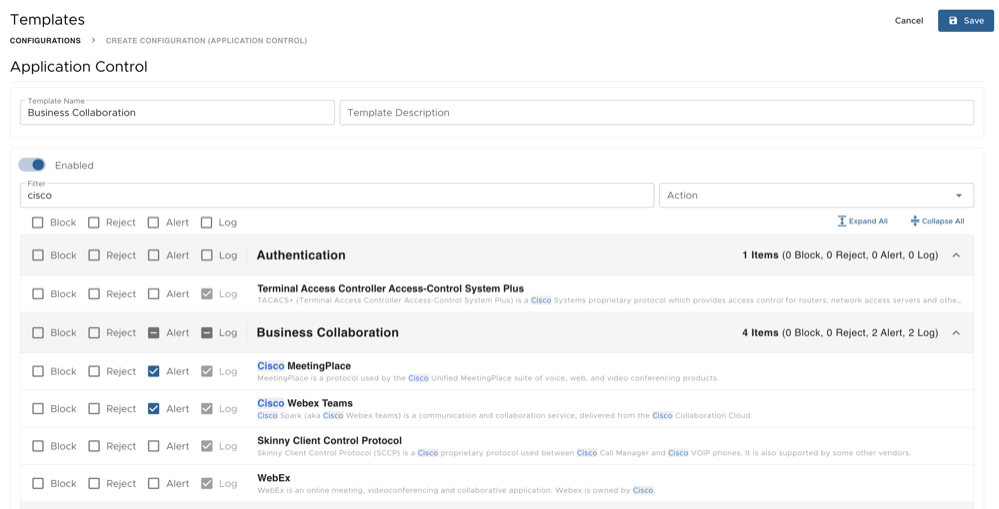
In the Application Control screen, provide a Name and Description for the Template.
From the list of available filters, search for a specific filter by filter name and action type (Block, Reject, Alert, and Log) to apply to the Template, and click Save.
Figure 25. Create Application Control Template
Configure DNS Filter Template
DNS Filter enables Admins to view all DNS requests on the network and define Domains to block by preventing them from resolving.
To create a new DNS Filter Template, perform the following steps:
In the Templates screen, click Create New > DNS Filter.
In the DNS Filter screen, provide a Name and Description for the Template.
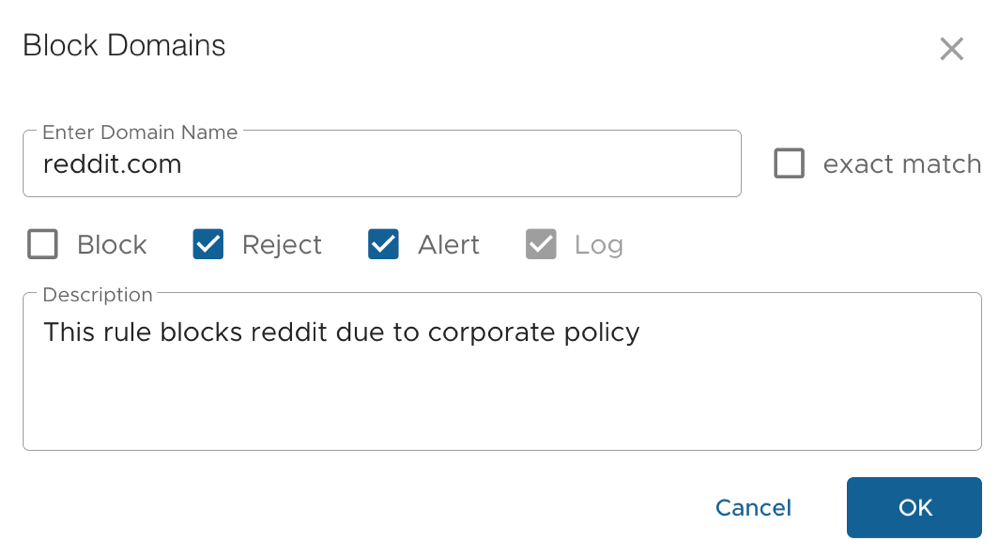
Under Block Domains, click Add Domain to configure a new block domain rule and apply it to the Template.
The Block Domains dialog appears.
Figure 26. Block Domains
In the Block Domains dialog, enter the domain name you want to block access to and select the "Exact Match" check box to create a rule that matches the specified domain name exactly.
Configure the filter actions as needed and click OK.
Block - Drop the session without sending any denial response.
Reject - Deny the session by sending an ICMP “Port Unreachable” message.
Log - Record the session event in the reports.
Alert - Include the session event as an alert.
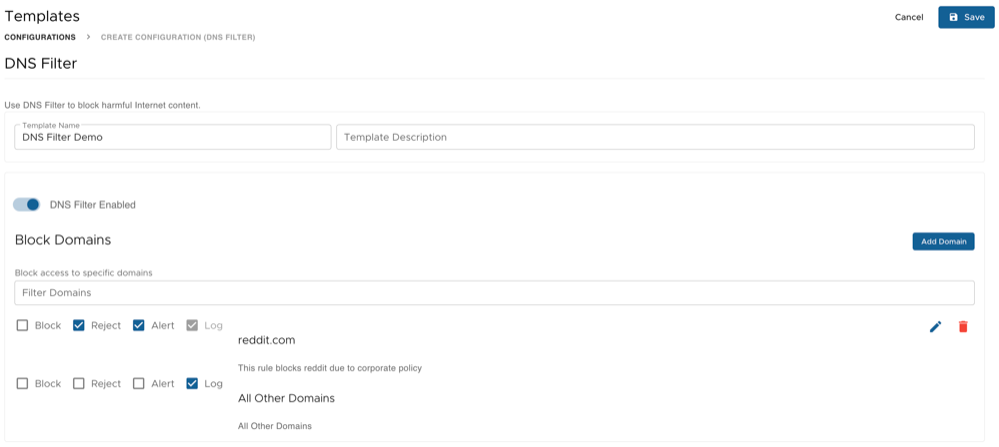
Use the Filter Domains search field to search for and find a specific domain to block access to from the configured domains.
For all other domains, configure the filter action as needed and click Save.
Figure 27. Create DNS Template
Configure Geo-IP Filter Template
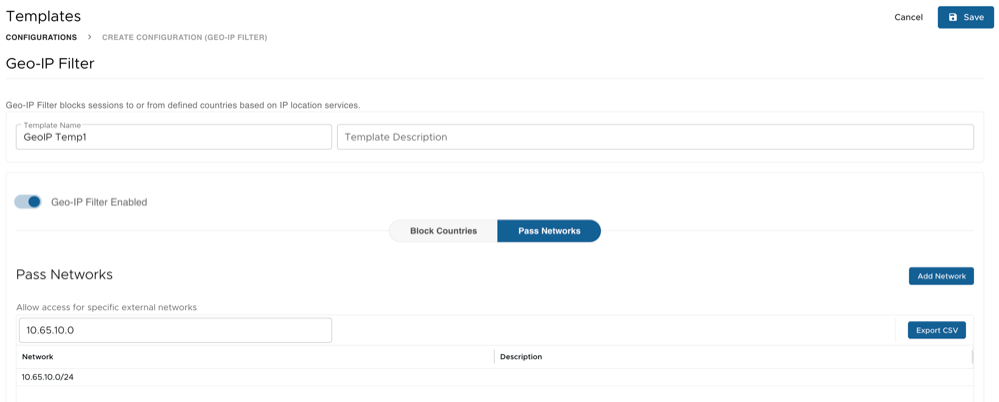
Geo-IP Filter blocks sessions to or from defined countries based on IP location services.
To create a new Geo-IP Filter Template, perform the following steps:
In the Templates screen, click Create New > Geo-IP Filter.
In the Geo-IP Filter screen, provide a Name and Description for the Template.
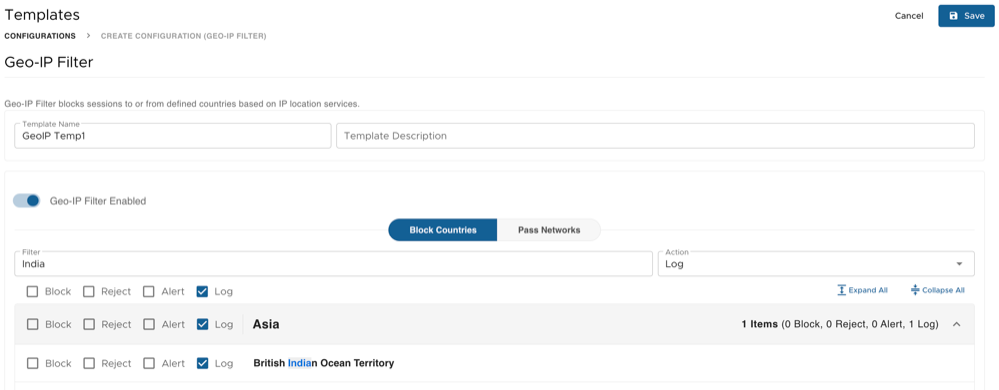
Under Block Countries, click the Filter field to search for the countries to block, by country name and action type, and apply to the Template.
Figure 28. Create Geo-IP Filter Template - Block Countries
Under Pass Networks, users can allow access to specific external networks by adding them to the Geo-IP Template. Click Add Network to configure an external network. Use the Search here... field to find and add the network to allow access.
After configuring Pass Networks and Block Countries, click Save.
Configure IP Reputation Template
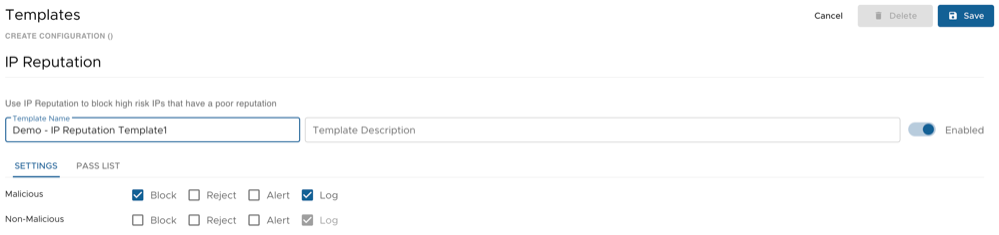
IP Reputation blocks high-risk IPs that have a poor reputation.
To create a new IP Reputation Template, perform the following steps:
In the Templates screen, click Create New > IP Reputation.
In the IP Reputation screen, provide a Name and Description for the Template.
Under Settings, configure the action types (Block, Reject, Alert, and Log) for the IP Reputation parameters (Malicious and Non-Malicious).
Figure 31. Create IP Reputation Template - Settings
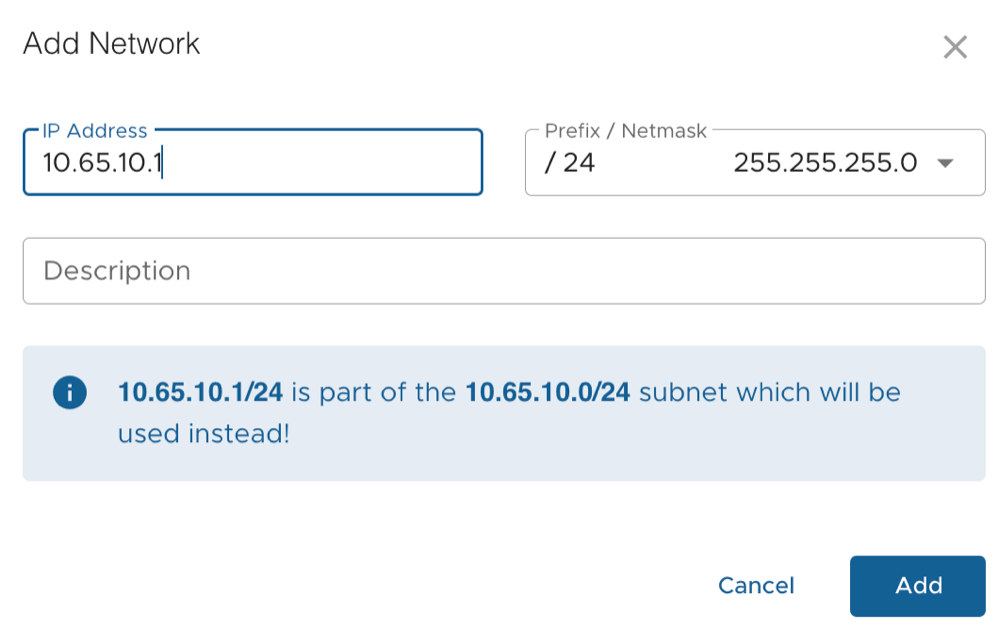
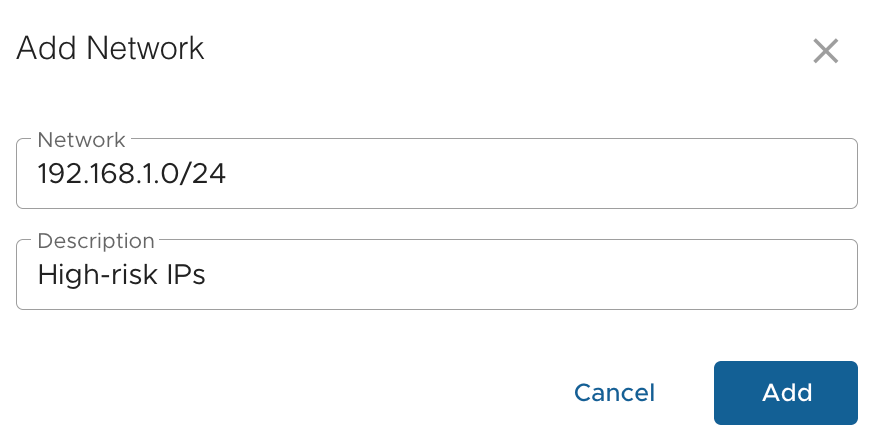
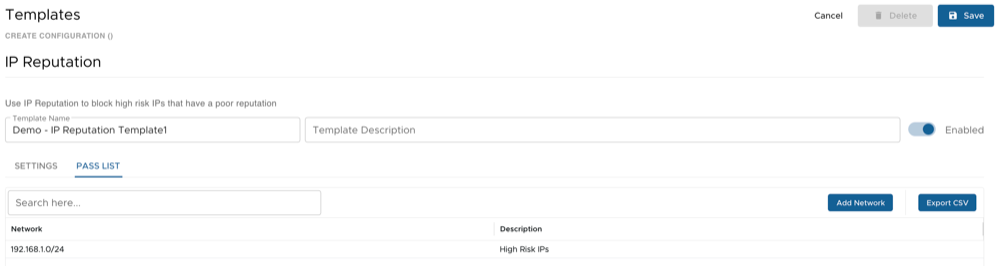
Under the Pass List, users can grant access to specific CIDR networks by adding them to the IP Reputation Template. Click Add Network to configure a CIDR network. Use the Search here... field to find and add the network to allow access.
Figure 32. Add Network - IP Reputation
Figure 33. Create IP Reputation Template - Pass List
After configuring the required settings and passed networks, click Save.
Configure URL Reputation Template
URL Reputation blocks high-risk sites that have a poor reputation.
To create a new URL Reputation Template, perform the following steps:
In the Templates screen, click Create New > URL Reputation.
In the URL Reputation screen, provide a Name and Description for the Template.
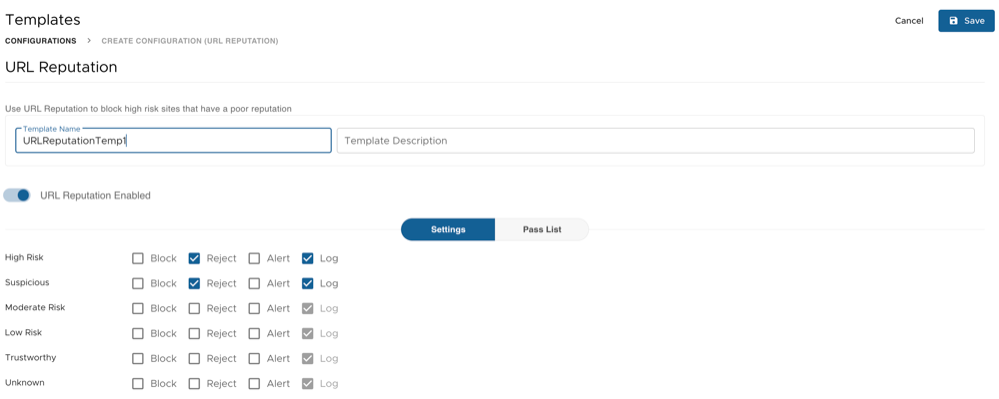
Under Settings, configure the action types (Block, Reject, Alert, and Log) for each URL Reputation parameter (High Risk, Suspicious, Moderate Risk, Low Risk, Trustworthy, and Unknown).
Figure 34. Create URL Reputation Template - Settings
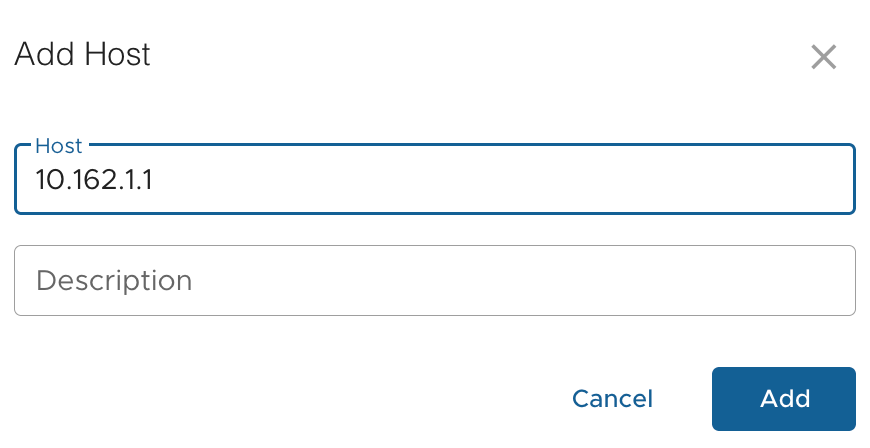
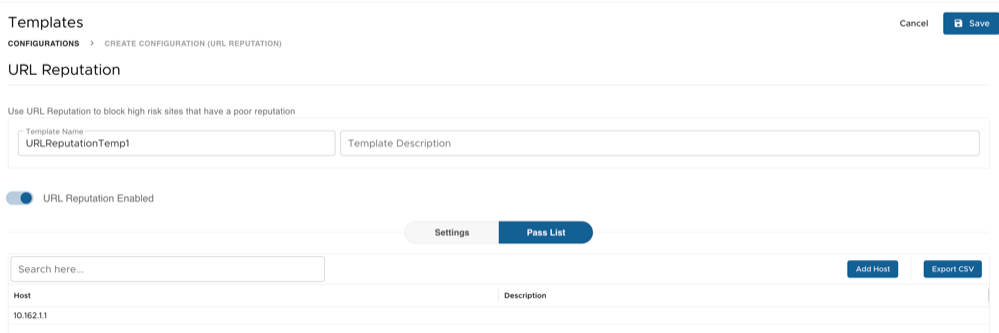
Under Pass List, click Add Host to configure specific hosts to allow access to. Use the Search here... field to find and add the host to allow access.
Figure 35. Add Host - URL Reputation
Figure 36. Create URL Reputation Template - Pass List
After configuring the required settings and passed hosts, click Save.
Configure Web Filter Template
Web Filter defines which URL categories to permit or deny by the policy. The default configuration of the Web Filter template restricts access to several categories classified under Security and Sensitive.
To create a new Web Filter Template, perform the following steps:
In the Templates screen, click Create New > Web Filter.
In the Web Filter screen, provide a Name and Description for the Template.
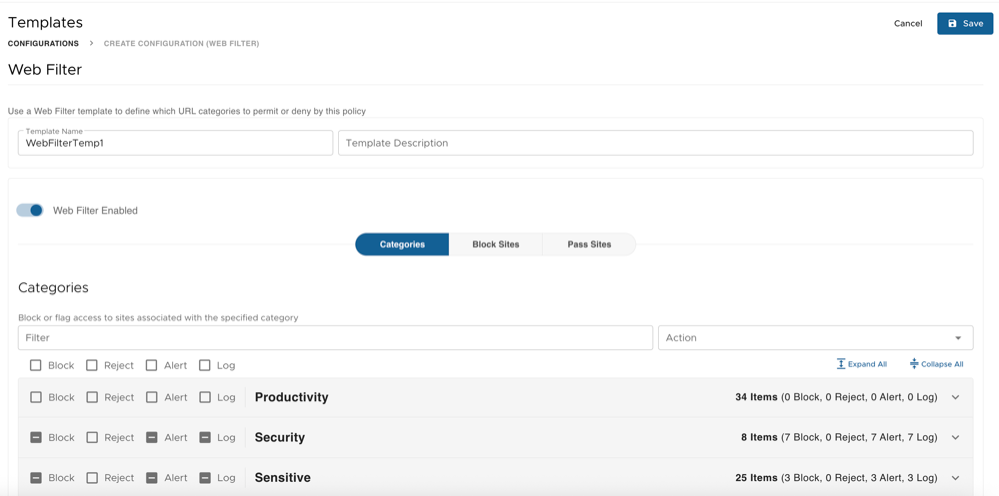
Under Categories, configure block or flag access to sites associated with the specified category.
Figure 37. Create Web Filter Template - Categories
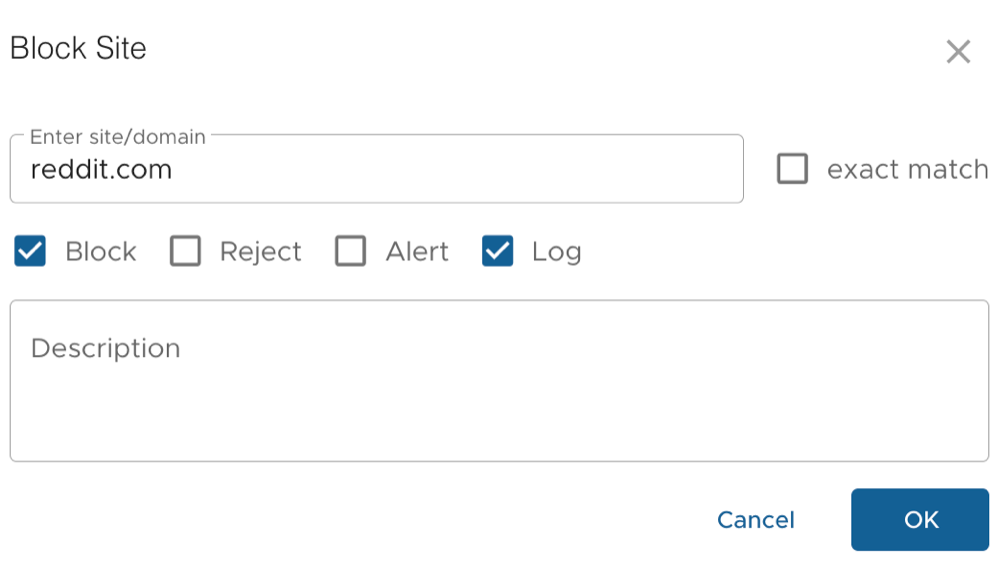
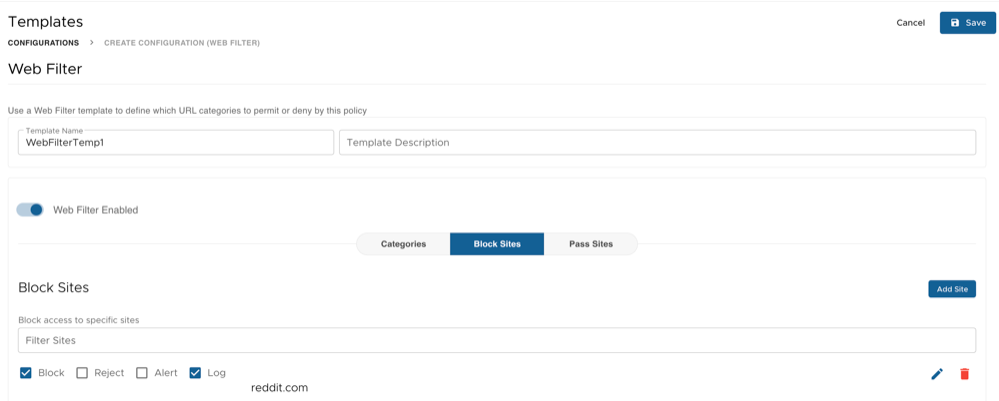
Under Block Sites, click Add Site to configure specific sites to block access.
Figure 38. Add Block Site
Figure 39. Create Web Filter Template - Block Sites
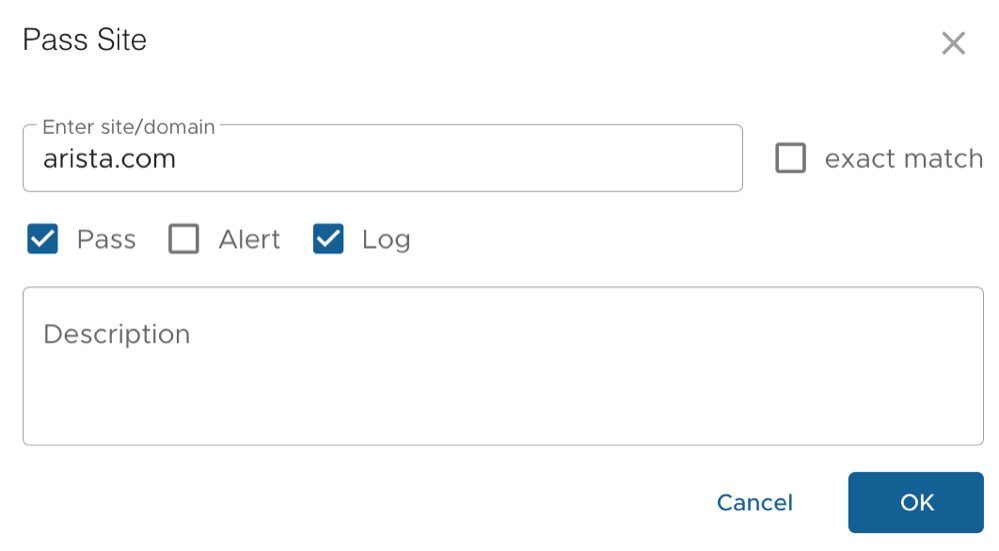
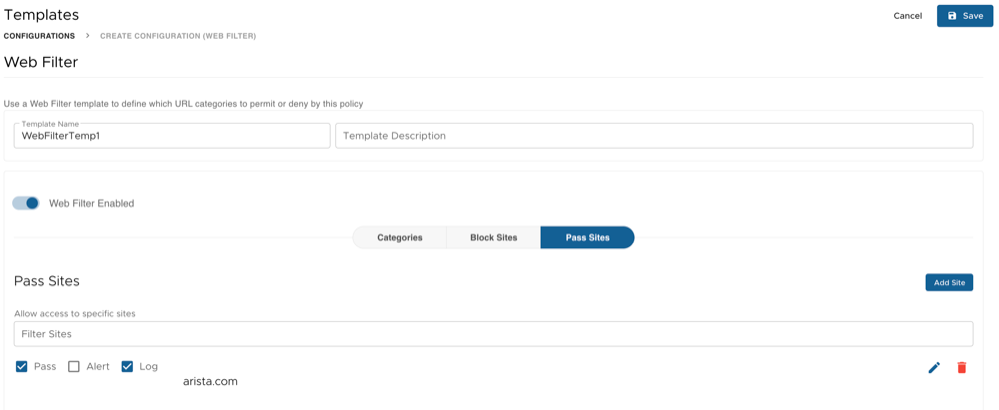
Under Pass Sites, click Add Site to configure specific sites to allow access.
Figure 40. Add Pass Site
Figure 41. Create Web Filter Template - Pass Sites
After configuring the required, blocked, and passed sites, click Save.
Configure Database Template
The database Template allows for the persistent storage of reporting events.
To create a new Database Template, perform the following steps:
In the Templates screen, click Create New > Database.
In the Database screen, provide a Name and Description for the Template.
Figure 42. Create Database Template
To add a new Database Connection, click Add Database.
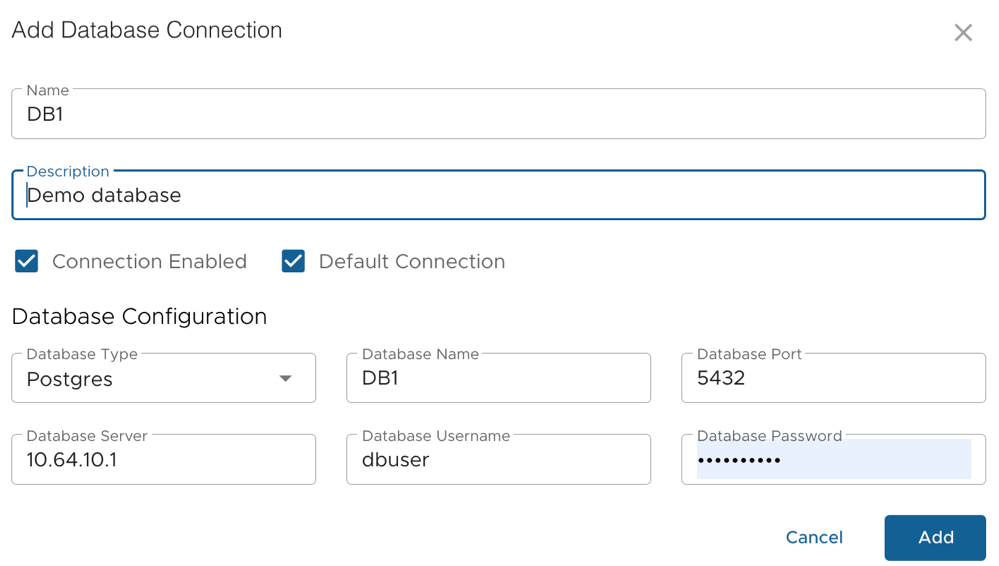
In the Add Database Connection dialog, provide the database name, description, and the required database configuration details (like Type, Port, Server, Username, and Password). Also, users can select the following checkboxes, and click Add.
Connection Enabled - When the Database Connection is enabled, the Edge will stream events to the database.
Default Connection - If Database Connection is set as the default option, it will use that default database for viewing Edge reports. If no database is designated as the default, the system will utilize the local database on the Edge.
Figure 43. Add Database Connection
Use the Search here... field to find a database that the users want to edit or enable/disable.
After configuring the required database connection details, click Save.
Configure Dynamic Blocklist Template
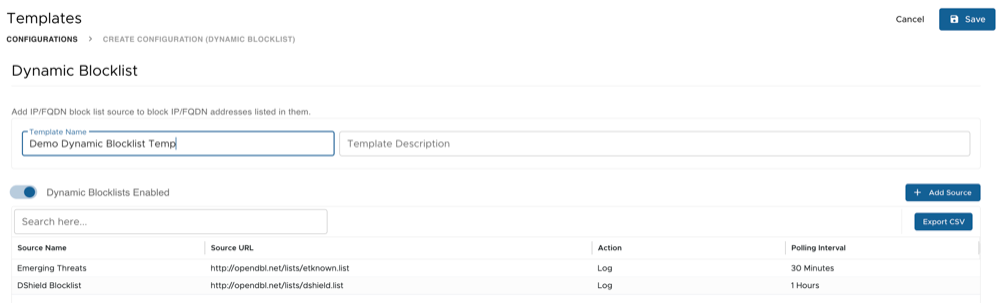
Dynamic Blocklist allows adding an IP/FQDN block list source to block IP/FQDN addresses listed in it. If Dynamic Blocklist template is configured then the Edge will fetch the remote list directly from the source.
To create a new Dynamic Blocklist Template, perform the following steps:
In the Templates screen, click Create New > Dynamic Blocklist.
In the Dynamic Blocklist screen, provide a Name and Description for the Template.
Figure 44. Create Dynamic Blocklist Template
To add a new Blocklist Source, click Add Source.
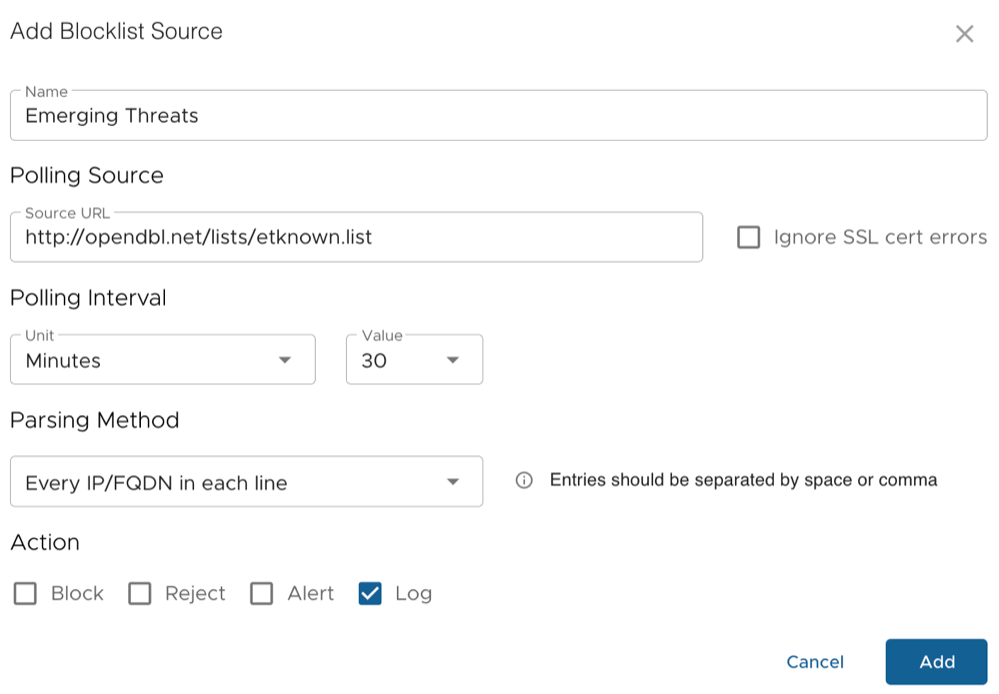
In the Add Blocklist Source dialog, provide the Source name, Source URL, polling interval, parsing method, and rule action, and click Add.
Figure 45. Add Blocklist Source
Use the Search here... field to find and add the dynamic blocklist sources to the Template.
After configuring the required details, click Save.
Configure IDS/IPS Template
Intrusion Detection and Prevention (IDS/IPS) scans, detect, and block attacks and suspicious traffic using signatures.
To create a new IDS/IPS Template, perform the following steps:
In the Templates screen, click Create New > IDS/IPS.
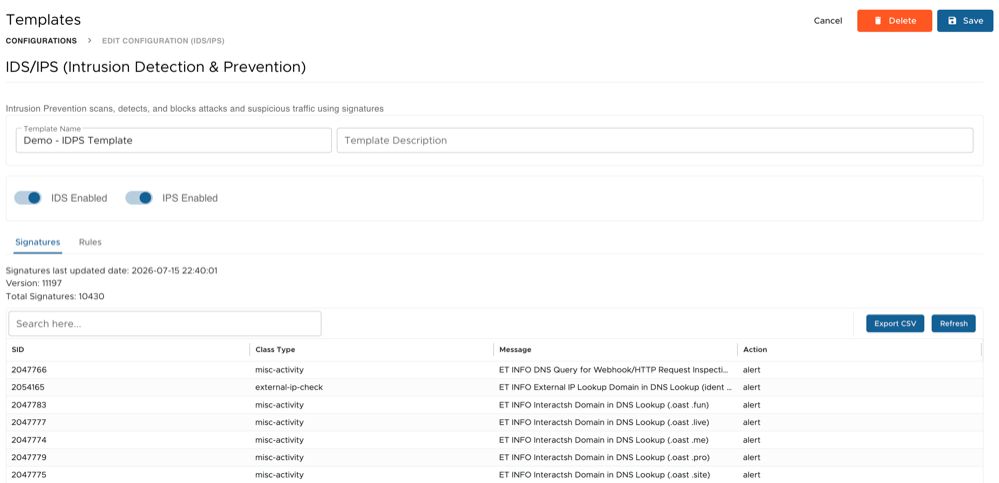
In the IDS/IPS screen, provide a Name and Description for the Template. By default, IDS is enabled. To enable IPS, turn on the IPS Enabled button.
Figure 46. Create IDS/IPS Template - Signatures
In the Signatures tab, use the Search here... field to find and add specific signatures to the Template. This enables the Admin to override the signature's default actions. For example, if there is a false positive, then the Admin can change the action from reject to log.
To add a new Rule to the Template, go to Rules > Add Rule.
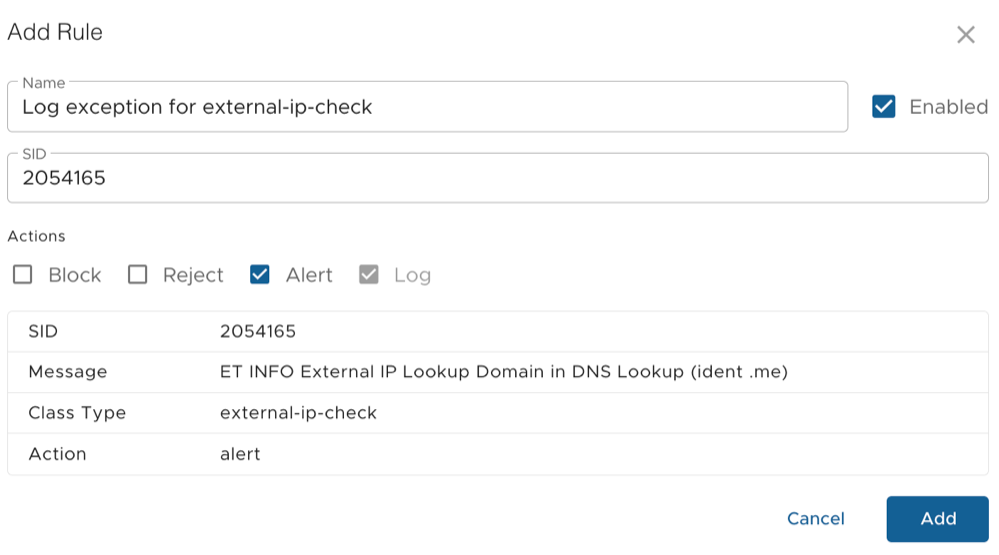
Figure 47. Add Rule
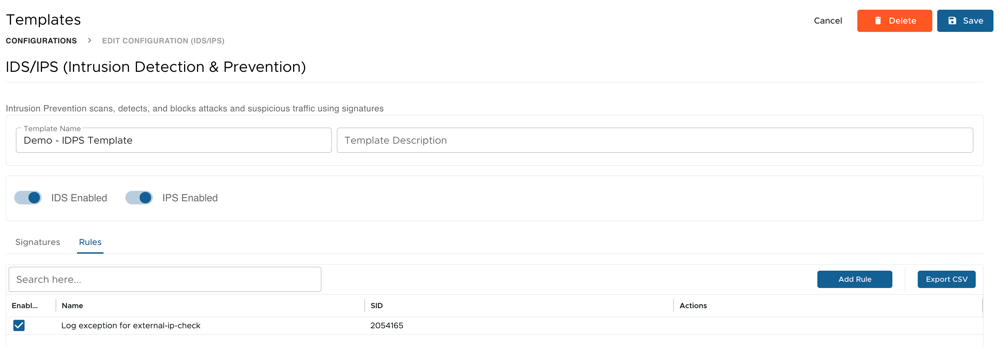
In the Add Rule dialog, provide the Rule name, System ID (SID), and rule action, and click Add. The Rules list displays the newly added rule.
Figure 48. Create IDS/IPS Template - Rules
After configuring the required details, click Save.
Configure Objects
An Object is a grouping of one or more traits: IP addresses, interfaces, application identifications, user or VLAN tag groups, and so on. Group these traits into named objects to streamline policy and rule configuration.
The ETM Dashboard enables the Admin to create and manage the following Object types to use in policies:
Custom Applications
Domains
GeoIP Locations
Interfaces
IP Addresses
Segments
Services
Create New Object
To create a new Object, perform the following steps:
Log in to the VeloCloud Orchestrator as an Enterprise User.
To access the ETM application from the VeloCloud Orchestrator, go to the Enterprise Applications drop-down menu and select ETM Nex-Gen Firewall.
Navigate to Configure > Objects.
From the left navigation menu, select the appropriate Object type to create; for example, to create a Custom Applications Object, select Custom Applications.
To create a new Object, click Create New. Provide a Name and Description for the Object and configure the required parameters.
Each type of Object has different configuration options, based on what details the Object will contain. For example, when creating a Custom Applications Object, provide the port(s) and IP address(es) used by the application.
Figure 49. Create Custom Applications Object
After configuring all the necessary configuration settings, click Save to finish creating an Object.
To create a new Object Group, click Create Group. Provide a Name and Description for the Object Group and click Save.
Figure 50. Create Custom Application Groups
For more information about how to configure the various supported Object types, see Object Type Configurations.
Manage Objects and Object Groups
From the main table of Objects and Object Groups, hover over any Object or Group to edit, clone, or delete the Object or Group.
The pencil icon opens the Object settings for editing.
The duplicate icon creates a copy of the highlighted Object and opens it for editing.
The trash can icon deletes the highlighted Object.
The table also provides the following global option buttons:
Export CSV exports a comma-separated list of Objects.
Refresh refreshes the list of Objects and Groups.
Delete … enables bulk deletion of Objects and Groups.
Object Type Configurations
The ETM Dashboard enables the Admin to create and manage Objects and Object Groups to use in policies and rules. This topic provides details about configuring the various Objects with examples.
Configure Custom Applications Object
Create custom applications based on IP and port information to use across multiple policy rules.
To create a new Custom Applications Object, perform the following steps:
Navigate to Configure > Objects > Custom Applications. The Custom Applications screen appears.
Figure 51. Custom Applications Screen
To create a new Object, click Create New.
Figure 52. Create Custom Applications Object
Provide a Name and Description for the Object and configure the following required parameters:
In the Port Number field, specify a single port or a list of ports, or port ranges.
In the IP Addresses field, input a comma-separated list of IPs/CIDRs or ranges.
After configuring all the necessary parameters, click Save.
To create a new Object Group, click Create Group. Provide a Name and Description for the Object Group and click Save.
Configure Domains Object
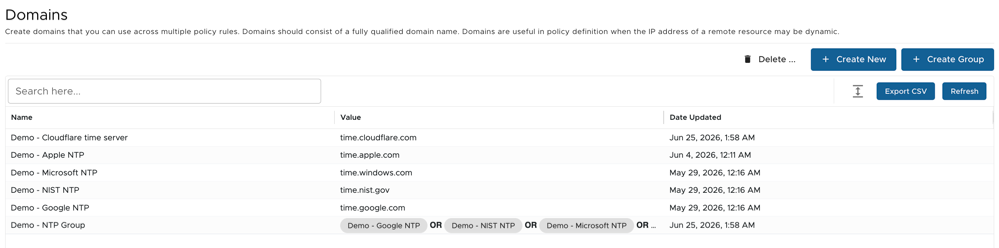
Create domains to use across multiple policy rules. Domains should consist of a fully qualified domain name. Domains are useful in policy definition when the IP address of a remote resource may be dynamic.
Note:The Domains screen displays Domains configured in the SD-WAN Object Groups.
To create a new Domains Object, perform the following steps:
Navigate to Configure > Objects > Domains. The Domains screen appears.
Figure 53. Domains Screen
To create a new Domain, click Create New.
Figure 54. Create Domains
Provide a Name, Description, and Hostname for the Object and click Save.
To create a new Domains Group, click Create Group. Provide a Name and Description for the Domains Group and click Save.
Configure GeoIP Locations Object
Create lists of countries to use across multiple policy rules.
Note: The GeoIP Locations Template may be easier to manage and blocks traffic in either direction, while the GeoIP Locations object provides more granular configuration.
To create a new GeoIP Location Object, perform the following steps:
Navigate to Configure > Objects > GeoIP Locations. The GeoIP Locations screen appears.
Figure 55. GeoIP Locations Screen
To create a new GeoIP Locations object, click Create New.
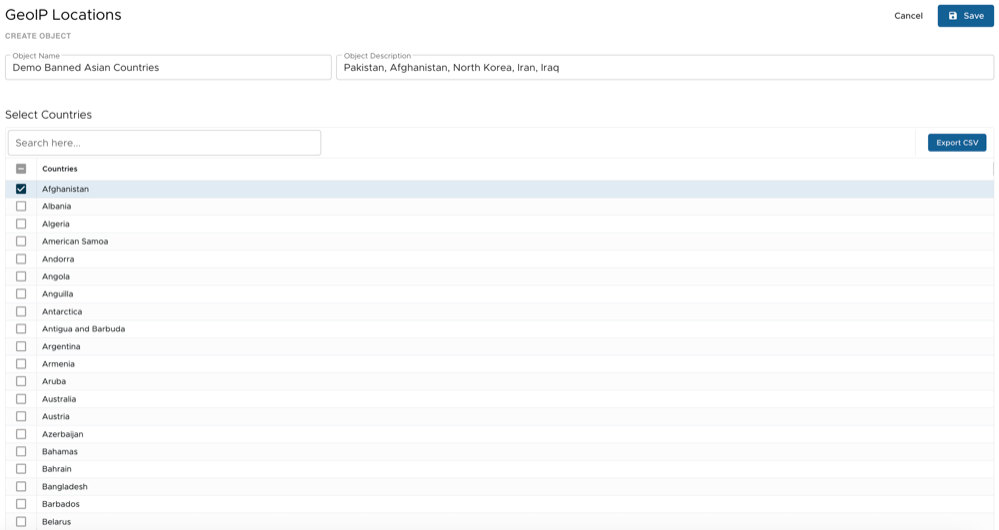
Figure 56. Create GeoIP Locations Object
Provide a Name and Description for the Object and select the lists of countries to use in policy rules.
After configuring all the necessary details to use in policy rules, click Save.
To create a new GeoIP Locations Group, click Create Group. Provide a Name and Description for the GeoIP Locations Group and click Save.
Configure Interfaces Object
Create Interfaces to use across multiple policy rules. Interfaces consist of known network interfaces and apply policy to any host that exists behind the designated interface.
To create a new Interfaces Object, perform the following steps:
Navigate to Configure > Objects > Interfaces. The Interfaces screen appears.
Figure 57. Interfaces Screen
To create a new Interface object, click Create New.
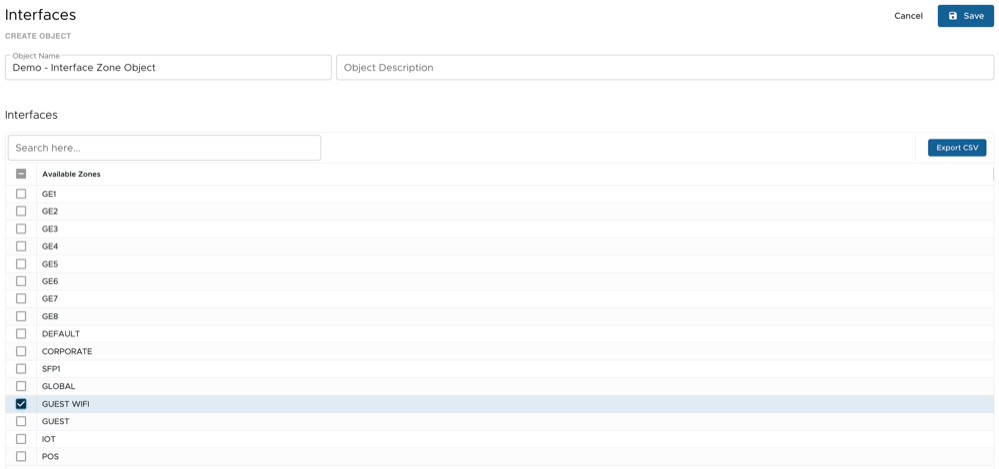
Figure 58. Create Interfaces Object
Provide a Name and Description for the Object.
From the list of Available Zones, select the Interfaces to use in policy rules, and click Save.
To configure a custom interface to use in policy rules, enter the Interface name and click Add. The Custom Interface appears under Available Zones.
To create a new Interfaces Group, click Create Group. Provide a Name and Description for the Interface Group and click Save.
Configure IP Addresses Object
Create lists of IP Addresses to use across multiple policy rules.
To create a new IP Address, perform the following steps:
Navigate to Configure > Objects > IP Addresses. The IP Addresses screen appears.
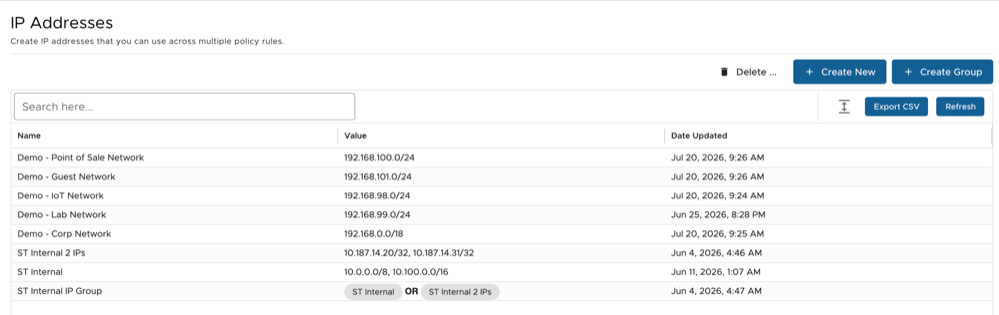
Figure 59. IP Addresses Screen
The screen displays the IP Address Objects created from SD-WAN configuration.
To create a new IP Address, click Create New.
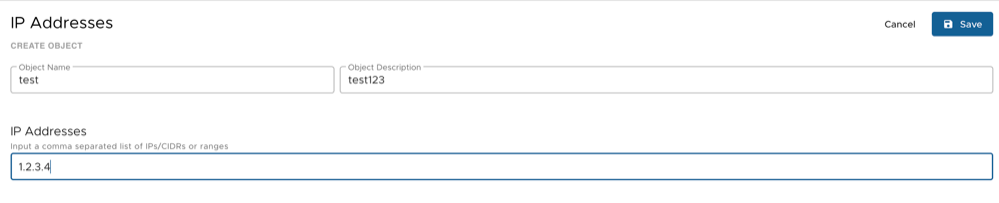
Figure 60. Create IP Addresses Object
Provide a Name and Description for the Object.
In the IP Addresses field, enter a comma-separated list of IP addresses/CIDRs or ranges, and click Save.
To create a new Object Group, click Create Group. Provide a Name and Description for the Object Group and click Save.
Configure Segments Object
Create Segments to use across multiple policy rules. Users can apply a policy to sessions within the Segment.
To create a new Segment, perform the following steps:
Navigate to Configure > Objects > Segments. The Segments screen appears.
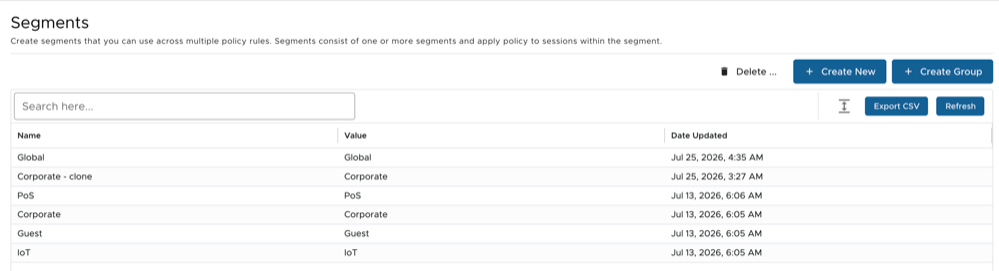
Figure 61. Segments Screen
The screen displays the Segment Objects created from SD-WAN configuration.
To create a new Segment, click Create New.
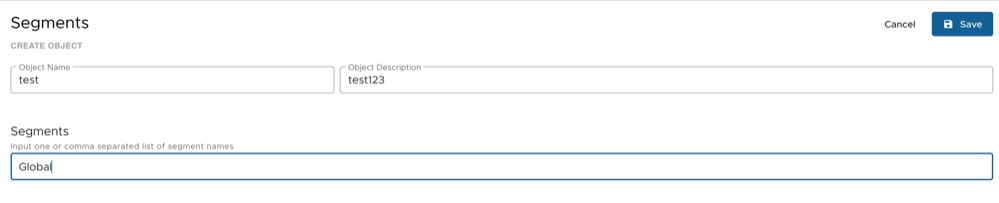
Figure 62. Create Segments Object
Provide a Name and Description for the Object.
In the Segments field, enter either one or a comma-separated list of Segment names (Examples: Global, Corporate, Guest, IoT, and so on).
Click Save.
To create a new Object Group, click Create Group. Provide a Name and Description for the Object Group and click Save.
Configure Services Object
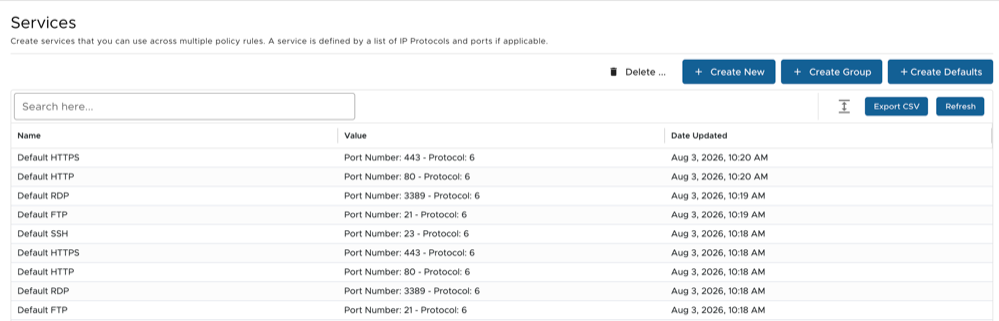
Create Services to use across multiple policy rules. A Service is defined by a list of IP Protocols and ports, if applicable.
To create a new Service, perform the following steps:
Navigate to Configure > Objects > Services. The Services screen appears.
Figure 63. Services Screen
The screen displays Service Group Objects created from SD-WAN configuration.
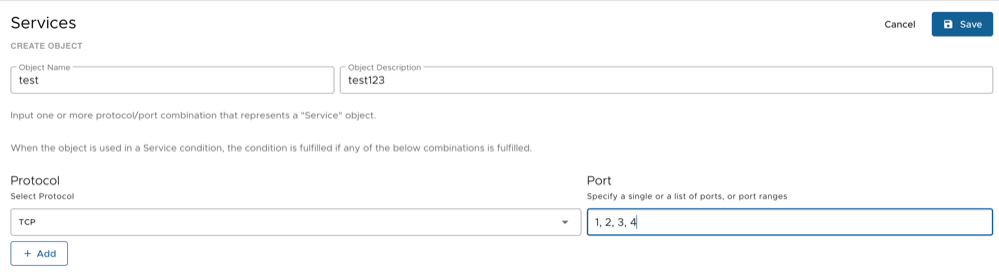
To create a new Service, click Create New.
Figure 64. Create Services Object
Provide a Name and Description for the Object.
Select a protocol from the Protocol drop-down menu.
In the Port field, enter a single port or a list of ports, or port ranges.
Note: Users can add or delete Protocols as required.
Click Save.
To create a new Object Group, click Create Group. Provide a Name and Description for the Object Group and click Save.
To create a Service Object with default values, click Create Defaults.