Print

Configure User Account Details

The My Account page allows users to configure basic user information, SSH keys, and API tokens. Users can also view the current user's role and the associated privileges.

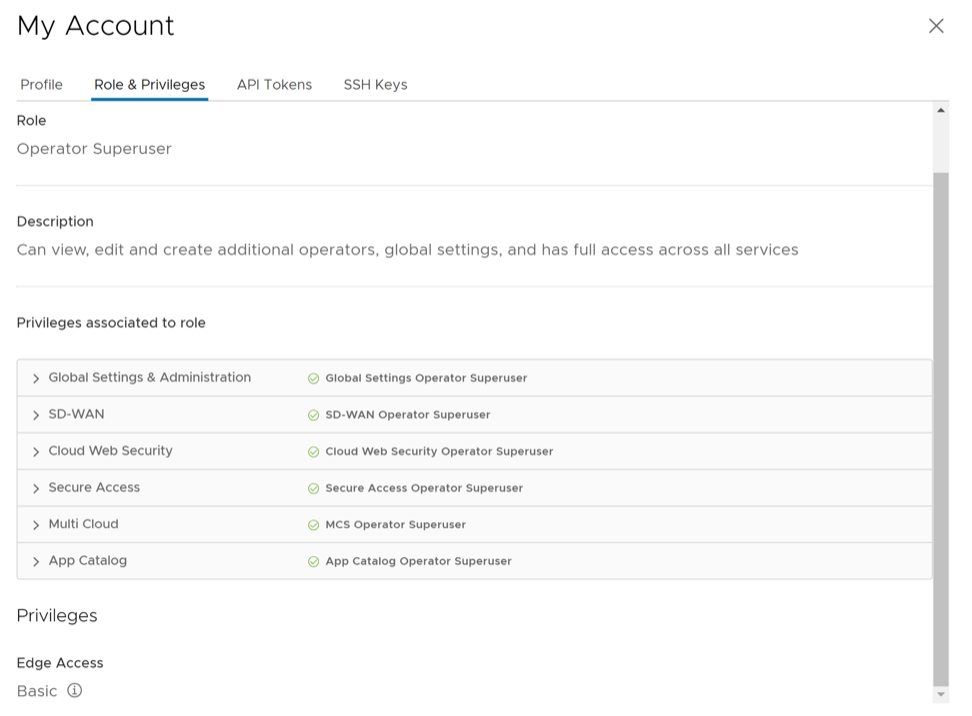
Configure user privileges to securely access Edges. Choose the Basic access level for the user. Configure the access level when creating a new user (under User Management), and then modify it later. Only users with the Superuser role can modify a user's access level.

To access the My Account page, perform the following steps:

  1. Select the User icon in the Global Navigation located at the top right of the screen.
    The User Information panel appears:
    Figure 1. User Information Panel
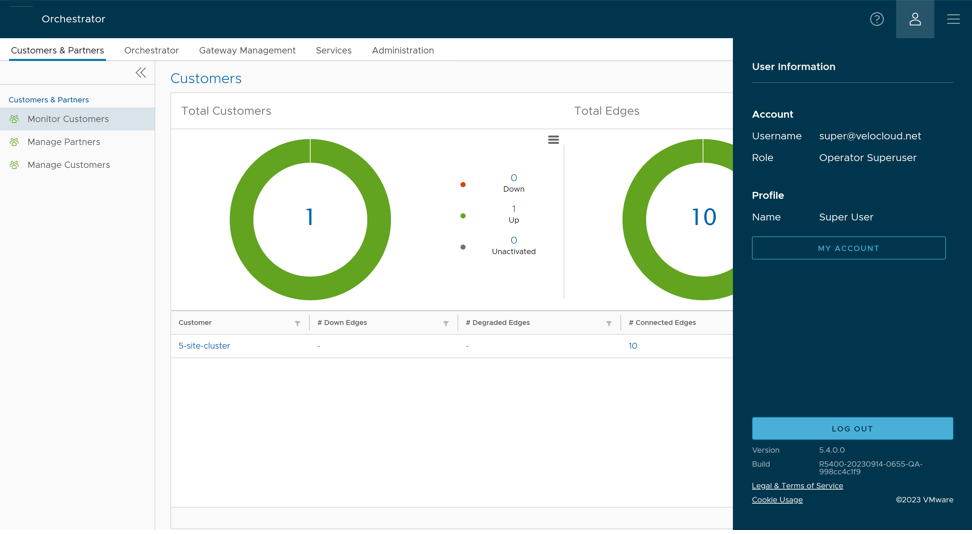
  2. Select the My Account button.
    The Orchestrator displays the Profile tab by default.
    Figure 2. Configure My Account - Profile Details
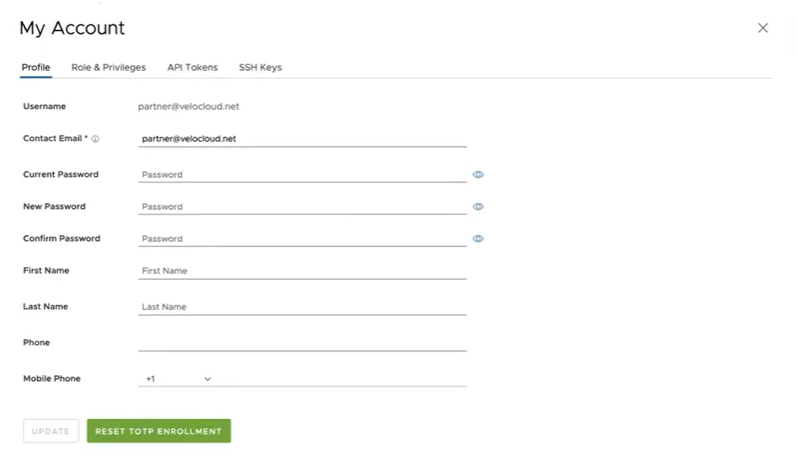
  3. Update the following basic user details:
    Table 1. Profile tab - Options and Descriptions
    Option Description
    Username Displays the username, and it is a read-only field.
    Contact Email Enter the primary contact email address of the user.
    Current Password Enter the current password.
    New Password Enter the new password.
    Note: The 4.5 release prohibits the special character '<' in passwords. Existing passwords containing the '<' character require an update before the system can save any changes.
    Confirm Password Re-enter the new password.
    First Name Enter the first name of the user.
    Last Name Enter the last name of the user.
    Phone Enter the primary phone number of the user.
    Mobile Phone Enter the mobile number of the user along with the country code.
  4. Select Update to save the user details.
  5. Select Reset TOTP Enrollment to reset the existing enrollment.
    Note: Changing the account password automatically resets the TOTP enrollment.
  6. Select the Role & Privileges tab to view the existing user role and description. This tab also displays the privileges associated with the user role.
    Figure 3. Configure My Account - Role & Privileges Details
  7. Select the API Tokens tab.
    The following screen is displayed.
    Figure 4. Configure My Account - API Tokens
  8. Enter a Name and Description for the token, and then choose the Lifetime from the drop-down menu.
  9. Select Generate Key.
  10. Select the SSH Keys tab to configure a Secure Shell (SSH) key-based authentication.

    The SSH key-based authentication is a secure and robust authentication method to access VeloCloud Edges. It provides a strong, encrypted verification and communication process between users and Edges. The use of SSH keys bypasses the need to manually enter login credentials and automates the secure access to Edges.

    Note:
    • This feature requires Release 5.0.0 or later for both the Edge and the Orchestrator.
    • Users with Operator Business or Business Specialist account roles cannot access Edges using key-based authentication.

    For more information on SSH keys, see Add SSH Key.

  11. After selecting the SSH Keys tab, select the Generate Key button. The following screen appears:
    Figure 5. Configure My Account - SSH Keys


    Table 2. SSH Keys - Options and Descriptions
    Option Description
    User Name Displays the username, and it is a read-only field.
    Actions Select either one of the following options:
    • Generate key: Use this option to generate a new pair of public and private SSH keys.
      Note: The system automatically downloads the generated key. SSH key generation uses the .pem format as the default. When using a Windows operating system, convert the file format from .pem to .ppk, and then import the key. For instructions to convert .pem to .ppk, see https://puttygen.com/convert-pem-to-ppk.
    • Enter key: Use this option to paste or enter the public key if users already have a pair of SSH keys.
    PassPhrase Choose to enter a unique passphrase to further safeguard the private key stored on the computer.
    Note: This is an optional field and is available only if a user has selected the Generate Key option.
    Duration Select the number of days by which the SSH key must expire.


  12. Select Generate Key.
    Note: Each user account supports only one SSH Key.
  13. To deactivate an SSH token, select the Revoke button. A pop-up window appears to confirm the revoke operation. Select the checkbox, and then select Revoke to revoke the key permanently.
    The system deletes the SSH keys for a user in the following cases:
    • Changing the user role to Operator Business or Business Specialist prevents Edge access via key-based authentication.
    • Deleting a user from the Orchestrator.
      Note: Deleting or deactivating a user in an external SSO provider prevents them from accessing the Orchestrator. Only the explicit removal of the user from the Orchestrator deactivates the associated Secure Edge Access keys. Therefore, first delete the user from the IdP before deleting from the Orchestrator.
Enable Secure Edge Access for the Enterprise and switch the authentication mode from Password-based to Key-based. See Enable Secure Edge Access for an Enterprise Operator.
..