Rack Mounting the Switch
This chapter includes the following sections:
Rack Mounting the Switch
The rack mounting procedure is identical for all switches covered by this guide. Illustrations in this chapter depict the mounting of a DCS-7050SX-128 switch.
Les procédure de montage du bâti est identique pour tous les commutateurs visés par ce guide. Illustrations dans ce chapitre montrent le montage d'un interrupteur de DCS-7050SX-128.
Two-Post Rack Mount provides instructions for mounting the switch in a two-post rack.
After completing the instructions for your rack type, proceed to Connecting Power Cables.
Two-Post Rack Mount
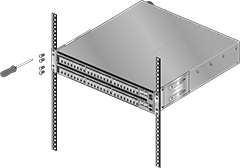
To mount the switch onto a two-post rack, assemble the mounting brackets to the chassis, then attach the brackets to the rack posts. Two-post accessory kits include two, three-hole mounting brackets.
Each chassis side has attachment pins that align with bracket holes; the number of pins (six or seven) varies by switch model. Pin orientation is symmetric and equidistant, supporting bracket placement where the flange is either flush with the front and rear panels, or not flush with the panels. Each bracket hole includes a key-opening for placing the bracket flush with the chassis and then locking it into place.
Attachment pins must engage all three upper bracket holes.
Goupilles de fixation doivent s’engager tous les trois trous de la bride supérieure..
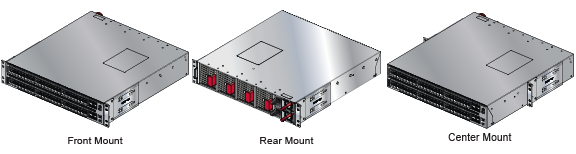
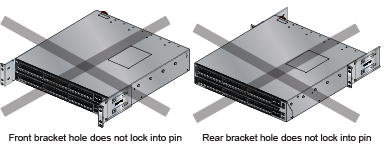
Figure 1 displays proper bracket mount configuration examples. Figure 2 displays improper bracket mount configuration examples.
Attaching Mounting Brackets to the Chassis
This procedure attaches mounting brackets to the switch chassis (Figure 3).
- Slide the bracket toward the front flange until the bracket clip locks with an audible click.
Figure 3. Attaching the Mounting Brackets to the Switch Chassis 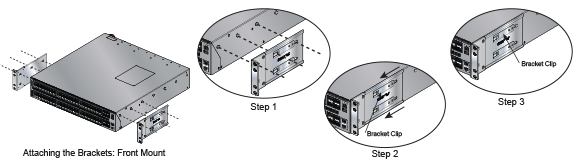
To remove the mounting bracket from the chassis, lift the front edge of the mounting bracket clip with a flathead screwdriver and slide the bracket away from the front flange (opposite from the installation direction).
Inserting the Switch into the Rack
This procedure attaches the switch to the rack.
- Lift the chassis into the rack. Position the flanges against the rack posts.
Figure 4. Inserting the Switch into the Rack