Manage Partners
- Log into the VeloCloud Orchestrator as an Operator user. In the SD-WAN service of the Operator portal, select Manage Partners.
Figure 1. Manage Partners 
- You can perform the following actions:
Table 1. Manage Partners Option Descriptions Option Description Search Enter a search term to search for the matching text across the table. Use the advanced search option to narrow down the search results. New Partner Select this option to add a new Partner. For additional information, see Create New Partner. Edit This option takes you to the Partner Overview page in the Partner portal, where you can edit the Partner Capabilities, Available Software Images, and Gateway Pool of the selected Partner. For additional information, see Configure Partner. Delete Deletes the selected Partners. Enter the number of selected Partners in the pop-up window, and then select Delete. Note: Ensure that you have removed all the Customers associated to the selected Partner, before deleting the Partner.Add Operator Profile Assigns an Operator profile to the selected Partners, which specifies the network settings managed by VeloCloud Orchestrator. In the Add Profiles to Selected Partners pop-up window, select a profile and select the arrow to add it. Select Save. For additional information, see More Select this option, and then select Download to download the list of Partners' profiles in a CSV format. - Following are the other options available in the Manage Partners area:
- Columns - Select this option and select the check boxes to view the required columns.
- Refresh - Select this option to refresh the page.
Create New Partner
Only Operator Superusers, Standard Operators, and Business Specialist Operators can create a new Partner.
Note: As an Operator Super User, you can temporarily deactivate creating new partners by setting the system property
session.options.disableCreateEnterpriseProxy to True. You can use this option when the Orchestrator exceeds the usage capacity.- Log into the VeloCloud Orchestrator as an Operator user. In the Operator portal, go to Customers & Partners > Manage Partners , and then select New Partner.
Figure 2. Create New Partner 
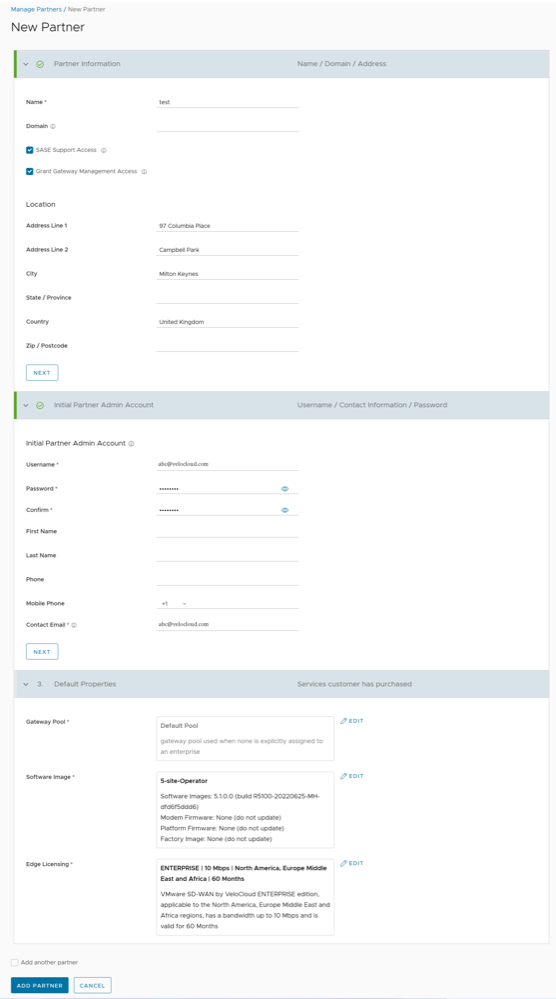
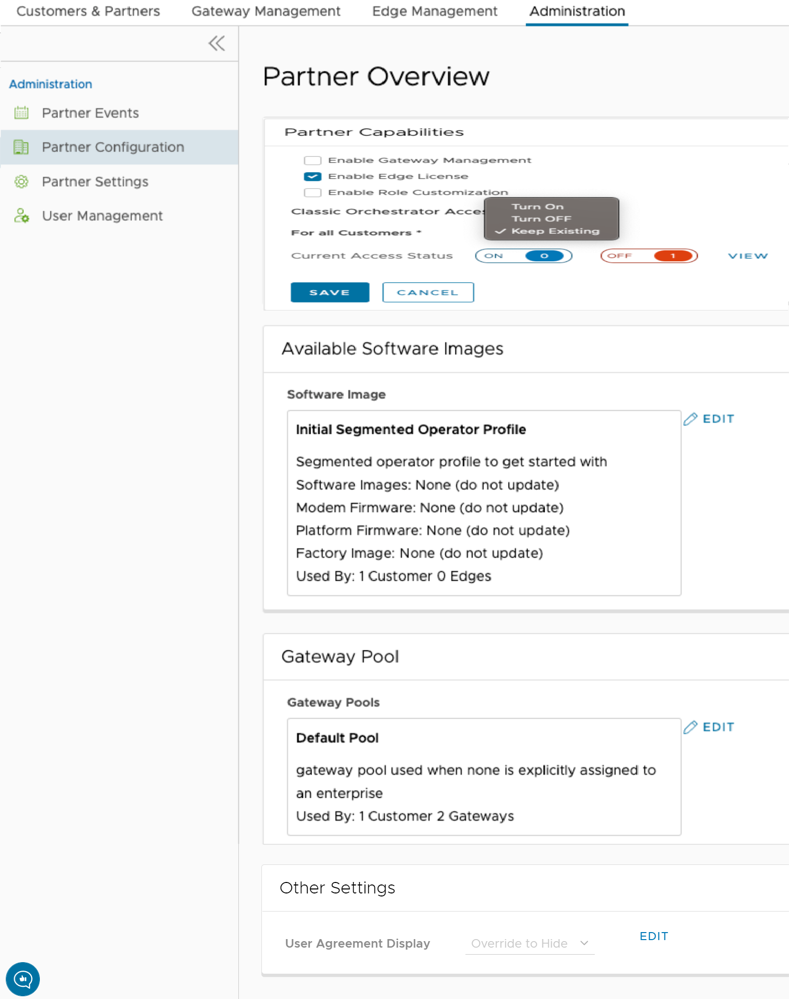
- On the New Partner page, enter the following details:
Note: Select Next to go to the next section on the page. The Next button is activated only when you enter all the mandatory details in each section.
Table 2. Create Partner Option Descriptions Option Description Partner Information Name Enter the Partner name. Domain Enter the domain name of the Partner. Support Access This option is selected by default and grants access to the Arista Support to view, configure, and troubleshoot the settings of the Partner. Grant Gateway Management Access Select the check box to allow the Partner to create and manage the Gateways. Location Enter relevant address details in the respective fields. Initial Partner Admin Account Username Enter the username in the 이 이메일 주소가 스팸봇으로부터 보호됩니다. 확인하려면 자바스크립트 활성화가 필요합니다. format. Password Enter a password for the Partner. Note: Starting from the 4.5 release, the use of the special character "<" in the password is no longer supported. In cases where users have already used "<" in their passwords in previous releases, they must remove it to save any changes on the page.Confirm Re-enter the password. First Name, Last Name, Phone, Mobile Phone Enter relevant details in the respective fields. Contact Email Enter the email address. The alerts on service status are sent to this email address. Default Properties Gateway Pool Click Add to select the SD-WAN Gateway Pool from the available list. After adding the SD-WAN Gateway Pools, you can select Edit to add or remove the pools. For additional information on SD-WAN Gateway Pools, see Manage Gateway Pools.
Software Image Select Add to select the Software Image from the available list. After adding the Software Image, you can select Edit to add or remove the images. For additional information on Software Images, see Software Images. Edge Licensing Select Add to select the SD-WAN Edge licenses from the available list. After adding the licenses, you can select Edit to add or remove the licenses. This option is available only when the value of System Property session.options.enableEdgeLicensingis set to True.Note: The license types can be used on multiple SD-WAN Edges. It is recommended to provide the Partners with access to all types of licenses to match their edition and region. For additional information, see Edge Licensing. - Select the Add Another Partner check box, to create another new Partner, or directly select the Add Partner button. The new Partner name is displayed on the Manage Partners page. You can select the Partner name to navigate to the Partner portal and add additional configurations to the Partner. For additional information, see Configure Partner.
Configure Partner
To configure Partner information for an existing Partner:
- In the Operator portal of the VeloCloud Orchestrator, select Manage Partners, and then select the Partner name to navigate to the Partner portal and add additional configurations to the Partner.
The Partner Overview page for the selected Partner appears.
Figure 3. Configure Partner 
- You can configure the following capabilities and settings for the selected Partner:
Table 3. Configure Partner Option Descriptions Option Description Partner Capabilities Selecting Edit allows you to select the following capabilities for the current Partner: - Enable Gateway Management – Allows the Partner users to create, configure, and manage their own Gateways.
- Enable Edge License – Allows the Partner users to manage their Edge Licenses.
- Enable Role Customization – Allows a Partner Super user to customize the service permissions of other Partner users and Enterprise users of the Partner.
Classic Orchestrator Access Displays the Classic Orchestrator accessibility settings for the Partner Customers. For All Customers: An Operator can choose any one of the following options from the drop-down menu:- Turn On: Allows Partner Customers to access the Classic Orchestrator.
- Turn Off: Does not allow Partner Customers to access the Classic Orchestrator.
- Keep Existing: This option indicates no change to the settings.
Current Access Status: Displays the access information (On/Off) for the existing Partner Customers. Click View to view the list of names and statuses of the Partner Customers.
Note: You must refresh the page to see the Classic Orchestrator UI button at the top right of the screen.Available Software Images Displays all the software images assigned to the Partner. Select Edit to add or remove the software images in the list. Note: You cannot remove the software images that are assigned to a Customer.Gateway Pool Displays the Gateway pools associated with the selected Partner. Select Edit to add or remove the Gateway pools in the list. Note: You cannot remove the Gateway Pools that are assigned to a Customer.Other Settings Displays the settings of the User Agreement only if you have activated the User Agreement feature. By default, the User Agreement feature is not activated. To enable the User Agreement feature, navigate to the System Properties in the Operator portal, and set the value of the session.options.enableUserAgreementssystem property as True.You can choose to override the default display settings of the User Agreement, by selecting the Edit button and selecting relevant option from the User Agreement Display drop-down menu. By default, the Customer inherits the display mode set in the system properties.
- After configuring the required Partner details, select Save Changes.