Upgrade Orchestrator
This section discusses how to upgrade the Orchestrator .
Orchestrator Upgrade Overview
- Prepare for the Orchestrator Upgrade.
- Send Upgrade Announcement.
- Proceed with the Orchestrator Upgrade.
- Complete the Orchestrator Upgrade.
Upgrade an Orchestrator
This section discusses how to upgrade an Orchestrator.
Step 1: Prepare for the Orchestrator Upgrade
To upgrade Orchestrator:
- Arista Support will assist you with your upgrade. Collect the following information prior to contacting Support.
- Provide a screenshot of the replication dashboard of the Orchestrator as shown below.
Figure 1. Orchestrator Dashboard 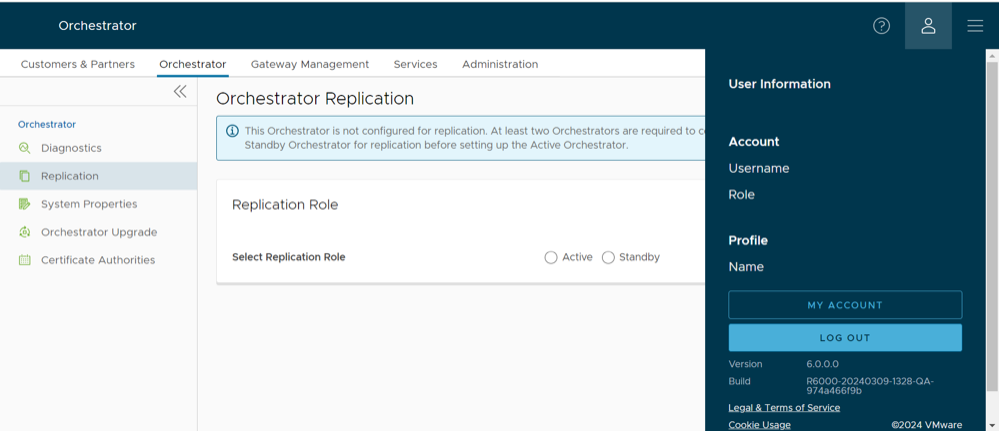
- Hypervisor Type and version (i.e. vSphere 6.7)
- Commands from the Orchestrator:
Note: Commands must be run as root (e.g. ‘sudo <command>’ or ‘sudo -i’).
- Run the script
/opt/vc/scripts/vco_upgrade_check.shto check:- LVM layout
- Memory Information
- CPU Information
- Kernel Parameters
- Some system properties
- ssh configurations
- Mysql schema and database sizes
- File_store locations and sizes
- Copy of
/var/logtar -czf /store/log-`date +%Y%M%S`.tar.gz --newer-mtime="36 hours ago" /var/log
- From the Standby Orchestrator:
sudo mysql
--defaults-extra-file=/etc/mysql/velocloud.cnf
velocloud -e 'SHOW SLAVE STATUS \G'
- Run the script
- From the Active Orchestrator:
sudo mysql
--defaults-extra-file=/etc/mysql/velocloud.cnf
velocloud -e 'SHOW MASTER STATUS \G'
- Provide a screenshot of the replication dashboard of the Orchestrator as shown below.
- Contact Arista Support, with the above-mentioned information for assistance with the Orchestrator upgrade.
Step 2: Send Upgrade Announcement
To send an upgrade announcement:
- In the Upgrade Announcement area, type in your message in the Banner Message text box.
Figure 2. Type your Banner Message 
- Select the Announce Orchestrator Upgrade button.
A pop-up message appears indicating that you have successfully created your announcement, and that your banner message is displayed at the top of the Orchestrator.
Figure 3. Banner Message is Displayed 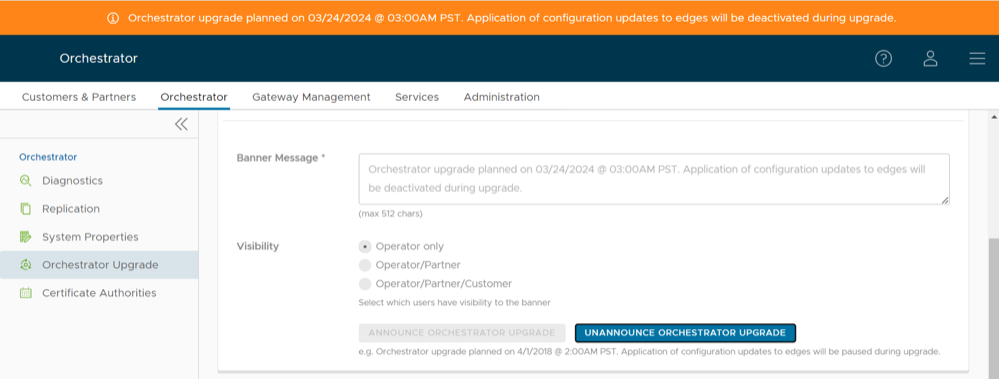
Step 3: Before Proceeding with the Orchestrator Upgrade
This section provides important information to consider prior to upgrading the Orchestrator, as well as how the image-based upgrade works. Contact Arista Support to assist you with the 5.4 to 6.0 upgrade.
Note:
- The Orchestrator OS, database, and several other dependent components currently in use have reached their end of life, and will no longer be supported.
- The benefit to upgrading to the 6.0 release is better security due to components with active LTS.
- Starting from the 6.0.0 release, existing events data is migrated from mySQL to ClickHouse, and all the new events data is stored in ClickHouse for a duration of 1 year.
Consider the following when upgrading to the 6.0 Release:
- This upgrade work does not modify any existing APIs.
- Just like other releases, there are schema changes with the 6.0 release. However, these changes will not impact the upgrade process.
The OS for the Orchestrator virtual appliance specific upgrades include the following:
- The OS version is changing from Ubuntu 18.04 to 22.04.
- Image based upgrade instead of a Debian based upgrade.
Important Notes for Upgrading from 5.4 to 6.0
With the 6.0 release, the Orchestrator is adopting an image-based upgrade approach, which will introduce the following important differences compared to previous upgrades.
- Any non-supported binaries installed on top of Orchestrator will be removed. These can include the off-the-shelf monitoring applications, remote access applications, etc.
- Back up any configurations if you want to continue using them. After the upgrade, you must reinstall them manually and configure them accordingly.
- For a successful upgrade, a reboot of the Orchestrator is required.
- The upgrade process requires a mandatory system-level REBOOT of the Orchestrator.
- After a successful upgrade, the Orchestrator does not support rolling back to the previous release. Therefore, ensure you have backups of the entire system, including
/store,/store2,/store3, and so forth, before upgrading. - At least 30GB of free space is required on the physical disk before upgrading the Orchestrator from 5.4.0 to 6.0.0.
Image-based Upgrade Process
This section discusses how the image-based upgrade process works.
- An Ubuntu 22.04-based VCO image is prepared with all required binaries with LVM partitions “
/” and “/var/" - The “
/” and “/var/” LVM partitions are "snapshotted" to represent new image rooftfs - These snapshots are packaged with upgrade scripts as shown in the below diagram to serve two primary functions:
- Transferring specific configurations, notably those associated with mysql, nginx, ssh, and their respective keys, from the existing system to the new snapshots.
- Adjusting the boot configuration to ensure the system boots using the new LVM partitions, thus ensuring the upgrade is complete and effective.
- As seen in the above diagram, the image-based upgrade replaces the old file system with a new one. As mentioned, this might result some unsupported files and packages being lost. Contact Arista Support before upgrade to ensure a safe and successful upgrade.
Best Practices/Recommendations:
Listed below are some upgrade best practices:
- From the System Properties page in the Orchestrator, make a note of the value of the
edge.heartbeat.spread.factorsystem property. Then, change the heartbeat spread factor to a relatively high value for a large Orchestrator (e.g. 20, 40, 60). This will help reduce the sudden spike of the resource utilization (CPU, IO) on the system. Make sure to verify that all Gateways and Edges are in a connected state before restoring the previousedge.heartbeat.spread.factorvalue from the System Property page in the Orchestrator. - Leave the demoted Orchestrator up for a few hours before complete shutdown or decommission.
- Freeze configuration modifications to avoid any additional configuration changes until the upgrade process is completed.
Step 4: Proceed with the Orchestrator Upgrade by Contacting Support
Contact Arista Support for assistance with the Orchestrator upgrade.
Step 5: Complete the Orchestrator Upgrade
After you have completed the Orchestrator upgrade, select the Complete Orchestrator Upgrade button. This re-enables the application of the configuration updates of Edges at the global level.
To verify that the status of the upgrade is complete, run the following command to display the correct version number for all the packages:
dpkg -l|grep vcoOrchestrator Disaster Recovery
This section discusses how to set up and upgrade disaster recovery in the Orchestrator .
Set Up DR in the VeloCloud Orchestrator
Upgrade the DR Setup
To upgrade a DR-enabled VCO pair:
Note: If the Orchestrator upgrade is from 2.X-> 3.2.X, run dr-standby-schema.sh on the Standby before starting the upgrade.
- Prepare for the Upgrade. For instructions, see Step 1: Prepare for the Orchestrator Upgrade.
- Proceed with the Orchestrator Upgrade. For instructions, see Step 4: Proceed with the Orchestrator Upgrade by Contacting Support.