Remote Access Point
The Remote Access Point (RAP) solution enables organizations to extend their Enterprise SSIDs to an Arista AP installed at a remote worker’s home office or a small branch office. The RAP solution uses industry-standard protocols to securely connect the remote AP deployed at a workplace with the enterprise data center over the public Internet.

This chapter contains the following topics:
Configure a Remote Access Point
- In CV-CUE, navigate to the and click Add Tunnel Interface Profile.
- From the Tunnel Type dropdown list, select VPN with IPSec.
- Provide the endpoint details for Primary and Secondary servers.
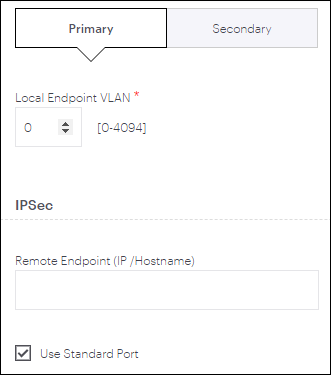
- Click the Use Standard Port checkbox to use the following IKE
ports for UDP:
- Port 500, if no NAT detected
- Port 4500, if NAT is detected between two endpoints
- Provide the details for IPSec Phase 1 and Phase 2 parameters
Note: For PANOS, when you configure the IKE Version 1 parameters for XAUTH authentication, you must provide only hexadecimal (hex) strings in Local (Left) Identifier. The Convert to Hex button appears when you enter any ASCII strings in the Identifier field. Click Convert to Hex to convert and add the hex strings to the Identifier field. Also, the hex string must always begin with @#. The Convert to Hex button automatically prepends the string with @#. If you use any other ASCII to Hex convertor, then ensure to prepend the hex string with @# before you add the string to the Identifier field.
.
Configure IPSec Credentials for Each Remote Access Point
The custom IPSec credential per AP provides network administrators the option to disable or break any tunnel between a remote AP and the enterprise data center. For example, when a remote employee quits an organization, network administrators can block the remote AP by changing the credentials so that the AP can no longer form the tunnel to the enterprise data center.
- In CV-CUE, navigate to the .
- Right-click the AP and select .
- Click Customize, and provide either PSK or XAUTH/EAP credentials.
- Monitor > WIPS > Managed WiFi Devices
- Floor Plans