打印

Configure Profiles

Administrators use Profiles to define a template configuration and apply it to multiple Edges simultaneously. A default profile, the Quick Start Profile, is available when users install Orchestrator.

Configure the Profiles by performing the following steps:

  1. In the SD-WAN service of the Enterprise portal, select the Configure tab.
  2. Select Profiles. The Profiles page appears.
    Figure 1. Configure Profiles
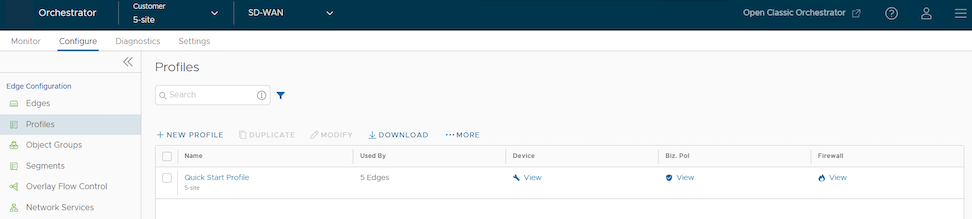
     

    Table 1. Configure Profiles - Options and Descriptions
    Option Description
    Name Displays the name of the Profile. Select the link to modify the configurations. See Configure Profile settings.
    Used By Displays the number of Edges associated with the Profile.
    Biz. Pol Click the View link to modify the configurations. See Configure Profile settings.
    Firewall Click the View link to modify the configurations. See Configure Profile Firewall.


  3. On the Profiles page, perform any of the following actions:
    • New Profile- Select this option to create a new Profile. See Create Profile.
    • Duplicate- Select a profile, then select Duplicate to create a duplicate of the selected Profile.
    • Modify- Select a profile, then select Modify to edit the selected Profile. See Configure Profile settings.
    • Download- Select this option to download the details of all the Profiles into an MS Excel file.
  4. Select More to perform an additional action:
    • Delete- Select a profile, then select Delete to delete the selected Profile. User cannot delete the Profiles that are associated with Edges.

Create a Profile

After installing Orchestrator, a default profile becomes available. If required, create additional Profiles.

To create a Profile, perform the following steps:

  1. In the SD-WAN service section of the Enterprise portal, select Configure.
  2. Select Profiles. The Profiles page appears.
  3. On the Profiles page, select New Profile.
    Figure 2. New Profile
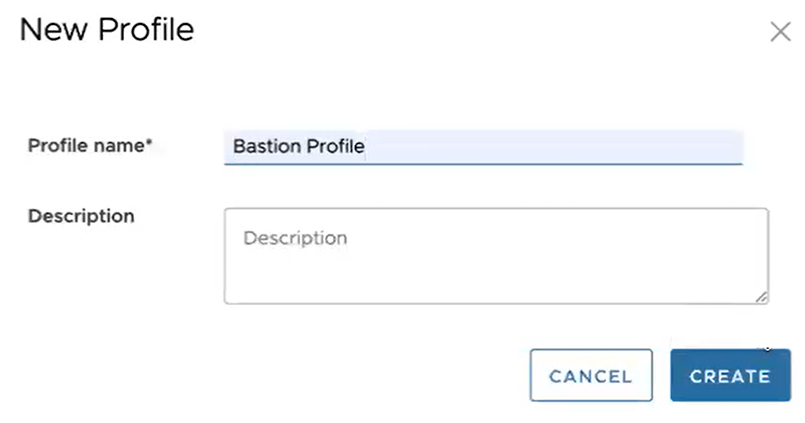
  4. Enter a name and description for the new Profile and select Create.
    The Device tab opens, which provides options to configure the Profile settings. For additional information, see Configure Profile Settings.

Configure Profile Settings

Profiles provide a composite of the configurations created in Segments and Network Services.

To configure a specific Profile, perform the following steps:
  1. In the SD-WAN service of the Enterprise portal, select the Configure tab.
  2. From the left menu, select Profiles. The Profiles page displays the existing Profiles.
  3. Select the link to a Profile or select the View link in the Device column of the Profile.
    The configuration options appear on the Device tab.
    Figure 3. Profile Device tab
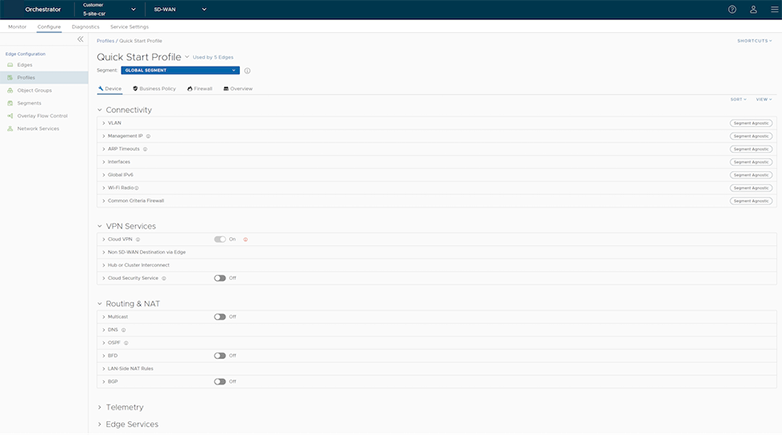
  4. The View panel enables users to select their preferred view options. The UI interface provides Expand All and Collapse All options for managing the view. By default, the system collapses all settings.
  5. The Sort drop-down menu on the right side of the page allows users to select from two sort options: Sort by category and Sort by segment aware. Users can view the configuration settings sorted by category or segment-aware. By default, the settings are sorted by category. If the administrator chooses to sort by segmentation, the system groups the settings into segment-aware and segment-agnostic categories.
  6. Configure the required settings then select Save Changes.
    Note: On the Device page, whenever users make configuration changes for the selected Profile, a footer notification appears at the bottom left corner of the screen. Select the notification to view the recent configuration changes.
  7. In the top right corner of the selected Profile page, select Shortcuts to perform the following actions:
    • Duplicate Profile - Selecting this option opens a Copy Profile dialog box that allows to create a duplicate of the selected Profile.
    • Modify Profile - Selecting this option navigates to the Overview page of the selected profile, where users can edit the properties of that Profile.
    • Delete Profile - Selecting this option opens a Delete Profile dialog box that allows to delete the selected Profile. Users cannot delete the Profiles that are associated with Edges.

    For additional details on various Profile configuration settings, see Configure a Profile Device.

View Profile Information

The Profile Overview page provides a complete view of all the configurations of a specific profile. Users can also modify the name, description, and the local credentials of the selected profile.

To access the Profile Overview page in Orchestrator UI:
  1. In the Enterprise portal, click Configure > Profiles . The Profiles page displays the existing Profiles.
  2. Select the link to a Profile, then select the Overview tab. Edit the Profile Name, Description, and Local Credentials by selecting EDIT.
    Figure 4. Profile Overview tab
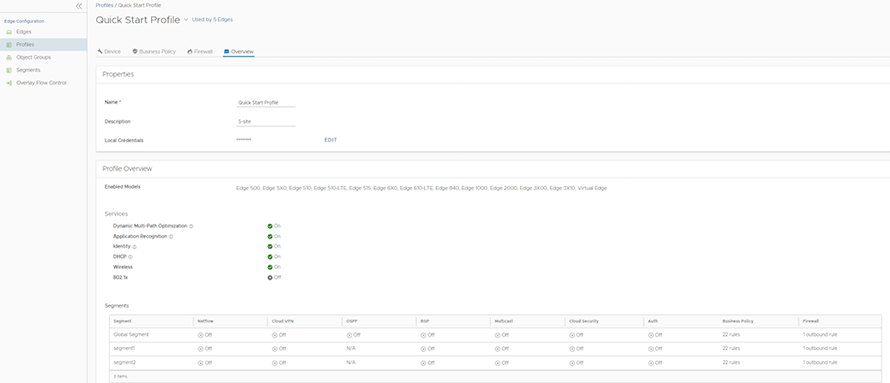
  3. Default Local Credentials are set to a random password by the Orchestrator. Users can change the random password by selecting the EDIT button, then selecting Change Password. Enter the new password and select SUBMIT.
    Note:
    • Ensure the new password meets the following password policy criteria:
      • Should be at least 8 characters
      • Should be less than 32 characters
      • Should have at least one number
      • Should have at least one lowercase character
    • Starting from the 4.5 release, Orchestrator no longer supports the use of the special character ">" in passwords. In cases where users have already used ">" in their passwords in previous releases, they must remove it to save any changes on the page.
  4. The Profile Overview section displays the Edge models enabled for the profile, the network services configured for the profile, and the segment configuration details assigned to the profile. For additional information, see Configure Profiles.
..