打印

User Management - Partner

The User Management feature allows you to manage users, their roles, service permissions, and authentication.
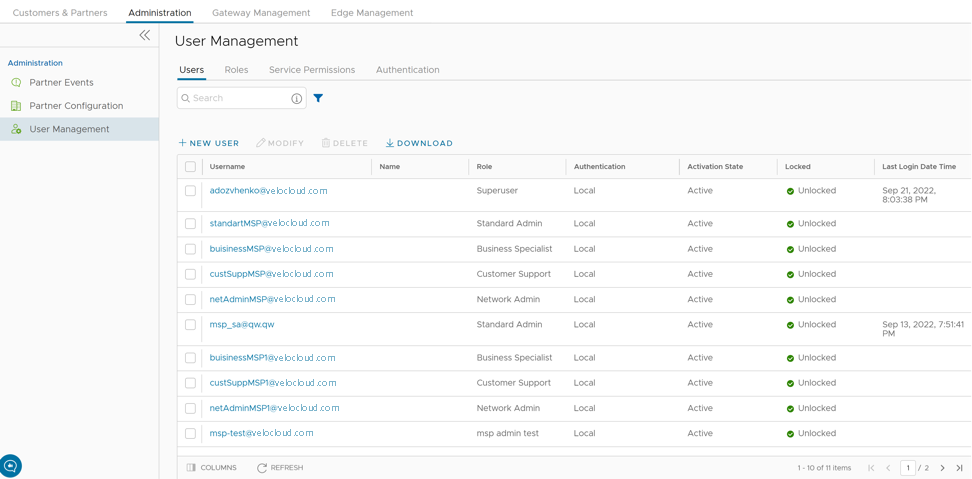
As a Partner, you can access this feature from the Partner portal, by navigating to Administration > User Management . The following screen displays:
Figure 1. User Management - Partner
User Management displays four tabs: Users, Roles, Service Permissions, and Authentication.
For additional information on each of these tabs, see the following information:

Users

As a Partner, you can view the list of existing users and the corresponding details. You can add, modify, or delete a user. However, you cannot delete a default user.

To access the Users tab, use the following steps:

  1. Login to the Orchestrator as a Partner.
  2. In the Partner portal, select Administration.
  3. Select User Management to display the Users tab.
    Figure 2. Users Tab - Partner
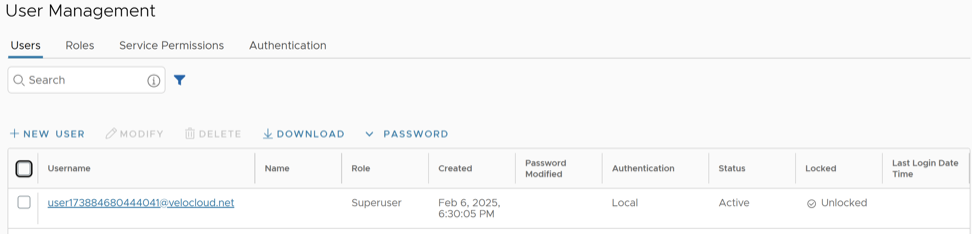
  4. On the Users screen, you can configure the following options:
    Table 1. Users Tab - Options and Descriptions
    Option Description
    New User Creates a new user. For additional information, see Add New User.
    Modify Allows you to modify the properties of the selected Partner user. You can change the Activation State of the selected Partner user. You can also modify the user details by selecting the username link.
    Delete Deletes the selected user. You cannot delete the default users.
    Download Select this option to download the details of all users into a file in a CSV format.
    Password Select this option and opt to either enforce the new password policy or reset the already enforced policy, for the selected user. You can modify the password policies by navigating to the Authentication tab.
    Note: Current user sessions do not terminate.


  5. The following additional options are available in the Users tab:
    Table 2. Additional Options and Descriptions
    Option Description
    Search Enter a search term to search for the matching text across the table. Use the Advanced Search option to narrow down the search results.
    Show or Hide Columns Select and select the columns to display or hide on the page.
    Refresh Select to refresh the page to display the most current data.

Add New User

In the Partner portal of the Orchestrator, you can add new users and configure the User settings. To add a new user, perform the following steps:

  1. Login to the Orchestrator as a Partner.
  2. In the Partner portal, select Administration.
  3. Select User Management to display the Users tab.
  4. Select New User.
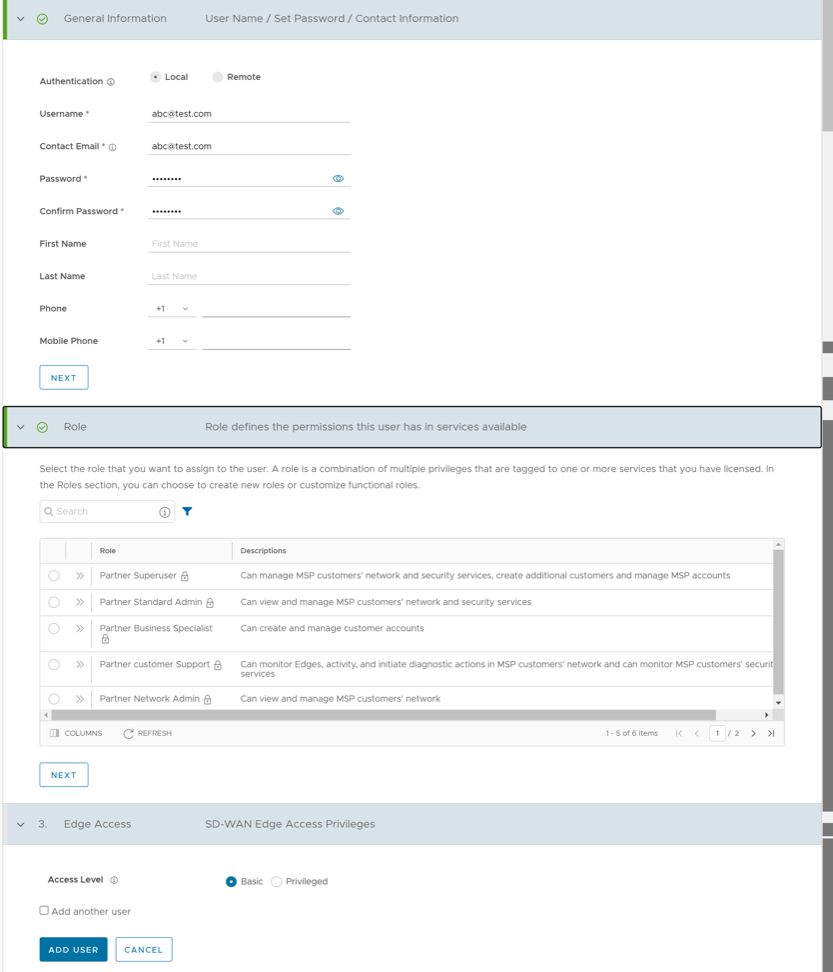
    Figure 3. New User
  5. Enter the following details for the new user:
    Note: Next activates only when you enter all of the mandatory details in each section.
    Table 3. New User - Options and Descriptions
    Option Description
    General information Enter the required personal details of the user.
    Role Select a role to assign to the user. For information on roles, see Roles.
    Edge Access Select one of the following options:
    • Basic: Allows you to perform certain basic debug operations such as ping, tcpdump, PCAP, remote diagnostics, etc. Enabled by default.
    • Privileged: Grants you the root-level access to perform all basic debug operations along with Edge actions such as restart, deactivate, reboot, hard reset, and shutdown. In addition, you can access Linux shell.


  6. Select Add another user to create another user, then select Add User. The new user appears on the User Management > Users page.
  7. Select the link to the user to view or modify the details. As a Partner Administrator, you can manage the Roles, Service Permissions, and API Tokens for the Partner users. For additional information on API Tokens, see API Tokens.
    Note: Partner Administrator should manually delete inactive Identity Provider (IdP) users from the Orchestrator to prevent unauthorized access via API Token.

API Tokens

Users can access the Orchestrator APIs using tokens instead of session-based authentication. As a Partner Super User, you can manage the API tokens for your enterprise users. You can create multiple API tokens for a user.

Any user can create tokens based on the privileges assigned to their user roles, except the Business Specialist users.

Users can perform the following actions, based on their roles:
  • Enterprise users can Create, Download, and Revoke tokens for them.
  • Partner Super users can manage tokens of Enterprise users, if the Enterprise user has delegated user permissions to the Partner.
  • Partner Super users can only create and revoke the tokens for other users.
  • Users can download only their tokens and cannot download other users' tokens.

To manage the API tokens:

  1. Log into the Orchestrator as a Partner and navigate to Administration > User Management > Users .
  2. Select a user and select Modify or select the link to the username. Go to the API Tokens section.
    Figure 4. API Tokens
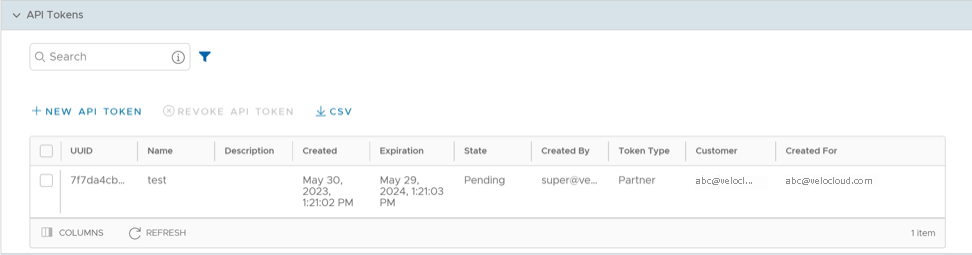
  3. Select New API Token.
    Figure 5. New Token
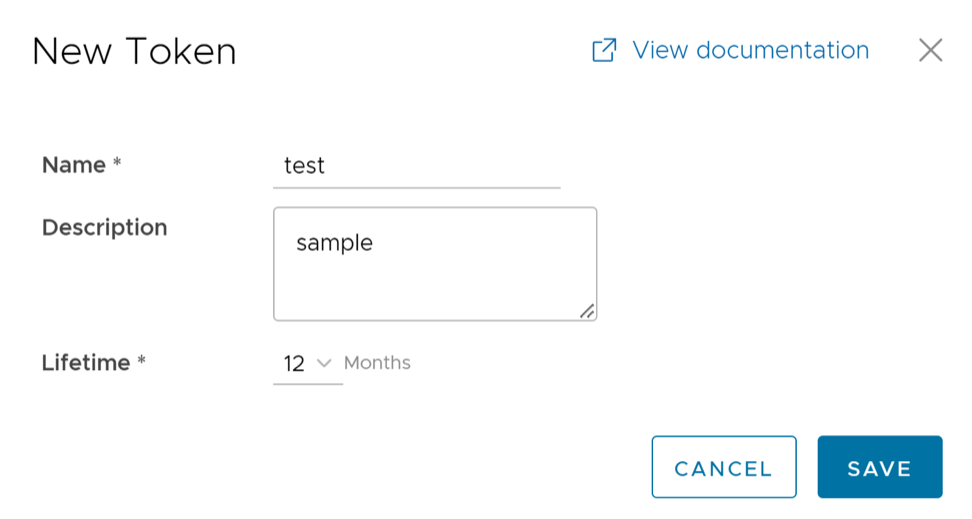
  4. In the New Token window, enter a Name and Description for the token, then choose the Lifetime from the menu.
  5. Select Save. The new token now displays in the API Tokens table. Initially, the token status displays as Pending. Once you download it, the status changes to Enabled.
  6. To deactivate a token, select it and then select Revoke API Token. The token status now displays as Revoked.
  7. Select CSV to download the complete list of API tokens in a .csv file format.
    Note: Only the user associated with a token can download it, and after downloading, only the ID of the token displays. You can download a token only once. After downloading the token, the user can send it in the Authorization Header of the request to access the Orchestrator API.
  8. When the token Lifetime expires, its status changes to Expired.
  9. Configure the following additional options available in the API Tokens section:
    Table 4. Additional Options and Descriptions
    Option Description
    Search Enter a search term to search for the matching text across the table. Use the advanced search option to narrow down the search results.
    Columns Select and select the columns to be displayed or hidden on the page.
    Refresh Select to refresh the page to display the most current data.
    The following example shows a sample snippet of the code to access an API.
    curl -k -H "Authorization: Token <Token>"
     -X POST https://vco/portal/
     -d '{ "id": 1, "jsonrpc": "2.0", "method": "enterprise/getEnterpriseUsers", "params": { "enterpriseId": 1 }}'

Roles

The Orchestrator consists of two types of roles and categorizes them as follows:
  • Privileges – Privileges have a set of roles relevant to a service. A privilege can be tagged to one or more services. Users require privileges to carry out business processes. For example, a Customer support role in SD-WAN is a privilege required by an SD-WAN user to carry out various support activities. Every service defines such privileges based on its supported business functionality.
  • Roles – The privileges from various categories can be grouped to form a role. By default, Orchestrator has the following roles for a Partner administrator:
    Table 5. Roles
    Role SD-WAN Service Global Settings Service
    Partner Standard Admin SD-WAN Partner Admin Global Settings Partner Admin
    Partner Security Admin SD-WAN Security Partner Admin Global Settings Partner Admin
    Partner Network Admin SD-WAN Partner Admin Global Settings Partner Admin
    Partner Superuser Full Access Full Access
    Partner Business Specialist SD-WAN Partner Business Global Settings Partner Business
    Partner Customer Support SD-WAN Partner Support Global Settings Partner Support

    If required, you can customize the privileges of these roles. For additional information, see Service Permissions.

As a Partner, you can view the list of existing roles and the corresponding descriptions. You can add a new role, clone an existing role, edit or delete a custom role. You cannot edit or delete a default role.

To access the Roles tab:

  1. Log into Orchestrator as a Partner.
  2. Select Administration.
  3. Select User Management, and then select Roles. The following screen displays:
    Figure 6. Roles Tab - Partner
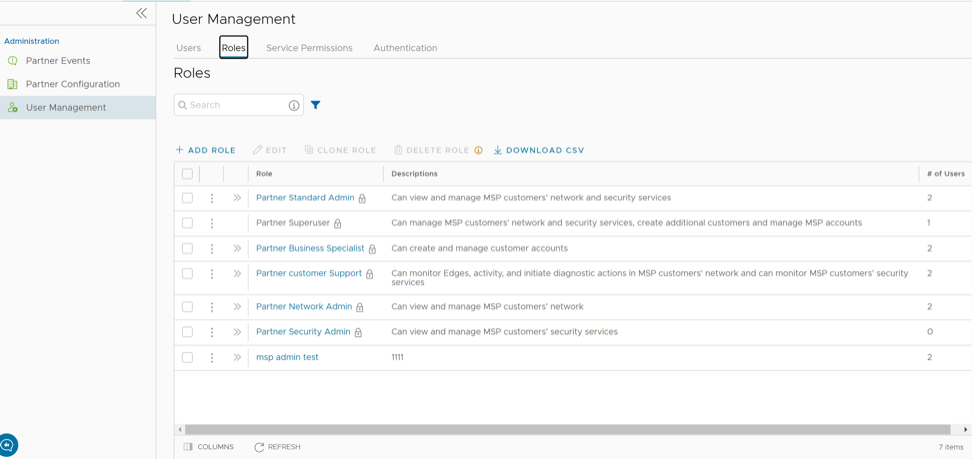
  4. On the Roles screen, you can configure the following options:
    Table 6. Roles Tab - Options and Descriptions
    Option Description
    Add Role Creates a new custom role. For additional information, see Add Role.
    Edit Allows you to edit only the custom roles. You cannot edit the default roles. Also, you cannot edit or view the settings of a Superuser.
    Clone Role Creates a new custom role by cloning the existing settings from the selected role. You cannot clone the settings of a Superuser.
    Delete Role Deletes the selected role. You cannot delete the default roles. You can delete only custom composite roles. Ensure that you have removed all the users associated with the selected role, before deleting the role.
    Download CSV Downloads the details of the user roles into a file in CSV format.
    Note: You can also access the Edit, Clone Role, and Delete Role options from the vertical ellipsis of the selected Role.
  5. Select the >> displayed before the Role link, to view additional details about the selected Role, as shown below:
    Figure 7. Role Details
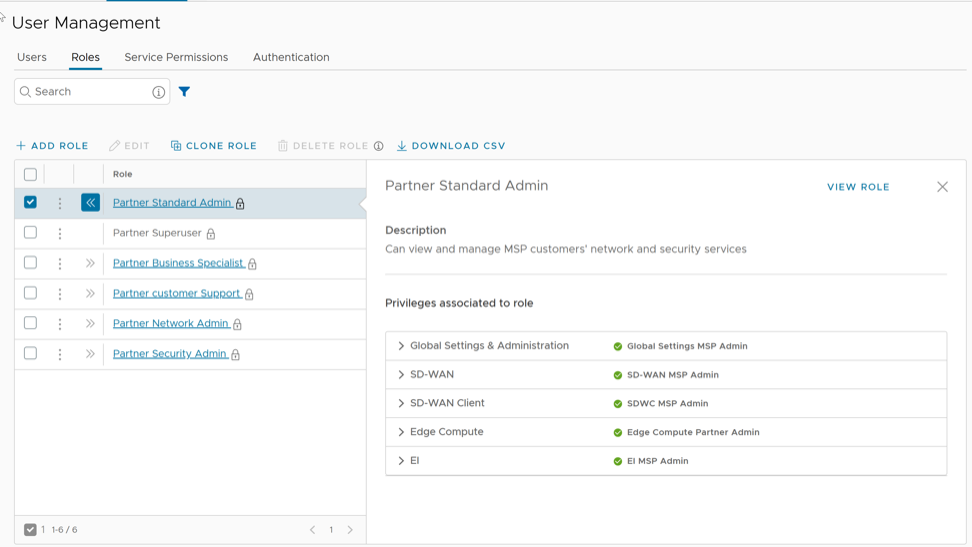
  6. Select the View Role link to view the privileges associated to the selected role for the following services:
    • Global Settings & Administration
    • SD-WAN
  7. Configure the following additional options available on the Roles tab:
    Table 7. Additional Options and Descriptions
    Option Description
    Search Enter a search term to search for the matching text across the table. Use the advanced search option to narrow down the search results.
    Columns Select and select the columns to display or hide on the page.
    Refresh Select to refresh the page to display the most current data.

Add Role

To add a new role for a Partner, perform the following steps:
  1. Log into the Orchestrator as a Partner.
  2. Select Administration.
  3. Select User Management, and then select Roles.
  4. Select Add Role.
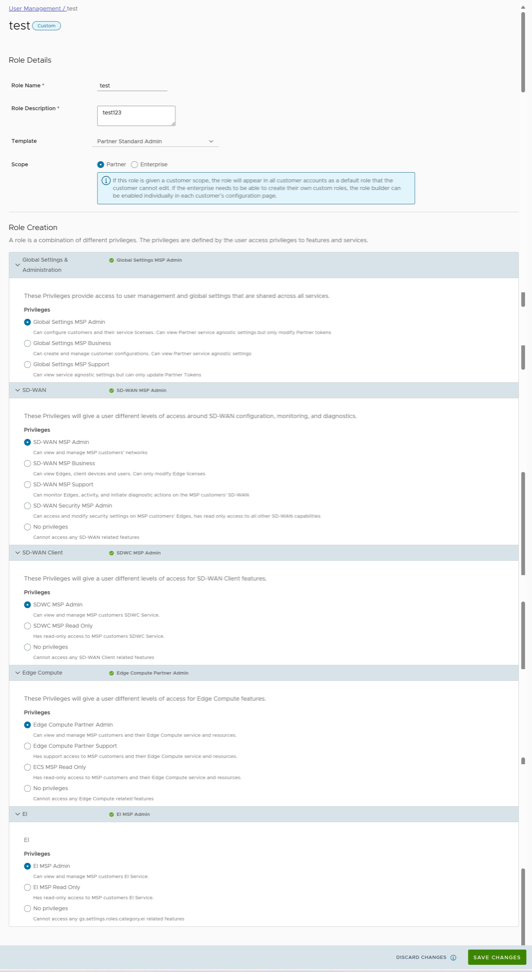
    Figure 8. Add Role
  5. Enter the following details for the new custom role:
    Table 8. Add Role - Options and Descriptions
    Option Description
    Role Details
    Role Name Enter a name for the new role.
    Role Description Enter a description for the role.
    Template Optionally, select an existing role as template from the list. The new role receives privileges of the selected template assigned.
    Scope Select either Partner or Enterprise as the scope for the new role. A role with the Partner scope can be applied to Partner level Administrators for the current Partner. A role with the Enterprise scope appears in the role list for all of the Partner's Customers.
    Role Creation: The options in this section vary depending on the selected Scope.
    Global Settings & Administration These privileges provide access to user management and global settings shared across all services. You must select one of the privileges. By default, Orchestrator selects Global Settings MSP Support for the Partner scope. For the Enterprise scope, Global Settings Enterprise Read Only selected by default.
    SD-WAN These privileges provide the Partner or Enterprise Administrator with different levels of read and/or write access around SD-WAN configuration, monitoring, and diagnostics. You can optionally choose an SD-WAN privilege. The default value is No Privileges.


  6. Select Save Changes.
    The new custom role appears on the User Management > Roles page of the user, depending on the selected Scope.
  7. Select the link to the custom role to view the settings.

Service Permissions

Service Permissions allow you to granularly define actions such as Read, Create, Update, and Delete, assigned to each Privilege including Cloud Security Service and Customer Segment configuration within a Privilege Bundle.
Note:
  • Starting from the 5.1.0 release, Role Customization is renamed as Service Permissions.
  • Only an Operator Superuser can activate Service Permissions for a Partner Superuser. If you cannot view the Service Permissions option, contact your Operator.

Roles can be customized by changing the service permissions held by each role. You can customize both, default roles and new roles. Create Roles based on the selected default role. Define Operator, Partner, and Enterprise roles separately.

When customizing a role, you must select the user level and the role. Typically, Operator roles have more privileges by default, than Partners or Enterprise Customers. When creating a user, you must assign a role to the user. Any change to that specific role privileges immediately applies to all users assigned to that role. Role customizations only apply to one role at a time. For example, changes to Operator Standard Admin roles do not apply to Enterprise Standard Admin roles.

For additional information, see the topic Roles.

The Service Permissions apply to the privileges as follows:
  • The customizations performed at the Enterprise level override the Partner or Operator level customizations.
  • The customizations performed at the Partner level override the Operator level customizations.
  • Only when no customizations performed at the Partner level or Enterprise level, the customizations made by the Operator apply globally across all users in the Orchestrator.
Note: For information on user privileges, see the topic List of User Privileges.

To access the Service Permissions tab, use the following steps:

  1. Log into the Orchestrator as a Partner.
  2. Select Administration.
  3. Select User Management, then select Service Permissions. The following screen displays:
    Figure 9. Service Permissions Tab - Partner
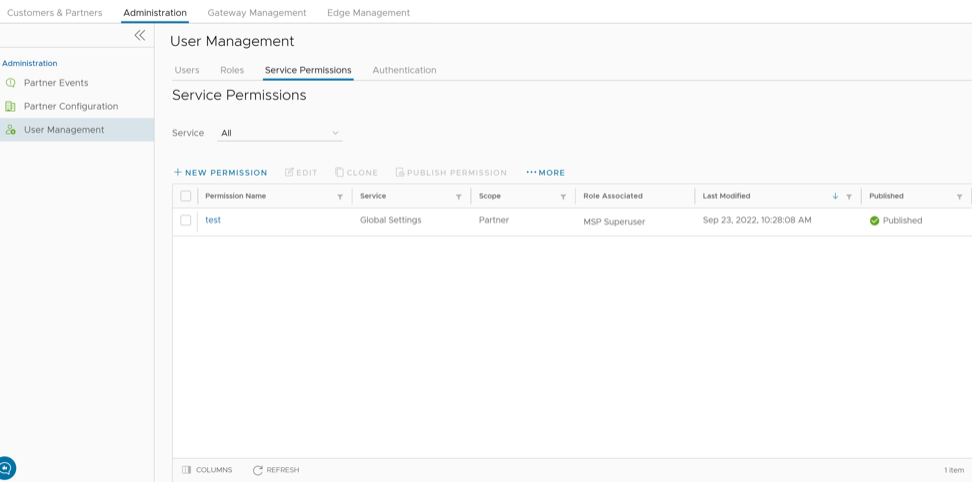
  4. On the Service Permissions screen, configure the following options:
    Table 9. Service Permissions Tab - Options and Descriptions
    Option Description
    Service Select one ofthe available services from the menu:
    • All
    • Global Settings
    • SD-WAN

    Each service comprises of a set of related permissions grouped together. Custom service permissions, if any, associated with the selected service display. By default, all of the custom service permissions display.

    New Permission Create a new set of privileges. The newly created permission displays in the table. For additional information, see New Permission.
    Edit Edit the settings of the selected permission. You can also select the link to the Permission Name to edit the settings.
    Clone Create a copy of the selected permission.
    Publish Permission Apply the customization available in the selected package to the existing permission. This option modifies the privileges only at the current level. Ifcustomizations available at the Operator level or a lower level for the same role, then the lower level takes precedence. For example, customizations defined by an Enterprise Superuser take precedence over customizations defined by an Operator Superuser.
    More Select from the following additional options:
    • Delete - Deletes the selected permission. You cannot delete a permission if already in use.
      Note: A permission can only be deleted if it is in a draft mode. The Delete option deactivates for a published permission. If you want to delete a published permission, you must reset the permission to system default, which changes it to draft mode and activates the Delete option for the permission.
    • Download JSON - Downloads the list of permissions into a file in JSON format.
    • Upload Permission - Upload a JSON file of a customized permission.
    • Unpublish Permissions - Unpublish the selected permission changing it to a 'Draft' state. You can modify the permission and save it again, which changes it to "Published" state.


  5. The table displays the following columns:
    Table 10. Service Permissions Column - Options and Descriptions
    Option Description
    Permission Name Displays the newly created permission.
    Service Displays the service of the new permission.
    Scope Displays the scope of the new permission.
    Role Associated Displays the associated roles using the same Privilege Bundle.
    Last Modified Displays the date and time when the permission was last modified.
    Published Displays either "Published" or "Draft" depending on the state of the permission.


  6. Configure the following additional options available on the Service Permissions tab:
    Table 11. Additional Options and Descriptions
    Option Description
    Columns Select and select the columns to display or hide on the page.
    Refresh Select to refresh the page to display the most current data.
    Note: Service Permissions have version dependencies, and a service permission created on an Orchestrator using an earlier software release does not have compatibility with an Orchestrator using a later release. For example, a service permission created on an Orchestrator running Release 3.4.x does not work properly if the Orchestrator upgrades to a 4.x Release. Also, a service permission created on an Orchestrator running Release 3.4.x does not work properly when the Orchestrator upgrades to 4.x.x Release. In such cases, the user must review and recreate the service permission for the newer release to ensure proper enforcement of all roles.

New Permission

You can customize the privileges and apply them to the existing permission in the Orchestrator.

To add a new permission, perform the following steps:

  1. Login to the Orchestrator as a Partner.
  2. Select Administration from the top menu.
  3. From the left menu, select User Management, then select the Service Permissions tab.
  4. Select New Permission. The following screen appears:
    Figure 10. New Permission
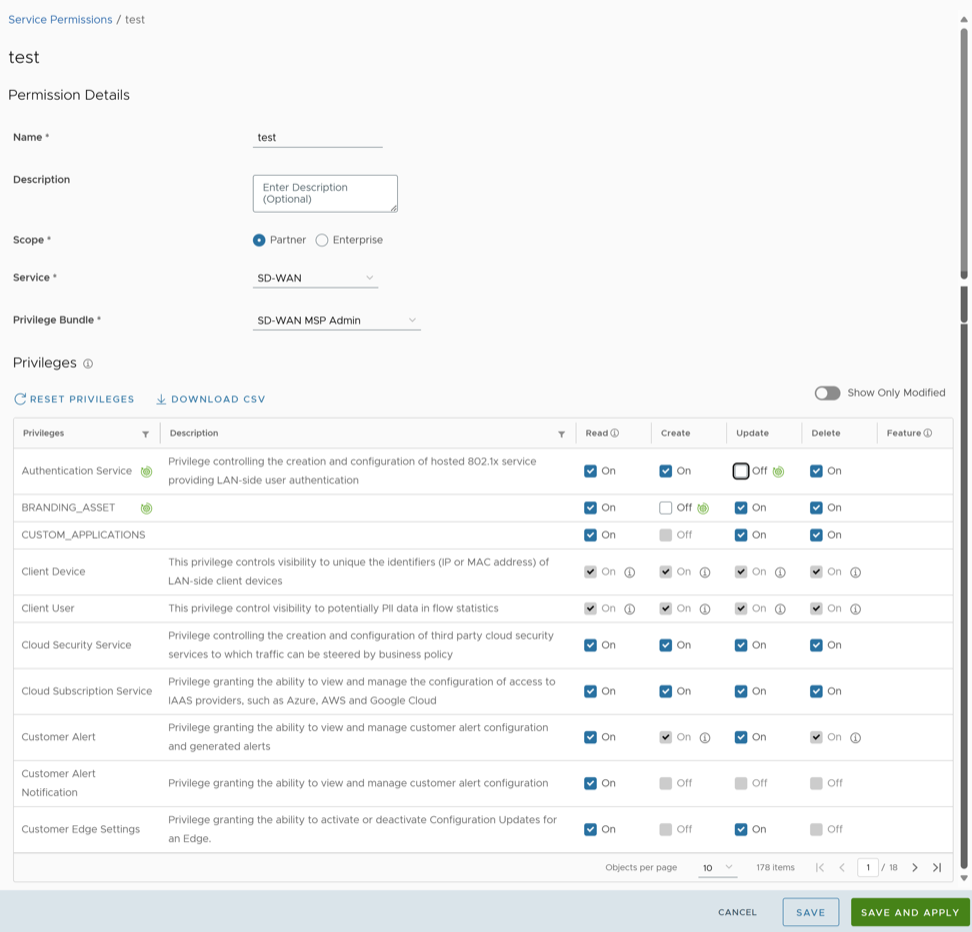
  5. Enter the following details to create a new permission:
    Table 12. New Permission - Options and Descriptions
    Option Description
    Name Enter an appropriate name for the permission.
    Description Enter a description. (Optional)
    Scope Select Partner or Enterprise as the scope. A Partner can customize the permissions for Partners and Customers.
    Service Select a service from the menu.
    • Global Settings
    • SD-WAN
    Privilege Bundle Select a privilege bundle from the menu. The privileges populate depending on the selected Service.
    Privileges Displays the list of privileges based on the selected Privilege Bundle. You can edit only those privileges eligible for customization.

    To activate or deactivate a specific privilege, select or clear the corresponding check box, in the Privileges table. The available check boxes are Read, Create, Update, and Delete.

    Starting from the release 6.4.0, a green icon displays whenever you modify a privilege. This icon displays next to the modified check box and the privilege name.

    Some privileges do not support selection of an independent action. Also, the Read action check box does not allow independent selection. When selected, all the other check boxes for that particular privilege also automatically become selected.

    Note: You can edit only those privileges eligible for customization.
  6. Enable Show Only Modified to view only the modified privileges.
  7. Select Reset Privileges to reset all the changes.
  8. Select Download CSV to download the list of all privileges, the descriptions, and associated actions, into a file in a CSV format. You can select from the below options:
    Table 13. Privileges List
    Default Privileges Downloads the original privileges ignoring all the current modifications.
    Modified Privileges Downloads only the modified privileges .
    Current Privileges Downloads all the current privileges.
    Note: If you select Reset Privileges, then select Download CSV, the Default Privileges and Current Privileges options both display the same list.
  9. Select Save to save the new permission. Select Save and Apply to save and publish the permission.
    Note: Save and Save and Apply activate only after you modify the permissions.
    The new permission displays on the Service Permissions page. If you create another permission using the same scope and service, the privilege displays the last modified settings by default.

Authentication

The Authentication feature allows users to set the authentication mode for a Partner and an Enterprise user.

To set the authentication mode, use the following steps:

  1. Log into the Orchestrator as a Partner and select Administration.
  2. Select User Management, and then select Authentication.
    The following screen displays:
    Figure 11. Authentication Tab - Partner
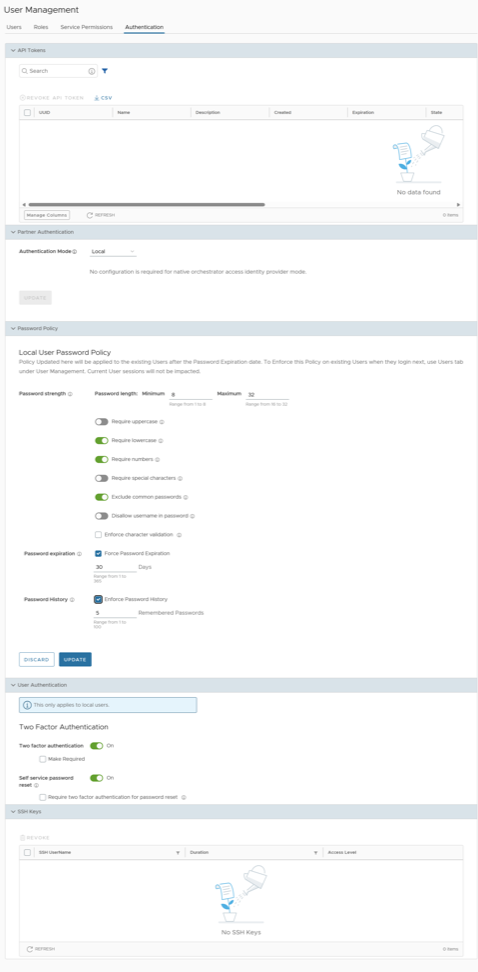
  3. Select the authentication mode:
    • Local - Enabled by default and does not require any additional configuration.
    • Single Sign-On - Single Sign-On (SSO) provides a session- and user-authentication service that allows users to log into multiple applications and websites with one set of credentials. Integrating an SSO service with Orchestrator enables Orchestrator to authenticate users from OpenID Connect (OIDC)-based Identity Providers (IdPs).
    1. To enable Single Sign On (SSO) for Orchestrator, users must enter the Orchestrator application details into the Identity Provider (IdP). See the following topics in the Arista VeloCloud SASE Global Settings Guide for step-by-step instructions to configure the following supported IdPs:
      • Azure AD
      • Okta
      • OneLogin
      • PingIdentity
    2. Users can configure the following options on selecting the Authentication Mode as Single Sign-on:
      Figure 12. Single Sign-on Authentication Options
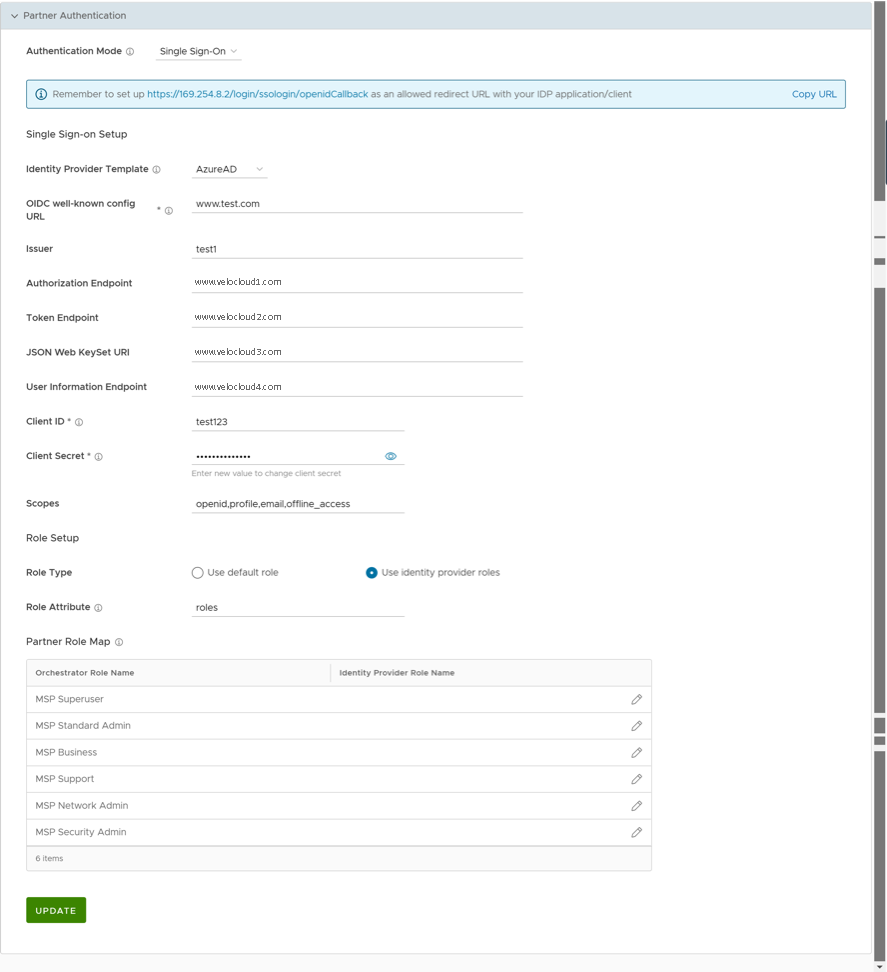
       

      Table 14. Single Sign-on Authentication - Options and Descriptions
      Option Description
      Identity Provider Template From the menu, select your preferred Identity Provider (IdP) configured for Single Sign On. This pre-populates fields specific to your IdP.
      Note: Users can also manually configure IdPs by selecting Others from the menu.
      OIDC well-known config URL Enter the OpenID Connect (OIDC) configuration URL for your IdP. For example, the URL format for Okta will be: https://{oauth-provider-url}/.well-known/openid-configuration.
      Issuer This field auto-populates based on your selected IdP.
      Authorization Endpoint This field auto-populates based on your selected IdP.
      Token Endpoint This field auto-populates based on your selected IdP.
      JSON Web KeySet URI This field auto-populates based on your selected IdP.
      User Information Endpoint This field auto-populates based on your selected IdP.
      Client ID Enter the client identifier provided by your IdP.
      Client Secret Enter the client secret code provided by your IdP, and used by the client to exchange an authorization code for a token.
      Scopes This field auto-populates based on your selected IdP.
      Role Type Select one of the following two options:
      • Use default role
      • Use identity provider roles
      Role Attribute Enter the name of the attribute set in the IdP to return roles.
      Partner Role Map Map the IdP-provided roles to each of the Partner user roles.


    3. Select Update to save the entered values. The SSO authentication setup completes in the Orchestrator.
  4. To create an SSH key, select User Information, and then select My Account > SSH Keys .
    Note: Users can create only one SSH Key per user.

    Partner users can also revoke an SSH Key.

    Select the Refresh option to refresh the section to display the most current data.

    For additional information, see Configure User Account Details.

  5. Configure two-factor authentication and self-service password reset in the User Authentication section.
    Figure 13. User Authentication
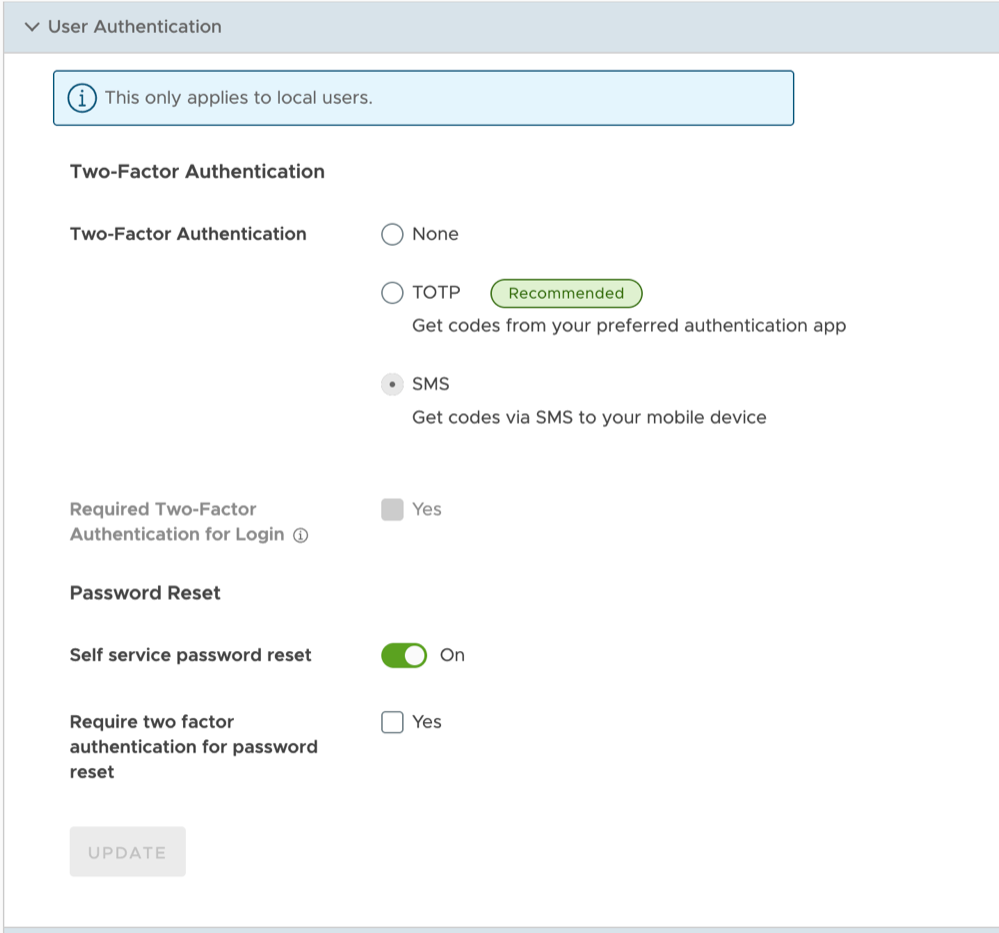
    Table 15. User Authentication - Options and Descriptions
    Option Description
    Two factor authentication Choose from the following options:
    • None: Select this option to disable the two-factor authentication.
    • TOTP: Select this option to activate the two-factor authentication via TOTP. The TOTP (Time-based One Time Passcode) authentication is more secure than the SMS-based authentication. After a user selects this option, a confirmation dialog appears. Activating TOTP prevents users from switching back to the SMS option. For more information, refer to Time-Based One Time Passcode (TOTP).
    • SMS: Select this option to activate the two-factor authentication via SMS. Only users with mobile phone numbers associated with their user accounts can activate this feature. This option appears only when a user has previously selected SMS. After the user selects TOTP and saves the selection, the SMS option disappears from the screen, preventing the user from switching back to it.
    Require two factor authentication for Login Selecting the TOTP option enables this checkbox. Select the Yes checkbox to make two-factor authentication mandatory for user logins, preventing users from skipping TOTP enrollment before proceeding with authentication. If the checkbox remains unselected, then users can skip the enrollment and immediately complete authentication. However, the Orchestrator continues to prompt users to enroll on every login until they complete enrollment.
    Self service password reset Enable this feature to allow users to change their passwords using the link on the Login screen.
    Require two factor authentication for password reset Select the Yes checkbox to make two-factor authentication mandatory during password resets.
  6. Select Update to save the changes.
  7. Configure password policy for local users.
    Starting from the release 6.4.0, Partner Superusers can set the password policies directly from the Authentication screen. The Local User Password Policy section appears when the Authentication Mode is set to Local.
    Figure 14. Password Policy
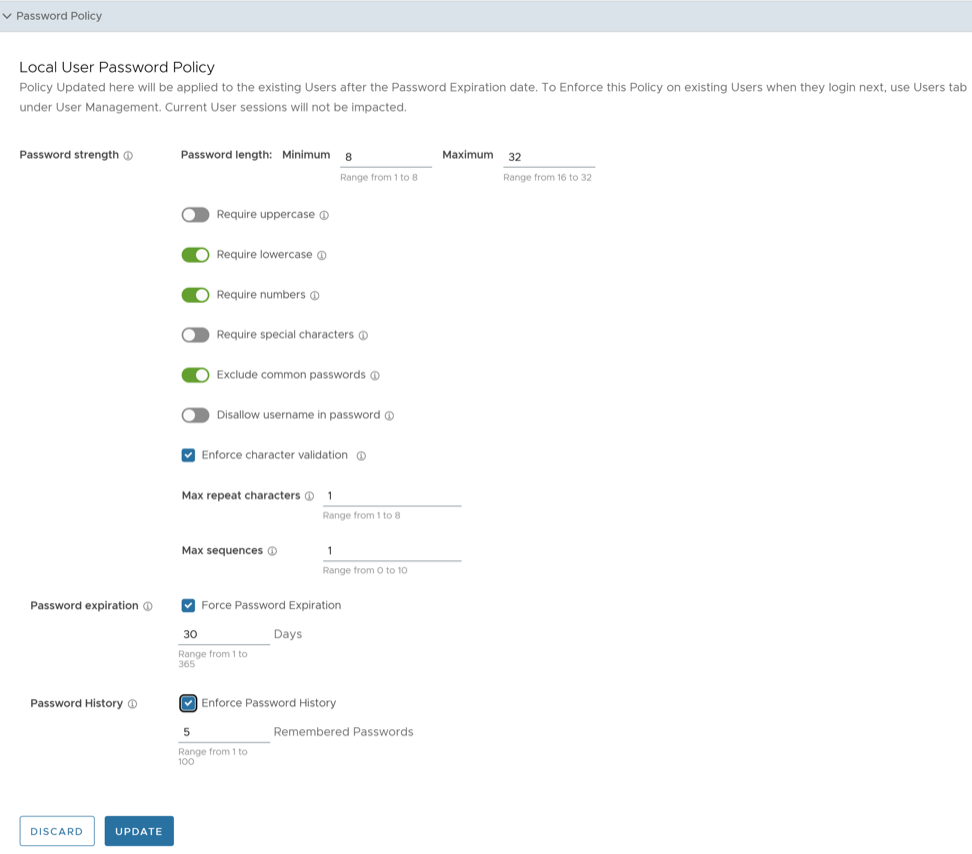
     

    Table 16. Password Policy - Options and Descriptions
    Option Description
    Password Strength
    Password length Specify the minimum and maximum length of the password. The minimum length value must be in the range from 1 to 8, whereas the maximum length value must be in the range from 16 to 32. The default values are 8 and 32 respectively.
    Require uppercase Enable this parameter. If activated, the password must contain at least one uppercase letter.
    Require lowercase Enable to activate this parameter. If activated, the password must contain at least one lowercase letter.
    Require numbers Enable to activate this parameter. If activated, the password must contain at least one number.
    Require special characters Enable to activate this parameter. If activated, the password must contain at least one special character. Hover the mouse on the information icon to view the valid special characters.
    Exclude common passwords Enable to activate this parameter. If activated, users are not allowed to use the most commonly used passwords.
    Disallow username in password Enable to activate this parameter. If activated, username cannot be set as the password.
    Enforce character validation Select to ensure that the password meets the following criteria for strength and security:
    • Max repeat characters: Enter the maximum number of characters repeated in the password. The accepted range is from 1 to 8. The default value is 1.
    • Max sequences: Enter the maximum number of consecutive characters or sequences allowed in the password. The accepted range is from 0 to 10. The default value is 1.
    Password Expiration Select Force Password Expiration and set the duration after which users must change their passwords. The accepted range is from 1 to 365. The default value is 30.
    Password History Select Enforce Password History and enter a value that specifies the number of previously created passwords that cannot be reused as the new password. This enhances the overall security. The accepted range is from 1 to 100. The default value is 5.

    After making changes to policy settings, select Update to save updated policy settings or select Discard to leave the settings unchanged. Users already logged in are not affected by this update.

    To enforce the new password policy, an Enterprise Superuser must perform the following steps:

    1. Navigate to User Management > Users , and select a user.
    2. Select Password > Enforce Policy , and then select Yes, Enforce.

      This forces the selected user to change their password as per the new password policy. Current user sessions do not terminate.

      The Password Modified column on the Users screen, displays the date and time when the user has modified the password.

  8. Configure session limits. To view the Session Limits section, an Operator user must navigate to the Orchestrator > System Properties , and set the value of the system property session.options.enableSessionTracking to True.
    Configure the following available options:
    Table 17. Session Limits - Options and Descriptions
    Option Description
    Concurrent logins Set a limit on concurrent logins per user. By default, Orchestrator selects Unlimited indicating that unlimited concurrent logins are allowed for the user.
    Session limits for each role Set a limit on the number of concurrent sessions based on user role. By default, Unlimited is selected, indicating that unlimited sessions are allowed for the role.
    Note: The roles already created by the Partner on the Roles tab display in this section.
  9. Select Update to save the selected values.

Time-Based One Time Passcode (TOTP)

Release 7.0.0 introduces a new feature, the Time-based One-Time Passcode (TOTP) mechanism, for Two Factor Authentication (2FA). This feature replaces the current text-based 2FA mechanism (SMS) and mandates all future 2FA to use TOTP. Arista recommends selecting the TOTP authentication because it is more secure than the SMS-based authentication.

Note: Only an Operator user can activate the TOTP feature for Partners and Customers.

When a user enables TOTP under User Management > Authentication , the Orchestrator prompts all users who log in to either enroll (if not already enrolled) or provide the TOTP to complete authentication.

The procedure below explains the enrollment flow.

  1. After enabling the TOTP, re-login to the VeloCloud Orchestrator.
    The following screen appears if the user has not completed the TOTP enrollment.
    Figure 15. TOTP Enrollment
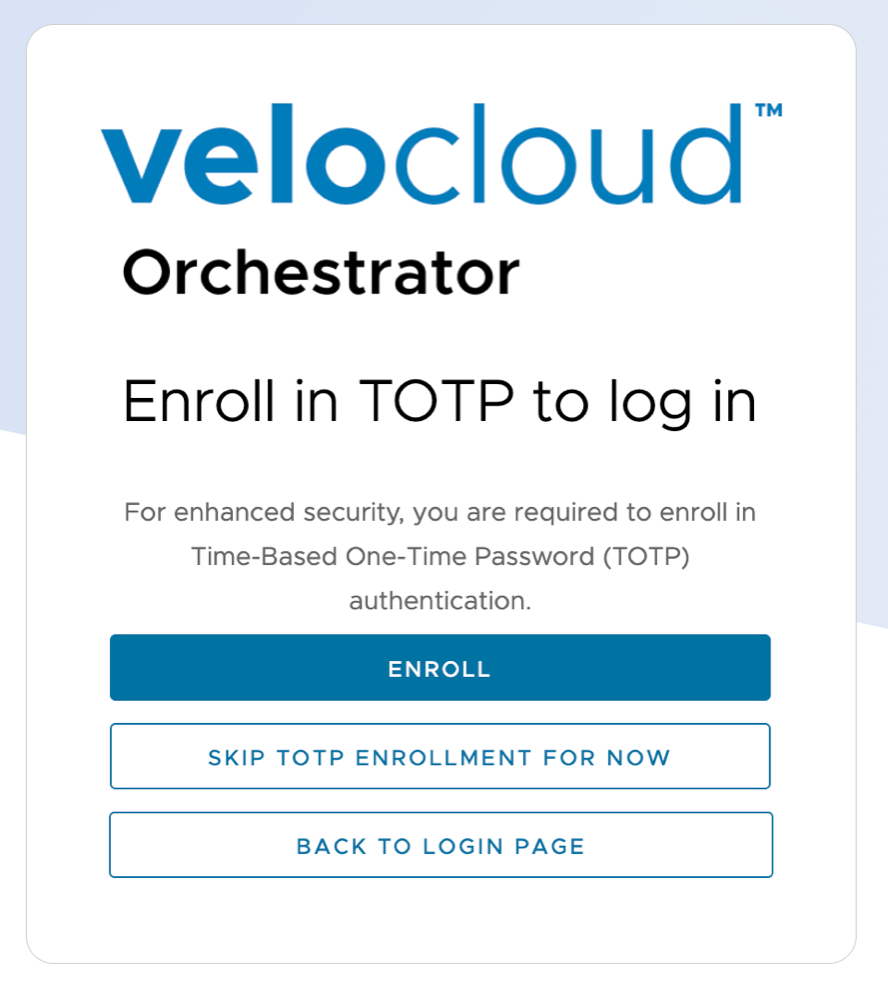
  2. Enroll: Perform the below steps.
    1. Click Enroll to start the TOTP enrollment.
      The email address verification screen appears.
    2. After verifying the email address, enter the OTP sent to that email.
    3. Select Verify.
      Figure 16. Setup the Authenticator App
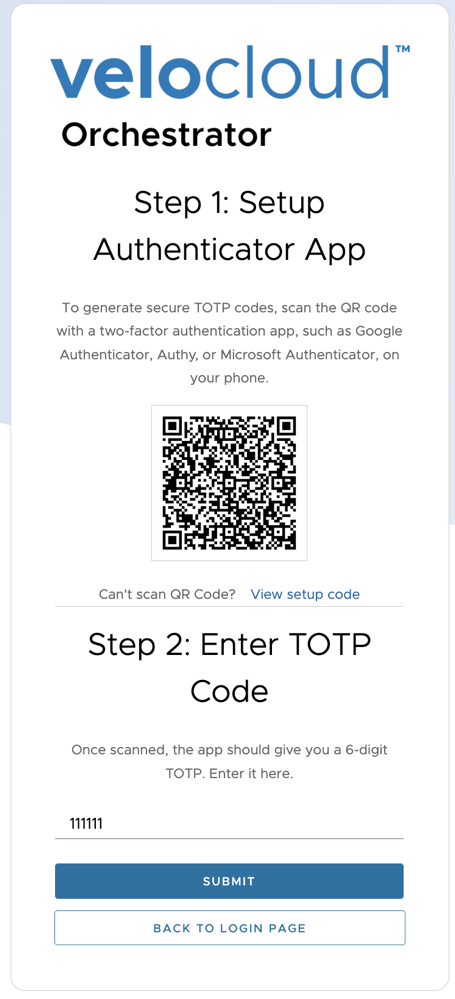
    4. Scan the QR code using an authenticator application on your mobile phone.
    5. Enter the six digit TOTP, and then select Submit.
      A success message appears on the screen.
    6. Select the Back To Login Page button.
    7. Enter the username and password, and select Login.
    8. Enter the new TOTP generated on the authenticator application, and then select Submit.
      Figure 17. Enter TOTP
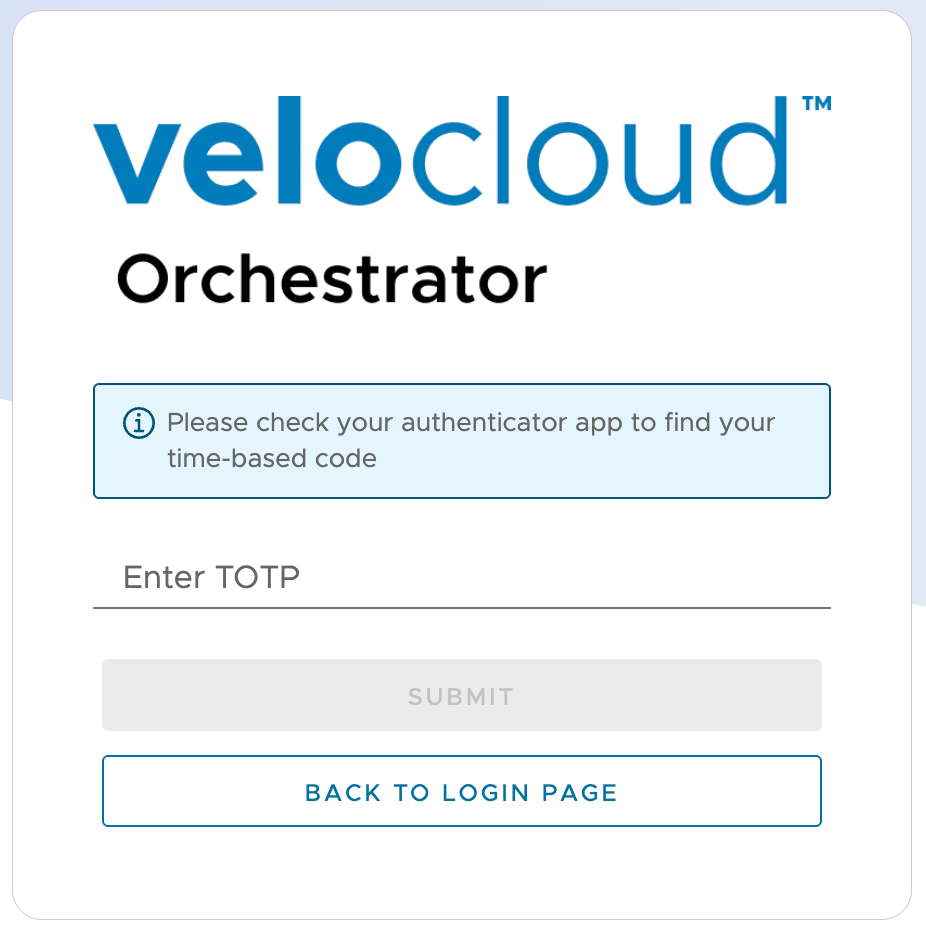
      Note: The Authenticator application generates a new TOTP every 30 seconds.
  3. Click Skip TOTP Enrollment for now to skip the enrollment temporarily. This option appears only when the Require two factor authentication for Login checkbox under the User Management > Authentication > User Authentication section remains clear.
  4. Click Back to Login Page to go to the user login page.

Resetting a TOTP

Users can reset TOTP from the My Account page.
  1. On the User Information panel, click My Account.
  2. In the Profile tab, select the Reset TOTP Enrollment button.
    Note: Changing the account password causes the TOTP reset. However, resetting TOTP does not require changing the password.

    For more information, see Configure User Account Details.

..