Virtual Edge Deployment
The Virtual Edge is available as a virtual machine that can be installed on standard hypervisors. This section describes the prerequisites and the installation procedure for deploying a Virtual Edge on KVM and VMware ESXi hypervisors.
Deployment Prerequisites for Virtual Edge
This topic discusses the requirements for Virtual Edge deployment.
Virtual Edge Requirements
- Supports 2, 4, 8, and 10 vCPU assignment.
Table 1. Virtual Edge Requirements 2 vCPU 4v CPU 8 vCPU 10 vCPU Minimum Memory (DRAM) 8 GB 16 GB 32 GB 32 GB Minimum Storage (Virtual Disk) 8 GB 8 GB 16 GB 16 GB - AES-NI CPU capability must be passed to the Virtual Edge appliance.
- Up to 8 vNICs (default is GE1 and GE2 LAN ports, and GE3-GE8 WAN ports).
Recommended Server Specifications
| NIC Chipset | Hardware | Specification |
|---|---|---|
| Intel 82599/82599ES | HP DL380G9 | http://www.hp.com/hpinfo/newsroom/press_kits/2014/ComputeEra/HP_ProLiantDL380_DataSheet.pdf |
| Intel X710/XL710 | Dell PowerEdge R640 | https://www.dell.com/en-us/work/shop/povw/poweredge-r640
|
| Intel X710/XL710 | Supermicro SYS-6018U-TRTP+ | https://www.supermicro.com/en/products/system/1U/6018/SYS-6018U-TRTP_.cfm
|
Recommended NIC Specifications
| Hardware Manufacturer | Firmware Version | Host Driver for Ubuntu 20.04.6 | Host Driver for Ubuntu 22.04.2 | Host Driver for ESXi 7.0U3 | Host Driver for ESXi 8.0U1a |
|---|---|---|---|---|---|
| Dual Port Intel Corporation Ethernet Controller XL710 for 40GbE QSFP+ | 7.10 | 2.20.12 | 2.20.12 | 1.11.2.5 and 1.11.3.5 | 1.11.2.5 and 1.11.3.5 |
| Dual Port Intel Corporation Ethernet Controller X710 for 10GbE SFP+ | 7.10 | 2.20.12 | 2.20.12 | 1.11.2.5 and 1.11.3.5 | 1.11.2.5 and 1.11.3.5 |
| Quad Port Intel Corporation Ethernet Controller X710 for 10GbE SFP+ | 7.10 | 2.20.12 | 2.20.12 | 1.11.2.5 and 1.11.3.5 | 1.11.2.5 and 1.11.3.5 |
Supported Operating Systems
- Ubuntu Linux Distribution
- Ubuntu 20.04.6 LTS
- Ubuntu 22.04.2 LTS
- VMware ESXi
- VMware ESXi 7.0U3 with VMware vSphere Web Client 7.0.
- VMware ESXi 8.0 U1a with VMware vSphere Web Client 8.0.
Firewall/NAT Requirements
- The Firewall must allow outbound traffic from the Virtual Edge to TCP/443 (for communication with the Orchestrator).
- The Firewall must allow traffic outbound to Internet on ports UDP/2426 (VCMP).
CPU Flags Requirements
For detailed information about CPU flags requirements to deploy Virtual Edge, see Special Considerations for Virtual Edge Deployment.
Special Considerations for Virtual Edge Deployment
- The SD-WAN Edge is a latency-sensitive application. Refer to the Arista Documentation to adjust the Virtual Machine (VM) as a latency-sensitive application.
- Recommended Host settings:
- BIOS settings to achieve highest performance:
- CPUs at 2.0 GHz or higher
- Enable Intel Virtualization Technology (Intel VT)
- Deactivate Hyper-threading
- Virtual Edge supports paravirtualized vNIC VMXNET 3 and passthrough vNIC SR-IOV:
- When using VMXNET3, deactivate SR-IOV on host BIOS and ESXi
- When using SR-IOV, enable SR-IOV on host BIOS and ESXi
- To enable SR-IOV on Arista and KVM, see:
- KVM- Activate SR-IOV on KVM
- Arista- Activate SR-IOV on Arista
- Deactivate power savings on CPU BIOS for maximum performance
- Activate CPU turbo
- CPU must support the AES-NI, SSSE3, SSE4, RDTSC, RDSEED, RDRAND instruction sets
- Recommend reserving 2 cores for Hypervisor workloads
For example, for a 10-core CPU system, recommend running one 8-core virtual edge or two 4-core virtual edge and reserve 2 cores for Hypervisor processes.
- For a dual socket host system, make sure the hypervisor is assigning network adapters, memory and CPU resources that are within the same socket (NUMA) boundary as the vCPUs assigned.
- BIOS settings to achieve highest performance:
- Recommended VM settings:
- CPU should be set to '100% reserved'
- CPU shares should be set to High
- Memory should be set to ‘100% reserved’
- Latency sensitivity should be set to High
- The default username for the SD-WAN Edge SSH console is root.
Cloud-init Creation
Cloud-init is a Linux package responsible for handling early initialization of instances. If available in the distributions, it allows for configuration of many common parameters of the instance directly after installation. This creates a fully functional instance that is configured based on a series of inputs. The cloud-init config is composed of two main configuration files, the metadata file and the user-data file. The meta-data contains the network configuration for the Edge, and the user-data contains the Edge Software configuration. The cloud-init file provides information that identifies the instance of the Virtual Edge being installed.
Cloud-init's behavior can be configured via user-data. User-data can be given by the user at the time of launching the instance. This is typically done by attaching a secondary disk in ISO format that cloud-init will look for at first boot time. This disk contains all early configuration data that will be applied at that time.
The Virtual Edge supports cloud-init and all essential configurations packaged in an ISO image.
Create the Cloud-init Metadata and User-data Files
- Create the meta-data file that contains the instance:
name.instance-id: vedge1
local-hostname: vedge1
- Add the network-interfaces section, shown below, to specify the WAN configuration. By default, all Edge WAN interfaces are configured for DHCP. Multiple interfaces can be specified.
root@ubuntu# cat meta-data instance-id: Virtual-Edge local-hostname: Virtual-Edge network-interfaces: GE1: mac_address: 52:54:00:79:19:3d GE2: mac_address: 52:54:00:67:a2:53 GE3: type: static ipaddr: 11.32.33.1 mac_address: 52:54:00:e4:a4:3d netmask: 255.255.255.0 gateway: 11.32.33.254 GE4: type: static ipaddr: 11.32.34.1 mac_address: 52:54:00:14:e5:bd netmask: 255.255.255.0 gateway: 11.32.34.254 - Create the user-data file. This file contains three main modules: Orchestrator, Activation Code, and Ignore Certificates Errors.
Table 4. Modules of User-data File Module Description vco IP Address/URL of the Orchestrator. activation_code Activation code for the Virtual Edge. The activation code is generated while creating an Edge instance on the Orchestrator. vco_ignore_cert_errors Option to verify or ignore any certificate validity errors. The activation code is generated while creating an Edge instance on the Orchestrator.
Important: There is no default password in Edge image. The password must be provided in cloud-config:#cloud-config password: passw0rd chpasswd: { expire: False } ssh_pwauth: True velocloud: vce: vco: 10.32.0.3 activation_code: F54F-GG4S-XGFI vco_ignore_cert_errors: true
Create the ISO File
Once you have completed your files, they need to be packaged into an ISO image. This ISO image is used as a virtual configuration CD with the virtual machine. This ISO image (called seed.iso in the example below), is created with the following command on Linux system:
genisoimage -output seed.iso -volid cidata -joliet -rock user-data meta-data network-dataIncluding the network-interfaces section is optional. If the section is not present, the DHCP option is used by default.
Once the ISO image is generated, transfer the image to a datastore on the host machine.
Install Virtual Edge
You can install Virtual Edge on KVM and VMware ESXi using a cloud-init config file. The cloud-init config contains interface configurations and the activation key of the Edge.
Ensure you have created the cloud-init meta-data and user-data files and have packaged the files into an ISO image file. For steps, see Cloud-init Creation.
- SR-IOV
- Linux Bridge
- OpenVSwitch Bridge
- On KVM, see Install Virtual Edge on KVM.
- On VMware ESXi, see Install Virtual Edge on VMware ESXi.
Activate SR-IOV on KVM
- Intel 82599/82599ES
- Intel X710/XL710
- Before using the Intel X710/XL710 cards in SR-IOV mode on KVM, make sure the supported Firmware and Driver versions specified in the Deployment Prerequisites for Virtual Edge section are installed correctly.
- SR-IOV mode is not supported if the KVM Virtual Edge is deployed with a High-Availability topology. For High-Availability deployments, ensure that SR-IOV is not enabled for that KVM Edge pair.
To enable the SR-IOV mode on KVM, perform the following steps.
To enable SR-IOV on KVM:
Validating SR-IOV (Optional)
You can quickly verify if your host machine has SR-IOV enabled by using the following command:
lspci | grep -i EthernetVerify if you have Virtual Functions:
01:10.0 Ethernet controller: Intel Corporation 82599 Ethernet Controller Virtual Function(rev 01)Install Virtual Edge on KVM
This topic describes how to install and activate the Virtual Edge on KVM using a cloud-init config file.
To run Virtual Edge on KVM using the libvirt:
The cloud-init already includes the activation key, generated while creating a new Virtual Edge on the Orchestrator. The Virtual Edge is configured with the config settings from the cloud-init file. This configures the interfaces as the Virtual Edge powers up. Once the Virtual Edge is online, it activates with the Orchestrator using the activation key. The Orchestrator IP address and the activation key have been defined in the cloud-init file.
Activate SR-IOV on Arista
- Intel 82599/82599ES
- Intel X710/XL710
Enabling SR-IOV on Arista is an optional configuration.
To activate SR-IOV on Arista:
- Make sure that your NIC card supports SR-IOV. Check the Hardware Compatibility List (HCL) at Arista Documentation.
- Brand Name: Intel
- I/O Device Type: Network
- Features: SR-IOV
Figure 1. Compatibility Guide 
The following KB article provides details of how to enable SR-IOV on the supported NIC: Enable SR-IOV on the supported NIC.
- Once you have a support NIC card, go to the specific host, select the Configure tab, and then choose Physical adapters.
Figure 2. Physical adapters 
- Reboot the hypervisor.
Figure 3. Reboot Hypervisor 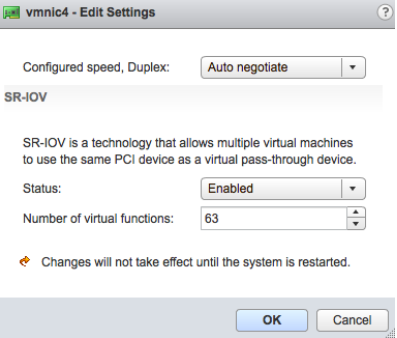
- If SR-IOV is successfully enabled, the number of Virtual Functions (VFs) will show under the particular NIC after ESXi reboots.
Figure 4. SR-IOV VFs 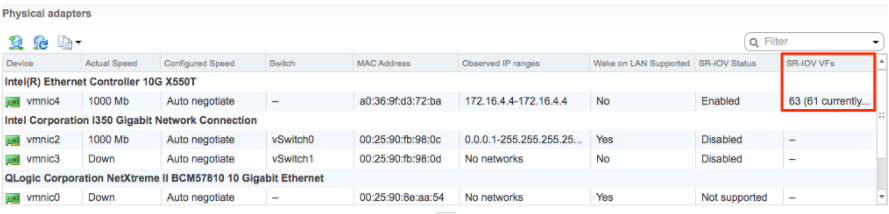 Note: To support VLAN tagging on SR-IOV interfaces, user must configure VLAN ID 4095 (Allow All) on the Port Group connected to the SR-IOV interface. For additional information, see VLAN Configuration.
Install Virtual Edge on VMware ESXi
This topic discusses how to install Virtual Edge on VMware ESXi.
If you decide to use SR-IOV mode, enable SR-IOV on Arista. For steps, see Activate SR-IOV on Arista.
To install Virtual Edge on VMware ESXi:
- Use the vSphere client to deploy an OVF template, and then select the Edge OVA file.
Figure 5. Deploy an OVF template 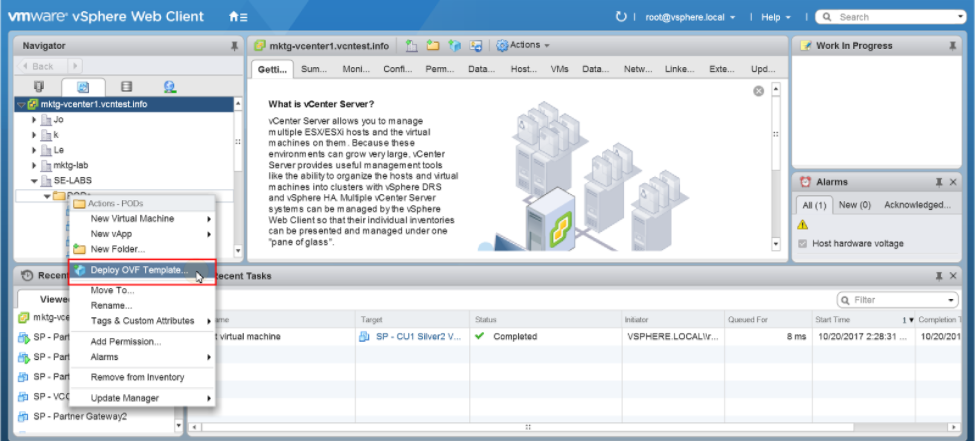
- Select an OVF template from an URL or Local file.
Figure 6. Select an OVF template 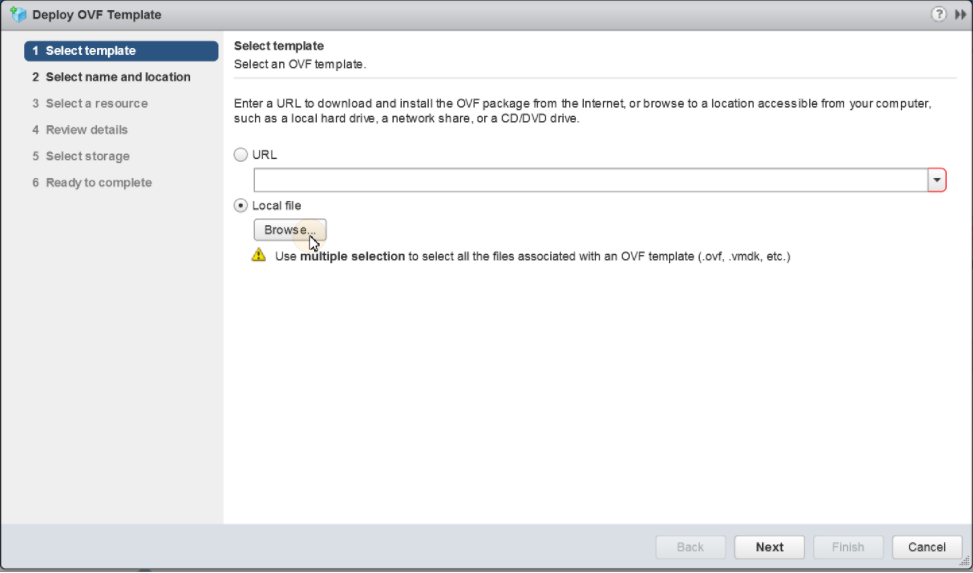
- Verify the template details.
Figure 7. Review Details 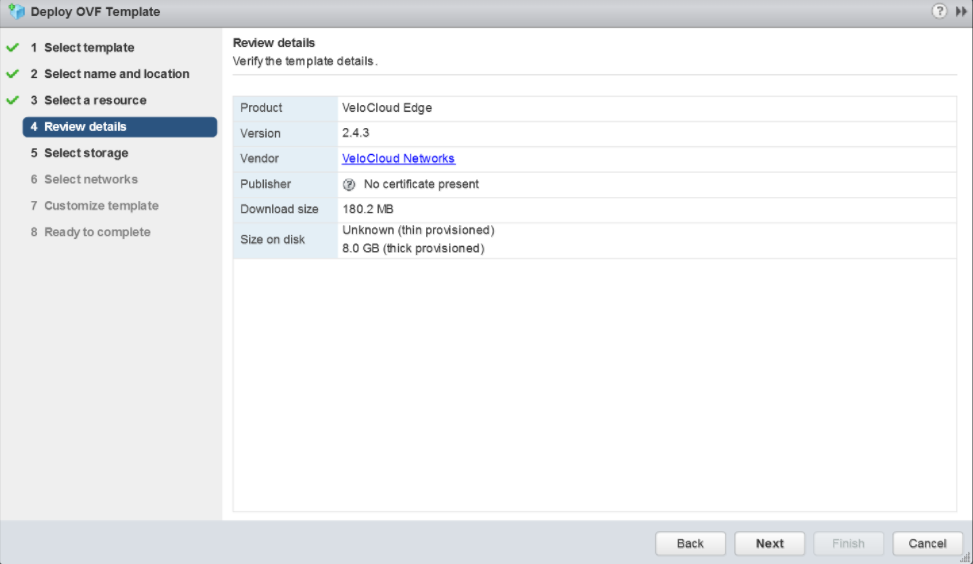
- Select the storage location to store the files for the deployment template.
Figure 8. Select Virtual Disk Format 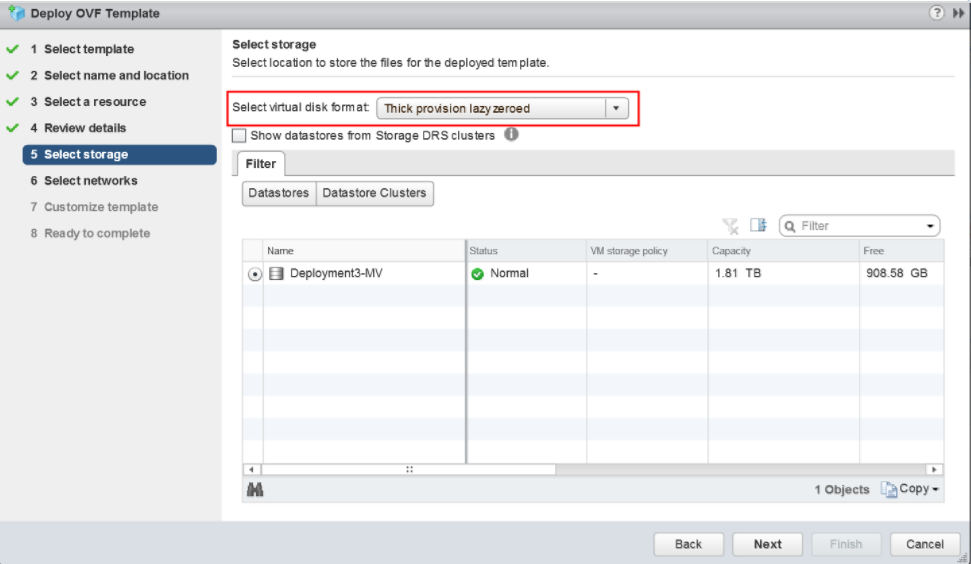
- Configure the networks for each of the interfaces.
Note: Skip this step if you are using a cloud-init file to provision the Virtual Edge on ESXi.
Figure 9. Select Networks 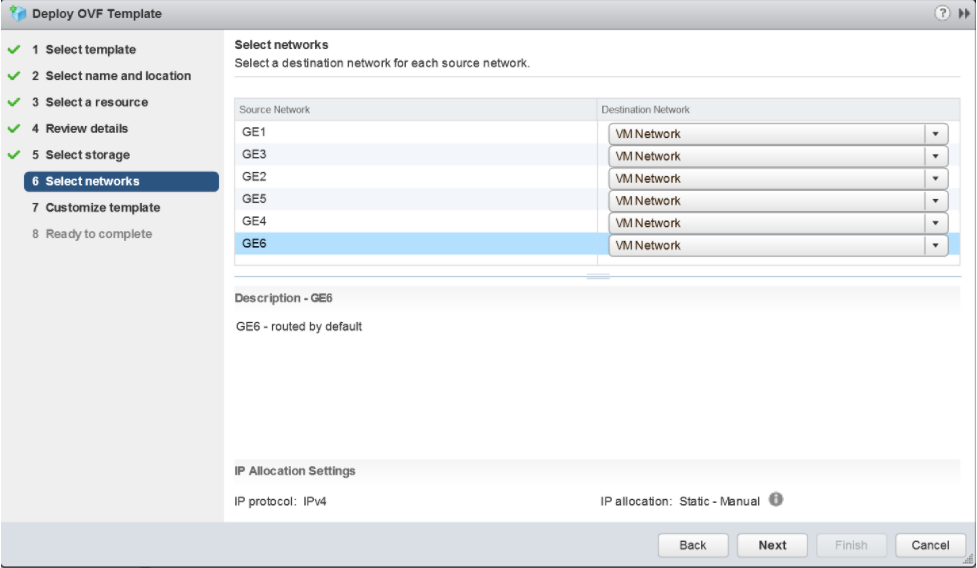
- Customize the template by specifying the deployment properties. The following image highlights:
- From the Orchestrator UI, retrieve the URL/IP Address. You will need this address for Step c below.
- Create a new Virtual Edge for the Enterprise. Once the Edge is created, copy the Activation Key. You will need the Activation Key for Step c" below.
Figure 10. Activation Key 
- On the customize template page shown in the image below, type in the Activation Code that you retrieved in Step b above, and the Orchestrator URL/IP Address retrieved in Step a above, into the corresponding fields.
Figure 11. Enter VCE Activation Code and VeloCloud Orchestrator Address 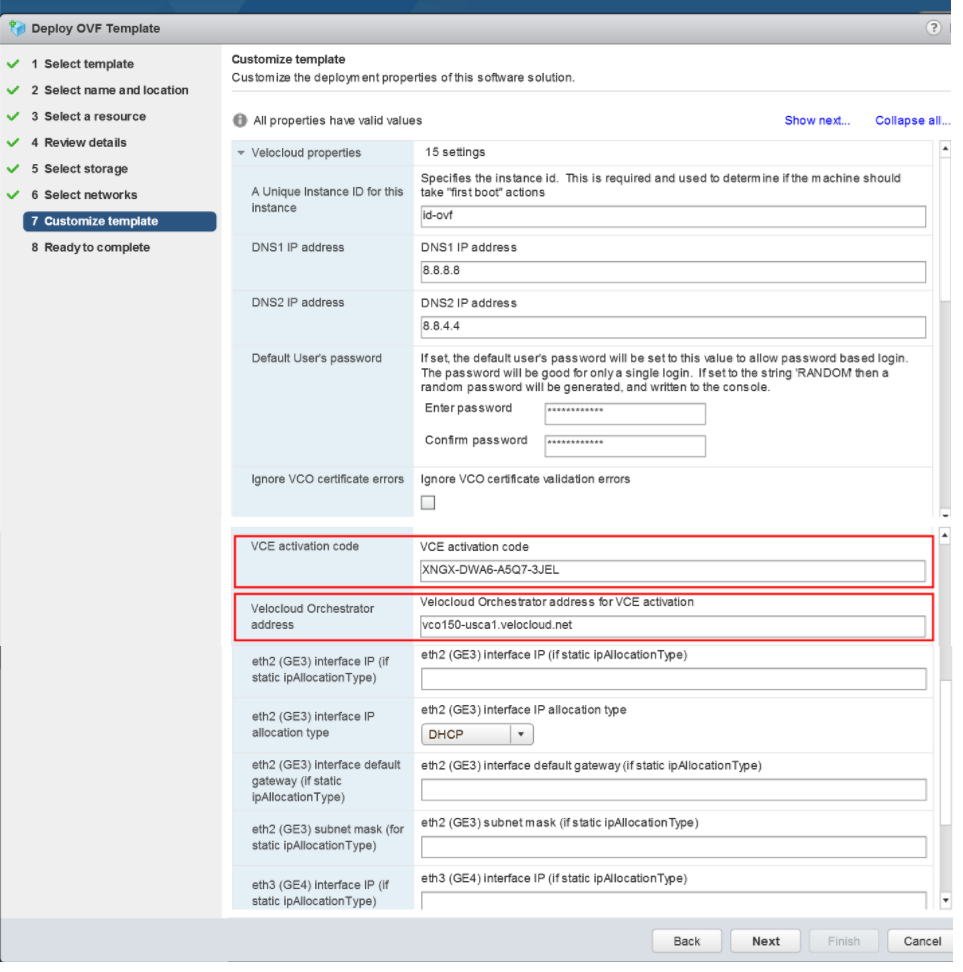
Figure 12. Customize Template 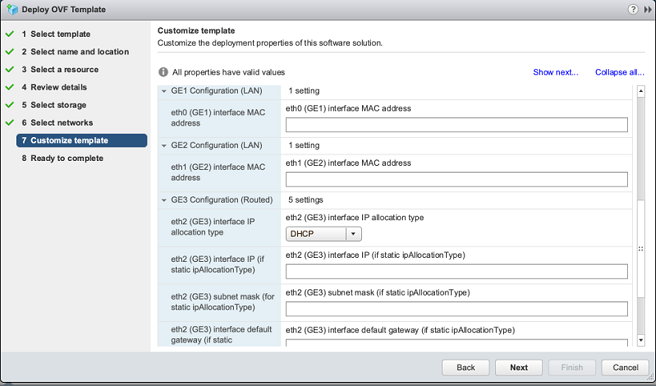
- Review the configuration data.
Figure 13. Review the configuration data 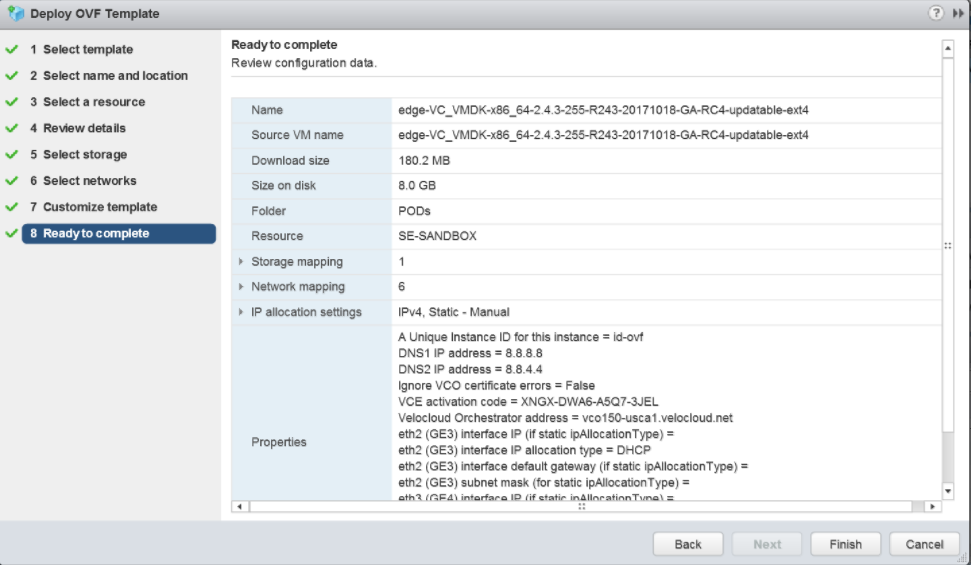
- Power on the Virtual Edge.
Figure 14. Power on the Virtual Edge 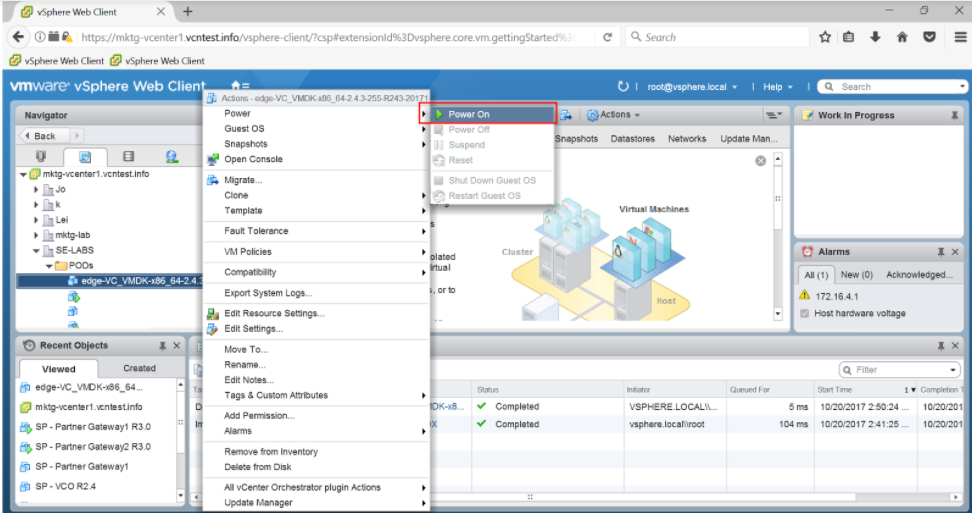 Once the Edge powers up, it establishes connectivity to the Orchestrator.