打印

Activate Edges

Users can deploy and activate Edges using the following two methods:
  • Edge Auto-activation (formerly known as Zero Touch Provisioning) — In this method, power-on the Edges and connect them to the internet. This causes the Edges to automatically start working as configured. For more information, refer to Activate SD-WAN Edges using Edge Auto-activation.
  • Email — This method ships Edges to the customer site with a factory-default configuration. Prior to activation, the Edges do not contain any configuration or credentials to connect to the Enterprise network. The administrator initiates an email with instructions to activate the Edges to the person in charge of installing Edges at the site. This person follows the instructions to activate the Edges. For more information, refer to Activate Edges Using Email.
The following table shows a comparison of activities allowed in each of the activation methods:
Table 1. Activation Methods
Activity Edge Auto-activation (Central NOC Activates) Email (Office Admin Activates)
No IT Visit Required
No Pre-staging Required
No Security Risk if Box Is Lost
No Site-by-site Link Profile Needed
No Device Tracking Needed  
Requires Email to Office Admin  
Requires Knowledge of Device to Site  

Activate SD-WAN Edges using Edge Auto-activation

Edge Auto-activation allows users to activate Edges by powering on the Edges and connecting them to the Internet.

Note: Release 5.1.0 introduces the term Edge Auto-activation to replace Zero Touch Provisioning.

This method eliminates the need of an activation link. Using this feature, the Service Provider can preconfigure the Edges and ship them to the Customers. Customers must turn on the Edges and connect the cables to the Internet to activate them. This method of Edge activation is also useful when the person at the remote site is unable to connect a laptop/tablet/phone to the Edge, and therefore cannot use an email or cannot click an activation code/URL.

Note:
  • Edge Auto-activation supports Edge models: 510, 510 LTE, 6x0, 7x0 and 3xx0.
  • For Edge Auto-activation to work, use the Orchestrator software version 4.3.0 or later.
As an Enterprise user, complete the following tasks to activate Edges using Edge Auto-activation:

Sign-up for Edge Auto-activation

  • The Enterprise Superuser must verify the Subscription Identifier (SID) for Secure Access Service Edge (SASE) orders received at booking. Contact Arista Support if a valid SID is unavailable.
  • Successful push activation requires outbound internet connectivity via DHCP.
Starting with the 5.1.0 release, the procedure for signing up for Edge Auto-activation has completely changed. Users no longer need to activate it in System Settings.

To sign-up for Edge Auto-activation, follow the below steps:

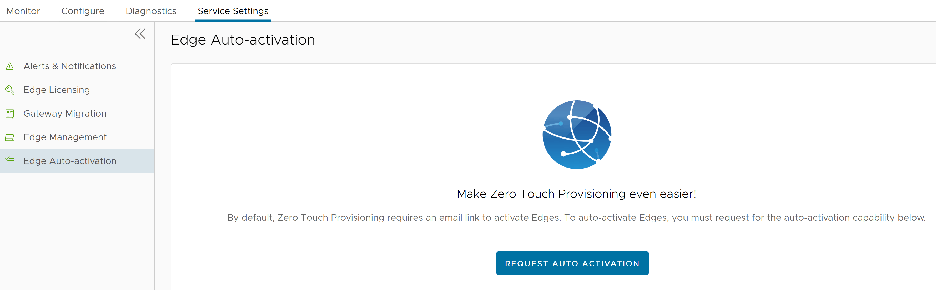
  1. In the SD-WAN service of the Enterprise portal, select Service Settings > Edge Auto-activation .
    Figure 1. Edge Auto-activation
  2. Select Request Auto-Activation. Enter the Subscription ID (SID), and then select the Request Auto-Activation button at the bottom of the pop-up window.
    Note: Enter the Subscription ID (SID) only during the first login. Access to Edge Auto-activation requires successful validation of the SID. The validation process may take up to 3 to 5 days. Contact the customer support team to update an incorrect SID.
Assign a Profile and a license to the Edges. For instructions, see Assign Profile and License to Edges.

Assign Profile and License to Edges

Sign-up for Edge Auto-activation to view the list of Edges on the Available Inventory page. For instructions, refer to Sign-up for Edge Auto-activation.
To assign Profile and License to the Edges:
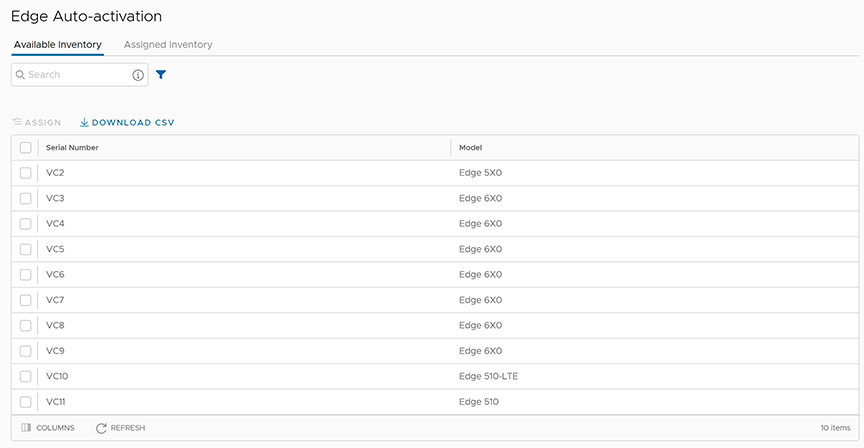
  1. In the SD-WAN service of the Enterprise portal, select Service Settings > Edge Auto-activation .
    Figure 2. Edge Auto-activation
  2. Select the Available Inventory tab that displays the list of unassigned Edges with Serial Number and Model.
    Note: The Available Inventory tab displays only those Edges shipped after the successful completion of the sign-up process. Future orders must include the assigned SID to ensure correct inventory reflection.
  3. Select the required Edges, and then select Assign.
    The Edge Assignment window appears:
    Figure 3. Edge Assignment
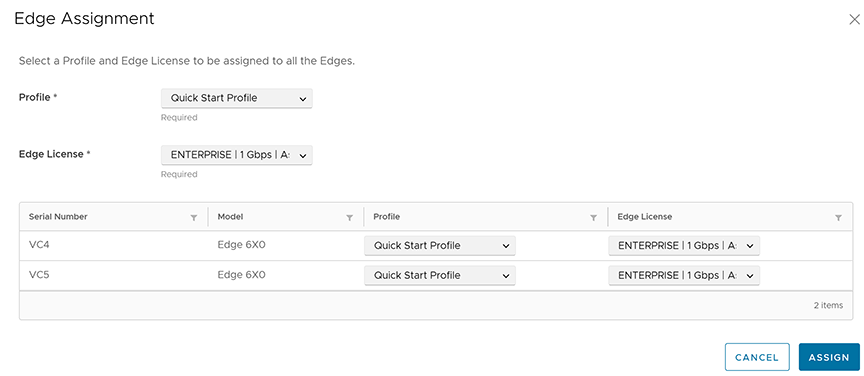
  4. Select the required Profile and License from the Profile and Edge License drop-down menus to assign them to all Edges in the inventory. Choose to override these settings for a specific Edge by selecting the appropriate Profile and License in the table.
  5. Select the Assign button. The Assigned Inventory tab displays Edges with assigned Profiles and Licenses. The Inventory State for assigned Edges reflects Assigned to Customer, while the Edge State indicates Pending.
  6. The following additional options are available on the Edge Auto-activation page:
    Table 2. Edge Auto-activation - Options and Descriptions
    Option Description
    Search Enter a search term to search for the matching text across the page. Use the advanced search option to narrow down the search results.
    Download CSV Select to download the list of Edges in an excel format.
    Columns Select and select the columns to be displayed or hidden on the page.
    Refresh Select to refresh the page to display the most current data.

Power on the assigned physical Edges and connect them to the internet. This connection redirects the Edges to the Orchestrator for automatic activation. After an Edge activates, the Assigned Inventory tab updates the Edge State from Pending to Activated.

Assign Inventory to an Edge

Assigning a profile and license to an Edge and powering it on enables deletion within the Orchestrator. In the event of accidental deletion, provisioning a new logical Edge and reassigning the inventory allows the Edge Auto-activation feature to activate the physical Edge upon power-on.
  1. In the SD-WAN service of the Enterprise portal, select Configure > Edges .
  2. Select Add Edge.
    The Provision an Edge page appears.
  3. Select a name for the Edge, and then select the required model, profile, and license.
  4. Select Add Edge.
    The newly added logical Edge appears on the Available Inventory page of the Edge Auto-activation window.
  5. Select this logical Edge entry, and then select Assign.
  6. Select the Profile and Edge License in the Edge Assignment window, and then select Assign.

Activate Edges Using Email

This method involves shipping the Edge to the Customer site with a factory-default configuration. Before activation, the Edge contains no configuration or credentials to connect to the Enterprise network.

Complete the following steps to activate Edges using the Email method:

  1. Send an Activation Email. The administrator initiates the activation process by sending an activation procedure email to the person who will install the Edge, typically a Site Contact. For additional information, refer to Send Edge Activation Email.
  2. Activate the Edge Device. The instructions in the activation procedure email activates the Edge device. For additional information, refer to Activate an Edge Device.

Send Edge Activation Email

The administrator initiates the activation process of an Edge by sending an activation procedure Email to the person installing the Edge, typically a Site Contact.

To send the Edge Activation Email:

  1. In the SD-WAN service of the Enterprise portal, select Configure > Edges .
    The Edges page displays the existing Profiles.
  2. Select the link to the Edge or select the View link in the Device column of the Edge.
  3. Select the Overview tab.
    The Edge Status section displays an option to send an activation email for any unactivated Edge.
    Figure 4. Edge Status
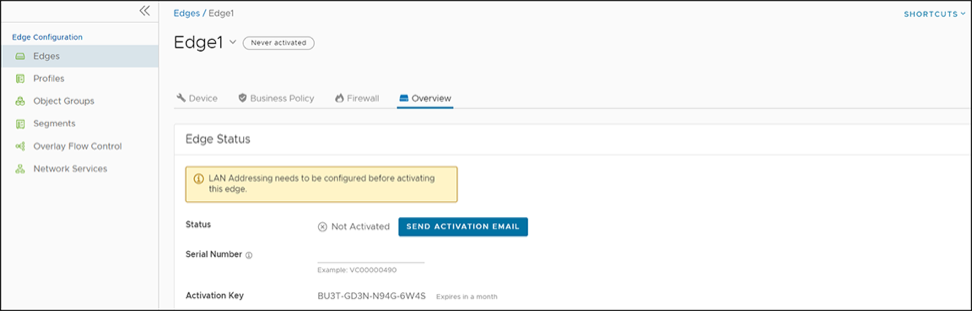
  4. Select Send Activation Email.
    Figure 5. Send Activation Email
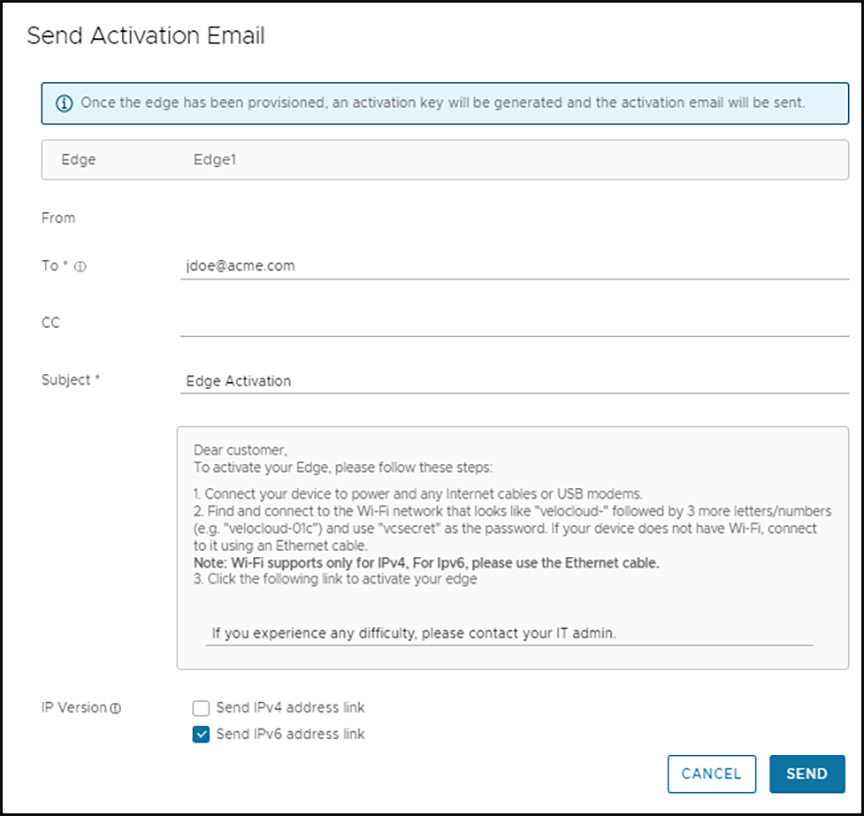
  5. Enter the details like Email address of the recipient, the Site contact, and Subject line. A default Email message is available. If required, add the contact details of IT Admin in the message. Select the IP version of the activation link. Choose a link containing an IPv4 address, an IPv6 address, or both.
  6. Select Send and the activation Email is sent to the Site contact.
    The Site contact activates the Edge after receiving the activation email. For additional information, refer to Activate an Edge Device.
    Note:
    • For the Edge 510 LTE device, the Activation Email includes Cellular Settings such as SIM PIN, Network, APN, and Username. The activation process requires a supported factory default image.
    • For 610, 620, 640, 680, and 610 LTE devices with SFPs configured for ADSL2/VDSL2, the activation email includes configuration settings such as Profile, PVC, VPC, etc. The activation process requires a supported factory default image.
    Remote Diagnostics for 510 LTE, 6x0, and 7x0 Devices:
    • Configuring the SD-WAN Edge 510 LTE device enables the “LTE Modem Information” diagnostic test for troubleshooting. The LTE Modem Information diagnostic test retrieves diagnostic information, such as signal strength, connection status, and more.
    • The DSL Status diagnostic test is available only for the 610, 620, 640, and 680 devices. Running this test shows the DSL status, which includes information such as Mode (Standard or DSL), Profile, xDSL Mode, and more.

    For information on how to run a diagnostic test, refer to Arista VeloCloud SD-WAN Troubleshooting Guide.

Activate an Edge Device

The Site Contact performs the steps outlined in the Edge activation procedure email.

In general, the Site Contact completes the following steps:

  1. Connect the Edge to a power source and insert any WAN link cables or USB modems for Internet connectivity.
  2. Connect a personal computer or mobile device (with access to the activation email) to an Edge by one of two methods:
    Note: The Edge device prevents the connected personal computer or mobile device from accessing the public Internet until activation.
    1. Find and connect to the Wi-Fi network that looks like velocloud- followed by three more letters/numbers (for example, velocloud-01c) with the password vcsecret.
      Note: Refer to the Wi-Fi SSID from the Edge device. The default Wi-Fi is vc-wifi. The Edge activation email provides instructions for using one or more Wi-Fi connections.
    2. If the Edge is not Wi-Fi capable (for example, a 6x0N model or a 3x00 model), use an Ethernet cable to connect to either an Ethernet-equipped computer or a mobile device with an Ethernet adapter to one of the Edge’s LAN ports.
      Note: For additional information about using either an iOS or Android mobile device with an Ethernet adapter to activate an Edge, refer to the below sections:
  3. Select the hyperlink in the email to activate the Edge.

    During the Edge activation, the activation status screen appears on the connected device.

    The Edge downloads the configuration and software from the Orchestrator and reboots multiple times to apply the software update. If the Edge has a front LED status light, that light would blink and change colors multiple times during the activation process.

    Once the Edge activation process successfully completes, the Edge is ready for service (if the Edge has a front LED status light, the light appears as solid green). The Edge routes network traffic once activation completes. In addition, more advanced functions such as monitoring, testing, and troubleshooting are also available.

Edge Activation using an iOS Device and an Ethernet Cable

This procedure requires the following components:
  • iPhone/iPad with email access
  • Ethernet adapter suitable for phone or tablet
There are multiple ways to activate a VeloCloud SD-WAN Edge. Arista recommends to use the Edge Auto-activation push activation whenever possible. Alternatively, use the email activation (pull activation) method using an iOS device and an Ethernet cable.
Note: The example used here is an Edge 540 and an iPhone 12 Pro Max. This process also works with other Edges and iPhone/iPad models.
  1. Complete the Edge configuration on the Orchestrator software. For details, refer to Configure Device Settings for Edges.
  2. Navigate to Configure > Edges > Edge Overview tab, and then select the Send Activation Email button.
  3. Enter the email address of the person activating the Edge, and then select Send.
  4. Power up the Edge, and then connect it to an available internet connection using an Ethernet cable.
    Note: Check the Edge Activation Guides for model-specific details to determine the correct port.
  5. Connect an Ethernet adapter to a phone, and then connect the Edge’s LAN port to the Ethernet adapter.
    Note: The Edge acquires a DHCP IP address from the ISP on the WAN (uplink) by default. The Edge also assigns a DHCP address to the phone connected to the LAN port. When the WAN connection is fully operational, the cloud LED on the Edge's front panel turns green.
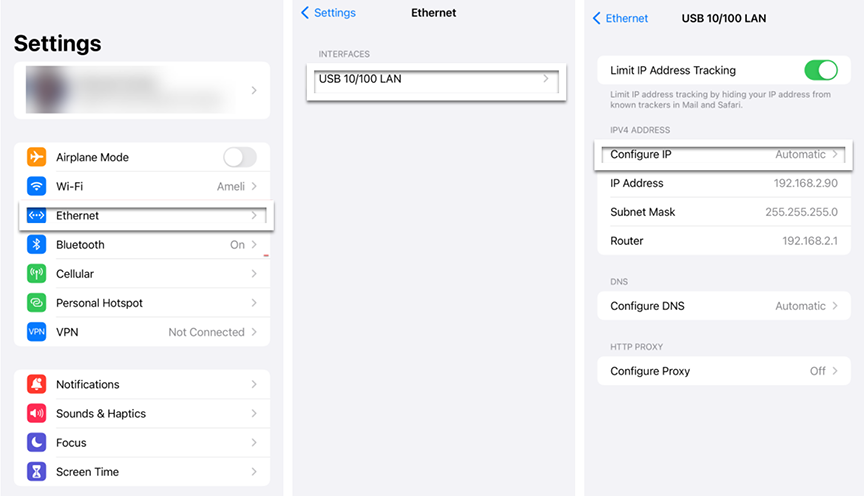
  6. In an iOS device, go to Settings > Ethernet . Select the appropriate interface. Under the IPv4 Address, select Configure IP as Automatic.
    Figure 6. Ethernet Settings
  7. Open the activation email from the phone, and then select the activation link displayed at the bottom of the screen to activate the Edge.
    The following screenshot is an example:
    Figure 7. Send Activation Email

    The phone screen shows an Activation successful message once the process completes.

Edge Activationusing an Android Device and an Ethernet Cable

This procedure requires the following components:
  • Android phone with email access
  • Ethernet adapter suitable for phone
The procedure below discusses the Edge email activation (pull activation) using an Android device and an Ethernet cable.
Note: The example used here is an Edge 610 and a Samsung Galaxy S10+ smartphone. This process also works with other Edges and Android phone models.
  1. Complete the Edge configuration on the Orchestrator software. For details, refer to Configure Device Settings for Edges.
  2. Navigate to Configure > Edges > Edge Overview tab, and then select the Send Activation Email button.
  3. Enter the email address of the person activating the Edge, and then select Send.
  4. Power up the Edge, and then connect it to an available internet connection using an Ethernet cable.
    Note: Check the Edge Activation Guides for model-specific details to determine the correct port.
  5. Connect an Ethernet adapter to a phone, and then connect the Edge’s LAN port to the Ethernet adapter.
    Note: The Edge acquires a DHCP IP address from the ISP on the WAN (uplink) by default. The Edge also assigns a DHCP address to the phone connected to the LAN port. When the WAN connection is fully operational, the cloud LED on the Edge's front panel turns green.
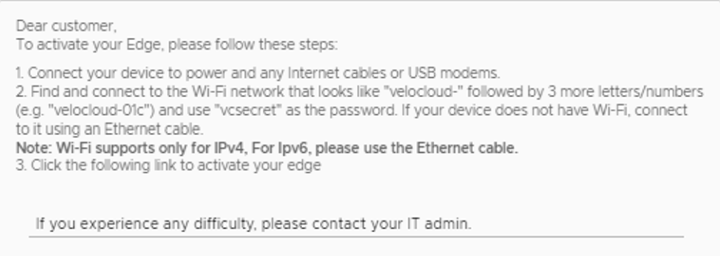
  6. Open the activation email from the phone, and then select the activation link displayed at the bottom of the screen to activate the Edge.
    The following screenshot is an example:
    Figure 8. Edge Activation Email
    The phone screen shows an Activation successful message once the process completes.

Request RMA Reactivation

Initiate a Return Merchandise Authorization (RMA) request either to return the existing Edge or to replace an Edge.

There are several scenarios that require an Edge RMA reactivation. Following are the two most common scenarios:
  • Replace an Edge due to a malfunction: A typical scenario that requires an Edge RMA reactivation when a malfunctioned Edge of the same model needs replacement. For example, a customer needs to replace a 520 Edge model with another 520 Edge model.
  • Upgrade an Edge hardware model: To replace an Edge with a different Edge model than the original, provision a new Edge in the Orchestrator and manually replicate the configuration from the old Edge to the new Edge before deleting the old Edge from the Enterprise. Use a different hardware model when performing an RMA Reactivation.
    CAUTION: Activating the new Edge deletes various configurations, such as Edge-override interface settings. As a result, the Edge may lose connectivity until the administrator reconfigures these settings.
Note: Only activated Edges support RMA reactivation request.
Initiate the RMA reactivation request using one of the following methods:

Request RMA Reactivation Using Edge Auto-activation

To request RMA reactivation using Edge Auto-activation:
  1. Log in to the Orchestrator, and then in the SD-WAN service of the Enterprise portal, go to Configure > Edges .
  2. Select the Edge for replacement.
    The Edge Overview page appears.
  3. Scroll down to the RMA Reactivation area, and then select Request Reactivation to generate a new activation key.
    The status of the Edge changes to Reactivation Pending mode.
    Note: The reactivation key is valid for one month only. When the key expires, a warning message appears. To generate a new key, select Generate New Activation Key. For details, refer to the RMA Reactivation section in View Edge Information.
  4. In the RMA Serial Number field, enter the serial number of the new Edge that needs activation.
  5. From the RMA Model drop-down menu, select the hardware model of the new Edge that needs activation.
    Note: If the Serial Number and the hardware model do not match the new Edge, the activation fails.
  6. Select Update.
    The new Edge's status changes to Reactivation Pending, and the old Edge's status changes to RMA Requested.
  7. To view the Edge State, go to Service Settings > Edge Auto-activation .
  8. Complete the following tasks to activate the new Edge:
    1. Disconnect the old Edge from the power and network.
    2. Connect the new Edge to the power and network. Verify the Edge’s internet connection.
    The new Edge connects to the Orchestrator for automatic activation. The new Edge's status changes to Activated.

Return the old Edge to clear the RMA Requested logical entry from the Service Settings > Edge Auto-activation page.

Request RMA Reactivation Using Email

To request RMA reactivation using email:
  1. Log in to the Orchestrator, and then in the SD-WAN service of the Enterprise portal, go to Configure > Edges .
  2. Select the Edge for replacement.
    The Edge Overview page appears.
  3. Scroll down to the RMA Reactivation area, and then select Request Reactivation to generate a new activation key. The status of the Edge changes to Reactivation Pending mode.
    Note: The reactivation key is valid for one month only. When the key expires, a warning message appears. To generate a new key, select Generate New Activation Key. For details, refer to RMA Reactivation section in View Edge Information.
  4. Select Send Activation Email to initiate the Edge activation Email with instructions. The Email consists of the instructions along with the activation URL. The URL displays the Activation key and the IP address of the Orchestrator.
  5. Complete the following tasks to activate the new Edge:
    1. Disconnect the old Edge from the power and network.
    2. Connect the new Edge to the power and network. Verify the Edge’s internet connection.
    3. Follow the activation instructions in the email. Select the activation link in the email to activate the Edge.
    The Edge downloads the configuration and software from the Orchestrator to complete the activation.
..