Print

Manage Customers

The Manage Customers option allows users to create new Customers, configure the Customer capabilities, clone the existing configuration, and to configure other Customer settings.
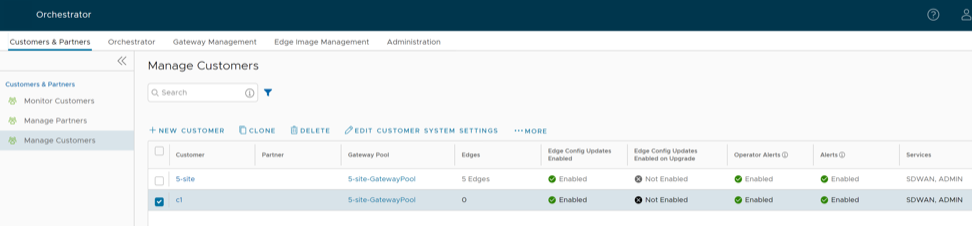
  1. In the Operator portal, navigate to Customers & Partners > Manage Customers .
    Figure 1. Manage Customers
  2. Perform the following actions:
    Table 1. Manage Customers - Options and Descriptions
    Option Description
    Search Enter a search term to search for the matching text across the table. Use the advanced search option to narrow down the search results.
    New Customer Select this option to add a new Customer. For more information, see Create New Customer
    Clone Clones the selected Customer's existing configurations. The user can select any of the additional clone attributes. For more information, see Clone a Customer.
    Delete Deletes the selected Customers. Enter the number of selected Customers in the pop-up window, and then select Delete.
    Note: Ensure the user removes all Edges associated with the selected Customer before deleting the Customer.
    Edit Customer System Settings Allows the user to edit the customer's system settings. For more information, see the Enterprise Settings section in the VeloCloud SD-WAN Administration Guide.
    Stage to Bastion Select to stage a Customer to the Bastion Orchestrator.
    Note: Stage to Bastion and Unstage from Bastion options are available only when the Bastion Orchestrator feature is activated using the session.options.enableBastionOrchestrator system property.

    For additional information, see Bastion Orchestrator Configuration Guide.

  3. Select More to perform the following actions:
    Table 2. Additional Option Descriptions
    Option Description
    Unstage from Bastion Removes a Customer from the Bastion Orchestrator.
    Edit Customer Edge Management Allows to edit the Edge Management feature for the selected Customers.
    Transfer to Partner Assigns the selected Customer to a Partner. The user can select an existing Partner from the drop-down list.
    Release from Partner Releases the selected Customer from the Partner.
    Send Support Email Sends customer support messages to the selected Customer.
    Assign Operator Profile Adds an Operator Profile for the selected Customers.
    Note: This option is available only for an Enterprise with the Edge Image Management feature activated.
    Update Edge Image Management Activates or deactivates the Edge Image Management feature for the selected Customers.
    Update Operator Alerts Activates or deactivates the Operator alerts for the selected Customers.
    Update Customer Alerts Activates or deactivates the Customer alerts for the selected Customers.
    Rebalance Gateways Rebalances the Gateways of Edges associated with the selected Customer
    Export All Customers Exports the details of all the Customers in the Operator portal to a CSV file. The default separator used is a comma (,).
    Export Customers Edge Inventory Exports the inventory details for all Edges associated with all Customers to a CSV file. The default separator used is a comma (,).


  4. Following are the other options available in the Manage Customers area:
    Table 3. Manage Customers Option Descriptions
    Option Description
    Columns Select this option and select the checkbox to view the required columns.
    Refresh Select this option to refresh the page.
    To configure a customer, see Configure Customers.

Create a New Customer

In the Operator portal, users can create Customers and configure the Customer settings. Only Operator Super Users and Operator Standard Admins can create a new Customer. As an Operator Super User, the user can temporarily deactivate creation of new Customers by setting the system property session.options.disableCreateEnterprise to True. The user can select this option when Orchestrator exceeds the usage capacity.
  1. In the Operator portal, go to Customers & Partners > Manage Customers , and then select New Customer. The New Customer page displays:
    Customer Information:
    Figure 2. Configure Customer Information
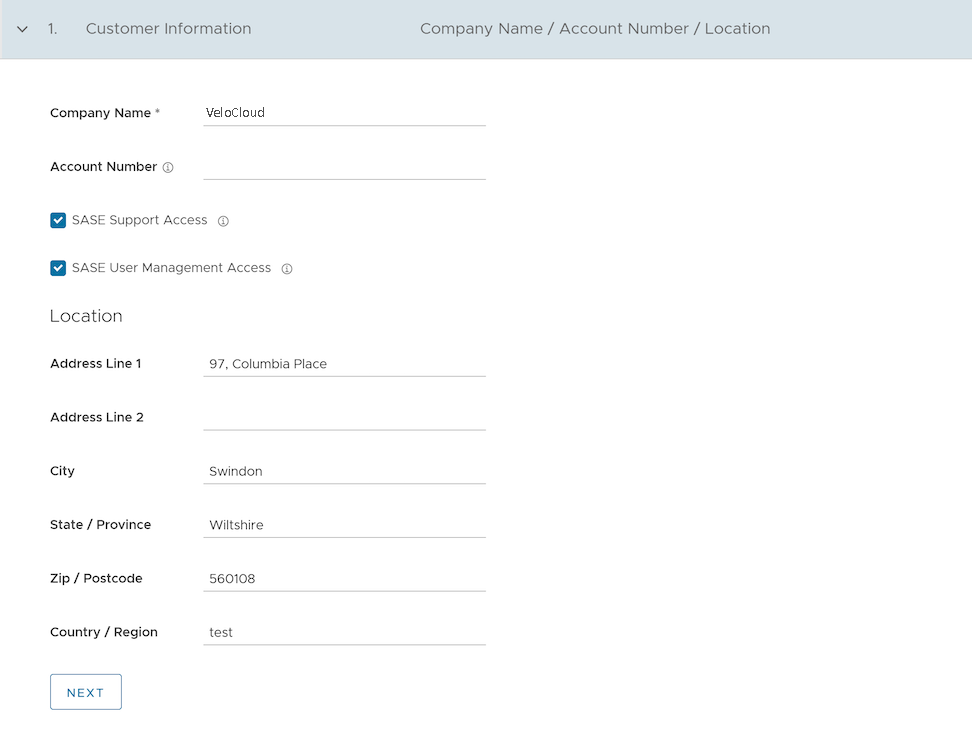
  2. Enter the details in the following fields and select Next.
    Note: Entering all mandatory details activates the Next button.
    Table 4. New Customer option Description
    Option Description
    Company Name Enter company name.
    Account Number Enter a unique identifier for the Customer.
    SASE Support Access This check box is selected by default, and grants access to the Arista Support to view, configure, and troubleshoot the Edges connected to the Customer.

    For security reasons, the Support cannot access or view the user identifiable information.

    SASE User Management Access Select the check box to allow the Arista Support to assist in User Management. The User Management includes options to create users, reset password, and configure other settings. In this case, the Support has access to user identifiable information.
    Location Enter relevant address details in the respective fields.


  3. The Administrative Account displays:
    Figure 3. Configure an Administrative Account
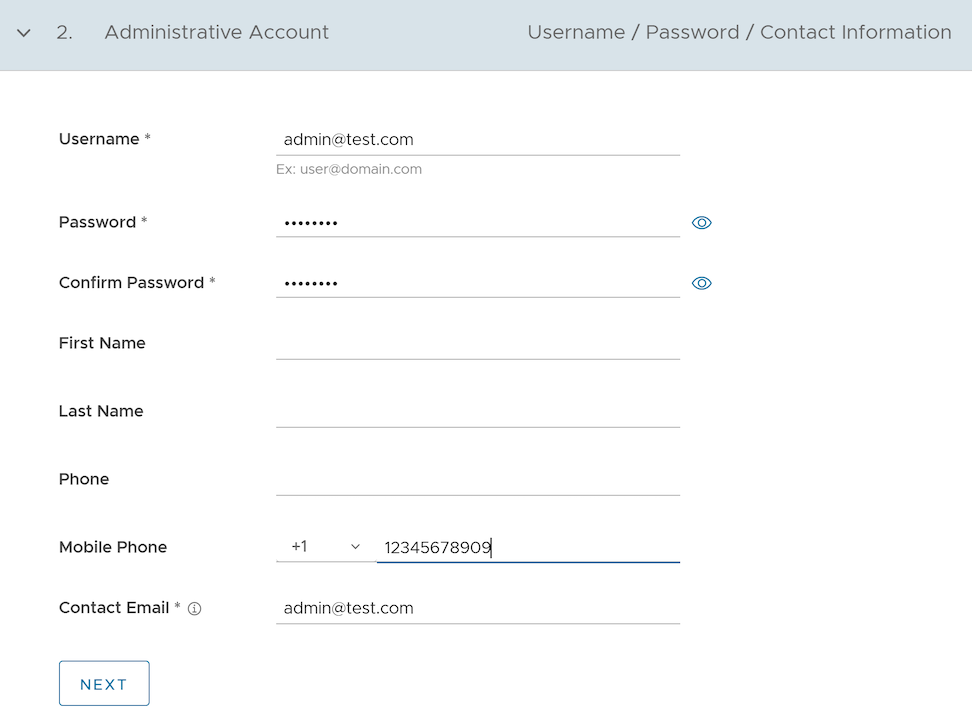
  4. Enter the details in the following fields and select Next.
    Note: Entering all mandatory details activates the Next button.
    Table 5. Administrative Account Option Description
    Option Description
    Username Enter the username in the This email address is being protected from spambots. You need JavaScript enabled to view it. format.
    Password Enter a password for the Administrator.
    Note: Starting from the 4.5 release, the use of the special character "<" in the password is no longer supported. In cases where users have already used "<" in their passwords in previous releases, they must remove it to save any changes on the page.
    Confirm Password Re-enter the password.
    First Name Enter the first name.
    Last Name Enter the last name.
    Phone Enter a valid phone number.
    Mobile Phone Enter a valid mobile number.
    Contact Email Enter the email address. The alerts on service status are sent to this email address.


  5. Selecting Next displays the Services section:
    Figure 4. Configure Services
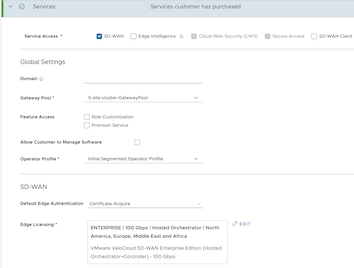
  6. Configure the following Global Settings:
    Table 6. Global Settings Option Descriptions
    Option Description
    Domain Enter the domain name to be used to activate Single Sign On (SSO) authentication for the Orchestrator.
    Gateway Pool Select an existing Gateway pool from the drop-down list.

    For additional information, see Manage Gateway Pools.

    Feature Access Select either Role Customization or Premium Service, or both the check boxes.
    Allow Customer to Manage Software Select the checkbox to allow an Enterprise Super User to manage the software images available for the Enterprise. Once selected, the Software Image field is displayed. Select Add and in the Select Software/Firmware Images pop-up window, select and assign the software/firmware images from the available list for the Enterprise. Select Done to add the selected images to the Software Image list.
    Note: Remove an assigned image from an Enterprise, only if the image is not currently used by any Edge within the Enterprise.

    For additional information, see Platform and Modem Firmware and Factory Images and Software Images.

    Operator Profile Select an Operator profile to be associated with the Customer from the available drop-down list. This field is not available if Allow Customer to Manage Software is selected.

    For additional information on Operator profiles, see Manage Operator Profiles.


  7. Service Access: This option is available above the Global Settings section. The user can choose which services the Customer can access, along with the roles and permissions available for each service.
    Note: This option is available only when the system property session.options.enableServiceLicenses is set as True.
  8. SD-WAN- When the user selects this service, the following options are available:
    Table 7. Service Access Option Description
    Option Description
    Default Edge Authentication Choose the default option to authenticate the Edges associated with the Customer, from the drop-down list.
    • Certificate Deactivated: Edge uses a pre-shared key mode of authentication.
    • Certificate Acquire: This option is selected by default and instructs the Edge to acquire a certificate from the certificate authority of the Orchestrator, by generating a key pair and sending a certificate signing request to the Orchestrator. Once acquired, the Edge uses the certificate for authentication to the Orchestrator and for establishment of VCMP tunnels.
      Note: After acquiring the certificate, the option can be updated to Certificate Required.
    • Certificate Required: Edge uses the PKI certificate. Operators can change the certificate renewal time window for Edges using the system property edge.certificate.renewal.window.
    Edge Licensing Select Add and in the Select Edge Licenses pop-up window, select and assign the Edge licenses from the available list for the Enterprise.
    Note: Multiple Edges support these license types. Provide customers with all license types to ensure they match their edition and region.

    For additional information, see Edge Licensing.

    Feature Access Select the Stateful Firewall checkbox to override the Stateful Firewall settings activated on the Enterprise Edge.


  9. After entering all the details, select the Add Customer button.

    If the user wants to add another customer, Select Add another Customer before Add Customer to add multiple customers. The new customer name appears on the Customers page. The user can select the Customer name to navigate to the Enterprise portal and add configurations to the Customer.

    For additional information, see Configure Customers.

Clone a Customer

The user can clone the configurations from an existing customer and create a new customer with the cloned settings.

Only Operator Super users and MSP Super users can clone a customer.

By default, the following configurations are cloned from the selected customer:
  • Enterprise configuration profiles
  • Enterprise network services and objects like:
    • DNS services
    • Private network names
    • Network Segments
  • Customer capabilities
  • Edge authentication scheme
  • Address groups and Port groups
Note: Distributed Cost Calculation does not copy to the cloned Enterprise.
The user cannot clone an Enterprise if it consists of the following:
  • Profile with Edge references, such as hubs and clusters.
  • Profile containing Partner Gateway References
  • Cloud Security Service enabled
  • Non SD-WAN Destinations
  • VNF or VNF licenses
  • Authentication services
  • NetFlow objects, like collectors or filters

Log in to the VeloCloud Edge Cloud Orchestrator as an Operator user. Navigate to Customers & Partners > Manage Customers .

  1. On the Customers page, select the customer the user wants to clone, and then select Clone .
  2. The Clone Customer page appears.
    Figure 5. Clone a Customer
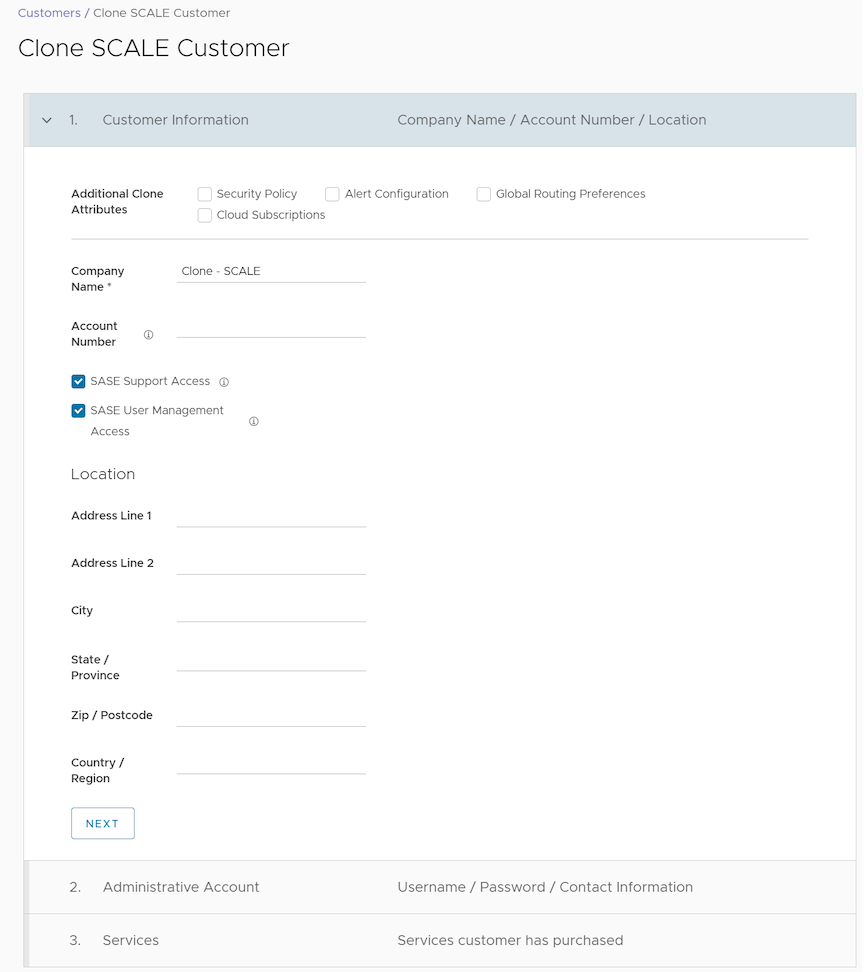
  3. Configure the Customer Information, Administrative Account details, and Services. For additional information, see Create New Customer.
  4. Select Add Customer.

    The new customer name appears on the Customers page. The customer now uses the cloned settings. The user can select the customer name to navigate to the Enterprise portal and add or modify the configurations.

    For additional information about customer configurations and settings, see Configure Customers.

Configure Customers

After creating a Customer, configure the feature options and settings that the Customer can access. As an Operator, choose the settings that the Customer can modify.

When you create a new Customer, you are redirected to the Customer Configuration page, where you can configure the Customer settings. Users can also navigate to the Customer Configuration page directly from the Operator portal by following the below steps:

  1. On the Monitoring and Configuration Options page, select a Customer, and from the top header, select SD-WAN > Global Settings .
  2. From the left menu, select Customer Configuration to display the page:
    Figure 6. Customer Configuration
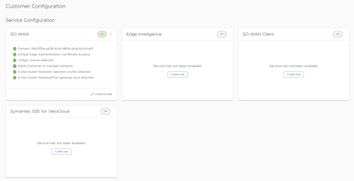
  3. The Service Configuration section includes the SD-WAN service. Select Turn On to activate the service. Select the vertical ellipsis in the top right corner of the tile to turn off or configure the service. You can also select the Configure option, located at the bottom right corner of the tile, to configure the respective service. The tile displays the configuration summary.
    Note: When you select the Turn off option, a pop-up window appears asking for your confirmation. Select the checkbox and select Turn Off Service.

Configure SD-WAN

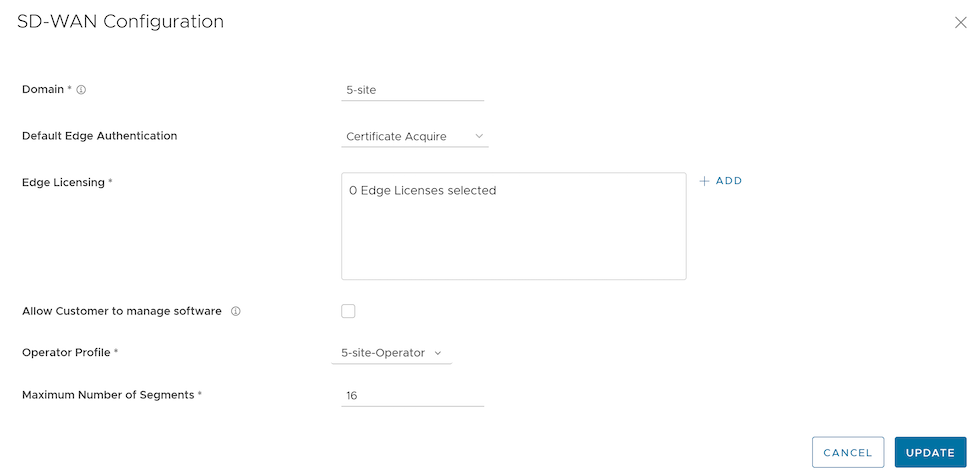
Select the Configure option to display the SD-WAN Configuration section. Configure the settings, and then select Update.
Figure 7. SD-WAN Configuration


Table 8. SD-WAN Configuration - Options and Descriptions
Option Description
Domain Enter the domain name to be used to activate Single Sign On (SSO) authentication for the Orchestrator.
Default Edge Authentication Choose the default option with authenticate the Edges associated to the Customer from the drop-down menu.
  • Certificate Deactivated: Edge uses a preshared key authentication mode.
  • Certificate Acquire: This option is selected by default and instructs the Edge to acquire a certificate from the certificate authority of the Orchestrator, by generating a key pair and sending a certificate signing request to the Orchestrator. Once acquired, the Edge uses the certificate for authentication with the Orchestrator and for establishing VCMP tunnels.
    Note: After acquiring the certificate, the option can be updated to Certificate Required.
  • Certificate Required: Edge uses the PKI certificate. Operators can change the certificate renewal time window for Edges using the system property edge.certificate.renewal.window.
Edge Licensing The existing Edge Licenses are displayed. Select Add to add or remove the licenses.
Note: License types are used across multiple Edges. It is recommended to provide your Customers with access to all types of licenses to match their edition and region. For additional information, see Edge Licensing.
Allow Customer to Manage Software Select the checkbox if you want to allow an Enterprise Superuser to manage the software images available for the Enterprise. For additional information, see the topic Edge Image Management in the VeloCloud SD-WAN Administration Guide.
Operator Profile Select an Operator profile to be associated with the Customer from the available drop-down menu. This field is not available if Allow Customer to Manage Software is selected. For additional information on Operator profiles, see Manage Operator Profiles.
Maximum Number of Segments Enter the maximum number of segments that can be configured. The valid range is 1 to 16. The default value is 16.

Configure Additional Settings

  1. Following are the additional configuration settings available on the Customer Configuration page:
    Table 9. Additional Configuration - Options and Descriptions
    Option Description
    Global
    User Agreement Display Select either of the following from the drop-down menu:
    • Inherit
    • Override to Hide
    • Override to Show
    Note: This field is available only when the system property session.options.enableUserAgreements is set to True.
    Feature Access Provides access to the selected features. Select one or more checkboxes from the below list to activate these features for the Customer:
    • Enterprise Auth- By default, only the Operator can activate or deactivate two-factor authentication for an Enterprise. When you select this checkbox, the Enterprise Admins can configure two-factor authentication. This option also controls Single Sign-On (SSO) activation and deactivation.
    • Enable Premium Service- This option is selected by default. Premium Service refers to the On-Demand Remediation feature, a core part of SD-WAN Dynamic Multipath Optimization (DMPO). All traffic that traverses a VeloCloud Gateway uses DMPO. When Premium Service is selected, the Gateway uses Forward Error Correction (FEC) for customer traffic impacted by high levels of WAN link jitter or loss, and which cannot be steered to a better quality WAN link. When Premium Service is not selected, traffic still traverses the VeloCloud Gateway and benefits from other components of DMPO like Continuous Monitoring, Dynamic Application Steering, and Secure Traffic Transmission. However, traffic impacted by high levels of WAN link jitter or loss does not benefit from error correction by the Gateway. For additional information, see the topic Dynamic Multipath Optimization (DMPO) in the VeloCloud SD-WAN Administration Guide.
    • Role Customization- Allows an Enterprise Super user to customize the role privileges for other Enterprise users.
    • Route Backtracking- Allows the device to choose the best route in the order of prefix length.
    • In-product Contextual Help Panel- Provides access to the 'In Product Help' panel integrated within the Orchestrator. This feature is deactivated by default. An Operator must activate this option for the Enterprise Customers.
    • Enable Firewall Logging to Orchestrator- By default, Edges cannot send their Firewall logs to the Orchestrator. Select this checkbox to allow an Edge to send the Firewall logs to the Orchestrator.
    • Customizable QoE- Allows the Customer to configure the minimum and maximum latency threshold values for Voice, Video, and Transactional application categories of an Edge.
    • Enable Classic Orchestrator UI- Allows the Customer to switch from the Angular Orchestrator UI to the Classic Orchestrator UI. This option is available only when the system property session.options.enableClassicOrchestrator is set to True.
    Delegate Management To Customer Allows the Customer to modify the settings of the selected property. Following two properties are always visible to the Customers:
    • Enable CoS Mapping- Allows the configuration of CoS mapping while configuring a business policy.
    • Enable Service Rate Limiting- Allows for rate limiting services in a business policy.
    Gateway Pool
    Current Gateway Pool Displays the current Gateway pool associated with the selected Customer. If required, you can choose a different Gateway pool available in the drop-down menu and select Save Changes.
    Gateways in this Pool Displays the Gateway details in the current pool.
    Partner Hand Off Activating the Gateway Pool option displays the Configure Hand Off section. If the Gateways in the Gateway pool have been assigned the Partner Gateway role, you can hand off the Gateways to Partners. For details, see Configure Partner Gateway Handoff to Production Orchestrator Configure Partner Handoff.
    Security Policy
    Hash By default, there is no authentication algorithm configured for the VPN header, as AES-GCM is an authenticated encryption algorithm. When you select the Turn off GCM checkbox, you can select one of the following as the authentication algorithm for the VPN header from the drop-down menu:
    • SHA 1
    • SHA 256
    • SHA 384
    • SHA 512
    Encryption Select either AES 128 or AES 256 as the AES algorithm's key size to encrypt data. The default encryption algorithm mode is AES 128.
    Note: The AES configuration affects only phase 2 tunnels.
    DH Group Select the Diffie-Hellman (DH) Group algorithm to be used when exchanging a pre-shared key. The DH Group sets the strength of the algorithm in bits. The supported DH Groups are 2, 5, 14, 15, 16, 19, 20, and 21.
    Note:
    • DH Groups 19, 20, and 21 are available starting from Release 5.2.0.
    • It is recommended to use DH Group 14, which is the default value.
    PFS Select the Perfect Forward Secrecy (PFS) level for additional security. The supported PFS Groups are 2, 5, 14, 15, 16, 19, 20, and 21. PFS Groups 19, 20, and 21 are available starting in Release 5.2.0. By default, PFS is deactivated.
    Turn off GCM Select this checkbox to activate Hash and select an authentication algorithm for the VPN header.
    IPSec SA Lifetime Time(min) Time when Internet Security Protocol (IPSec) rekeying is initiated for Edges. The minimum IPsec lifetime is 3 minutes and the maximum IPsec lifetime is 480 minutes. The default value is 480 minutes.
    Note: It is not recommended to configure a low lifetime value for IPsec (less than 10 minutes), as it can cause traffic interruption in some deployments due to rekeys. The low lifetime values are for debugging purposes only.
    IKE SA Lifetime(min) Time when Internet Key Exchange (IKE) rekeying is initiated for Edges. The minimum IKE lifetime is 10 minutes and maximum IKE lifetime is 1440 minutes. The default value is 1440 minutes.
    Note: It is not recommended to configure low lifetime values for IKE (less than 30 minutes), as it can cause traffic interruption in some deployments due to rekeys. The low lifetime values are for debugging purposes only.
    Secure Default Route Override Select the checkbox so that the destination of traffic matching a secure default route (either Static Route or BGP Route) from a Partner Gateway can be overridden using Business Policy.
    Edge Network Function Virtualization- Allows to activate NFV on the Edges and allows Customers to deploy third party VNFs on service ready Edge platforms. Currently, the service ready Edge platform models are 520v and 840. As an Operator User, when you activate the Edge NFV, Customers can configure and deploy VNFs and VNF licenses from their network services.
    Edge NFV Select this option to activate the ability to deploy VNFs on Edges. After deploying one or more VNFs on Edges, you cannot deactivate this option.
    Security VNFs Select the relevant checkboxes to deploy the corresponding security VNFs on Edges. For additional information, see the topic Security VNFs in the VeloCloud SD-WAN Administration Guide.
    SD-WAN Settings
    OFC Cost Calculation Select the required checkbox:
    • Distributed Cost Calculation: Select this checkbox to delegate route cost calculation to Edges/Gateways.
      Note: This option is available only for the Edges/Gateways with version 3.4.0 and later. After activating Distributed Cost Calculation, it is recommended to refresh the routes by navigating to Configure > Overlay Flow Control in the SD-WAN service of the Enterprise portal. For additional information, see Configure Distributed Cost Calculation.
    • Use NSD Policy- Select this checkbox to use NSD policy for route cost calculation to Edges/Gateways.
      Note: This option is available only for the Edges/Gateways with version 4.2.0 and later.
    Multiple-DSCP tags per Flow Path Calculation This feature is used when the original user traffic is encapsulated in another tunnel (GRE/IPsec), and the DSCP labels are saved in the new IP header. The feature activates path calculation for a single flow (same source/destination) with multiple DSCP tags and offers path differentiations based on the DSCP values in the flow.

    Select the Include DSCP value as part of flow lookup checkbox to include DSCP values as part of flow look-up and path calculation. For additional information, see Configure Path Calculation with Multiple DSCP Labels per Flow.

    Note: This field is available only when the system property session.options.enableFlowParametersConfig is set to True.
    Feature Access
    Stateful Firewall Select the Stateful Firewall checkbox to override the Stateful Firewall settings activated on the Enterprise Edge.
    Enhanced Firewall Services Select the Enhanced Firewall Services checkbox to activate the Enhanced Firewall Services using the Firewall functionality in VeloCloud Orchestrator.
    Note: For Enhanced Firewall Services (EFS) to work, ensure the Edge version is upgraded to 5.2.0.0.
    Note: Deselecting this option only deactivates the EFS feature in the UI. To deactivate the EFS feature for an existing customer, you must first deactivate the EFS feature in the SD-WAN service of the Enterprise portal by navigating to Configure > Profiles/Edges > Firewall > Firewall Feature Control > Enhanced Security and then by clearing this checkbox in Global Settings.
    For additional information about configuring the various Enhanced Security Services and associating them with a Firewall rule, see the topic Configure Enhanced Security Services in the VeloCloud SD-WAN Administration Guide.


  2. Select Save Changes.
Note: When you modify the Security Policy settings, the changes may cause interruptions to the current services. In addition, these settings may reduce overall throughput and increase the time required for VCMP tunnel setup, which may impact branch to branch dynamic tunnel setup times and recovery from Edge failure in a cluster.

Configure a Handoff Operator

You can configure a Gateway to hand off to Partners. The Gateway acts as a Partner Gateway, enabling you to configure the Handoff Interface, Static Routes, BGP, and other settings.

Ensure that the Gateway to hand off is assigned the Partner Gateway Role. In the Orchestrator portal, Operator or Partner, select Gateways and select the link to an existing Gateway. In the Properties section of the selected Gateway Overview page, you can enable the Partner Gateway role.
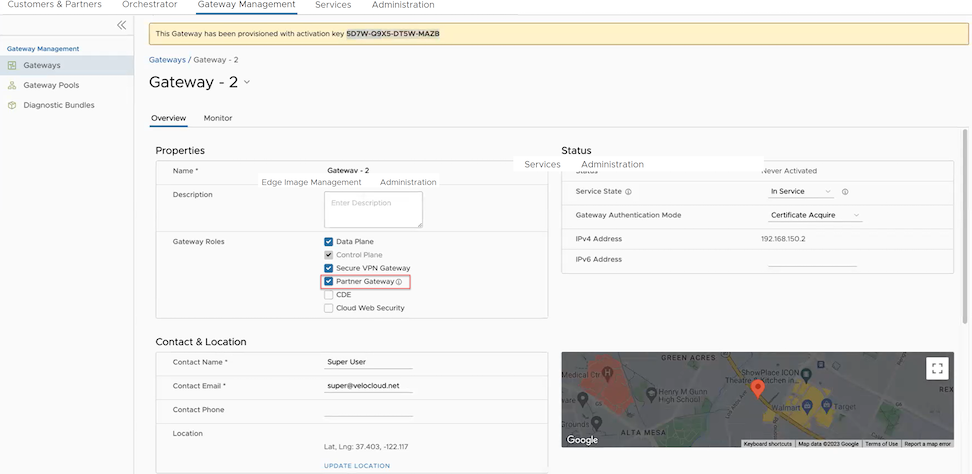
Figure 8. Manage Gateways

To configure the handoff settings, perform the following steps:

  1. Log in to the Orchestrator as an Operator user.
  2. Navigate to Customers and Partners > Manage Customers .
  3. In the Manage Customers window, select the link of the desired customer.
  4. Go to Global Settings > Customer Configuration .
  5. In the Customer Configuration window, scroll down to Additional Configuration and expand the Gateway Pool area.
  6. Enable Partner Hand Off.
  7. In the Configure Hand Off area, configure the following fields:
    Figure 9. Configure Hand Off
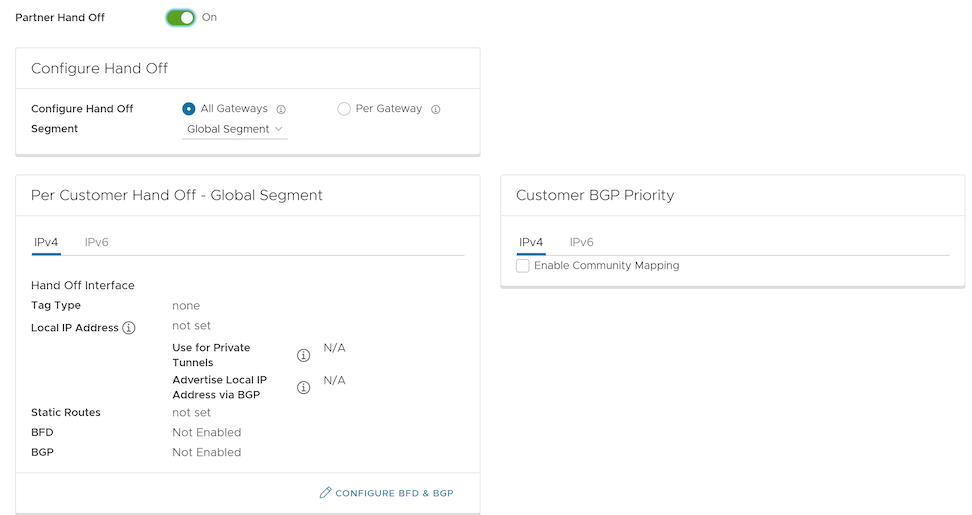
     

    Table 10. Hands Off Option Descriptions
    Option Description
    Configure Hand Off By default, the hand off configuration is applied to all the Gateways. If you want to configure a specific Gateway, choose Per Gateway, and then select the Gateway from the drop-down list.
    Segment By default, the Global Segment is selected, which means that the hand off configuration is applied to all the segments. If you want to configure a specific segment, select the segment from the drop-down menu.
    Hand Off Interface This section displays the values that are configured on the Configure BGP and BFD page.
    Customer BGP Priority Select the check box and configure the Community Mapping details.


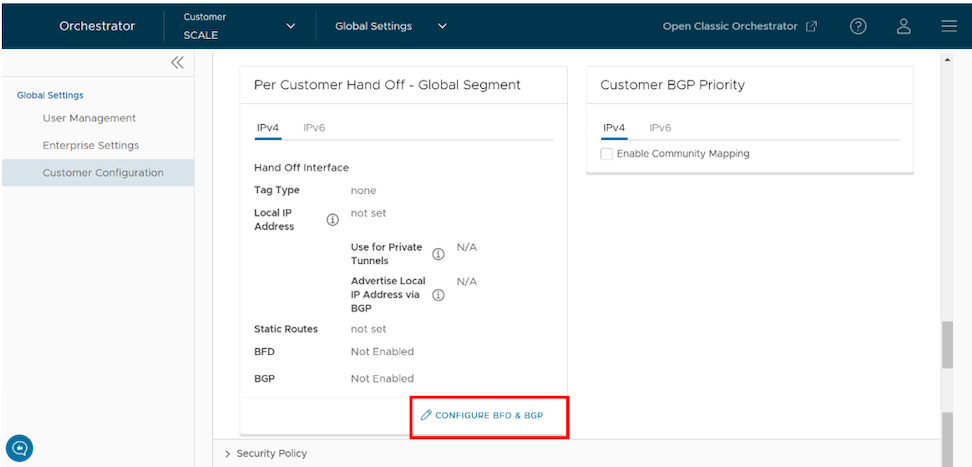
  8. At the bottom of the Per Customer Hand Off – Global Segment area, select the Configure BFD and BGP link.
    Figure 10. Per Customer Handoff with Global Segment
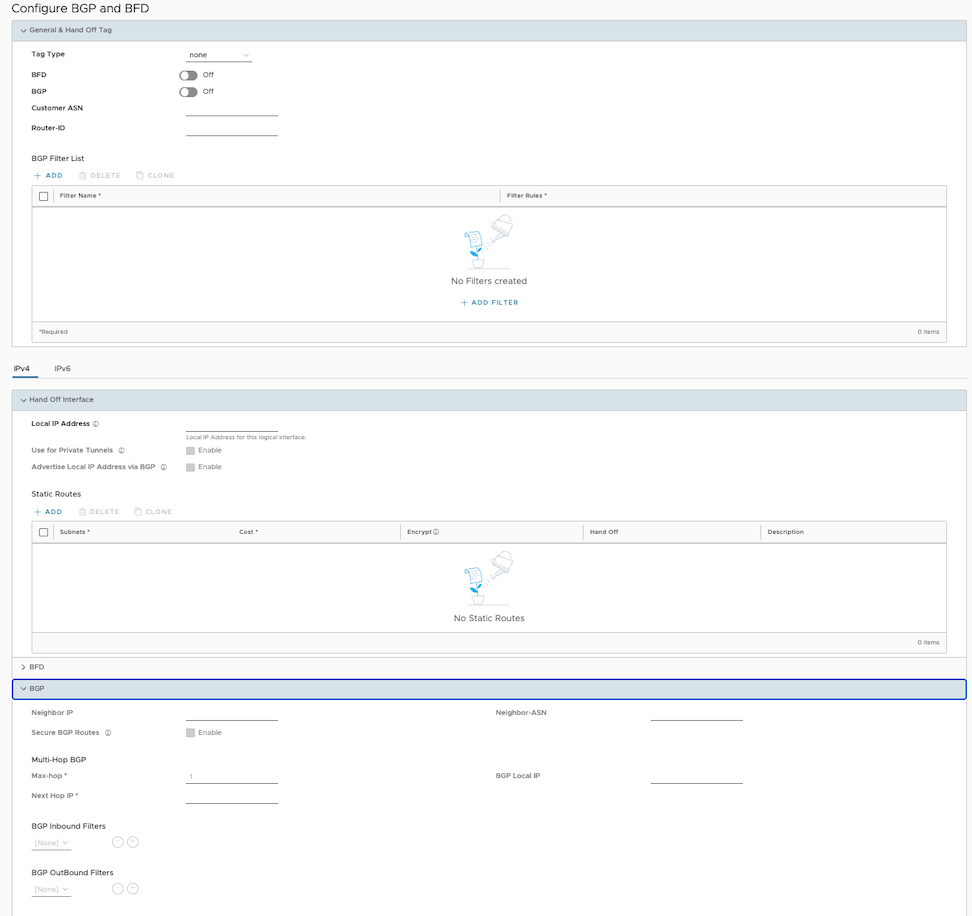
  9. The Configure BGP and BFD screen displays:
    Figure 11. Configure BGP and BFD
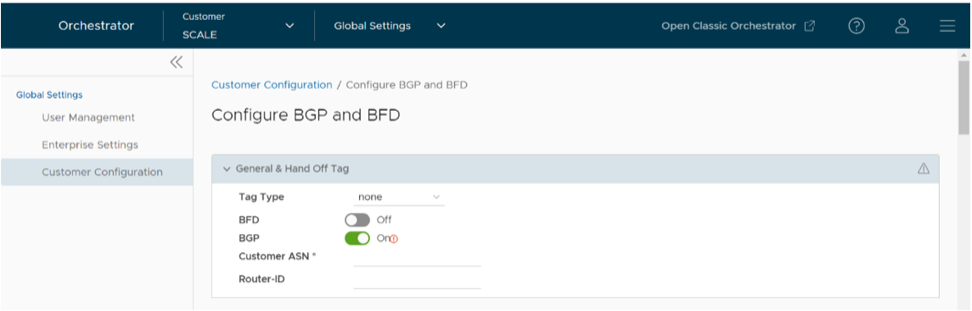
  10. Open the General & Hand Off Tag section and turn the BGP option to the On position.
    Figure 12. Enable BGP
  11. Scroll down to the BGP section and select the arrow to display the BGP section.
  12. Configure the following fields:
    Table 11. BGP Option Descriptions
    Option Description
    Hand Off Tag
    Tag Type Choose the tag type, which is the encapsulation, in which the Gateway hands off customer traffic to the Router. The following are the types of tags available:
    • None- Untagged. Choose this during a single-tenant handoff or a handoff towards shared services VRF.
    • 802.1Q- Single VLAN tag
    • 802.1ad / QinQ(0x8100) / QinQ(0x9100)- Dual VLAN tag
    Customer ASN Enter the Customer Autonomous System Number.
    Hand Off Interface: You can configure the following settings for IPv4 and IPv6.
    Local IP Address Enter the Local IP address for the logical Hand Off interface.
    Use for Private Tunnels Select the check box so that private WAN links connect to the private IP address of the Partner Gateway. If private WAN connectivity is activated on a Gateway, the Orchestrator audits to ensure that the local IP address is unique for each Gateway within an Enterprise.
    Advertise Local IP Address via BGP Select the check box to automatically advertise the private WAN IP of the Partner Gateway through BGP. The connectivity is provided using the existing Local IP address.
    Static Routes: You can add, delete, or clone a static route.
    Subnets Enter the IP address of the Static Route Subnet that the Gateway should advertise to the Edge.
    Cost Enter the cost to apply weighting on the routes. The range is from 0 to 255.
    Encrypt Select the check box to encrypt the traffic between Edge and Gateway.
    Hand off Select the hand off type as either VLAN or NAT.
    Description Enter a descriptive text for the static route. This field is optional.
    BFD: Turn the toggle button to On to activate this section.
    Peer Address Enter the IP address of the remote peer to initiate a BFD session.
    Detect Multiplier Enter the detection time multiplier. The remote transmission interval is multiplied by this value to determine the detection timer for connection loss. The range is from 3 to 50.
    Receive Interval Enter the minimum time interval, in milliseconds, at which the system can receive the control packets from the BFD peer. The range is from 300 to 60000 milliseconds.
    Local Address Enter a locally configured IP address for the peer listener. This address is used to send the packets.
    Transmit Interval Enter the minimum time interval, in milliseconds, at which the system can send the control packets from the BFD peer. The range is from 300 to 60000 milliseconds.
    BGP: Turn the toggle button to On to activate this section.
    Neighbor IP Enter the IP address of the configured BGP neighbor network.
    Secure BGP Routes Select the check box to allow encryption for data-forwarding over BGP routes.
    Max-hop Enter the number of maximum hops to allow multi-hop for the BGP peers. TheMax-hop range is 1 to 255, with and default value of 1.
    Note: This field is available only for eBGP neighbors when the local ASN and the neighboring ASN are different.
    Next Hop IP Enter the next-hop IP address to be used by BGP to reach the multi-hop BGP peer.
    Note: This option is available only for multi-hop eBGP with a Max-hop count greater than 1.
    Neighbor-ASN Enter the Autonomous System Number of the Neighbor network.
    BGP Local IP Local IP address is the equivalent of a loopback IP address. Enter an IP address that the BGP neighborships can use as the source IP address for the outgoing BGP packets.
    Note: The BGP Local IP address must be from a different subnet than the handoff IP address.

    If you do not enter any value, the IP address of the Hand Off Interface is used as the source IP address.

    BGP Filter List Configure BGP filters.
    BGP Inbound Filters Assign a filter to inbound.
    BGP Outbound Filters Assign a filter to outbound.
    BGP Optional Settings
    BFD Select the check box to subscribe to the BFD session.
    Router-ID Enter the Router ID to identify the BGP Router.
    Keep Alive Enter the BGP Keep Alive time in seconds. The default timer is 60 seconds.
    Hold Timers Enter the BGP Hold time in seconds. The default timer is 180 seconds.
    Turn off AS-PATH Carry Over Select the check box to turn off AS-PATH carry over, which influences the outbound AS-PATH to make the L3-routers prefer a path towards a PE. If you select this option, ensure to tune your network to avoid routing loops. It is recommended not to select this check box.
    MD5 Auth Select the check box to activate BGP MD5 authentication. This option is used in a legacy or federal network and serves as a security guard for BGP peering.
    MD5 Password Enter a password for MD5 authentication.
    Note: Starting from the 4.5 release, the use of the special character "<" in the password is no longer supported. In cases where users have already used "<" in their passwords in previous releases, they must remove it to save any changes on the page.

Configuring Route Summarization

Route Summarization is new for the 5.2 release. For an overview, use case, and black hole routing details for Route Summarization, see the Route Summarization section in the VeloCloud SD-WAN Administration Guide. For Route Summarization configuration details, follow the steps below:
  1. Navigate to the Route Summarization area in the BGP section.
    Figure 13. Configure Route Summarization
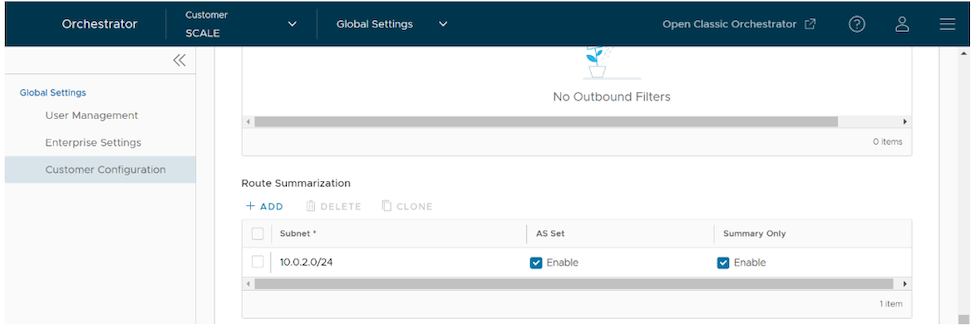
  2. Configure the Route Summarization fields:
    Table 12. Route Summarization Option Descriptions
    Option Description
    +Add Select +Add to add a new row in the Route Summarization area.
    Note: To add additional rows to configure Route Summarization, select +Add. To Clone or delete a route summarization, use the appropriate buttons, located next to +Add.
    Subnet column Under the Subnet column, enter the IP subnet.
    AS Set column Generate AS set path information from the summarized routes (while advertising the summarized route to the peer). Under the AS Set column, select the Yes check box if applicable.
    Summary Only column Under the Summary Only column, select the Yes check box to allow only the summarized route to be sent.


  3. Select Update to save the settings.

Configure Distributed Cost Calculation
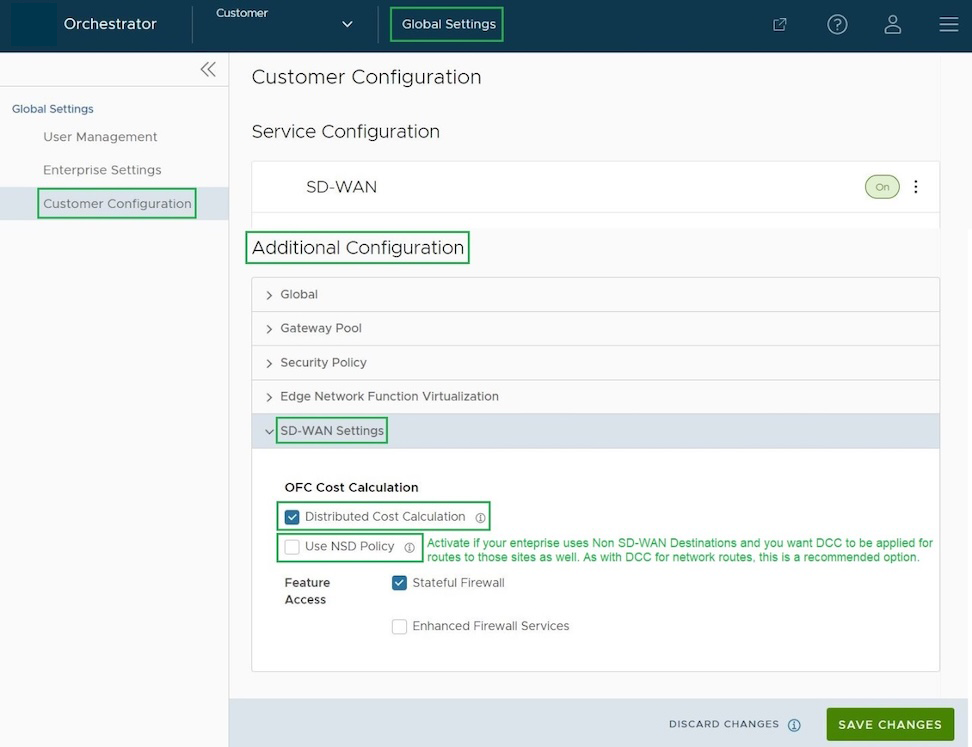
By default, the Orchestrator actively learns the dynamic routes. VeloCloud SD-WAN Edges and Gateways rely on the Orchestrator to calculate initial route preferences and return them to the Edge and Gateway. The Distributed Cost Calculation feature enables you to distribute the route cost calculation to the Edges and Gateways. Only an Operator user can configure Customer settings, including Distributed Cost Calculation.
Ensure the following before you activate the Distributed Cost Calculation feature.
  • All the Edges and Gateways must use software version 3.4.0 or later.
  • The software image associated with the Operator Profile must use version 3.4.0 or later.
Note: If experiencing an issue with Orchestrator based route calculation, enable Distributed Cost Calculation.
This default method of using Orchestrator in both dynamic route calculation and the distribution of those routes to Edges and Gateways has the following drawbacks:
  • If the Orchestrator is under a high load, the route convergence time is significantly high, for example, as much as 40 seconds for 2000+ routes, as the Orchestrator takes that time to calculate the preference for all the synchronized routes and returns those preferences to the Edges and Gateways.
  • Using the Orchestrator for route calculation means that new dynamic routes learned while the Orchestrator was unreachable do not advertise until the Orchestrator becomes reachable again.

When a customer enterprise uses Distributed Cost Calculation, the Orchestrator is no longer actively involved in the route preference calculation and instead routes are properly inserted in order by the Edge and Gateway instantly upon learning them and then convey these preferences to the Orchestrator.

When you choose to enable Distributed Cost Calculation for the Edges and Gateways, the feature provides the following benefits:
  • Minimizes the impact on route learning when an Orchestrator is unreachable.
  • Route convergence time is reduced from minutes to seconds in large networks with thousands of dynamic routes.
  • Network delays are significantly reduced.
  • Provides instantaneous Data Plane convergence.
  • Supports enhanced re-ordering and pinning of routes on the Overlay Flow Control.
  • Provides an option to refresh routes on the Overlay Flow Control page. Whenever the Overlay Flow Control policy changes, the Refresh Routes option applies the changes to the existing routes immediately, without requiring a restart of the Edge or Gateway.
Enabling Distributed Cost Calculation has the following impacts on the Customer Enterprise network:
  • All local dynamic routes are refreshed, and their preference and advertisement actions are updated. This updated information is advertised to the Gateway and Orchestrator, and eventually across the Enterprise. The customer's network needs to completely rebuild the route table, which for most customer deployments will take less than 5 seconds. A large scale customer deployment (like 100,000+ routes) may take up to 2 minutes. During the time the route table is being rebuilt, customer traffic for all sites is impacted.
  • Any existing flows using these routes may be affected by the change in the routing entries.
Note: It is recommended to enable Distributed Cost Calculation in a maintenance window to minimize the impact on the Customer Enterprise.

To configure Distributed Cost Calculation for a customer:

  1. In the Operator portal, navigate to Manage Customers.
  2. Select a customer, then either select Edit Customer System Settings or select the link to the customer.
  3. In the Enterprise portal, go to Global Settings > Customer Configuration .
    Figure 14. Configure Distributed Cost Calculation
  4. On the Customer Configuration page, navigate to the Additional Configuration > SD-WAN Settings > OFC Cost Calculation section and configure the following:
    • Select the Distributed Cost Calculation checkbox to delegate the cost calculation of routes to Edges and Gateways.
    • Select the Use NSD Policy checkbox to use the Non SD-WAN Destination policy for route cost calculation of Edges and Gateways. This option is available only for Edges and Gateways running Software version 4.3.0 or later.
  5. Select Save Changes.
    Note: After enabling Distributed Cost Calculation, it is recommended to refresh the routes in the Overlay Flow Control page in the SD-WAN service of the Enterprise portal.
    Note: When an Enterprise has Distributed Cost Calculation activated and a user tries to deactivate the software update on the Operator Profile page, then the user must ensure that, in the future, no Edges in the Enterprise are downgraded to software image versions lower than 3.4.0. If one or more Edges in the Enterprise are using software image version below 3.4.0, the Enterprise traffic may take a sub-optimal path. The sub-optimal path will be corrected only when the Edge is upgraded to 3.4.0 or later versions.
    The following are some of the scenarios in which the software versions can change, and the user must make sure the Edges are using the software image version 3.4.0 or later:
    • Factory Reset- When an Edge is reset to the factory settings, it restores the software version of the Edge to factory image version, which can be below 3.4.0.
    • Edge Activation- When an Edge is activated, it may come up with software versions below 3.4.0.

    Once Distributed Cost Calculation activates, all the dynamic routes are assigned new preferences and advertise action based on the Distributed Cost Calculation. The new information is propagated across the Enterprise Network.

    The Orchestrator is no longer actively involved in the route preference calculation. Instead, the routes are properly inserted in order by the Edge, and the Gateway instantly upon learning them, and then these preferences are conveyed to the Orchestrator.

    The Overlay Flow Control policy is sent to Edges and Gateways in Control Plane Configuration updates. Edges and Gateways send the routes with computed cost and advertise action to the Orchestrator. Edges and Gateways handle the order of the routes based on the cost and route attributes.

    To view a summary of all the routes in your network, select Configure > Overlay Flow Control in the SD-WAN service of the Enterprise portal. You can view the routes and advertise action on the Overlay Flow Control page. For additional information, see the topic Overlay Flow Control in the VeloCloud SD-WAN Administration Guide.

Configure Path Calculation with Multiple DSCP Labels per Flow

An Edge classifies traffic flows based on the first packets in each flow. You can create business policies in an application based on the Differentiated Service Code Point (DSCP) and different DSCP markings to determine flow treatment.

By default, an Edge classifies a flow based on the first few packets received in the flow. Business Policy and QoS marking determine the flow treatment. Once the flow is classified, an entry containing the flow's five-tuple information is created in the flow cache table.Subsequent packets in the flow will use the five-tuple lookup against the flow cache table.

For network topologies with Layer 3 network devices doing encapsulation or encryption before the traffic arrives at the Edge, this creates a challenge for the Edge to forward traffic based on the Business Policy. The traffic from end users is multiplexed into a single flow with the same source and destination IP addresses and protocols by the Layer 3 encapsulation/encryption device, as illustrated in the following image.
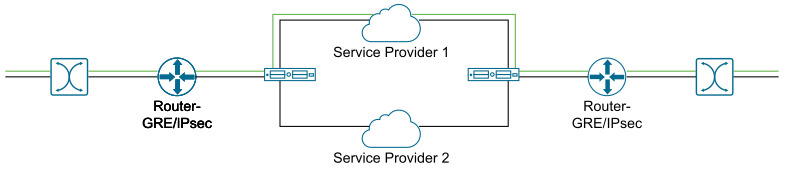
Figure 15. Traffic Flow

The impact of multiplexing end user flows into a single tunnel creates polarization of the flow forwarding using the five tuples of flow cache table, which results in WAN links not being utilized.

The Path Calculation with Multiple DSCP Labels per Flow allows the DSCP value to be included, along with the five tuples, in the flow cache table lookup. Use the path calculation with multiple DSCP tags when the original user traffic is encapsulated in another tunnel, like GRE or IPsec, and DSCP labels are preserved in the new IP header. This option enables path calculation for a single flow with multiple DSCP labels that share the same source and destination IP addresses. It provides path differentiation based on the DSCP labels in the flow.

When you enable the Multiple-DSCP tags per Flow Path Calculation, the Edges can differentiate the traffic flows based on the DSCP marked labels.

To enable Multiple-DSCP tags per Flow Path Calculation:

  1. In the Operator portal, select Orchestrator > System Properties .
  2. Select New.
  3. In the New System Property window, create a system property with the following parameters:
    • Name: session.options.enableFlowParametersConfig
    • Data Type: Boolean
    • Value: True
  4. Select Save Changes.
  5. In the Operator portal, navigate to Global Settings > Customer Configuration > .
  6. On the Customer Configuration page, go to the additional configuration settings section, and then under SD-WAN settings, select the Include DSCP value as part of flow lookup checkbox for Multiple-DSCP tags per Flow Path Calculation.
    Note: This option is available only when the system property session.options.enableFlowParametersConfig is set to True.
  7. Select Save Changes.
  8. In the Edges, different flows are created based on different DSCP labels.
    Note: When you select Include DSCP value as part of flow lookup, the inter-operability with previous versions is undefined.

    While configuring the business policy for an Edge, you can choose to match a DSCP label for an application. For additional information, see the topic Configure Business Policy Rule in the VeloCloud SD-WAN Administration Guide.

    When traffic arrives at the Edge, if the traffic flow matches the selected application and DSCP tag, then the corresponding action is performed.

    You can create additional business policies with different DSCP labels to match different traffic flows and apply different treatments for those flows. For additional information on business policies, see the VeloCloud SD-WAN Administration Guide.

    Limitations

    • The path calculation with multiple DSCP labels per Flow is not applicable for the Gateways. You can enable this option only for Edge-to-Edge tunnels, where Edge-to-Edge can be any of the following:
      • Edge-to-Edge through Hub
      • Spoke-to-Hub
      • Dynamic Branch-to-Branch
      You can use this option for On-Premise deployment, where the Gateway is used only for control plane functionality and not for data plane traffic.
    • The path calculation with multiple DSCP labels per Flow is intended only for GRE or IPSec traffic. The direct Internet traffic does not carry multiple DSCP labels within a single flow.
    • After you enable the path calculation option, when the traffic flow consists of packets with the same five-tuple information but different DSCP markings, LAN side NAT might not work as expected.
..