Wireless Intrusion Prevention Techniques
About Wireless Intrusion Prevention Techniques
A large number of Wi-Fi devices Access Points (APs) and clients-are commonly present in the vicinity of an enterprise. While most are legitimate devices, belonging either to the enterprise or businesses around it, manually tracking the presence of any threat-posing devices among them or Wi-Fi connections violating the enterprise security policy is impractical.
Arista Wireless Intrusion Prevention System (WIPS) can automate that process and protect enterprise networks from Wi-Fi-based vulnerabilities and attacks. It can also track the physical location of Wi-Fi devices on enterprise premises.
- Authorized: Owned and officially deployed by the enterprise,
- External: Legitimate Wi-Fi devices in the enterprise vicinity, and
- Rogue: Unauthorized Wi-Fi devices on the enterprise network.
You can enable automatic intrusion prevention using Arista CV-CUE, by navigating to or from
Depending on the type of threat, intrusion prevention can be defined in the following ways.
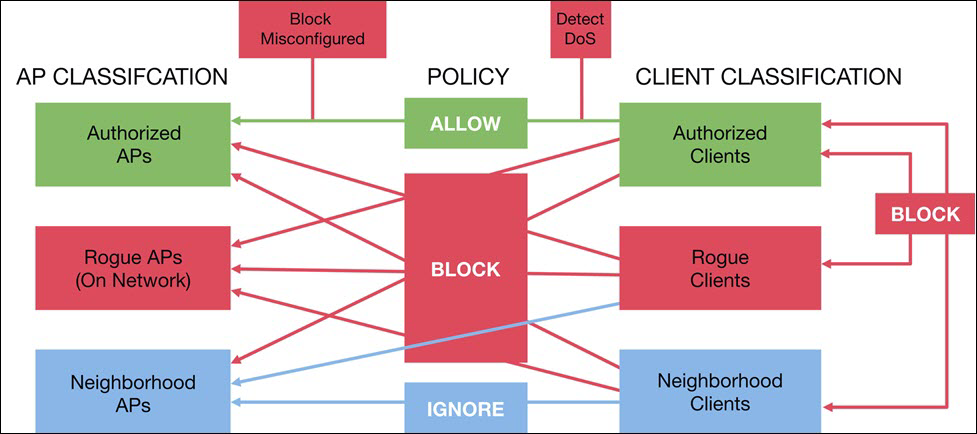
Access Point Prevention
To automatically block all connections to threat-posing APs such as rogue APs, banned APs, and misconfigured APs.
Client Prevention
To automatically prevent client connections based on the type of client involved, e.g., authorized, guest, rogue, external, banned, and the type of AP (or client) to which it tries to connect. Thus, Client Prevention can block various types of threat-posing Wi-Fi connections, e.g., an authorized client could be blocked from connecting to an external AP that is a Wi-Fi hotspot while allowing other external clients to connect to that AP; an unauthorized client could be blocked from connecting to an authorized AP while allowing authorized clients to connect to that AP.
Threat Prevention
- ARP spoofing/MAC spoofing: In ARP spoofing, an attacker sends a spoofed ARP reply, on behalf of an authorized AP, for a legitimate connection request by a Wi-Fi client. The reply contains the spoofed MAC address of the legitimate AP and links with the legitimate IP address, thus establishing the connection between them. The attacker can potentially receive all the data intended for the legitimate user.
- Honeypot: In a honeypot or man-in-the-middle attack, an unauthorized AP, in the vicinity of an enterprise, tries to lure authorized enterprise clients to connect to it by broadcasting the same SSID as an authorized one, but at a higher RSSI. An attacker could also launch multiple honeypots ( aka multipot) simultaneously to evade security.
- DoS Attack: By using a variety of techniques, an attacker can flood an enterprise network with a number of junk Wi-Fi frames or frames that consume a significant amount of airtime, starving legitimate APs and clients from transmitting, thus, disrupting the Wi-Fi service of the legitimate users.
- Inline: It is the background scanning done by the third radio of an AP. An inline technique is majorly acquired in the absence of WIPS or when automatic intrusion prevention is turned off. When a client sends a request for connection, the AP detects the client as- rogue or authorized as per the client auto-classification policy already defined. If it is rogue, the AP keeps on discarding the request packets on the driver level itself but if it is an authorized client the AP itself authenticates it. This happens for both open and encrypted APs.
- De-Auth: This technique is useful to prevent the authorized connection by sending the de-auth packets in compliance with the 802.11 messaging format for disconnecting the unauthorized ones. When a misbehaving client connects to a rogue AP and tries to access the network, the authorized AP senses the unauthorized connection and unicasts a de-auth packet to the client. By sending de-auth packets, the connection is disrupted with the rogue AP. For encrypted Adhoc client prevention, where prevention beacons are sent can also be prevented using the same technique. This can also happen in offline mode. Offline Mode- When an AP is in online mode, it keeps on receiving and storing the data of all the rogue or misconfigured connections in a list as defined by AP auto-classification. So, even when the AP goes into offline mode, this list helps to detect the rogue APs and automatically prevent any activity from them.
- Wireless ARP Prevention: ARP poisoned packets are sent over a network when the multipot attack happens where the transit between multiple APs is so fast that the de-authentication technique is not effective. So, the WIPS sensor sends a spoofed de-authentication packet with a spoofed MAC address over the wireless medium, thus, preventing any authorized clients to connect to a rogue AP.
- Wired ARP: Any activity from a rogue AP should be detected and disabled. When any unauthorized activity is detected, poisoned ARP packets are sent on open Adhoc or wired connections as well. Wired ARP technique also takes place when the defined intrusion prevention level capacity becomes full. For example, if we had selected "Block" level which prevents one channel per radio and a threat posing device is detected then we switch to wired ARP. With this technique, ARP poisoning packets are sent from the wired interface to prevent any wireless clients to connect to the secured wired network through a rogue AP. The packets are unicasted to the authorized client, thus, not affecting the other connections.
- Selective NAV: The prevention technique is used for Dos attacks. DoS attacks can prove harmful as they disrupt the legitimate receiver from any services. To mitigate this attack, WIPS allows the APs to allow a definite time slot for the clients. In this way, the rogue AP trying to flood the network with useless packets never gets a chance to connect.
- Cell Splitting: Cell splitting is used to prevent encrypted ad hoc Wi-Fi mode where fake beacons are sent with random cell id so that the clients in ad hoc mode think that the preventing device is the ad hoc owner while the id keeps on changing randomly where the owner actually never settles on a particular cell id.
Intrusion Prevention Level
Arista WIPS offers four levels of automatic intrusion prevention, listed below.
| Level | Number of channels-per-radio prevented |
|---|---|
| Block | 1 |
| Disrupt | 2 |
| Interrupt | 3 |
| Degrade | 4 |
Each automatic intrusion prevention level defines the number of channels-per-radio that an AP can prevent. To detect an intrusion, an AP radio scans all the channels in its frequency band of operation, spending 120 ms on each channel. One scan cycle is the time it takes an AP radio to complete scanning all the channels once. At each level, Arista WIPS can prevent up to 10 intruding devices.
Consider an AP whose intrusion prevention level is set to "Block". Suppose this AP detects an intrusion on channel 36. Since the level is set to "Block", the AP can prevent one channel per band—in this case, channel 36. Then, during its scan cycle, the AP "visits" channel 36 more frequently, sending deauthentication packets to block the unwanted communication on channel 36. (Intrusions subsequently detected on other channels are put in a "Pending" list.) If the intrusion prevention level is set to "Disrupt" and the AP detects intrusions on two channels, then it divides the time it spends sending deauthentication packets between the two channels. This disrupts the unwanted communication on each of the two channels but does not block it completely. "Disrupt" is, therefore, a weaker form of prevention than "Block"; some packets belonging to the intruding device may get through. This logic extends to "Interrupt" and "Degrade" as well—these levels respectively interrupt and degrade the unwanted communication; they do not disrupt or block it.
So the trade-off is between the effectiveness of intrusion prevention and its coverage—in terms of the number of channels across which threats can be prevented. Larger the number of channels-per-radio prevented, the weaker the prevention since the AP has to divide the time it spends sending deauthentication packets among a larger number of channels. Choose the intrusion prevention level based on the needs of your Wi-Fi environment. By default, the intrusion prevention level is set to "Disrupt".
Authorized Wi-Fi Policy
- Authorized: Owned and officially deployed by the enterprise,
- External: Legitimate Wi-Fi devices in the enterprise vicinity, and
- Rogue: Unauthorized Wi-Fi devices on the enterprise network.
- The characteristics of the official enterprise Wi-Fi network, e.g., SSID name, whether or not the SSID is a guest SSID, the type of authentication and encryption used, a mapping of SSIDs to specific enterprise subnetworks they are allowed to run on, allowed vendors, etc.
- A pre-classification of Wi-Fi APs as potentially authorized or rogue based on whether or not they are connected to one of the monitored enterprise subnetworks (enabled by default), or based on the Received Signal Strength Indicator(RSSI) with which those APs are visible to Arista WIPS.
Using SSID Profile Settings
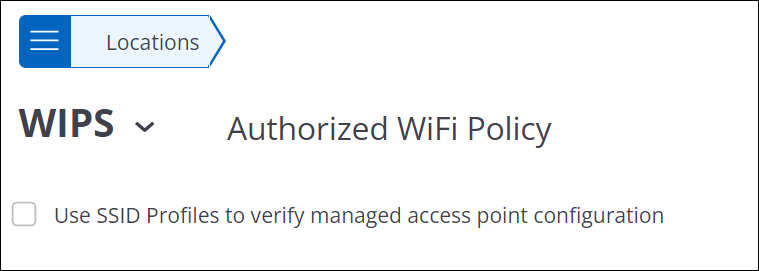
Authorized Wi-Fi Profile per SSID
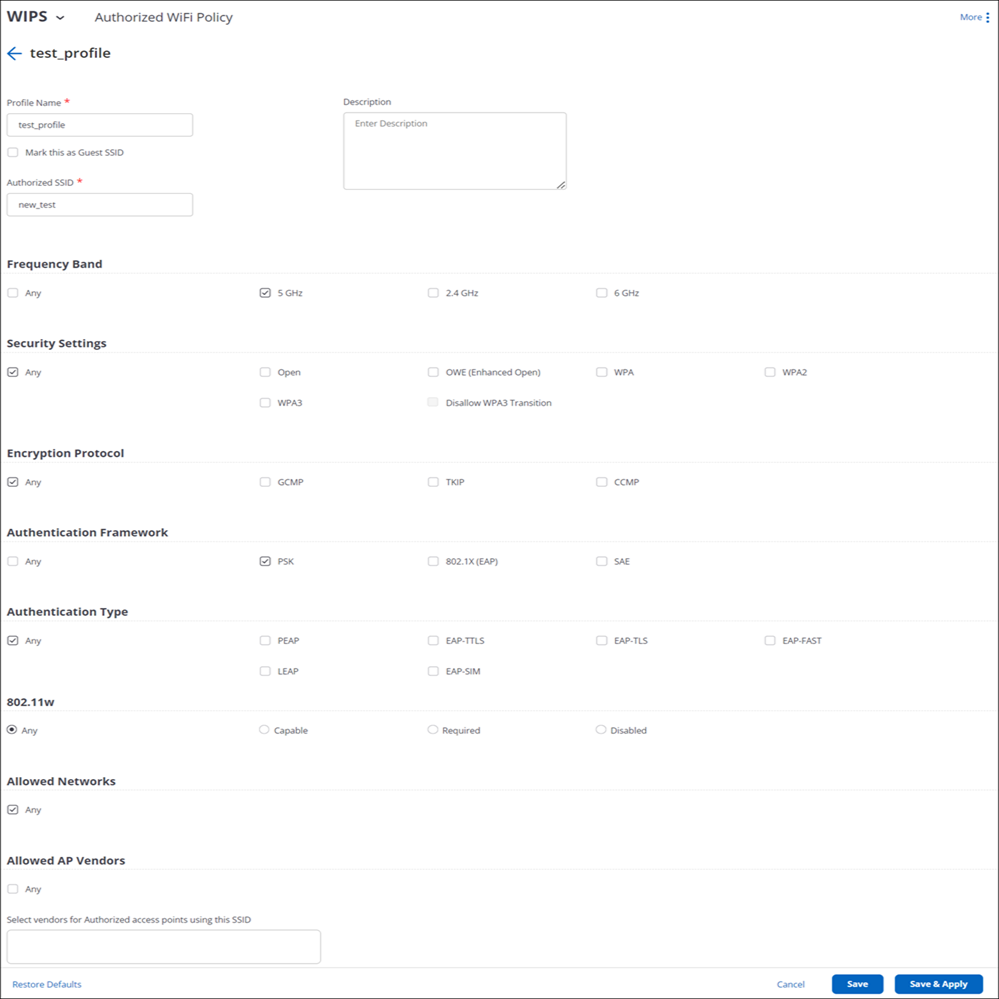
When an SSID configuration does not match the authorized Wi-Fi policy, the SSID is marked as a Misconfigured SSID. When an SSID configuration does not follow the security policies of Wi-Fi 6 and 6E, the SSID is marked as Non Compliant. As shown in the figure below, you can filter on the Classification column under to find APs running misconfigured SSIDs.

You can select an AP to see the SSIDs that are misconfigured and to view the reasons for the configuration mismatch. Active APs running misconfigured SSIDs are marked orange on the and tabs.
Access Point Auto Classification
Arista Wireless Intrusion Prevention System (WIPS) continuously scans the Wi-Fi frequency spectrum to detect other Wi-Fi devices present in the vicinity.
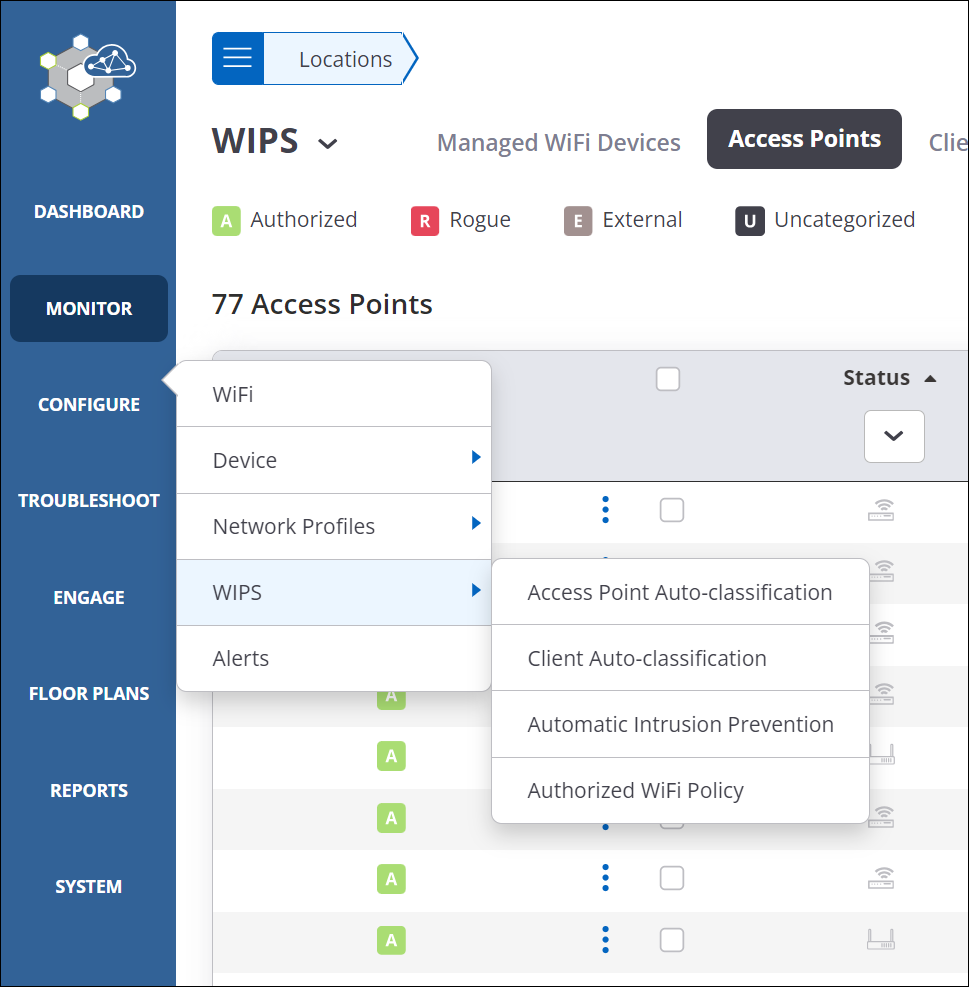
Arista managed APs that are on the wired network and comply with the <Authorized Wi-Fi Policy> are automatically classified as Authorized. The AP Auto-Classification Policy allows you to let the Arista WIPS automatically classify potentially rogue APs as rogue APs and potentially external APs as external APs. By default, the AP auto-classification is enabled. You can edit the policy under
You can also freeze the list of your authorized APs by using the Authorized AP List Locking feature so that no more APs get automatically classified as authorized.
Client Prevention
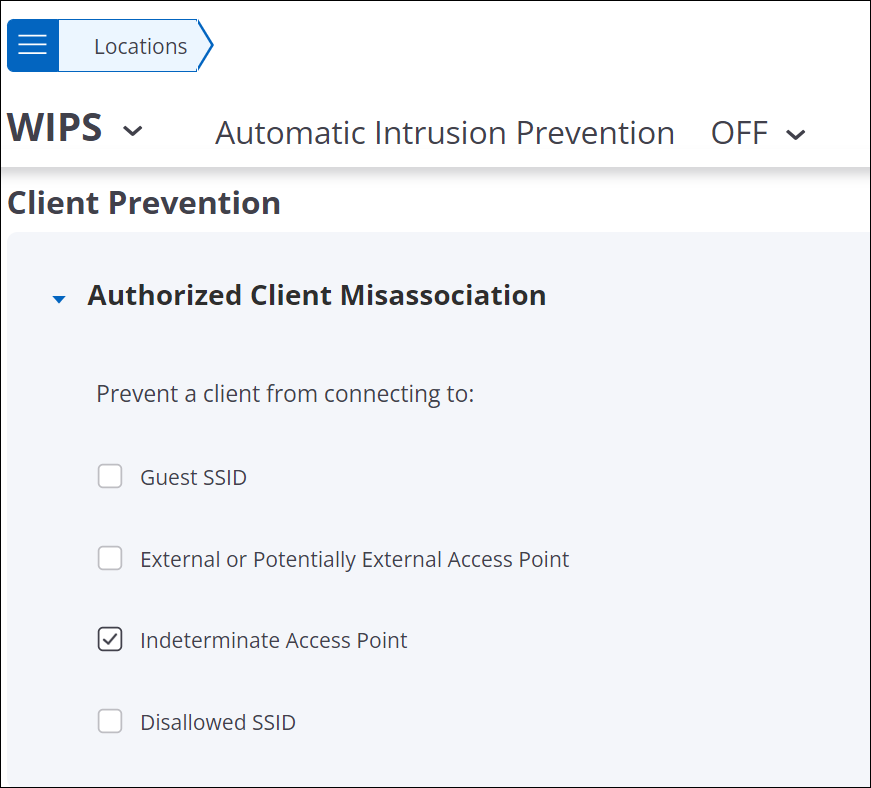
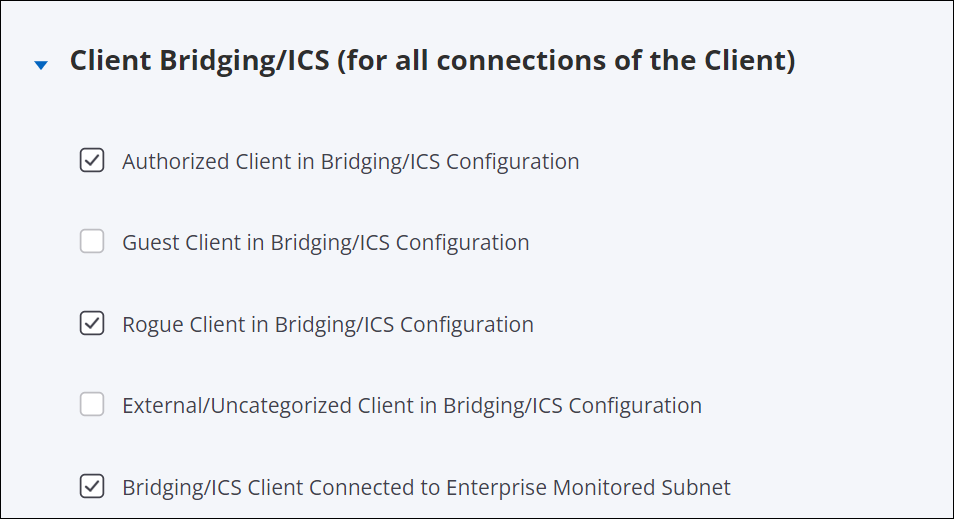
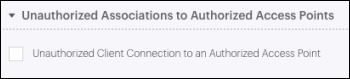
Client prevention allows you to choose the types of Wi-Fi client communication you want to prevent.
- The type of the client (Rogue, Authorized, External, or Guest) as determined by Client auto-classification.
- The device that the client attempts to connect to—Authorized Access Point (AP), other clients, etc.
The examples below show how specific client types and connection attempts can be prevented depending on the use case.
Authorized Client Misassociation
Client Bridging/ICS
Unauthorized Associations To Authorized Access Points
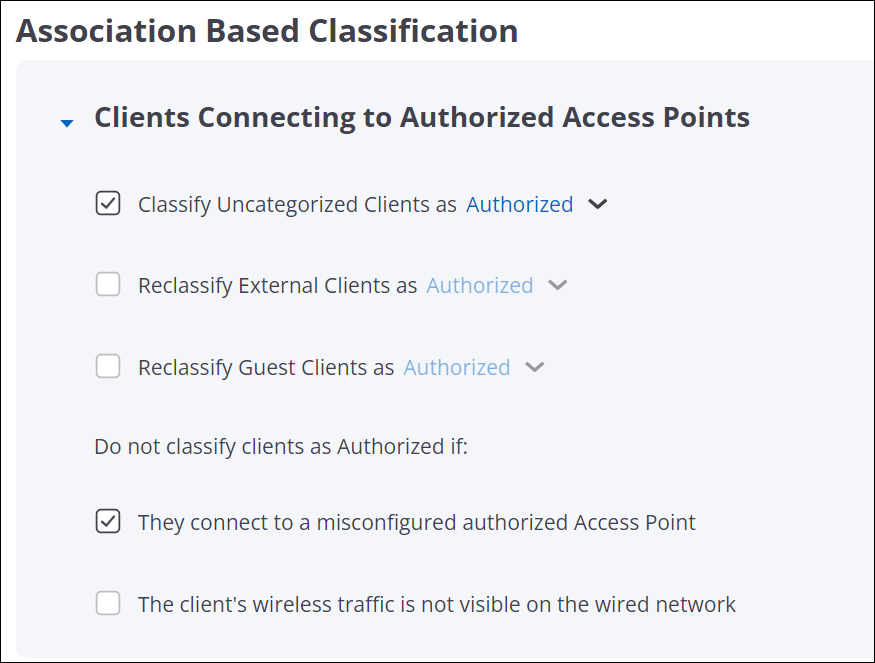
Client Auto-Classification
Classifying Wi-Fi clients can help you automatically enforce your Wi-Fi security policies.
- Authorized: These are enterprise-owned, managed clients that are expected to comply with the enterprise security policies, e.g., they are allowed to connect to the enterprise-managed Wi-Fi Access Points (APs) but not to other APs.
- Guest: These are clients that are brought along by visitors in your organization. Guest clients are normally allowed to connect to the guest Wi-Fi network for Internet access and have limited or no access to the internal network.
- External: These are unmanaged clients detected in the vicinity of your enterprise. They are normally blocked from connecting to your managed APs but could connect to other APs. Such clients could be typically ignored unless their behavior poses a threat to your enterprise security.
- Rogue: These are typically unauthorized clients that try to intrude into your enterprise network, for instance, by connecting to a rogue AP. The activity of such clients should be monitored and their unauthorized access should be blocked.
By default, clients are left uncategorized initially and classified based on the type of AP or Wi-Fi network they connect. You can optionally choose to classify any newly discovered client as either External, Authorized, or Guest, and let them be reclassified based on association. Association-based classification can be based on the type of AP that the client connects to. For example, an uncategorized client attempting to connect to any external AP is classified as external.
The examples below show how clients can be auto-classified depending on their association.
Clients Connecting to Authorized Access Points
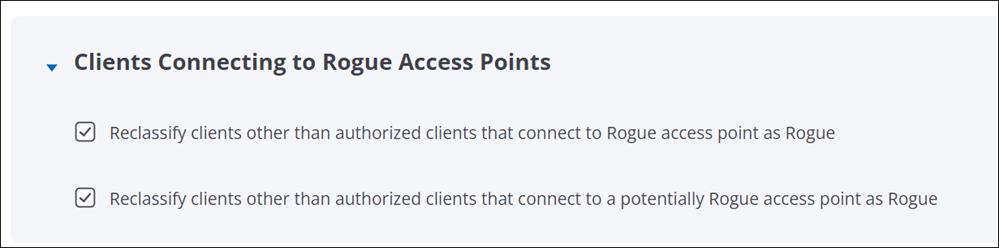
Clients Connecting to Rogue Access Points
Banned Device List
You can ban certain Wi-Fi devices from accessing the enterprise network when needed. For instance, if an enterprise laptop gets stolen, its unauthorized access to the enterprise network needs to be restricted.
To prevent such access, you can add those Wi-Fi access points or clients to the Banned Access Points and Banned Clients, respectively. This can be done either by entering the MAC addresses of the individual access points or clients or by uploading a .csv file with the list of comma-separated MAC addresses. The banned devices can be defined only at the topmost or root folder of the location tree.
In addition, you can configure an alert that will warn you if a banned access point or client from the list is detected in the vicinity. Wi-Fi connectivity with a banned access point or client can also be prevented automatically by configuring the relevant intrusion prevention policy.
WLAN Integration
Whether you are using Arista WIPS or transitioning to cloud-based Wi-Fi, integrating the Arista Cloud Wi-Fi server with your on-premises WLAN controller allows you to leverage key advantages of the cloud server while continuing to use your controller-based WLAN.
The Arista cloud-based Wi-Fi server fetches information about access points, clients, and signal strengths from WLAN controllers using Simple Network Management Protocol (SNMP). Arista WIPS can then use this information to automatically classify authorized devices managed by the controller and track Wi-Fi client locations.
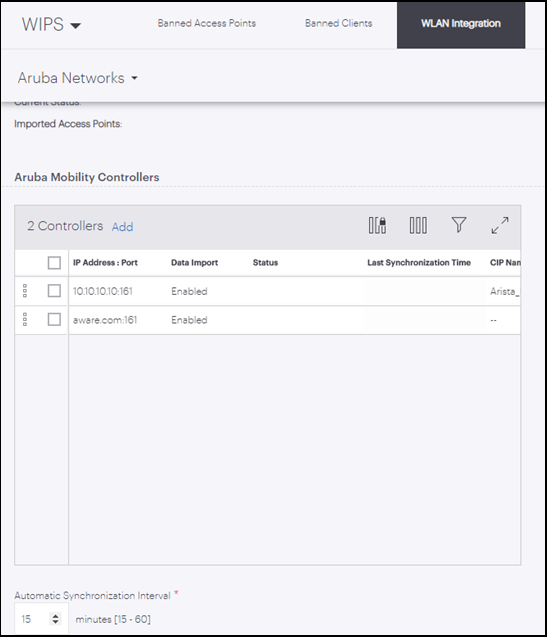
Arista supports integration with Aruba Mobility Controllers and Cisco WLC.
Configure WLAN Integration
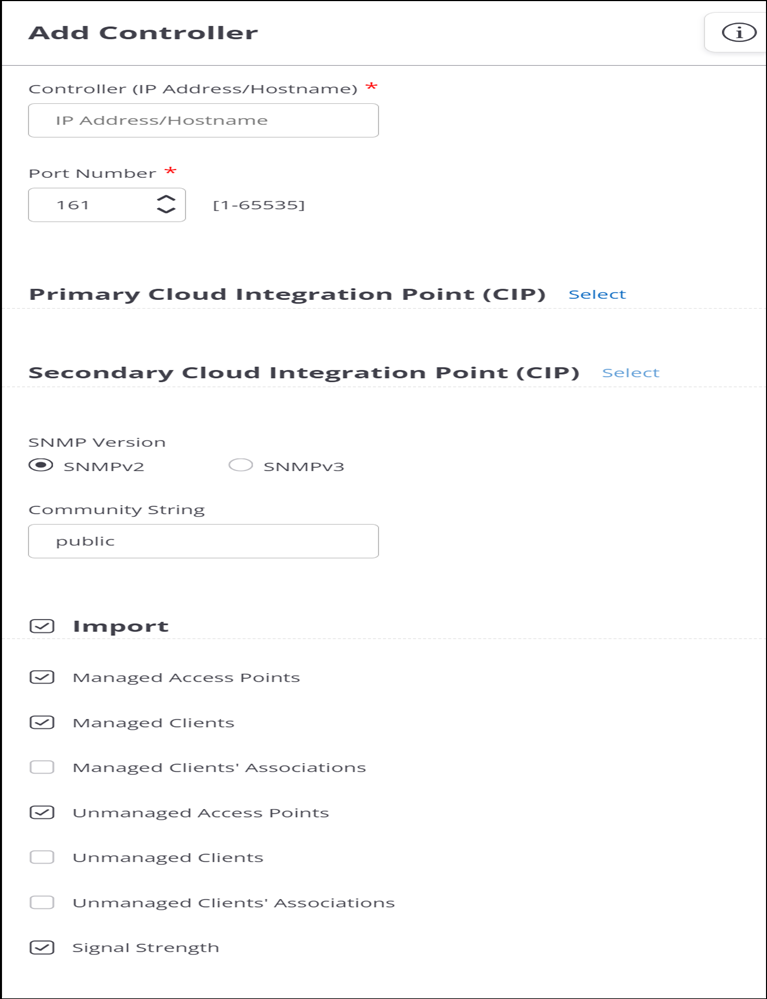
On the main WLAN Integration tab, set the Automatic Synchronization Interval; this is the interval that defines how frequently the Arista Cloud fetches information from the controller. Save the settings to complete adding the controller.
Controller Settings
| Field | Description |
|---|---|
| Controller (IP Address/Hostname) | Enter the IP address or hostname of the controller.
Note:If the controller uses a private IP address, you need to select a Cloud Integration Point.
|
| Port Number | The controller port number from which data is imported. |
| Primary Cloud Integration Point (CIP) | From the drop-down list, select an Arista device that you want to use as the primary Cloud Integration Point (CIP) for this controller.
Important: You must open port number 3852 in your network from the CIP to Arista cloud. |
| Secondary Cloud Integration Point (CIP) | From the drop-down list, select an Arista device that you want to use as the secondary Cloud Integration Point (CIP) for this controller.
If the primary CIP goes down, the secondary one ensures connectivity of your service to the cloud. |
| SNMP Version | Select SNMP V2 or V3 for the Arista cloud communication with the controller. |
| Community String | User-defined community string using which Arista cloud communicates with the controller. The default value is 'public'. |
| Import | Select to enable the import of data from the controller. |
| Managed Access Points | Select to import managed access point information from the controller. |
| Managed Clients | Select to import information about clients associated with access points managed by the controller. |
| Unmanaged Access Points | Select to import information about access points not managed by the controller. |
| Unmanaged Clients | Select to import information about clients associated with access points not managed by the controller. |
| Signal Strength | Select to import signal strength information from the controller. |
Monitor Networks
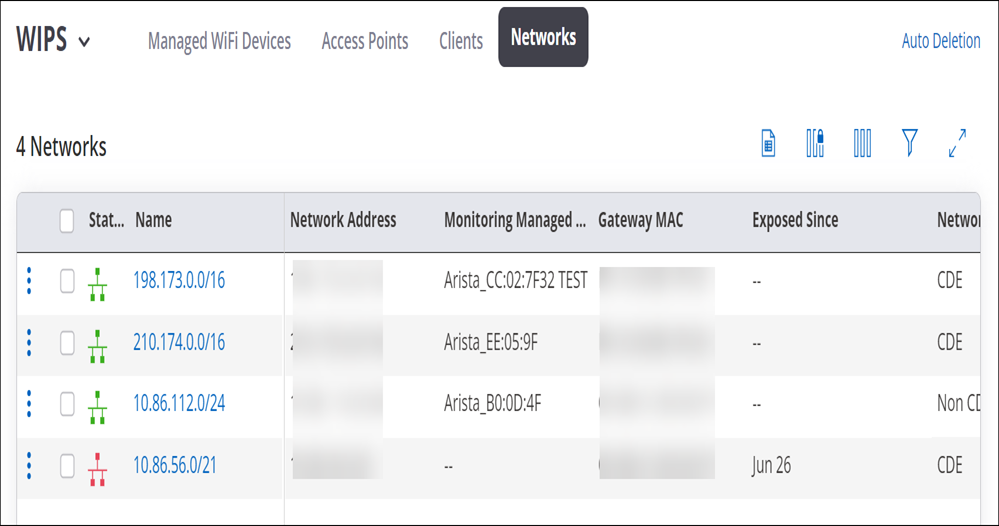
Card Dataholder Environment (CDE) networks are networks that store, process, or transmit payment card transactions and sensitive cardholder data. CDE networks are in the scope of PCI DSS compliance. You can right-click on a network and change its type from CDE to Non-CDE or vice versa.
Auto-Deletion Settings
Using auto-deletion settings, you can specify parameters to automatically rogues Access Points (APs) and clients.
- APs
- Network
- Clients
- Alerts
- Inactive Authorized APs
Auto-Delete Access Points, Clients, and Network
You can specify the duration of inactivity after which rogue Access Points (APs) or clients are automatically deleted. For networks, you can define the duration for which the networks are retained on the server. After the specified retention duration, the networks are automatically deleted from the server. If you want to retain manually classified APs or clients, you can specify that in the auto-deletion parameters.
You can also delete authorized but inactive APs from the current location. Click Delete Inactive Authorized Access Points at the bottom of the Access Points tab.
- Got to .
- Click Auto Deletion.
- From the right pane, define the parameters to delete access points, clients, and network.

- Save the settings.
WIPS Advanced Settings
Under you can define Advanced Settings that allow you to pre-classify Access Points (APs) and define No-Wi-Fi networks.
Access Point Pre-Classification
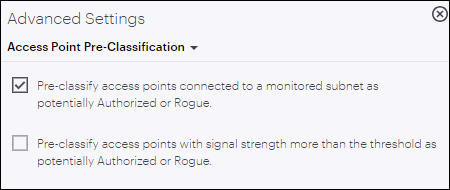
You can also have WIPS pre-classify APs based on the signal strength with which they are visible. As shown in the figure below, if you enable signal strength based pre-classification, CV-CUE allows you to define a signal strength threshold. APs with signal strength greater than the threshold are automatically classified as potentially authorized or rogue.
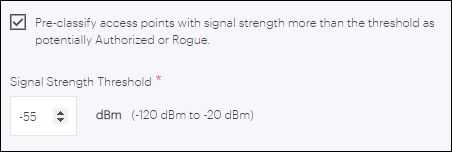
Relying on signal strength based classification alone, however, is not advisable, especially if you plan to enable automatic intrusion prevention. First, if a legitimate AP from a neighboring facility is visible with a signal strength higher than the threshold, then classifying it as rogue could disrupt legitimate Wi-Fi connections to the AP. Therefore, use this classification only if you are sure that no unauthorized Wi-Fi operates in the vicinity of your location. Second, signal strength based classification will not detect rogue APs that operate with a signal strength weaker than the threshold (smartphones running Wi-Fi hotspots, for example).
Define No-Wi-Fi Networks
