
Introduction
CVA 7 is a full rebuild of the CloudVision Appliance (CVA) software on a new architecture. The new architecture provides a much richer set of management and security primitives. It is fully controllable by REST API, Web based GUI or CLI.
Internally, the OS in CVA 7 is based on Alma Linux 9.
Some of the key features of CVA 7 include:
-
REST API + GUI + CLI
-
AAA: Radius, TACACS, Password Rules, NIST 800-63b etc.
-
Crypto: Certificate Management, Ciphers/Macs config
-
Monitoring: SNMP, Prometheus
-
Network: IPv4/IPv6 Dual Stack, DHCP, SLAAC
-
Operations: Unattended (re)installation ("Pave/Repave")
Support Matrix
Appliance Models
CVA 7.2.0 is supported on the following Hardware appliance models:
- DCA-200-CV
- DCA-250-CV
- DCA-300-CV
- DCA-350E-CV (*)
- DCA-400-CV
- DCA-450-CV
The optional disk encryption feature is supported on appliances marked with (*).
Upgrade
CVA 7.2 supports upgrade from CVA 7.0.x and CVA 7.1.x versions
Supported Applications
CloudVision Portal
CloudVision Portal (CVP) is supported from CVP version 2024.2.
CVX
CloudVision eXchange (CVX) is supported on CVA from CVA version 7.1.0 onward.
New Feature Highlights
- DCA-400/450 support
Limitations
- Fresh install does not clear the data disk - Fresh install of CVA on a hardware appliance with an existing data disk will result in persistence of the original data disk content. To clear the disk and reclaim the space, any existing data must be manually deleted.
- vEOS VMs are not supported: CVA 7.2.0 does not support vEOS VMs.
Installation and Setup
Fresh Install of CVA 7
This assumes you already have iDRAC or physical access to the hardware appliance.
- Download the CVA 7 ISO image:
- https://www.arista.com/en/support/software-download
- CloudVision > CloudVision Appliance > 7.2.0 > cva-7.2.0.iso
- https://www.arista.com/en/support/software-download
- Boot the hardware appliance into the ISO image, using one of the following methods:
- Mounting an ISO image (HTTP URL) to the appliance (preferred). See: Integrated Dell Remote Access Controller 9 Version 3.30.30.30 User's Guide
- Mounting an ISO image stored locally on the appliance (often much slower). See:
Using the Virtual Media Function on iDRAC6, iDRAC7, iDRAC8 and iDRAC9 | Dell US - USB flash drive (with physical access)
- Burn the ISO image on to the USB flash drive using utilities such as dd)
- Insert the USB flash drive into the appliance
- Reboot the appliance
-
Press F11 for the Boot Manager to boot to the USB flash drive. See:
How to boot into the BIOS or the Lifecycle Controller on your PowerEdge Server | Dell US
- Follow the prompts to start the installation
AlmaLinux 9.5 (Teal Serval)
Kernel 5.14.0-503.40.1.el9_5.x86_64 on an x86_64

localhost login: arista (automatic login)

Last login: Wed Jul 16 13:12:25 on tty1

Start installation? (Yes/No) > yes

Verifying the integrity of the installation media...

Extracting files to prepare for installing CloudVision Appliance 7.2.0 (aristanetworks/atlas-cva/cva-7.2.0 #1)...

Checking hardware compatibility for installing CloudVision Appliance 7.2.0 (aristanetworks/atlas-cva/cva-7.2.0 #1)...

CloudVision Appliance 7.2.0 (aristanetworks/atlas-cva/cva-7.2.0 #1) will be installed onto the following disk:

Path   : /dev/sda
Vendor : DELL
Model  : PERC H330 Adp
Serial : 002cb31005525fca2e0043cd2020a7c2
Size   : 200G


Press Enter to confirm >

Installing... (this may take a few minutes)
- You have now installed CVA 7 onto the appliance
Press Enter to confirm >

Installing... (this may take a few minutes)

Installation completed successfully.

Please remove the installation media and press Enter to reboot >
Initial setup (first boot) of CVA
The first time CVA 7 boots up it uses a console based setup program called “firstboot” to set up basic appliance parameters like IP addresses and initial admin passwords. These can later be changed via the CLI, GUI or REST API.
The firstboot setup program is available in the following ways:
- On the serial console
- Via the integrated management (iDRAC) of the appliance
- On the physical console (Video ports) of the appliance
CloudVision Appliance 7.2.0 (aristanetworks/atlas-cva/cva-7.2.0 #1)
Log in as 'admin' to configure

cva login:
Login as admin and follow the prompts to complete firstboot
CloudVision Appliance 7.2.0 (aristanetworks/atlas-cva/cva-7.2.0 #1)
Log in as 'admin' to configure

cva login: admin
This product is governed by an End User License Agreement (EULA).
You must accept this EULA to continue using this product.

You can view this EULA from our website at:
https://www.arista.com/en/eula

Do you accept the EULA for this product? (Yes/No) [Yes] >
Do you accept the EULA for this product? (Yes/No) [Yes] > yes

Running system pre-check


Finished system pre-check


Starting first-time setup


Local Node Configuration
------------------------
Emergency recovery user password >
Emergency recovery user password (retype to confirm) >
Hostname > cva266

Management network options:

[1] IPv4 only
[2] IPv6 only
[3] IPv4 and IPv6

> 3

Management network (IPv4) options:

[1] Manual
[2] Automatic via DHCP

[1] > 2

Management network (IPv6) options:

[1] Automatic via SLAAC & DHCPv6
[2] Manual

[1] > 1
Administrator password >
Administrator password (retype to confirm) >

System Time
-----------
NTP server 1 > ntp.aristanetworks.com
NTP server 2 (Optional) >

Menu
----

Please choose an option:

[ 1] Apply settings
[ 2] Reset and start over
[ 3] Update Recovery Password   (*****)
[ 4] Update Hostname            (cva266)
[ 5] Update IP Option           (IPv4 and IPv6)
[ 6] Update IPv4 Method         (Automatic via DHCP)
[ 7] Update IPv6 Method         (Automatic via SLAAC & DHCPv6)
[ 8] Update Admin Password      (*****)
[ 9] Update NTP Server 1        (ntp.aristanetworks.com)
[10] Update NTP Server 2        (<none>)

[1] >
Please choose an option:

[ 1] Apply settings
[ 2] Reset and start over
[ 3] Update Recovery Password   (*****)
[ 4] Update Hostname            (cva266)
[ 5] Update IP Option           (IPv4 and IPv6)
[ 6] Update IPv4 Method         (Automatic via DHCP)
[ 7] Update IPv6 Method         (Automatic via SLAAC & DHCPv6)
[ 8] Update Admin Password      (*****)
[ 9] Update NTP Server 1        (ntp.aristanetworks.com)
[10] Update NTP Server 2        (<none>)

[1] > 1
[Stage 1] Initializing system
[Stage 2] Configuring local node
  Waiting for network configuration
  IP address on br0 is 10.244.24.232
  Generating cryptographic keys
[Stage 3] Configuring system time
  Initializing the system time by polling the NTP server:
    ntp.aristanetworks.com
[Stage 4] Configuring cluster
  Cluster configured successfully.
  Current node ID is 30035
  All cluster nodes:
    Node 30035: [fdfd:5c41:712d:d068:d28e:79ff:fef4:17c8]:6642
appliance-type: atlas-cva
[Stage 5] Configuring Atlas packages
  Adding bundled local Atlas package sources.

First-time setup is complete!

Press enter to continue >
After firstboot completes, you can login as admin (with the password you set above) to CVA 7:
- Web UI at https://<cva-ip-address>
- CLI via SSH
Upgrade from existing CVA
Upgrade from CVA 6 or before
Direct upgrade from CVA 6.x to 7.2.0 is not supported. To upgrade from CVA 6, please first perform the upgrade to CVA 7.1.1 (see TOI - Framework to upgrade from legacy CVA) and then proceed with a subsequent upgrade to CVA 7.2.0 by following the steps below.
Upgrade from CVA 7 or later
Upgrading CVA involves one or more reboots. It is highly recommended to have remote console (e.g. iDRAC) and physical access ready in case recovery becomes necessary.
1. Download the new CVA ISO image (e.g. cva-7.2.0.iso) from the Software Download page on arista.com.
2. Copy the new CVA ISO image onto the to-be-upgraded CVA using one of the following methods (2a - 2d).
2a. SCP (executing the scp command from any other machine)
On the machine that carries the new CVA ISO image, run:
scp <file> admin@<cva-ip>://image
Example:
scp cva-7.2.0.iso 该邮件地址已受到反垃圾邮件插件保护。要显示它需要在浏览器中启用 JavaScript。://image
2b. SCP (executing the copy command from CVA)
Login to the CVA CLI and run:
enable
copy scp://<user>:<password>@<host>/<iso-image-path> image://
Example:
enable
copy scp://root:该邮件地址已受到反垃圾邮件插件保护。要显示它需要在浏览器中启用 JavaScript。/cva-7.2.0.iso image://
2c. HTTP/HTTPS URL (via the CLI)
Login to the CVA CLI and run:
enable
copy <url-to-iso> image://
Example:
enable
copy https://192.0.2.101/cva-7.2.0.iso image://
ignore-ssl-certificate can be optionally used (i.e. appended to the end of the copy command) if the HTTPS server presents a self-signed certificate or a private CA certificate.
2d. HTTP/HTTPS URL (via the GUI)
- In the CVA Web UI, go to the Maintenance > Upgrade page.
- It should land you at the Images tab by default.
- Click Copy Image to import the CVA ISO image using an HTTP/HTTPS URL.
3. Go to the GUI and in the Images tab locate the image that has just been imported.
4. Click Upgrade and follow the instructions to complete the process. The CVA reboots into the new version upon a successful upgrade.
Setting up CVP on CVA 7
… via the GUI
-
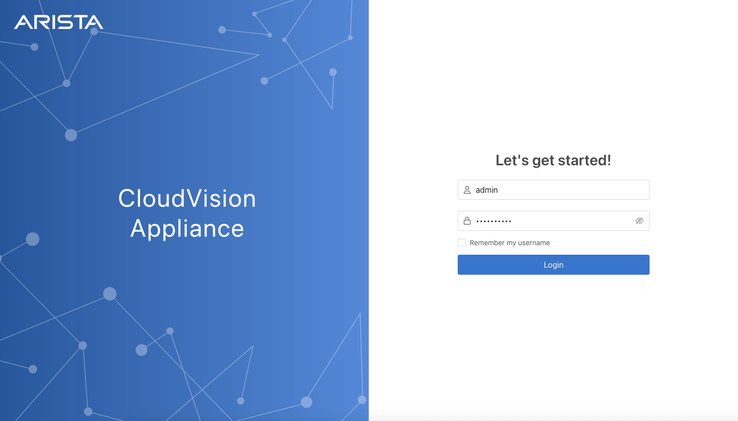
Login to the CVA 7 Web UI at https://<cva-ip-address> on your web browser
-
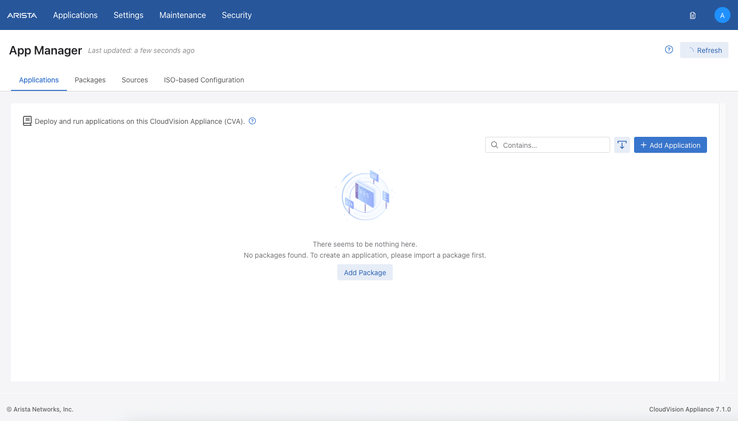
Click Add Package to import a CVP atswi image into this CVA 7 instance
-
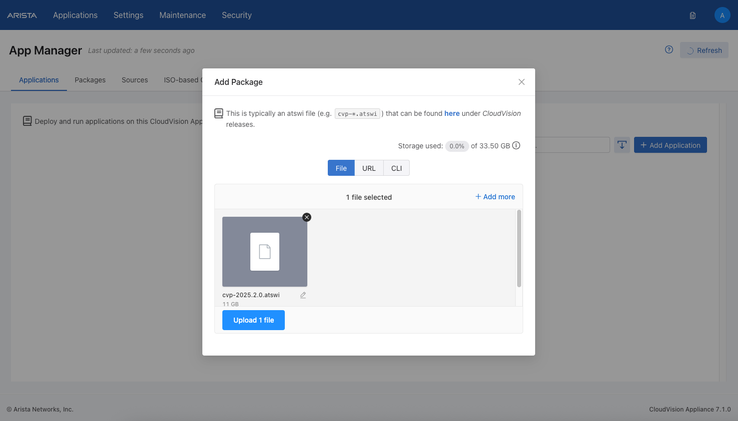
Import a CVP atswi image downloaded from the arista.com Software Downloads page
https://www.arista.com/en/support/software-download
e.g. CloudVision > CloudVision Portal > Active Releases > 2026.1> 2026.1.1 > cvp-2026.1.1.atswiThe file can be uploaded by selecting (or drag-and-drop) a file to upload via the browser:
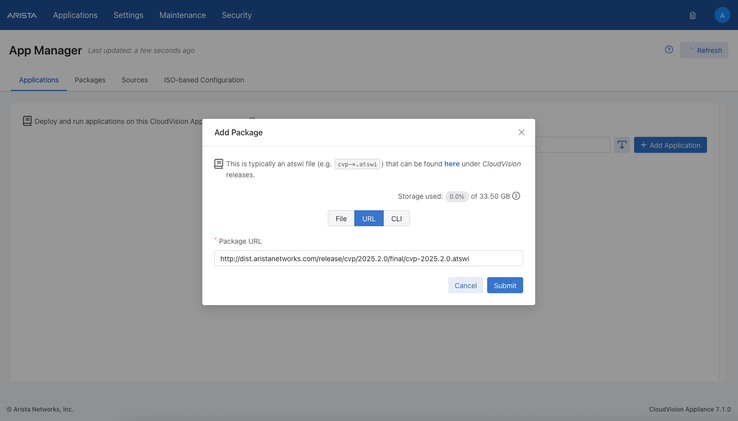
Alternatively, if hosted on a web server, the URL can be used to import the CVP atswi image:
When a package has already been added, additional packages may be added under Sources > Actions > Add Package:
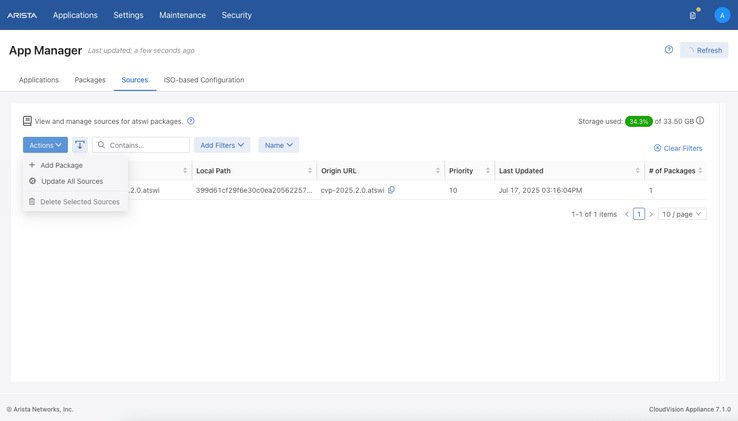
-
Click Submit and wait for the import to finish
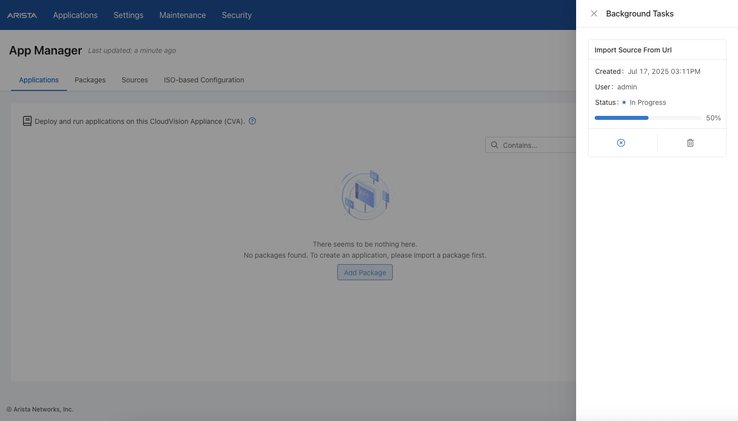
-
When import is complete, close the Background Tasks drawer
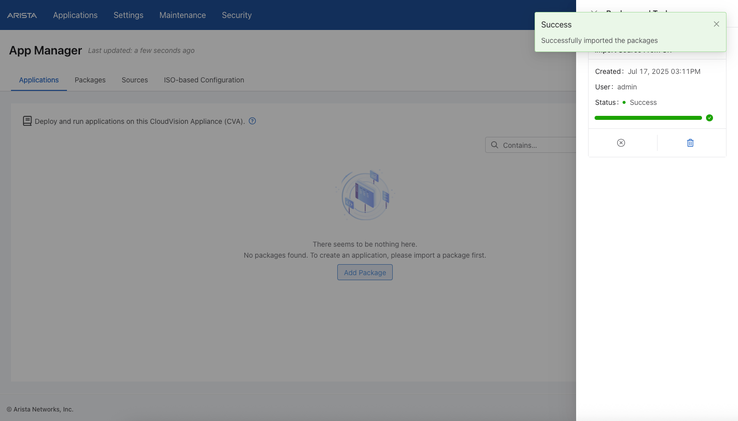
-
Click Add Application
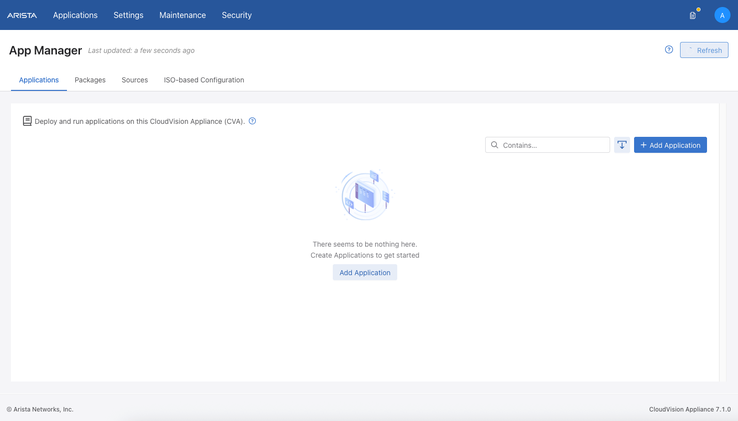
-
Select the CVP/CVX package and version imported just now, then click Next
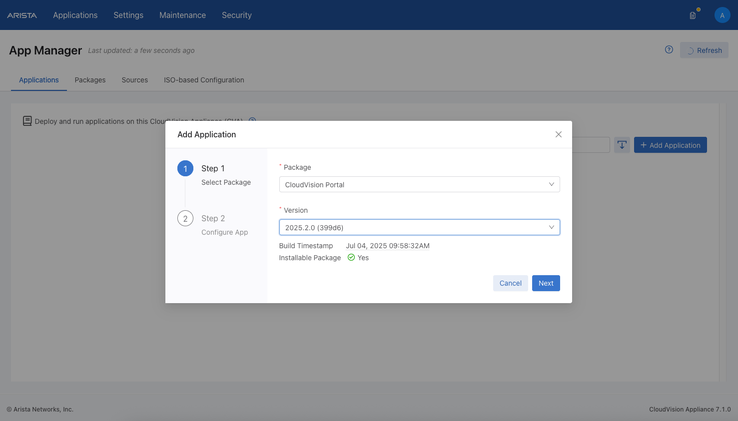
-
Set the Desired State to Running, then click Submit
Optional: An ISO-based Configuration file may be specified to automatically provision the new instance of CVP. The ISO file can be imported via the ISO-based Configuration tab in the UI.
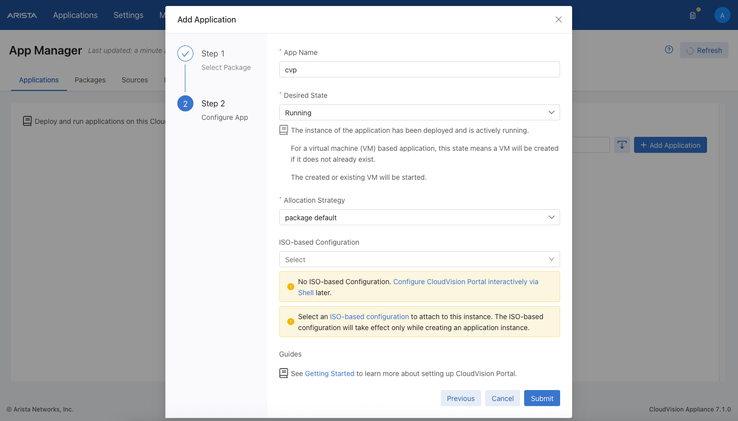
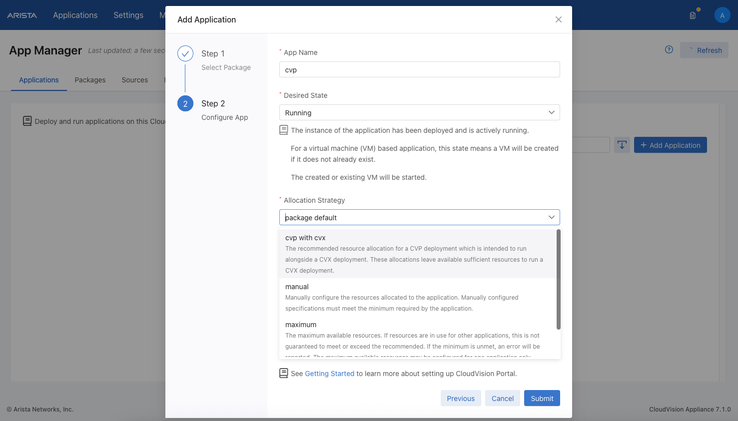
Optional: the resource allocation strategy may also be selected at this point to determine the vCPU and memory allocation the VM receives. The allocation may also be updated after deployment (this requires a VM reboot), please see Managing the VM Resource Allocations on CVA 7 for further details.
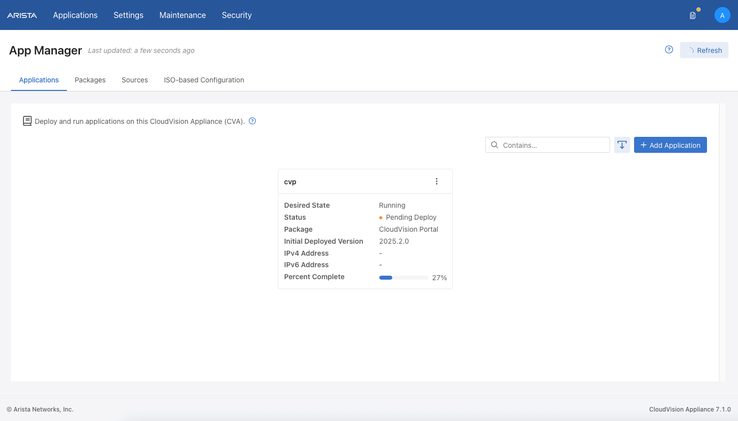
-
The CVP application is now being deployed
-
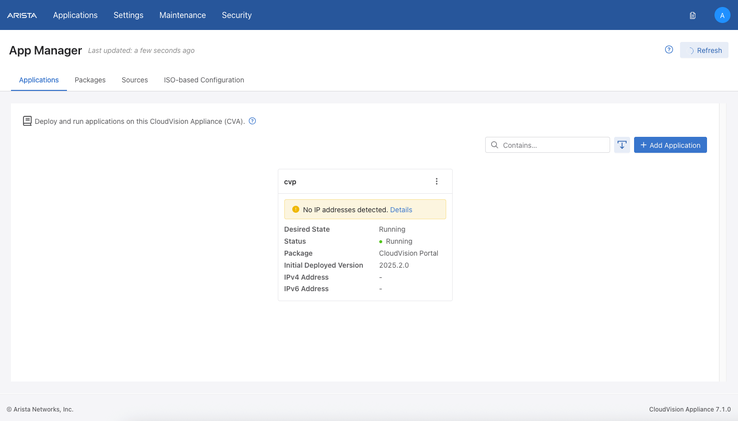
The CVP application is now running. However, CVP does not have any IP addresses yet (unless the instance has already been provisioned with the ISO-based configuration above). Click Details to follow-up on that.
-
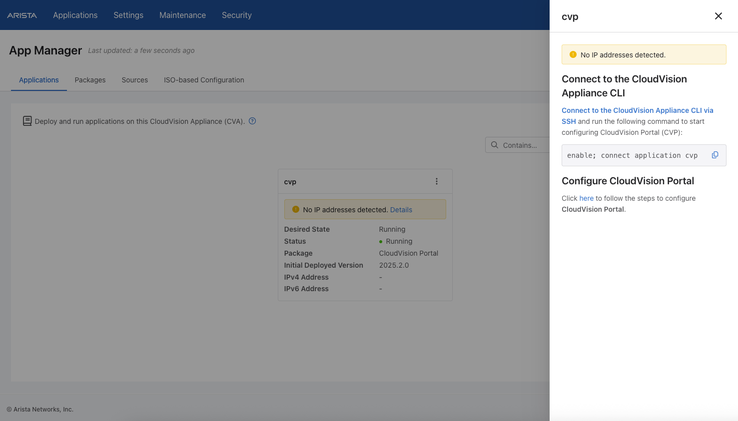
Click Connect to the CloudVision Appliance CLI via SSH
-
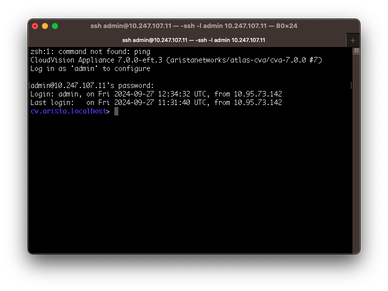
Now you are in the CVA 7 CLI
-
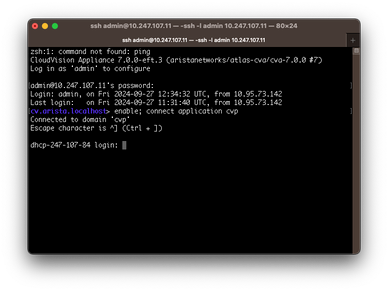
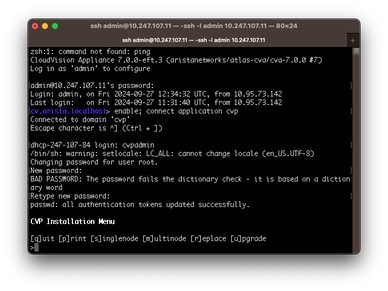
Run enable; connect application cvp (copied and pasted from the CVA 7 Web UI above) to connect to the CVP console
-
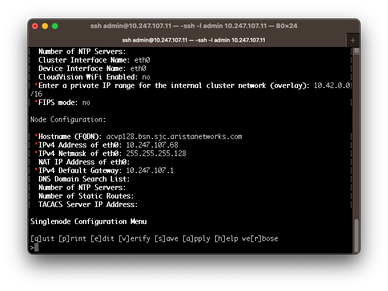
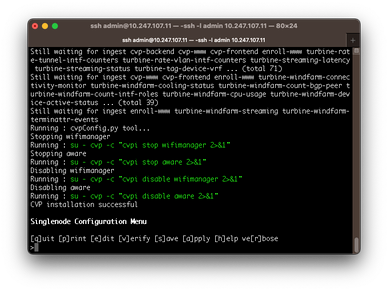
Login as cvpadmin and follow the prompts to set up CVP. A sample output can be found at:
-
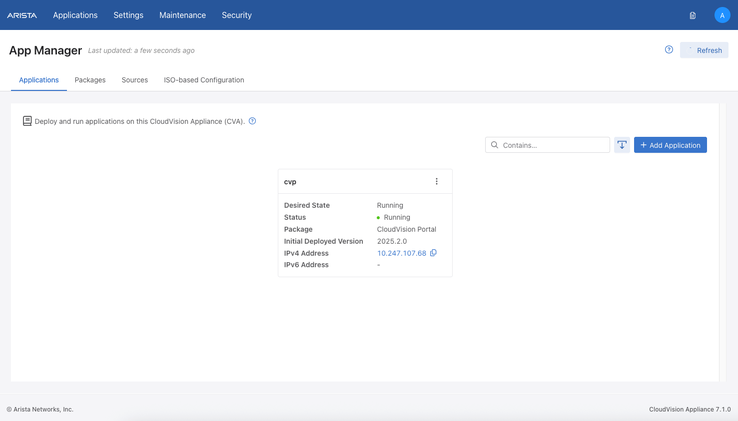
The IP address of CVP is now shown in the CVA 7 Web UI. Click the IP address to go to the CVP UI
-
You now have a working instance of CVP ✅
Set up CVP on CVA 7
… via the CLI
Step 1: Connect to the CLI, using username admin and the password you specified on firstboot
ssh admin@<ip-address>
Step 2: Download the CVP atswi package from an HTTP server
CVP atswi images can be downloaded from the arista.com Software Downloads page:
https://www.arista.com/en/support/software-download
e.g. CloudVision > CloudVision Portal > Active Releases > 2025.2 > 2025.2.0 > 2025.2.0.atswi
enable
copy <cvp-package-url> package://<optional package source name>
Sample output
cva> enable
cva# copy https://dist.aristanetworks.com/release/cvp/2025.2.0/final/cvp-2025.2.0.atswi package://
 00:02:23: Completed

Successfully imported atswi package:
Name: CloudVision Portal
Version: 2025.2.0
Checksum: 8cb31b3ca859c66fc1004ed20876eddf2c037f328abbfe9f8c3d59b32065653e
Step 3: Create an app deployment
enable
config
application <deployment name>
package-checksum <checksum-from-above>
Step 3.A: (optional) ISO-based configuration
An ISO may also be optionally specified at this stage to configure the CVP deployment using CVP’s ISO-based configuration. To do this, the ISO must be uploaded via the GUI or the CLI commands below:
enable
copy <cvp-iso-url> userdata://<ISO name>
The imported ISO may then be configured as shown below:
provisioning-userdata <ISO name>
Step 3.B: (optional) Configure a resource allocation strategy
A resource allocation strategy may be configured or can be omitted in order to use the package provided default. The allocations strategy can also be updated after app deployment but requires a resource reallocation which involves an app reboot.
strategy cvp-with-cvx
Step 4: Deploy and run the app
Once the deployment config has been added, the app can be deployed by setting the desired-state to running:
desired-state running
Following completion of these steps, the deployment process will begin. The app state can be monitored via the show application command as shown in the Introduction to the CVA 7 CLI section below.
Sample output:
cva> enable
cva# config
cva(config)# application cvp
cva(config-app)# package-checksum 8cb31b3ca859c66fc1004ed20876eddf2c037f328abbfe9f8c3d59b32065653e
cva(config-app)# desired-state running
cva(config-app)# show application
~~~~~~~~~~~~~~~~~~~~~~~~~~~~~~~~~~~~~~~~~~~~~~ Application Config  ~~~~~~~~~~~~~~~~~~~~~~~~~~~~~~~~~~~~~~~~~~~~~~
Name Desired State Package Checksum Package Name       Package Version Allocation Strategy Provisioning Userdata
----|-------------|----------------|------------------|---------------|-------------------|---------------------|
cvp  running       8cb31            CloudVision Portal 2025.2.0        package-default

~~~~~~~~~~~~~~~~~~~~~~~~~~~~~~~ Application State  ~~~~~~~~~~~~~~~~~~~~~~~~~~~~~~~
Name Status  Initial Deployed Version Last Refreshed                 Completion %
----|-------|------------------------|------------------------------|------------|
cvp  running 2025.2.0                 2025-07-17 14:47:36.944000 UTC
None.
None.
Once the application is running, use the connect application cvp command to connect to the CVP console.
cva> enable; connect application cvp
Connected to domain 'cvp'
Escape character is ^] (Ctrl + ])
CentOS Linux 7 (Core)
Kernel 6.2.2-1.el7.elrepo.x86_64 on an x86_64
localhost login:
Login as cvpadmin and follow the prompts to set up CVP. A sample output can be found at:
https://www.arista.com/en/cg-cv/cv-shell-based-configuration
cva> enable; connect application cvp
Connected to domain 'cvp'
Escape character is ^] (Ctrl + ])
CentOS Linux 7 (Core)
Kernel 6.2.2-1.el7.elrepo.x86_64 on an x86_64
localhost login: cvpadmin
Changing password for user root.
New password:
BAD PASSWORD: The password is shorter than 8 characters
Retype new password:
passwd: all authentication tokens updated successfully.
CVP Installation Menu
[q]uit [p]rint [s]inglenode [m]ultinode [r]eplace [u]pgrade
>s
Enter the configuration for CloudVision Portal and apply it when done.
Entries marked with '*' are required.
Common Configuration:
  CloudVision Deployment Model [d]efault [w]ifi_analytics: d
  DNS Server Addresses (IPv4 Only): 172.22.22.40
  DNS Domain Search List:
  Number of NTP Servers:
  Cluster Interface Name: eth0
  Device Interface Name: eth0
  CloudVision WiFi Enabled: no
 *Enter a private IP range for the internal cluster network (overlay): 10.42.0.0
/16
 *FIPS mode: no
Node Configuration:
 *Hostname (FQDN): acvp102.bsn.sjc.aristanetworks.com
 *IP Address of eth0: 10.243.253.102
 *Netmask of eth0: 255.255.248.0
  NAT IP Address of eth0:
 *Default Gateway: 10.243.248.1
  DNS Domain Search List:
  Number of NTP Servers:
  Number of Static Routes:
  TACACS Server IP Address:
Singlenode Configuration Menu
[q]uit [p]rint [e]dit [v]erify [s]ave [a]pply [h]elp ve[r]bose
>a
When the CVP setup is complete, you can reach CVP via its Web UI or via SSH ✅
[ 2172.882489] IPv6: ADDRCONF(NETDEV_CHANGE): eth0: link becomes ready
[ 2172.896797] IPv6: ADDRCONF(NETDEV_CHANGE): vethdd0d744f: link becomes ready
[ 2172.903753] flannelbr0: port 215(vethdd0d744f) entered blocking state
[ 2172.910386] flannelbr0: port 215(vethdd0d744f) entered forwarding state
Still waiting for ingest enroll-www turbine-windfarm-ptp-metrics turbine-windfarm-ptp-threshold-events turbine-windfarm-streaming turbine-windfarm-tag-intf turbine-windfarm-version-bgp
Running : cvpConfig.py tool...
Stopping wifimanager
Running : su - cvp -c "cvpi stop wifimanager 2>&1"
A cvpi -v=3 start all command with pid 13970 is already running. Retrying after 60 seconds.
Running : su - cvp -c "cvpi stop wifimanager 2>&1"
Stopping aware
Running : su - cvp -c "cvpi stop aware 2>&1"
Disabling wifimanager
Running : su - cvp -c "cvpi disable wifimanager 2>&1"
Disabling aware
Running : su - cvp -c "cvpi disable aware 2>&1"
CVP installation successful
Singlenode Configuration Menu
[q]uit [p]rint [e]dit [v]erify [s]ave [a]pply [h]elp ve[r]bose
>
Setting up CVX on CVA 7
To deploy CVX, please import a CVX atswi as shown for CVP in the section above. CVX may be deployed following the same procedure as for CVP in GUI steps 1 - 9 and CLI steps 1 - 4.
The example below shows the deployment steps for CVX via the GUI.
-
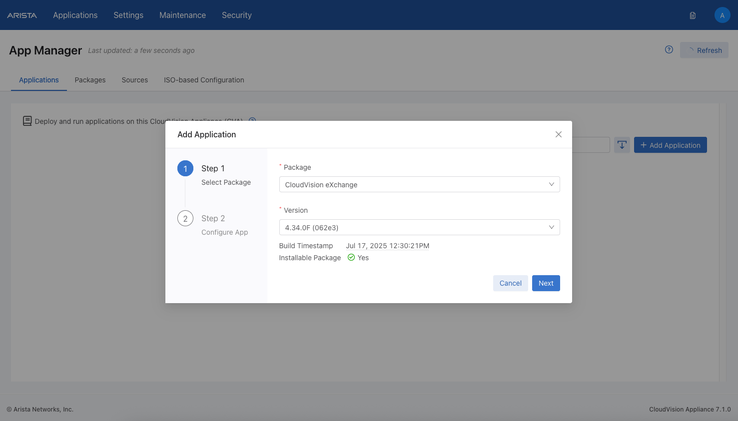
Select the CVX package
-
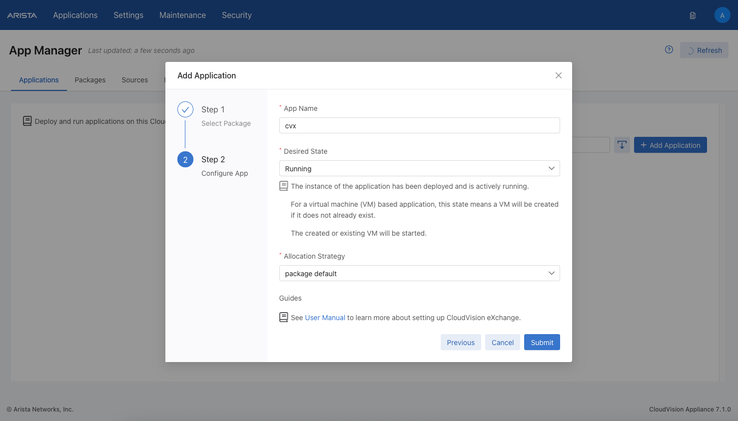
Configure and deploy the CVX application
-
Wait for the configured Desired State to be reached
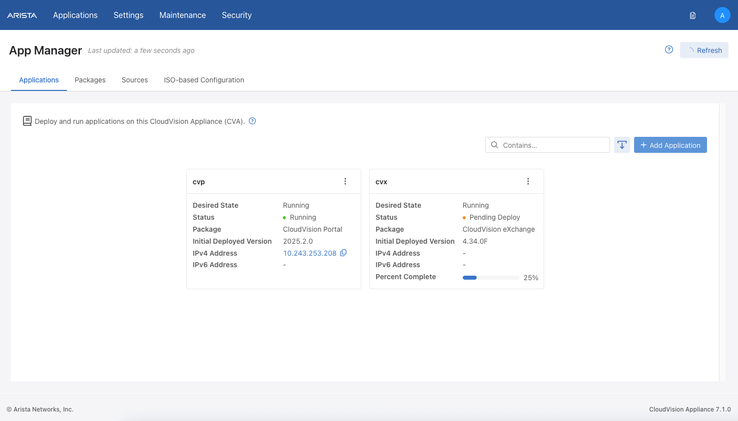
If CVX is deployed alongside CVP, please ensure the relevant co-operative resource strategies “cvx-with-cvp” and “cvp-with-cvx” are in use (for each respectively). Failure to do so may prevent deployment from proceeding as shown below:
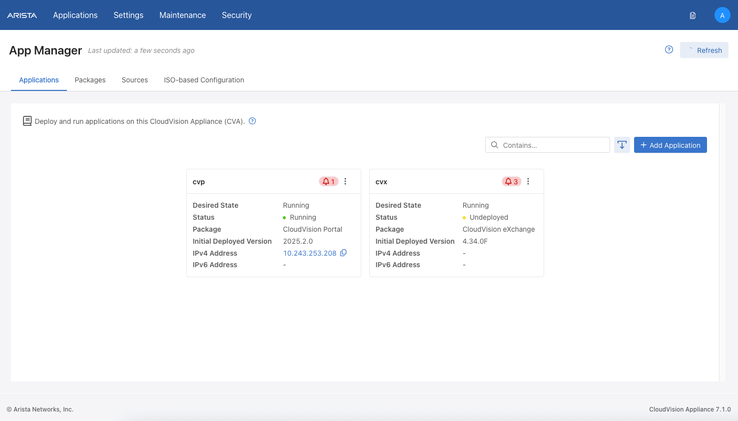
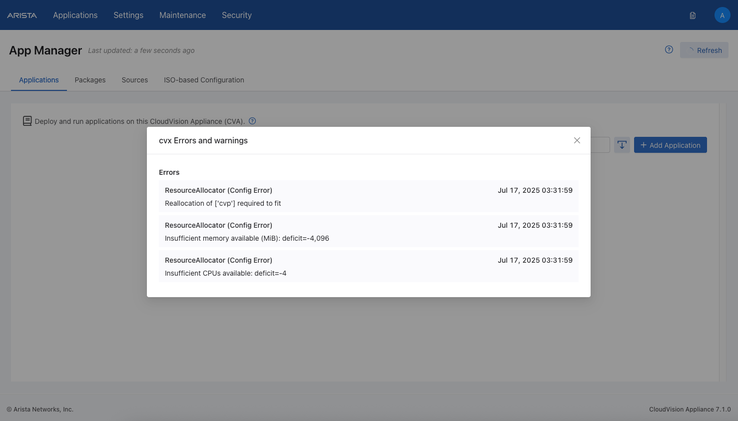
To proceed with deployment, please configure the correct strategies and trigger reallocation (of CVP) via Reallocate Resources as indicated via the error below:
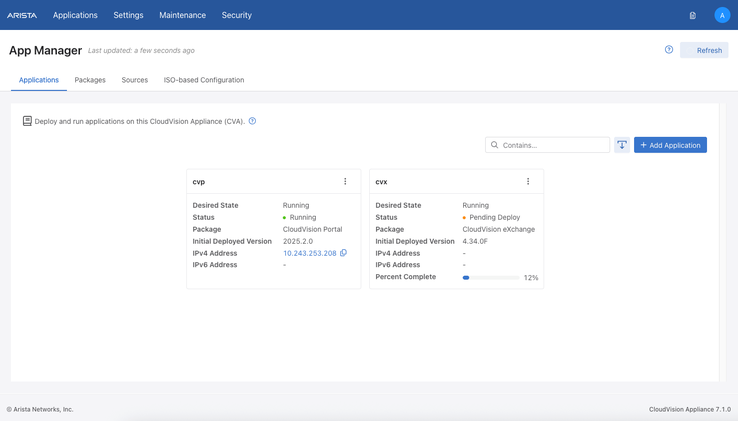
Following reallocation, the resource required to run CVX will be reclaimed from CVP and allow the CVX deployment to proceed:
Managing VM Resource Allocation on CVA 7
CVA 7.1.0 added functionality to manage the resource allocations for the deployed VMs via the REST API (with GUI and CLI support). This feature allows the memory and vCPU allocation to be configured for each VM. Overallocation of resources with multiple VMs or exceeding the host resources is not supported.
The system tracks two types of resource allocations:
-
Computed Allocation: The latest resource allocation computed for the application based on the selected strategy. When a new strategy has been selected, this represents the allocation the application will receive following reallocation or fresh deployment.
-
Deployed Allocation: The resource allocation currently in use by the deployed application. For applications not yet deployed, no allocation is reported.
Please see the sections below for instructions on using this feature and inspecting the allocations above in the GUI and CLI. Further details on the available strategies can be found in the Resource Allocation Strategies section.
… via the GUI
Configuring resource allocation during deployment
During initial app deployment the allocation strategy may be selected as shown below:
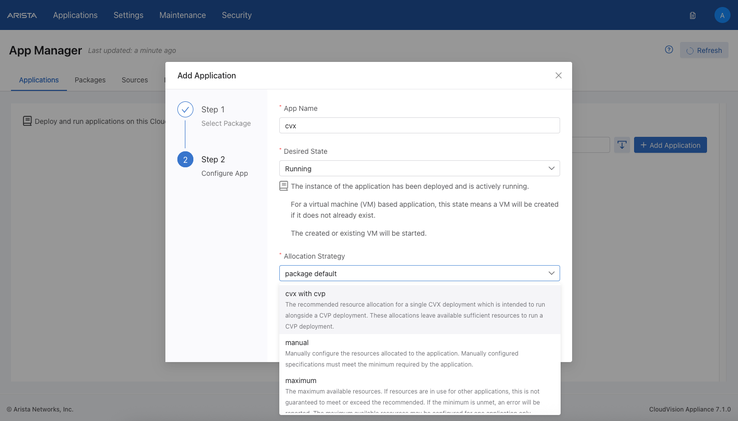
When strategy “manual” is used, further options are provided to enter the exact VM specs:
Updating the resource allocation after deployment
-
Following app deployment, the strategy may be updated by selecting Edit Application and selecting a new strategy using the menu shown above.
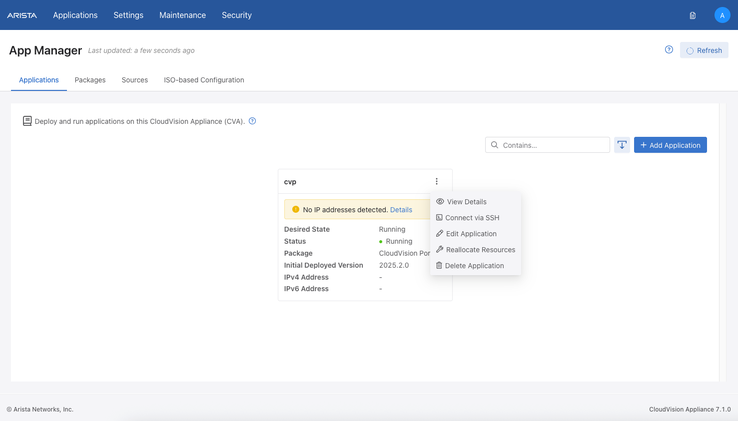
-
Once the config has been submitted, the app will receive a new resource allocation. The mismatch between the available allocation and currently used allocation is reported as an error indicating “Updated allocation detected. Reallocate required.”
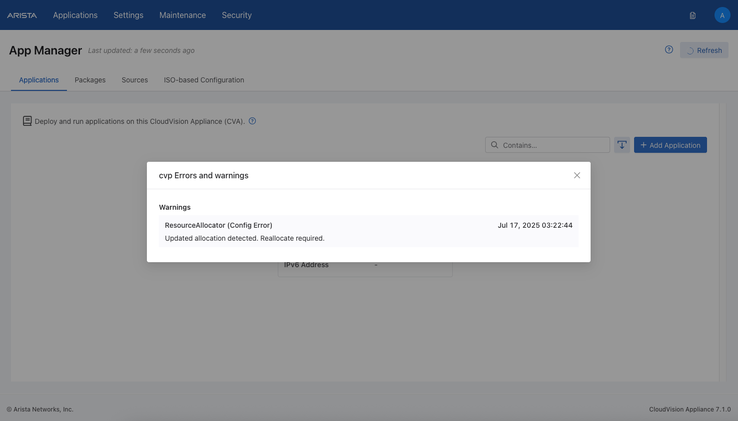
-
To update the deployed VM to receive the new allocation, a reallocation must be manually triggered. During this time, the application will continue to run with the prior allocation. The incoming newly computed allocation may be inspected and compared with the existing deployed allocation via View Details (shown in the bottom right):
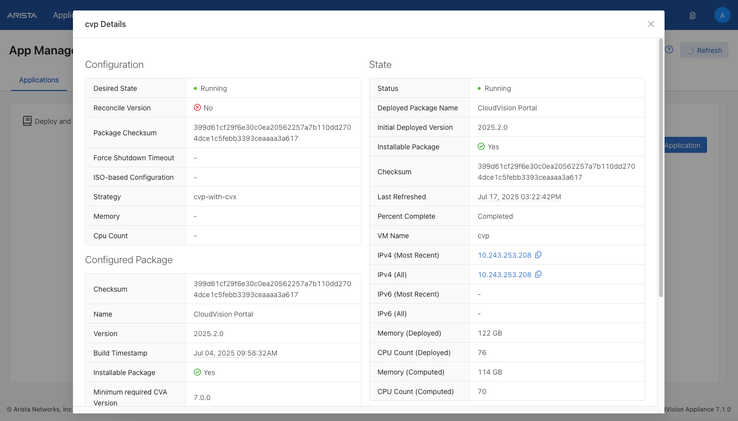
-
To update the application to receive the new allocation, trigger a reallocation via Reallocate Resources
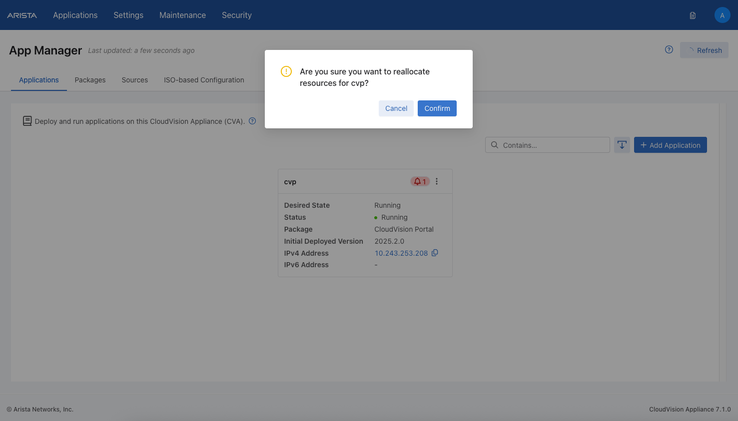
-
Reallocation will orchestrate the necessary VM shutdown and update its configured resources
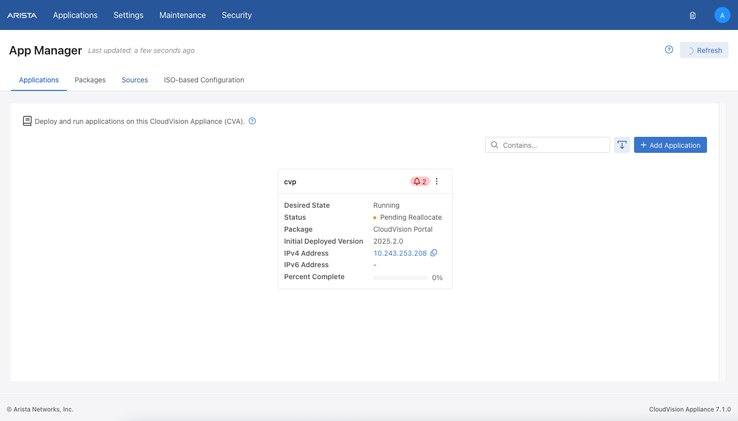
-
Following reallocation, the VM will be returned to its prior Desired State and the deployed allocation will be updated
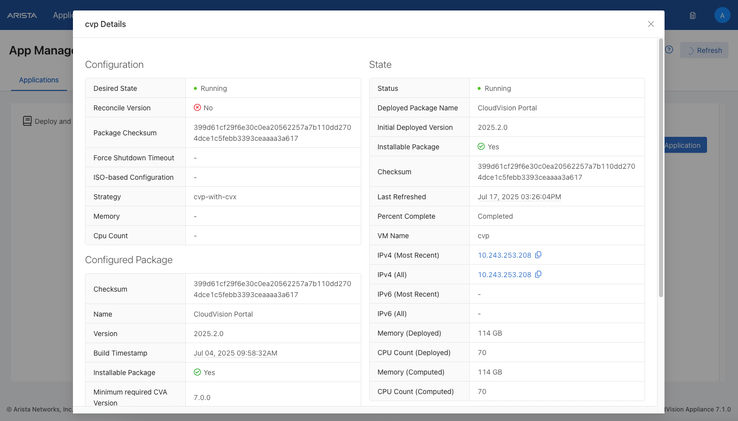
… via the CLI
Configuring the resource allocation during deployment
The resource allocation strategy may be configured during app deployment using the strategy command (when in the config-app submode). Tab completion can be used to reveal the list of available strategies provided by a package and their descriptions.
cva> enable
cva# config
cva(config)# application cvp
cva(config-app)# package-checksum 399d61cf29f6e30c0ea20562257a7b110dd2704dce1c5febb3393ceaaaa3a617
cva(config-app)# strategy
cvp-with-cvx     manual           maximum          package-default
cva(config-app)# strategy
<Strategy Name >
 cvp-with-cvx                                        The recommended resource allocation for a CVP deployment which is intended to run alongside a CVX deployment. These allocations leave available sufficient resources to run a CVX deployment.
 manual                                              Manually configure the resources allocated to the application. Manually configured specifications must meet the minimum required by the application.
 maximum                                             The maximum available resources. If resources are in use for other applications, this is not guaranteed to meet or exceed the recommended. If the minimum is unmet, an error will be reported. The maximum available resources may be configured for one application only.
 package-default                                     The default allocation strategy for the CVP atswi. The default maps to "maximum".
<Atlas/app/config/resource-allocation/strategy>       <String (default package-default)>
cva(config-app)# strategy maximum
When strategy “manual” is configured, the individual memory and CPU specs must also be provided.
cva1(config-app)# strategy manual
cva1(config-app)# memory-bytes 132660876480
cva1(config-app)# cpu-count 70
Updating the resource allocation after deployment
Step 1: After app deployment, the strategy can be re-configured using the same command shown above.
cva(config-app)# show running-config application

! application
application cvp
  desired-state running
  package-checksum 399d61cf29f6e30c0ea20562257a7b110dd2704dce1c5febb3393ceaaaa3a617
  strategy maximum
cva(config-app)# strategy cvp-with-cvx
cva(config-app)# show running-config application

! application
application cvp
  desired-state running
  package-checksum 399d61cf29f6e30c0ea20562257a7b110dd2704dce1c5febb3393ceaaaa3a617
  strategy cvp-with-cvx
Step 2: After the config update,, the app will receive a new resource allocation. The mismatch between the available allocation and currently used allocation is reported as an error indicating “Updated allocation detected. Reallocate required.”
cva(config-app)# show application
~~~~~~~~~~~~~~~~~~~~~~~~~~~~~~~~~~~~~~~~~~~~~~ Application Config  ~~~~~~~~~~~~~~~~~~~~~~~~~~~~~~~~~~~~~~~~~~~~~~
Name Desired State Package Checksum Package Name       Package Version Allocation Strategy Provisioning Userdata
----|-------------|----------------|------------------|---------------|-------------------|---------------------|
cvp  running       399d6            CloudVision Portal 2025.2.0        cvp-with-cvx

~~~~~~~~~~~~~~~~~~~~~~~~~~~~~~~ Application State  ~~~~~~~~~~~~~~~~~~~~~~~~~~~~~~~
Name Status  Initial Deployed Version Last Refreshed                 Completion %
----|-------|------------------------|------------------------------|------------|
cvp  running 2025.2.0                 2025-07-17 16:13:15.849000 UTC
None.

~~~~~~~~~~~~~~~~~~~~~~~~~~~~~~~~~~~~~~ Application Warnings  ~~~~~~~~~~~~~~~~~~~~~~~~~~~~~~~~~~~~~~
Name Failure type Message                                           Last reported
----|------------|-------------------------------------------------|------------------------------|
cvp  config-error Updated allocation detected. Reallocate required. 2025-07-17 16:13:08.115000 UTC
Step 3: To update the deployed VM to receive the new allocation, a reallocation must be manually triggered. During this time, the application will continue to run with the prior allocation. The incoming newly computed allocation may be inspected and compared with the existing deployed allocation via show application <deployment name> state details:
cva1(config-app)# show application cvp state details
State Last refreshed                 : 2025-07-17 16:16:35.907000 UTC
State Nature                         : vm
State Status                         : running
Deployed version App id              : cvp
Deployed version App nature          : vm
Deployed version Build timestamp     : 2025-07-04 08:58:32 UTC
Deployed version Checksum            : 399d61cf29f6e30c0ea20562257a7b110dd2704dce1c5febb3393ceaaaa3a617
Deployed version Installable package : True
Deployed version Name                : CloudVision Portal
Deployed version Version             : 2025.2.0
Running version App id               : cvp
Running version App nature           : vm
Running version Build timestamp      : 2025-07-04 08:58:32 UTC
Running version Checksum             : 399d61cf29f6e30c0ea20562257a7b110dd2704dce1c5febb3393ceaaaa3a617
Running version Installable package  : True
Running version Name                 : CloudVision Portal
Running version Version              : 2025.2.0
Vm state Vm name                     : cvp
Ipv4 All                             : 10.243.253.208
Ipv4 Most recent                     : 10.243.253.208
Computed allocation Cpu count        : 70
Computed allocation Memory bytes     : 114GB
Deployed allocation Cpu count        : 76
Deployed allocation Memory bytes     : 122GB
Step 4: To update the application to receive the new allocation, trigger a reallocation via reallocate application <deployment name>:
cva1(config-app)# reallocate application cvp
None.
Step 5: Reallocation will orchestrate the necessary VM shutdown and update its configured resources:
cva1(config-app)# show application
~~~~~~~~~~~~~~~~~~~~~~~~~~~~~~~~~~~~~~~~~~~~~~ Application Config  ~~~~~~~~~~~~~~~~~~~~~~~~~~~~~~~~~~~~~~~~~~~~~~
Name Desired State Package Checksum Package Name       Package Version Allocation Strategy Provisioning Userdata
----|-------------|----------------|------------------|---------------|-------------------|---------------------|
cvp  running       399d6            CloudVision Portal 2025.2.0        cvp-with-cvx

~~~~~~~~~~~~~~~~~~~~~~~~~~~~~~~~~~~~ Application State ~~~~~~~~~~~~~~~~~~~~~~~~~~~~~~~~~~~~
Name Status           Initial Deployed Version Last Refreshed                 Completion %
----|----------------|------------------------|------------------------------|------------|
cvp  pending-shutdown 2025.2.0                 2025-07-17 16:30:14.851000 UTC 20%
None.

~~~~~~~~~~~~~~~~~~~~~~~~~~~~~~~~~~~~~~ Application Warnings  ~~~~~~~~~~~~~~~~~~~~~~~~~~~~~~~~~~~~~~
Name Failure type Message                                           Last reported
----|------------|-------------------------------------------------|------------------------------|
cvp  config-error Updated allocation detected. Reallocate required. 2025-07-17 16:30:14.848000 UTC
cvp  config-error Triggering shutdown and re-allocation.            2025-07-17 16:30:14.851000 UTC
Step 6: Following reallocation, the VM will be returned to its prior Desired State and the deployed allocation will be updated:
cva1(config-app)# show application cvp state details
State Last refreshed                 : 2025-07-17 16:32:37.782000 UTC
State Nature                         : vm
State Status                         : running
Deployed version App id              : cvp
Deployed version App nature          : vm
Deployed version Build timestamp     : 2025-07-04 08:58:32 UTC
Deployed version Checksum            : 399d61cf29f6e30c0ea20562257a7b110dd2704dce1c5febb3393ceaaaa3a617
Deployed version Installable package : True
Deployed version Name                : CloudVision Portal
Deployed version Version             : 2025.2.0
Running version App id               : cvp
Running version App nature           : vm
Running version Build timestamp      : 2025-07-04 08:58:32 UTC
Running version Checksum             : 399d61cf29f6e30c0ea20562257a7b110dd2704dce1c5febb3393ceaaaa3a617
Running version Installable package  : True
Running version Name                 : CloudVision Portal
Running version Version              : 2025.2.0
Vm state Vm name                     : cvp
Ipv4 All                             : 10.243.253.208
Ipv4 Most recent                     : 10.243.253.208
Computed allocation Cpu count        : 70
Computed allocation Memory bytes     : 114GB
Deployed allocation Cpu count        : 70
Deployed allocation Memory bytes     : 114GB
Resource Allocation Strategies
For CVA 7.2.0, the supported strategies and their corresponding allocations are listed in this section. Resource allocation strategies are provided by the atswi package and may therefore be updated independently of CVA such that the values provided here are not guaranteed to be accurate for newer atswis.
Recommended Minimum Allocations
For all of the strategies below, the resulting allocation must meet the recommended minimum for the application. When the recommended minimum is not met, a warning is reported. Deployment in this scenario is not blocked but is not advised as the application may experience degraded performance. The recommended minimum allocations are:
-
CVP: 52 GiB memory and 28 vCPUs
-
CVX: 4 GiB memory and 4 vCPUs
Common Strategies
These strategies may be configured for either CVX or CVP.
Manual
Allows users to manually configure resource allocations for both the memory and CPU allocation. Custom specifications must meet the application's recommended requirements or a warning is reported.
Maximum
Automatically allocates all available system resources. If resources are in use by other applications, the allocation may not meet the recommended. Only one application can use maximum allocation at a time.
CVP Strategies
These strategies are applicable to CVP only.
Package Default
The default allocation strategy for CVP. This maps to the "maximum" strategy.
CVP with CVX
The recommended resource allocation for CVP deployments running alongside CVX. These allocations reserve sufficient resources for a CVX deployment. The exact values are shown in the table below.
| SKU | Memory (GiB) | vCPUs |
|---|---|---|
| DCA-200 | 52 | 32 |
| DCA-250 | 52 | 32 |
| DCA-300 | 52 | 40 |
| DCA-350 | 114 | 70 |
| DCA-400 | 52 | 40 |
| DCA-450 | 235 | 84 |
CVX Strategies
These strategies are applicable to CVX only.
Package Default
The default allocation strategy for CVX. This corresponds to 8 GiB memory and 8 vCPUs.
CVX with CVP
The recommended resource allocation for a single CVX deployment running alongside CVP. This corresponds to 5 GiB memory and 6 vCPUs. This allocation leaves sufficient resources for a CVP deployment.
Introduction to the CVA 7 CLI
Log in to CVA 7 using the local console or SSH.
Mode and sub-modes divide CLI commands, which restrict commands to the appropriate context. The main modes and their available commands are as follows:
- login mode: commands available immediately after logging in, with the broadest possible context.
- enable mode: commands that are available only after entering the enable command.
- config mode: commands that significantly affect system configuration and can only be entered after entering the configure command. The user can also access submodes from this mode.
Enter submodes from config mode to provision specific monitoring fabric objects. For example, the application <app-name> command changes the CLI prompt to (config-app)# and lets the user configure the application identified by the given name.
When the user logs in, the CLI appears in login mode, where the default prompt is the system name followed by a greater than sign (>), as shown below:
cva1>
To change the CLI to enable mode, enter the enable command. The default prompt for enable mode is the system name followed by a pound sign (#), as shown below:
cva1> enable
cva1#
To change to config mode, enter the configure command. The default prompt for config mode is the system name followed by (config)#, as shown below:
cva1> config
cva1(config)#
To change to a submode, enter the command from config mode, followed by any object identifier required, as in the following example:
cva1(config)# application cvp
cva1(config-app)#
To return to enable mode, type end, as shown below:
cva1(config)# end
cva1#
To view the path to the current CLI prompt, enter the show this command from any nested submode, as in the following example:
cva1(config-app)# show this

! application
application cvp
  desired-state running
  package-checksum 0cfe8afd32391dca9ad95ba031076f8fae2969641392cc0f3cf9511a7c6a1ab3
  provisioning-userdata userdata://node1-cvp_10_243_253_101.iso
cva1(config-app)#
To view details about the configuration, enter the show this details command, as in the following example:
cva1(config-app)# show this details

! application
application cvp
  desired-state running
  no reconcile-version
  package-checksum 0cfe8afd32391dca9ad95ba031076f8fae2969641392cc0f3cf9511a7c6a1ab3
  provisioning-userdata userdata://node1-cvp_10_243_253_101.iso
cva1(config-app)#
To view a list of available commands in the current or submode, enter the help command.
cva1> help
For help on specific commands: help <command>
Commands:
  %<n>       Move job to foreground
  category   Show permission category for command
  debug      Manage cli features
  difference Show only the differences between successive invocations of other commands
  echo       Print remaining arguments
  enable     Enter enable mode
  exit       Exit submode
  help       Show help
  history    Show commands recently executed
  logout     Logout
  no         Prefix existing commands to delete item
  ping       Send echo messages
  ping-tcp   Check the connectivity of a specific IPv4 TCP port
  ping-udp   Check the connectivity of a specific IPv4 UDP port
  ping6      Send echo messages
  ping6-tcp  Check the connectivity of a specific IPv6 TCP port
  ping6-udp  Check the connectivity of a specific IPv4 UDP port
  reauth     Reauthenticate
  repeat     Show output of other commands
  set        Manage CLI sessions settings
  show       Show operational or config information
  support    Generate diagnostic data bundle
  terminal   Manage CLI sessions settings
  topic      Show documentation on topic
  upload     Upload diagnostic data bundle for technical support
  watch      Show output of other commands
  whoami     Identify the current authenticated account
  workflow   Show workflow documentation
cva1>
To view detailed online help for the command, enter the help command followed by the command.
cva1> help support
Support Command: Generate diagnostic data bundle
Support Command Syntax:
  support [[skip-cluster] logs-since-days <logs-since-days> [skip-jfr-dump] [sequential]]
Next Keyword Descriptions:
  logs-since-days:
  sequential:
    Use sequential (non-parallel) fallback collection mode, which will be slower but use fewer resources.
  skip-cluster:
    Skip cluster information from the collection.
  skip-jfr-dump:
    Skip creating JFR information during collection.
Support Command: Generate diagnostic data bundle
Support Command Syntax:
  support [[skip-cluster] logs-since-days <logs-since-days> [skip-jfr-dump] [sequential]]
Next Keyword Descriptions:
  logs-since-days:
  sequential:
    Use sequential (non-parallel) fallback collection mode, which will be slower but use fewer resources.
  skip-cluster:
    Skip cluster information from the collection.
  skip-jfr-dump:
    Skip creating JFR information during collection.
cva1>
To display the options available for a command or keyword, enter the command or keyword followed by a question mark (?).
cva1> support ?
 logs-since-days     Generate diagnostic data bundle
 sequential          Use sequential (non-parallel) fallback collection mode, which will be slower but use fewer resources.
 skip-cluster        Skip cluster information from the collection.
 skip-jfr-dump       Skip creating JFR information during collection.
<Command-end>        <cr>: Return to execute command
 ;                   command separator
 |                   pipe to command
 >                   redirect
cva1>
To view any command's permitted values or keywords, enter the command followed by a space and press the <Tab> key. The command completion feature displays a concise list of permitted values, as in the following example:
cva1> support <TAB>
logs-since-days  skip-cluster     ;                >
sequential       skip-jfr-dump    |                 <cr>
cva1>
Protocol Access Required For CVA
You can control access to CVA for specific protocols, and in the case of SSH, you can allow access only from specific IP addresses or subnetworks. The following table summarizes the TCP/UDP protocol ports that CVA uses. The CLI access-list option column shows the options for the ports that can be enabled or disabled using the CLI access-list command (config-controller-access submode entered via cluster; access-control). The ports listed are open by default on CVA, except for SNMP, which is disabled by default.
These ports must also be open on any device, such as a router or firewall, that connects the management console or application to CVA.
| Protocol | Port | Application | CLI access-list option | Match criteria |
|---|---|---|---|---|
| HTTP | TCP 80 | GUI auto-redirect | ||
| HTTPS | TCP 443 | GUI remote access | gui | Default any, configurable |
| HTTPS | TCP 8443 | REST API | api | Default any, configurable |
| ICMP/ICMPv6 | ICMP/ICMPv6 | Selected ICMP types | ||
| ICMP/ICMPv6 | ICMP/ICMPv6 | Selected ICMP types | ||
| SNMP | UDP 161, 162 | SNMP | snmp | Default none, configurable |
| SSH | TCP 22 | CLI remote access | ssh | Default any, configurable |
| syslog | UDP 514 | |||
| vce-api | UDP 7443 | vCenter integration | vce-api | Enabled by default |
Note: Be careful when configuring firewall rules for the SSH protocol, which is permitted from all subnetworks by default. The option exists to restrict SSH access to one or more specific subnetworks. However, this denies access from all other subnetworks. If no connectivity from a specified subnetwork is available, accessing the Controller is only through the local console.