Configuration for Route-Based NSD Via Edge
Route-Based NSD Via Edge to the VMware Cloud AWS Gateway Overview
The example topology illustrates the Integration of Arista VeloCloud SD-WAN and VMware Cloud on AWS, which uses IPSec connectivity between the VeloCloud Edge and the VMware Cloud Gateway.

This section provides step-by-step procedures on how to achieve connectivity between an SDWAN Edge and a VMware Cloud Gateway.
- Find Public IP used for VPN connectivity by selecting the Networking and Security tab. The VPN Public IP displays below the Overview pane.
Figure 2. Overview Pane 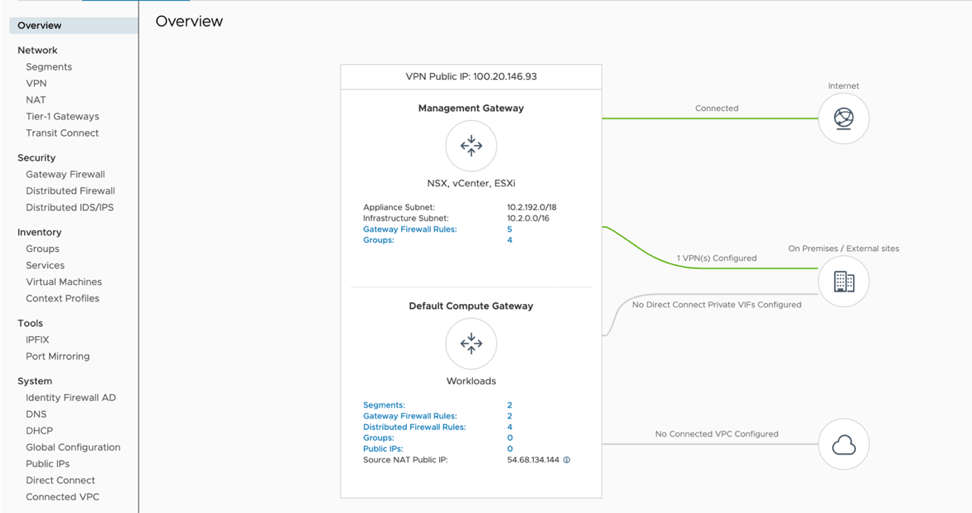
- Log into the SD-WAN Orchestrator and verify that the Edges are present with a green status icon displayed next to them.
Figure 3. Network Overview 
- Go to the Configure tab and select Network Services, and then under Non SD-WAN Destination via Edge, select the New button.
Figure 4. Network Services 
- Provide a name for the Non SD-WAN Destination via Edge, select the type, in this case, Generic IKEv2 Router(Route Based VPN), and select Next
Figure 5. Service name and Type 
- Select the Advanced button and provide below details.
- Select Save Changes.
Figure 6. Non SD-WAN Destinations via Edge 
- Select Save Changes.
- On the left pane, select .
Figure 7. Monitor Edges 
- Under the device setting of Edge complete the following steps.
- In the drop-down menu, select the NSD via Edge.
Figure 8. NSD via Edge 
- In the drop-down menu, select the NSD via Edge.
- Select the Add button and update the following fields below (see image below).
- Destination primary Public IP – VMC Gateway Public IP.
Figure 9. Add Tunnel 
- Destination primary Public IP – VMC Gateway Public IP.
- Activate BGP settings for an Edge, as shown in the image below.
Figure 10. BGP Settings 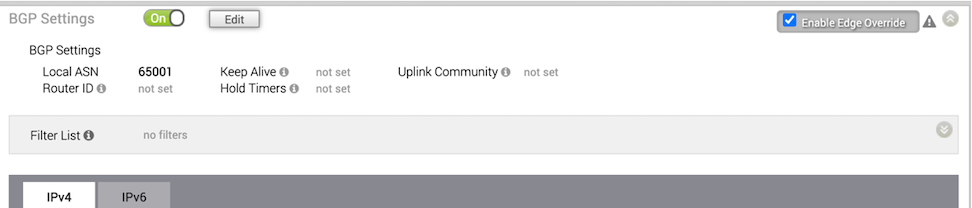
- Select the Edit button and update BGP parameters for NSD neighbor.
- Local IP – 169.254.32.1 NOTE: It is recommended to use a /30 CIDR from 169.254.0.0/16 subnet excluding following VMC reserved addresses- 169.254.0.0-169.254.31.255, 169.254.101.0-169.254.101.3
Figure 11. BGP Editor 
- Local IP – 169.254.32.1 NOTE: It is recommended to use a /30 CIDR from 169.254.0.0/16 subnet excluding following VMC reserved addresses- 169.254.0.0-169.254.31.255, 169.254.101.0-169.254.101.3
- Navigate to Networking and Security and select the VPN tab. In the VPN area, select Route Based VPN, and select Add VPN.
Figure 12. VMC-SD-WAN 
- Provide a name for the Route Based VPN and configure the following.
- Select Save.
Figure 13. Network and Security 
- Select Save.
- Once the configuration is complete, the tunnel is automatically activated and will proceed to negotiate the IKE Phase 1 and Phase 2 parameters with the peer, which is the VeloCloud EDGE.
Figure 14. Route Based VPN 
- Once the tunnel displays (green), verify that the NSD via Edge tunnel/BGP status in the SD-WAN Orchestrator (go to ).
Figure 15. Network Services 
Figure 16. BGP Edge Neighbor State 
- Start a ping from a client connected at each end towards the opposite client, and verify ping reachability. The tunnel configuration has been completed and verified.
Figure 17. Ping Verification 
Figure 18. Verified Status 