Rack Mounting the Switch
Les procédure de montage du bâti est identique pour tous les commutateurs visés par ce guide. Illustrations dans ce chapitre montrent le montage d’un interrupteur de DCS-7010T-48.
Two-Post Rack Mount
This section provides instructions for mounting the switch in a two-post rack.
To mount the switch onto a two-post rack, assemble the mounting brackets to the chassis, then attach the brackets to the rack posts. Two-post accessory kits include the following parts:
-
2x mounting brackets
- 6x M4x5 flat head Phillips screws.
The following image displays the proper bracket placement for the rack mount.
Attaching Mounting Brackets to the Chassis
The following figure displays the front bracket alignment for mounting the switch into a four-post rack.

| 1 | Attaching brackets for the front mount |
- Align the mounting brackets with the attachment pins to obtain the desired mounting position.
- Place the bracket flush on the chassis with attachment pins protruding through key openings.
- Slide the bracket towards the front flange until the bracket clip locks with an audible click.
To remove the mounting bracket from the chassis, lift the front edge of the mounting bracket clip with a flathead screwdriver and slide the bracket away from the front flange (opposite from the installation direction).
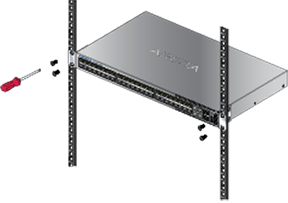
Inserting the Switch into the Rack
- Attach the bracket flanges to the rack posts.
Figure 3. Inserting the Switch into the Rack