Arista 应用交换机:世界上第一款可编程的数据平面
Arista 7124FX 提供 24 个端口的线速和超低延迟的 10Gb 以太网,使用灵活的 SFP+ 数据包,其中 8 个端口通过专门的完全可编程的 FPGA 路由,在这里用户可以加载他们自己的自定义应用程序。FPGA 支持 160Gbps 的吞吐量并提供超过 6 百万个可编程的逻辑门,以在网络中运行高性能的关键任务应用程序。
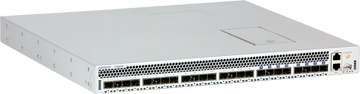
Arista 7124FX
Arista 7124FX 最常用在金融应用中,您希望应用程序尽可能地接近数据源或者与数据流内联。 本交换机联合确定性的超低延迟转发路径,可增加竞争优势。 其他应用包括金融服务交易、政府、国防和高性能计算。
Arista Application Switch Overview
性能
- 1RU 中 24 个 1/10GbE 端口
- 480 Gbps/360Mpps
- 线速 L2/3/4 转发
- 次 500 纳秒延迟
- 低延迟、低抖动,适用于所有数据包大小和通信类型
- 动态缓冲区分配
嵌入式应用交换机子系统
- 用于自定义嵌入式应用程序的 FPGA 子系统
- 专门的内存和 PCIe 连接
- 本机集成 EOS 检测和操作
- 创建您自己的应用程序,或安装第三方应用程序
其他功能
- 内置 50Gb SSD,可获得高级日志记录功能、数据捕获功能和应用程序支持
- 高级服务开通和监视功能,零接触服务开通 (ZTP)、延迟分析器 (LANZ) 和 VMTracer 等工具
- Arista EOS:适用于所有产品的单一二进制映像、可访问 Linux 工具、可扩展平台
7124FX 已经证实的超低延迟解决方案可提供确定性的延迟,即使在处理关键任务流量的负载下,而且可以同时运行多个应用程序。