
Activate SD-WAN Edges using Edge Auto-activation

Edge Auto-activation allows you to activate Edges by powering on the Edges and connecting them to the Internet.

Note: Starting from the 5.1.0 release, Zero Touch Provisioning renamed as Edge Auto-activation.

This method eliminates the need of an activation link. Using this feature, the Service Provider can preconfigure the Edges and ship them to the Customers. The Customers just power-on the Edges and connect the cables to the internet to activate the Edges.

This method of Edge activation becomes useful when the person at the remote site cannot connect a laptop, tablet, or phone to the Edge, and cannot use an email or cannot select an activation code/URL.

Note:
  • Edge Auto-activation supports Edge models: 510, 510 LTE, 6x0, 7x0 and 3xx0.
  • For Edge Auto-activation to work, use the Orchestrator software version 4.3.0 or later.
As a Partner user, complete the following tasks to activate Edges using Edge Auto-activation:

Sign Up for Edge Auto-activation

As a Partner user, ensure you have a valid Partner Relationship Management Identifier (PRM ID) received at the time of registering with Arista. If you do not have a valid PRM ID, contact Arista Partner Connect.

The configuration requires Outbound Internet connectivity using DHCP to complete the push activation successfully.

To sign up for Edge Auto-activation, perform the following tasks:
  1. Log in to Orchestrator, and then go to Edge Management > Edge Auto-activation .
  2. On the Edge Auto-activation page, enter the PRM ID.
  3. Select Submit
    Note: You must enter the PRM ID when you log in for the first time. You can view the Edge inventory in the Available Inventory tab after the PRM ID successfully validates. The validation process may take up to 3 to 5 days. If you enter an incorrect PRM ID, you must contact the Customer Support team to change it.

    Only the Edges shipped to you after the successful completion of the sign-up process appear in the Available Inventory tab. Ensure that you use the PRM ID assigned to you in all your future orders to reflect the correct inventory. You must assign the Edges to Customers, and then assign a profile and a license to Edges. For instructions, refer to Assign Edges to Customers.

Assign Edges to Customers

Ensure you have signed up for Edge Auto-activation so you can view the list of Edges in the Available Inventory page. For instructions, refer to Sign-Up for Edge Auto-activation.
To assign Edges to Customers, perform the following steps:
  1. Log into Orchestrator, and then go to Edge Management > Edge Auto-activation . A list of Edge inventory with Serial number and Model appears.
  2. Select all the Edges to assign to the Customer, and then select Assign To Customer.
    The Edge Assignment window appears.
    Figure 1. Edge Assignment
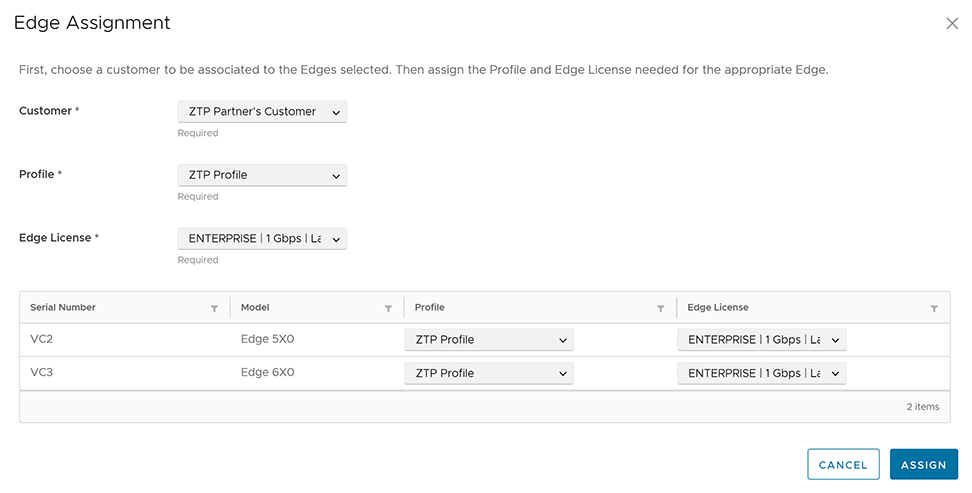
  3. From the Customer list, select the Customer to assign the Edges.
  4. From the Profile and Edge License lists, select the required profile and license to assign to all Edges in the inventory.
    Note: You can opt to override these settings for a specific Edge by selecting the appropriate profile and license in the table.
  5. Select Assign.
    The Edges with an assigned Customer, profile and license, appear in the Assigned Inventory tab. The Inventory State for the assigned Edges displays as Assigned to Customer and the Edge State displays as Pending.
  6. The following includes the additional options available on the Edge Auto-activation page:
    Table 1. Additional Options and Descriptions
    Option Description
    Search Enter a search term to be searched across the items in the table. Use the advanced search option for more filters.
    Download CSV Download the list of Edges in an Excel format.
    Columns Select this option and select the check boxes to view the required columns.
    Refresh Select this option to refresh the table properties.

    When your Customer powers on the assigned physical Edges and connects them to the internet, the Edges redirect to Orchestrator and automatically activate. After activating an Edge, the Edge State in the Assigned Inventory tab changes from Pending to Activated.

Reassign an Edge to Another Customer

Reassign an Edge to another Customer before activating the Edge.

If you decide to reassign an activated, you must deactivate the Edge, and then reassign the Edge to another Customer. For instructions about deactivating an Edge, refer to the topic Remote Actions. After you deactivate the Edge, its state changes to Offline. You can now reassign the Edge to another Customer.

To reassign an Edge to another Customer, perform the following tasks:

  1. Log into Orchestrator, and then go to Edge Management > Edge Auto-activation . Select Assigned Inventory.
  2. Select the Edge to reassign and then select Reassign.

    The Edge Reassignment window displays.

  3. From the Customer list, select the Customer to reassign the Edge.
  4. From the Profile and Edge License lists, select the required profile and license to assign to the Edge.
  5. Select Reassign.

    Although the Edge reassigns to the new Customer, a corresponding entry appears in the Configure > Edges page for the original Customer assigned the Edge. Select the logical Edge entry, and then select Delete to delete the entry manually.