User Management - Partner
The User Management feature allows you to manage users, their roles, service permissions (formerly known as Role Customization), and authentication.
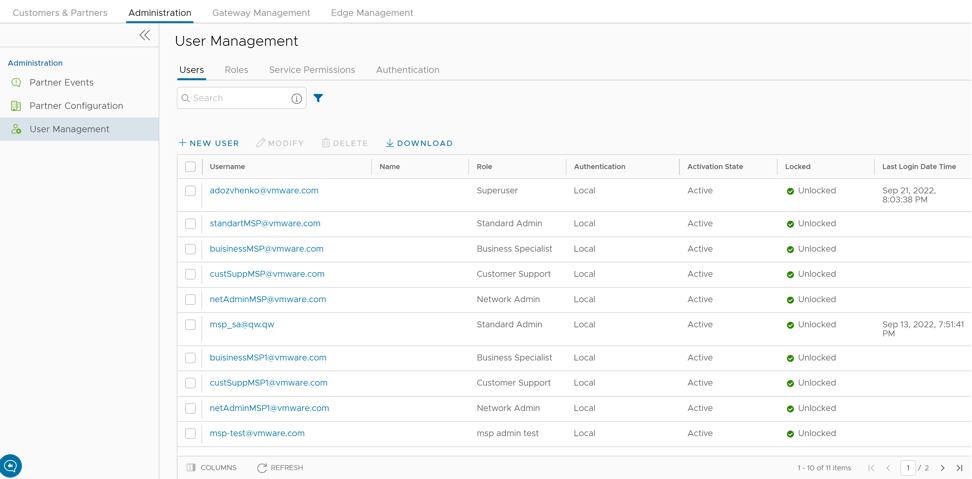
Users
As a Partner, you can view the list of existing users and their corresponding details. You can add, modify, or delete a user. However, you cannot delete a default user.
To access the Users tab:
- From the left menu, select User Management. The Users tab is displayed by default.
Figure 2. Users- Partner 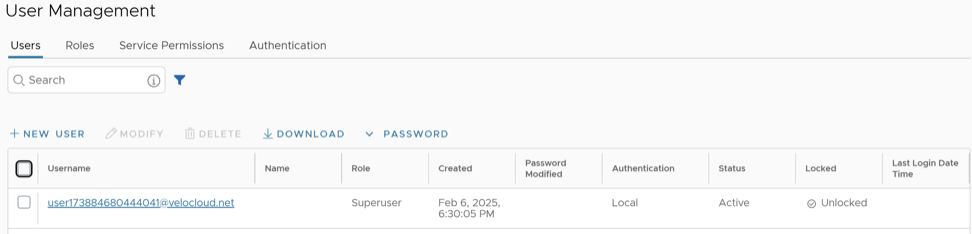
Add New User
In the Partner portal of the Orchestrator, you can add new users and configure the user settings. To add a new user, perform the following steps:
- Select New User.
Figure 3. Add New User 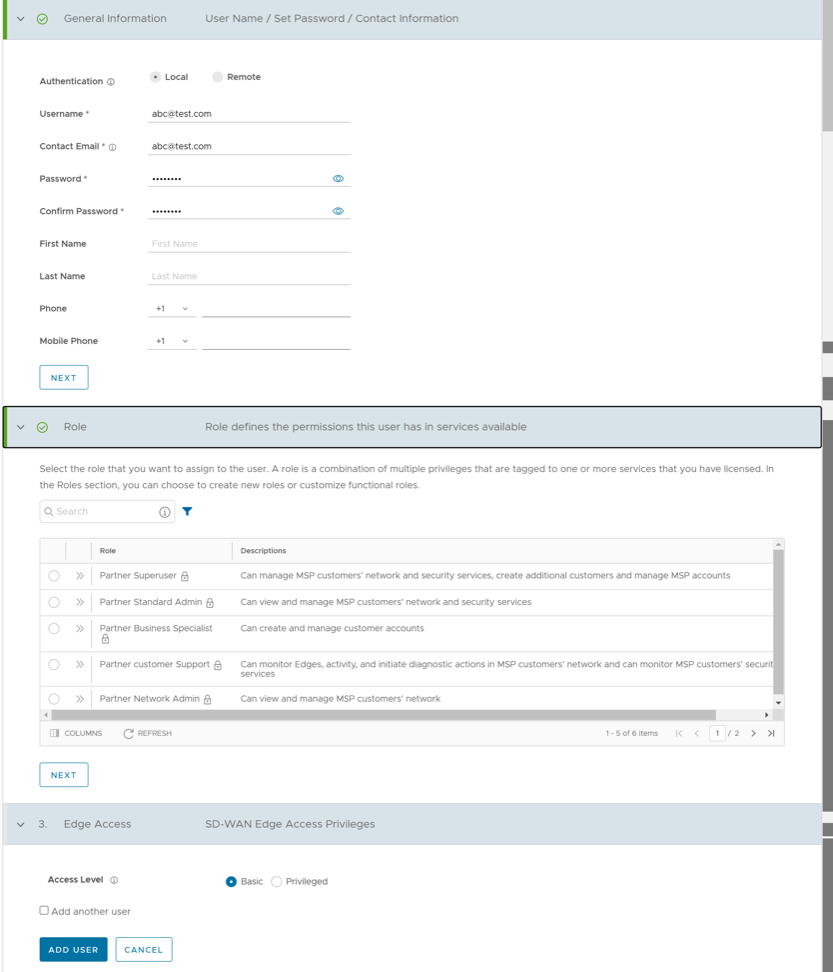
API Tokens
The users can access the Orchestrator APIs using tokens instead of session-based authentication. As Partner Super User, you can manage the API tokens for your enterprise users. You can create multiple API tokens for a user.
Any user can create tokens based on the privileges they have been assigned to their user roles, except the Business Specialist users.
- Enterprise users can Create, Download, and Revoke tokens for them.
- Partner Super users can manage tokens of Enterprise users, if the Enterprise user has delegated user permissions to the Partner.
- Partner Super users can only create and revoke the tokens for other users.
- Users can download only their own tokens and cannot download other users' tokens.
To manage the API tokens:
- Select a user and select Modify or select the link to the username. Go to the API Tokens section.
Figure 4. API Tokens 
- Select New API Token.
Figure 5. New Token 
curl -k -H "Authorization: Token <Token>"
 -X POST https://vco/portal/
 -d '{ "id": 1, "jsonrpc": "2.0", "method": "enterprise/getEnterpriseUsers", "params": { "enterpriseId": 1 }}'
Roles
Starting from the 5.1.0 release, Functional Roles are renamed as Privileges, and Composite Roles are renamed as Roles.
- Privileges – Privileges are a set of roles relevant to a service. A privilege can be tagged to one or more services. Users require privileges to carry out business processes. For example, a Customer support role in SD-WAN is a privilege required by an SD-WAN user to carry out various support activities. Every service defines such privileges based on its supported business functionality.
- Roles – The privileges from various categories can be grouped to form a role. By default, the following roles are available for a Partner administrator:
Table 5. Roles Role SD-WAN Service Global Settings Service Partner Standard Admin SD-WAN Partner Admin Global Settings Partner Admin Partner Security Admin SD-WAN Security Partner Admin Global Settings Partner Admin Partner Network Admin SD-WAN Partner Admin Global Settings Partner Admin Partner Superuser Full Access Full Access Partner Business Specialist SD-WAN Partner Business Global Settings Partner Business Partner Customer Support SD-WAN Partner Support Global Settings Partner Support If required, you can customize the privileges of these roles. For additional information, see Service Permissions.
As a Partner, you can view the list of existing roles and their corresponding descriptions. You can add a new role, clone an existing role, edit or delete a custom role. You cannot edit or delete a default role.
To access the Roles tab:
- From the left menu, select User Management, and then select the Roles tab. The following screen appears:
Figure 6. Roles- Partner 
- Select the >> displayed before the Role link, to view more details about the selected Role, as shown below:
Figure 7. Role Details 
Add Role
To add a new role for a Partner, perform the following steps:
- Select Add Role.
Figure 8. Add Role 
Service Permissions
Service Permissions allow you to granularly define actions (Read, Create, Update, and Delete) assigned to each Privilege (such as Cloud Security Service and Customer Segment configuration) within a Privilege Bundle.
- Starting from the 5.1.0 release, Role Customization is renamed as Service Permissions.
- Only an Operator Superuser can activate Role Customization for a Partner Superuser. If the Role Customization option is not available for you, contact your Operator.
Roles can be customized by changing the service permissions held by each role. You can customize both, default roles and new roles. Roles are created based on the selected default role. Operator, Partner, and Enterprise roles are defined separately. So, there are default roles for each level, such as Operator Superuser, Partner Standard Admin, and Enterprise Support.
When customizing a role, you must select both, the user level and the role. Typically, Operator roles have more privileges by default, than Partners or Enterprise Customers. When creating a user, you must assign a role to the user. Any change to that specific role's privileges is immediately applied to all users assigned to that role. Role customizations only apply to one role at a time. For example, changes to Operator Standard Admin roles do not get applied to Enterprise Standard Admin roles.
For additional information, see the topic Roles.
- The customizations done at the Enterprise level override the Partner or Operator level customizations.
- The customizations done at the Partner level override the Operator level customizations.
- Only when there are no customizations done at the Partner level or Enterprise level, the customizations made by the Operator are applied globally across all users in the Orchestrator.
To access the Service Permissions tab:
- From the left menu, select User Management, and then select the Service Permissions tab. The following screen appears:
Figure 9. Service Permissions- Partner 
New Permission
You can customize the privileges and apply them to the existing permission in the Orchestrator.
To add a new permission, perform the following steps:
- Select New Permission. The following screen appears:
Figure 10. New Permission 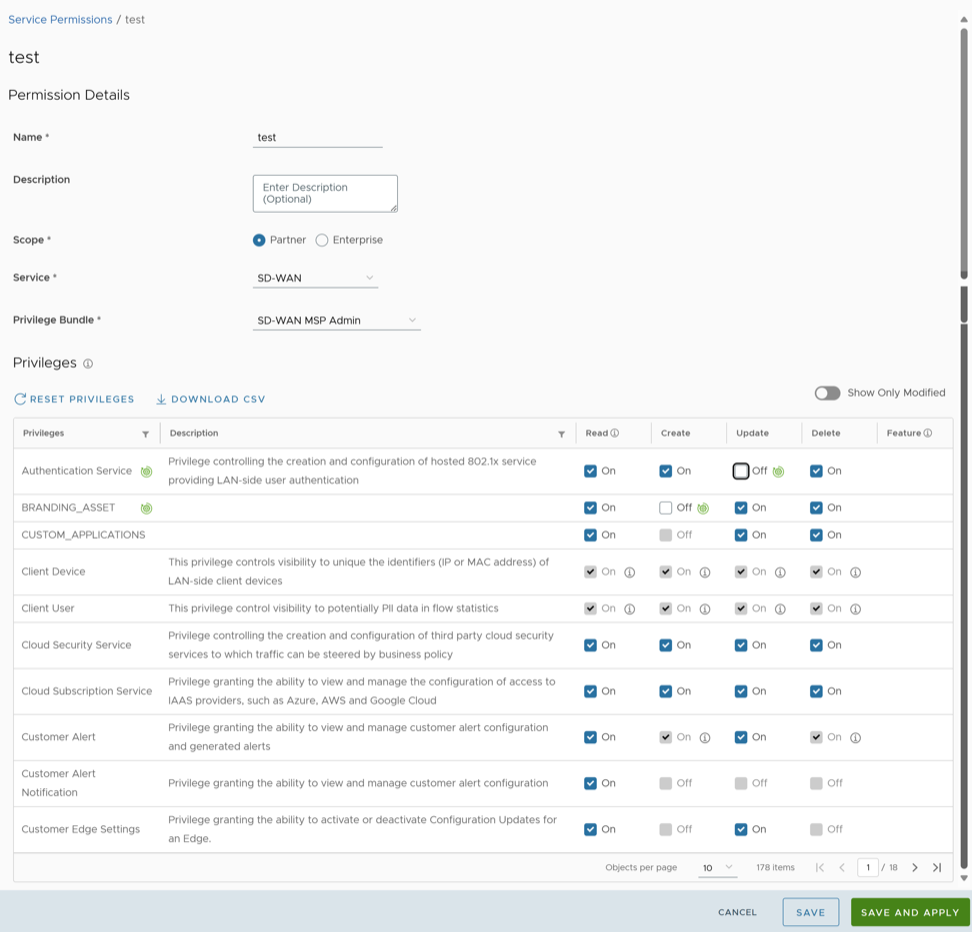
Authentication
The Authentication feature allows you to set the authentication mode for a Partner and an Enterprise user.
To set theauthentication mode:
- From the left menu, select User Management, and then select the Authentication tab.
The following screen appears:
Figure 11. User Management Screen 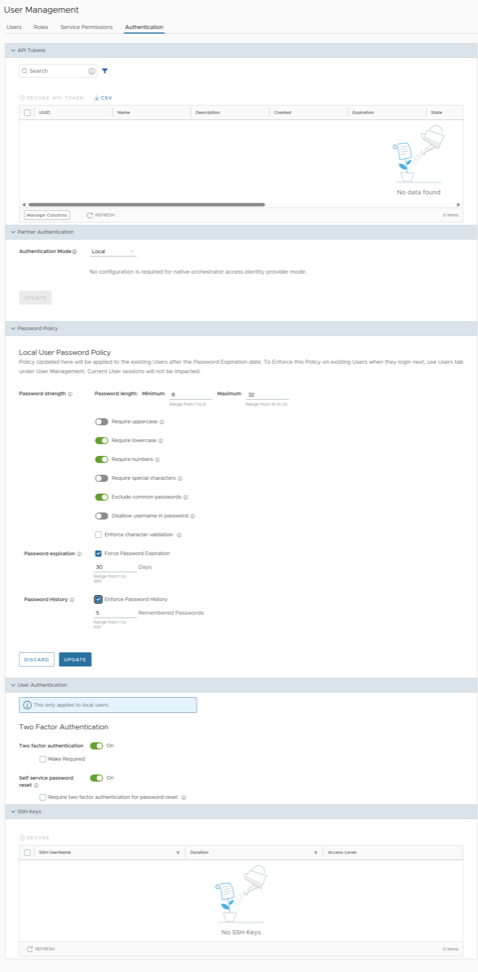
- Choose the authentication mode:
- Local: This is the default option and does not require any additional configuration.
- Single Sign-On: Single Sign-On (SSO) is a session- and user-authentication service that allows users to log in to multiple applications and websites with one set of credentials. Integrating an SSO service with Orchestrator enables Orchestrator to authenticate users from OpenID Connect (OIDC)-based Identity Providers (IdPs).
- You can configure the following options when you select the Authentication Mode as Single Sign-on:
Figure 12. Single Sign-on Authentication Options 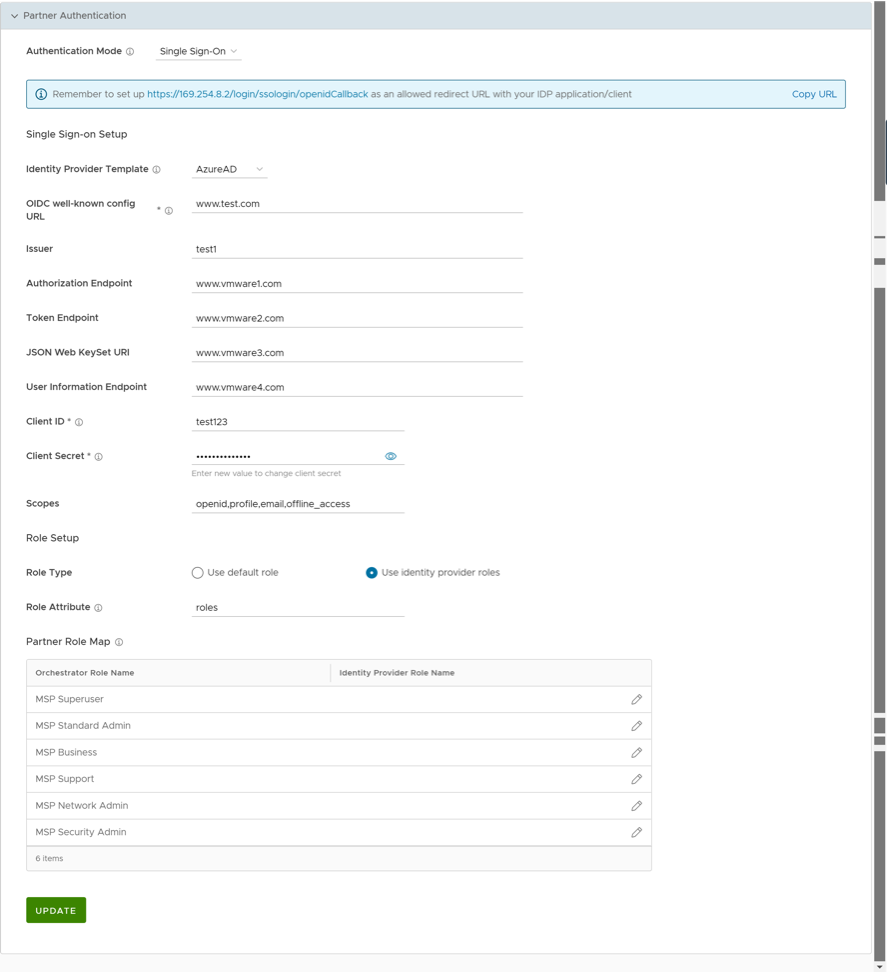
Table 14. Single Sign-on Authentication Option Descriptions Option Description Identity Provider Template From the drop-down menu, select your preferred Identity Provider (IdP) that you have configured for Single Sign On. This pre-populates fields specific to your IdP. Note: You can also manually configure your own IdPs by selecting Others from the drop-down menu.OIDC well-known config URL Enter the OpenID Connect (OIDC) configuration URL for your IdP. For example, the URL format for Okta will be: https://{oauth-provider-url}/.well-known/openid-configuration.Issuer This field is auto-populated based on your selected IdP. Authorization Endpoint This field is auto-populated based on your selected IdP. Token Endpoint This field is auto-populated based on your selected IdP. JSON Web KeySet URI This field is auto-populated based on your selected IdP. User Information Endpoint This field is auto-populated based on your selected IdP. Client ID Enter the client identifier provided by your IdP. Client Secret Enter the client secret code provided by your IdP, that is used by the client to exchange an authorization code for a token. Scopes This field is auto-populated based on your selected IdP. Role Type Choose one of the following two options: - Use default role
- Use identity provider roles
Role Attribute Enter the name of the attribute set in the IdP to return roles. Partner Role Map Map the IdP-provided roles to each of the Partner user roles.
- Configure two-factor authentication and self-service password reset in the User Authentication section.
Figure 13. User Authentication Options 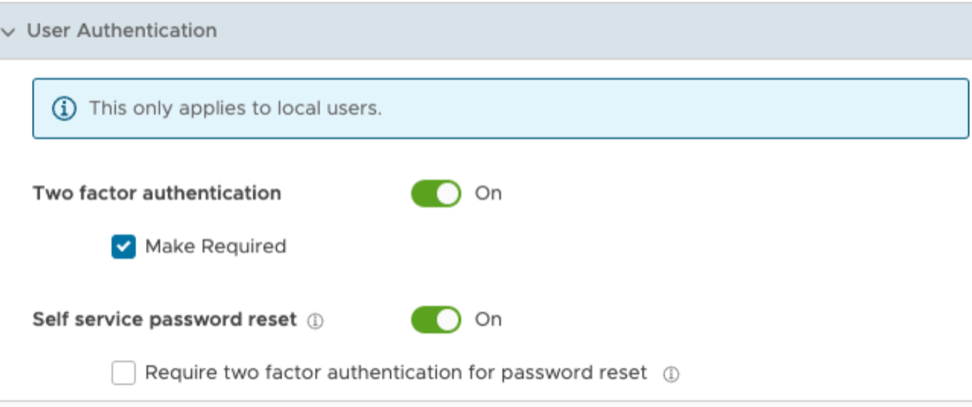
Table 15. User Authentication Option Descriptions Option Description Two factor authentication Slide the toggle button to activate this feature for all users. Select the Make Required check box to make this authentication mandatory for all users. Self service password reset Slide the toggle button to allow users to change their passwords using the link on the Login screen. Select the Require two factor authentication for password reset check box to make this authentication mandatory for all users. This makes the two factor authentication a required step before a user resets their password. Note: This feature can be activated only for those users whose mobile phone numbers are associated with their user accounts. - Configure password policy for local users.
Starting from the release 6.4.0, Partner Superusers can set their own password policies directly from the Authentication screen. The Local User Password Policy section appears when the Authentication Mode is set to Local.
Figure 14. Password Policy Options 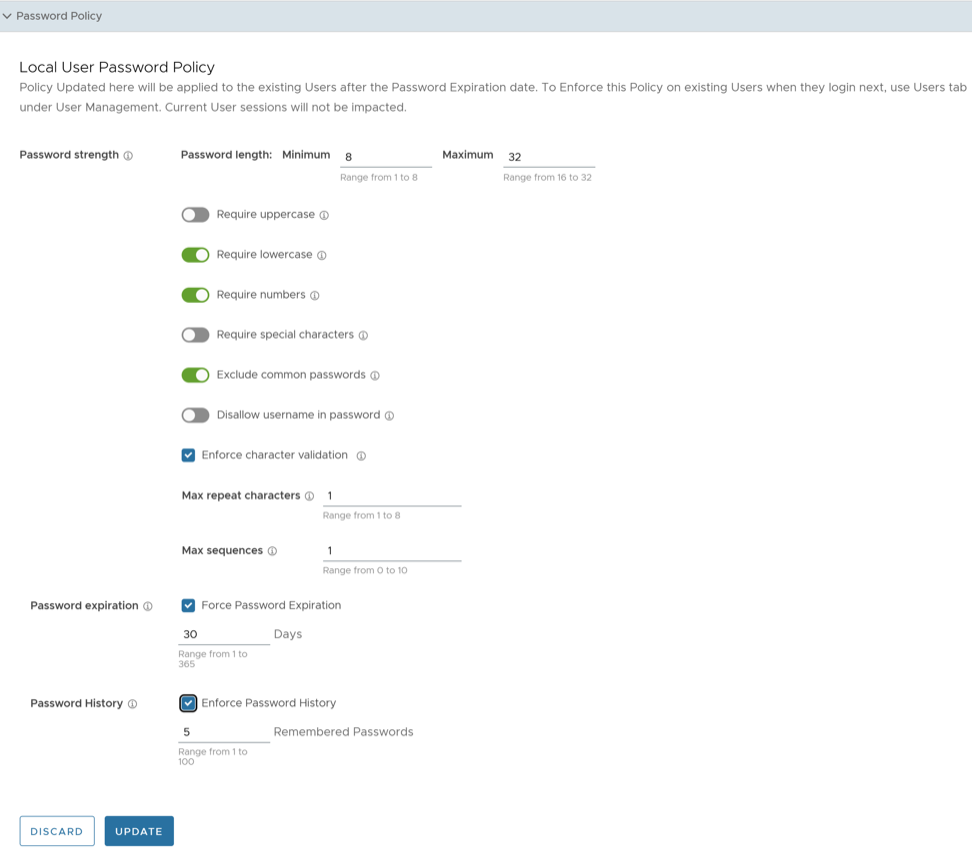
Table 16. Password Policy Option Descriptions Option Description Password Strength Password length Specify the minimum and maximum length of the password. The minimum length value must be in the range from 1 to 8, whereas the maximum length value must be in the range from 16 to 32. The default values are 8 and 32 respectively. Require uppercase Slide the toggle button to activate this parameter. If activated, the password must contain at least one uppercase letter. Require lowercase Slide the toggle button to activate this parameter. If activated, the password must contain at least one lowercase letter. Require numbers Slide the toggle button to activate this parameter. If activated, the password must contain at least one number. Require special characters Slide the toggle button to activate this parameter. If activated, the password must contain at least one special character. Hover the mouse on the information icon to view the valid special characters. Exclude common passwords Slide the toggle button to activate this parameter. If activated, users are not allowed to use the most commonly used passwords. Disallow username in password Slide the toggle button to activate this parameter. If activated, username cannot be set as the password. Enforce character validation Select this check box to ensure that the password meets the following criteria for strength and security: - Max repeat characters: Enter the maximum number of characters that can be repeated in the password. The accepted range is from 1 to 8. The default value is 1.
- Max sequences: Enter the maximum number of consecutive characters or sequences that can be allowed in the password. The accepted range is from 0 to 10. The default value is 1.
Password Expiration Select the Force Password Expiration checkbox and set the duration after which users must change their passwords. The accepted range is from 1 to 365. The default value is 30. Password History Select the Enforce Password History checkbox and enter a value that specifies the number of previously created passwords that cannot be reused as the new password. This enhances the overall security. The accepted range is from 1 to 100. The default value is 5. After making changes to policy settings, select Update to save updated policy settings or select Discard to leave the settings unchanged. Users who are already logged in are not affected by this update.
To enforce the new password policy, an Enterprise Superuser must perform the following steps:
Configure Azure Active Directory for Single Sign On
To set up an OpenID Connect (OIDC)-based application in Microsoft Azure Active Directory (Azure AD) for Single Sign On (SSO), perform the following steps.
Ensure you have a valid Azure AD account.
- To create a new application, search and select the Azure Active Directory service.
Figure 15. Azure Active Directory Service 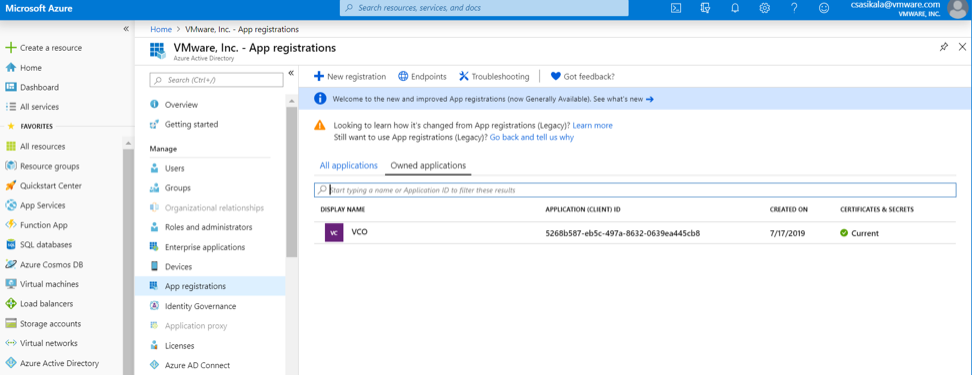
- Go to . The Register an application screen appears.
Figure 16. Register an Application 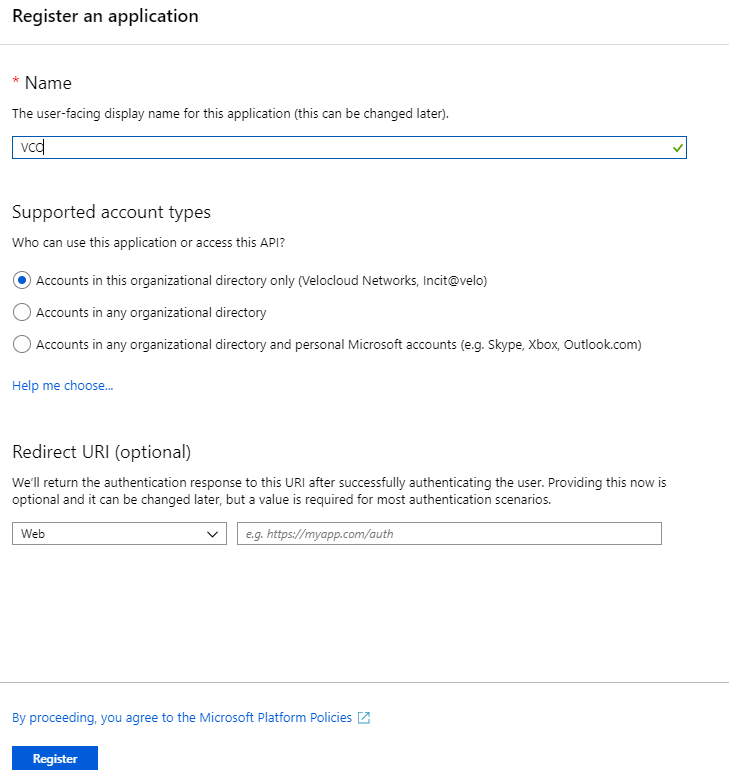
- Go to . The Add a client secret screen appears.
Figure 17. VCO Certificates and Secrets 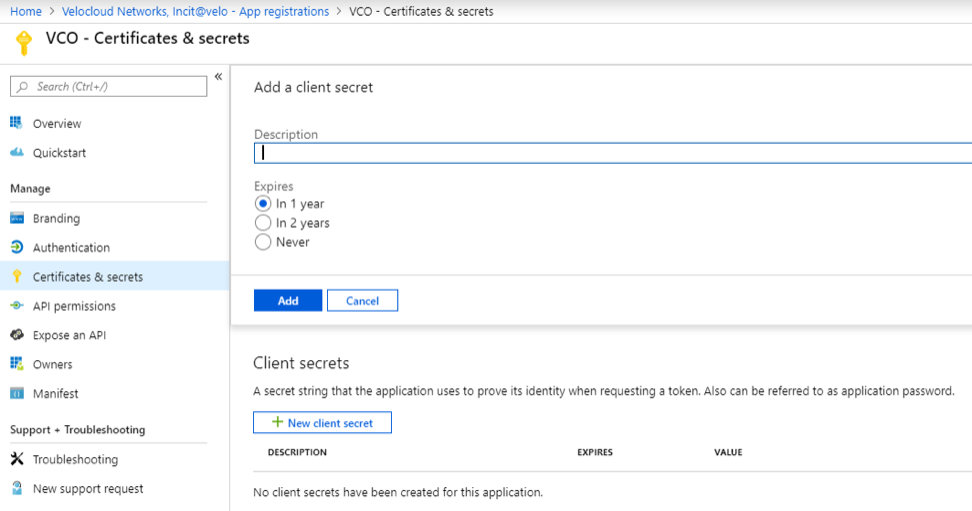
- To configure permissions for your Orchestrator application, select on your Orchestrator application and go to . The Request API permissions screen appears.
Figure 18. API Permissions 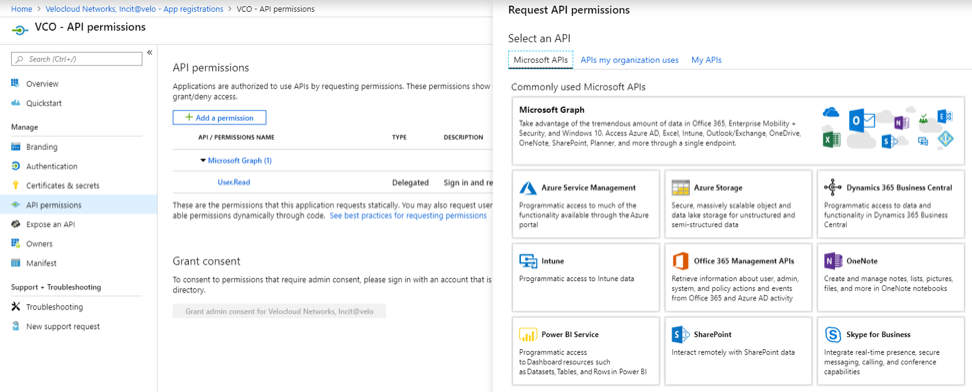
- To add and save roles in the manifest, select on your Orchestrator application and from the application Overview screen, select Manifest. A Web-based manifest editor opens and allows you to edit the manifest within the portal. Optionally, you can select Download to edit the manifest locally, and then use Upload to reapply it to your application.
Figure 19. vco- Manifest 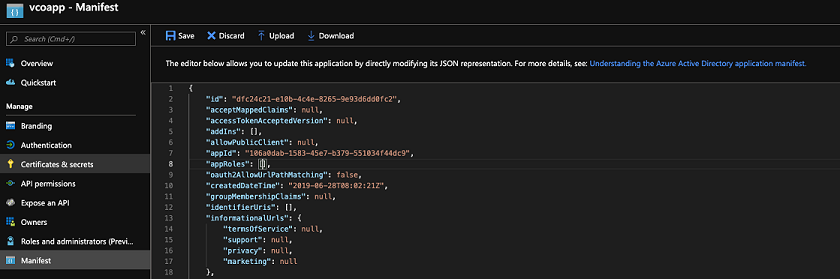
- In the manifest, search for the
appRolesarray and add one or more role objects as shown in the following example and select Save.Note: The value property fromappRolesmust be added to the Identity Provider Role Name column of the Role Map table, located in the Authentication tab, in order to map the roles correctly.Sample role objects{ "allowedMemberTypes": [ "User" ], "description": "Standard Administrator who will have sufficient privilege to manage resource", "displayName": "Standard Admin", "id": "18fcaa1a-853f-426d-9a25-ddd7ca7145c1", "isEnabled": true, "lang": null, "origin": "Application", "value": "standard" }, { "allowedMemberTypes": [ "User" ], "description": "Super Admin who will have the full privilege on Orchestrator", "displayName": "Super Admin", "id": "cd1d0438-56c8-4c22-adc5-2dcfbf6dee75", "isEnabled": true, "lang": null, "origin": "Application", "value": "superuser" }Note: Make sure to set id to a newly generated Global Unique Identifier (GUID) value. You can generate GUIDs online using web-based tools, https://www.guidgen.com/), or by running the following commands:- Linux/OSX-
uuidgen - Windows-
powershell [guid]::NewGuid()
Figure 20. vco-Manifest 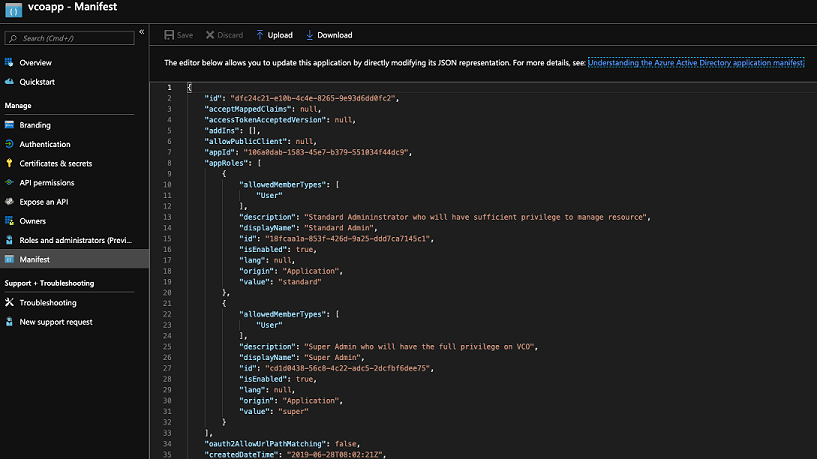
Roles are manually set up in the Orchestrator, and must match the ones configured in the Microsoft Azure portal.
Figure 21. App Roles 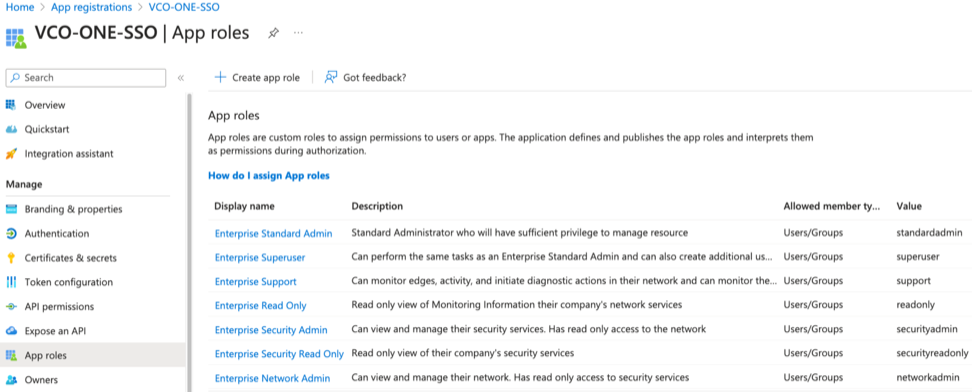
- Linux/OSX-
Configure Okta for Single Sign On
To support OpenID Connect (OIDC)-based Single Sign On (SSO) from Okta, you must first set up an application in Okta. To set up an OIDC-based application in Okta for SSO, perform the steps on this procedure.
Ensure you have an Okta account to sign in.
- To create a new application, select . The Add Application screen appears.
Figure 22. Add an Application to Okta 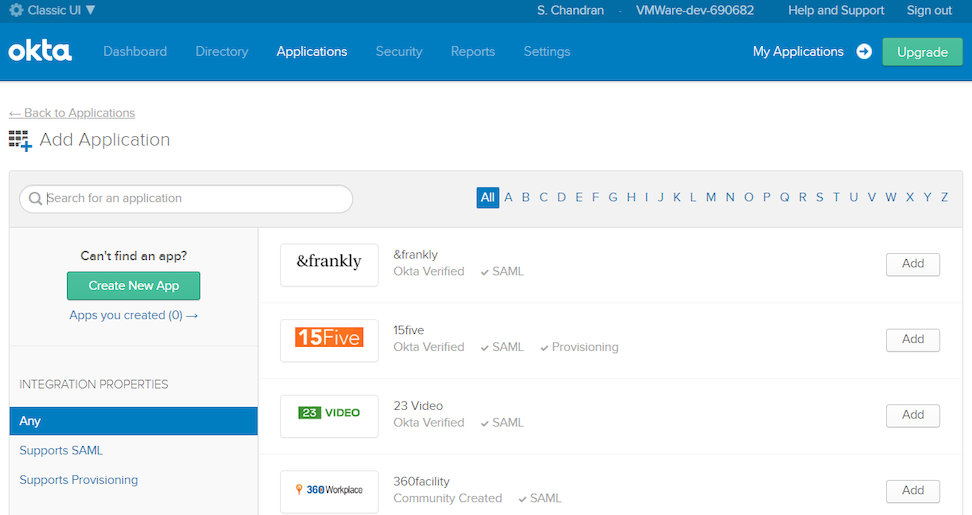
- Select OpenID Connect as the Sign on method and select Create. The Create OpenID Connect Integration screen appears.
Figure 23. Create an OpenID Connect Integration 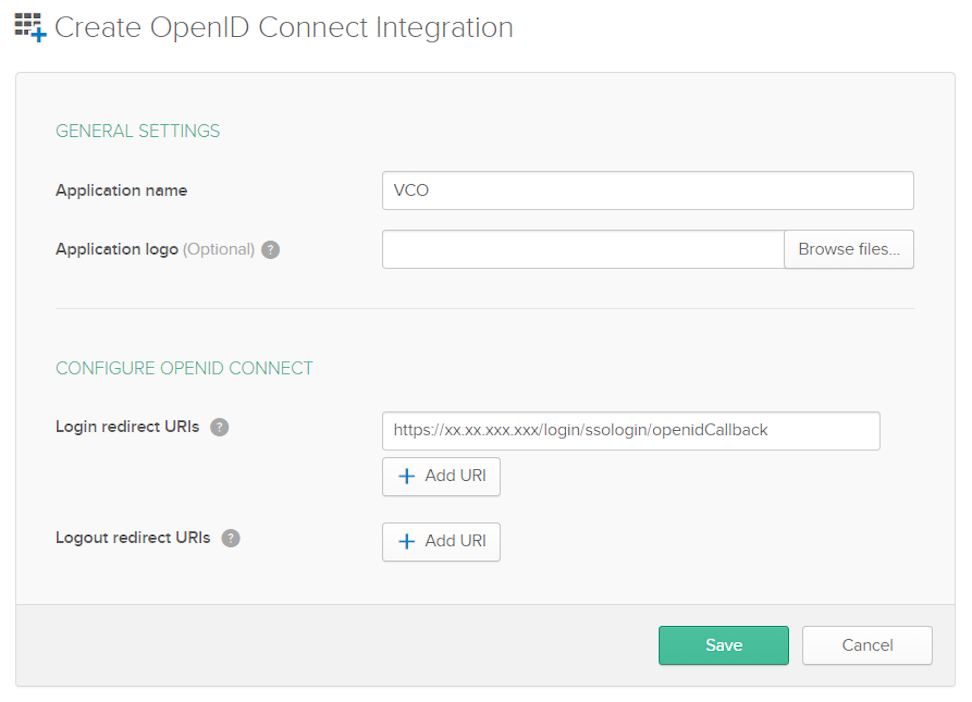
- On the General tab, select Edit and select Refresh Token for Allowed grant types, and select Save.
Note down the Client Credentials, Client ID and Client Secret, to be used during the SSO configuration in Orchestrator.
Figure 24. General Settings 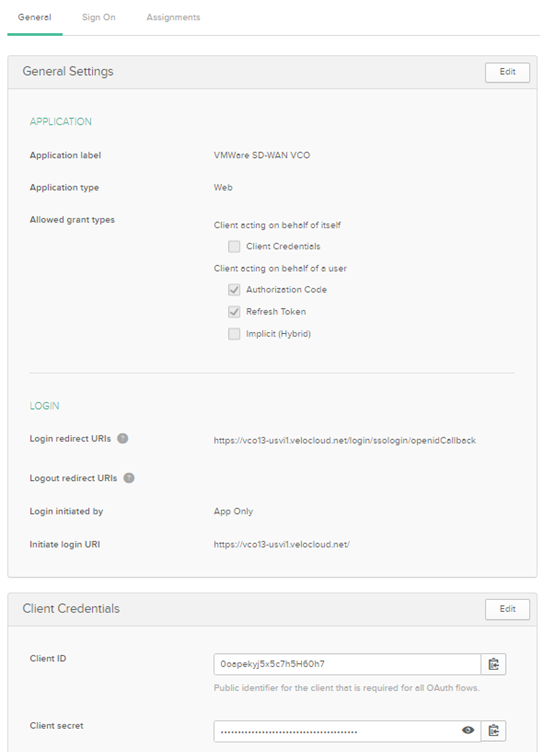
- Select Save. The application is setup in IDP. You can assign user groups and users to your Orchestrator application.
Figure 25. Settings 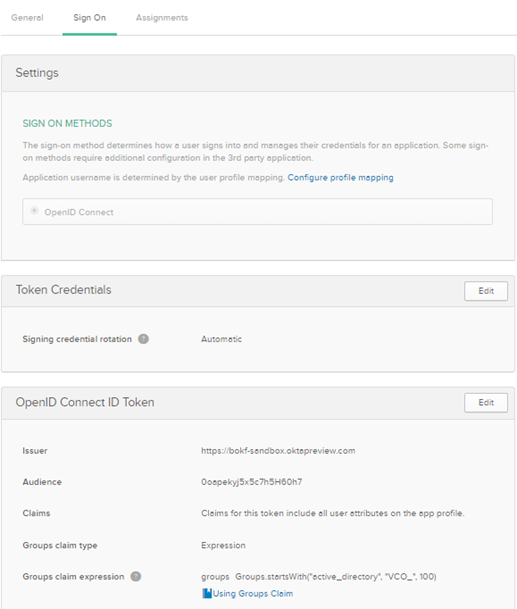
Assigning Users and Groups
- Select Assign next to available user groups or users you want to assign the Orchestrator application and select Done. The users or user groups assigned to the Orchestrator application display.
Figure 26. Assigning Users and Groups 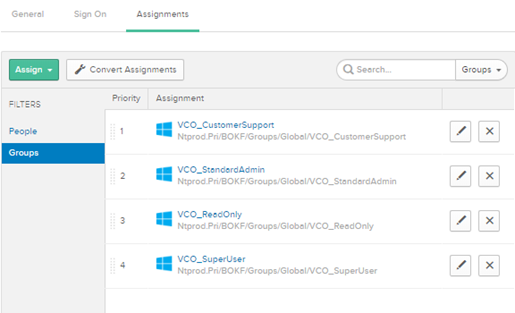
You have completed setting up an OIDC-based application in Okta for SSO.
Configure PingIdentity for Single Sign On
To set up an OpenID Connect (OIDC)-based application in PingIdentity for Single Sign On (SSO), perform the steps on this procedure.
- In the upper navigation bar, select Applications.
Figure 27. PingOne Applications 
- On the My Applications tab, select OIDC and then select Add Application. Add OIDC Application appears.
Figure 28. Adding the OIDC Application 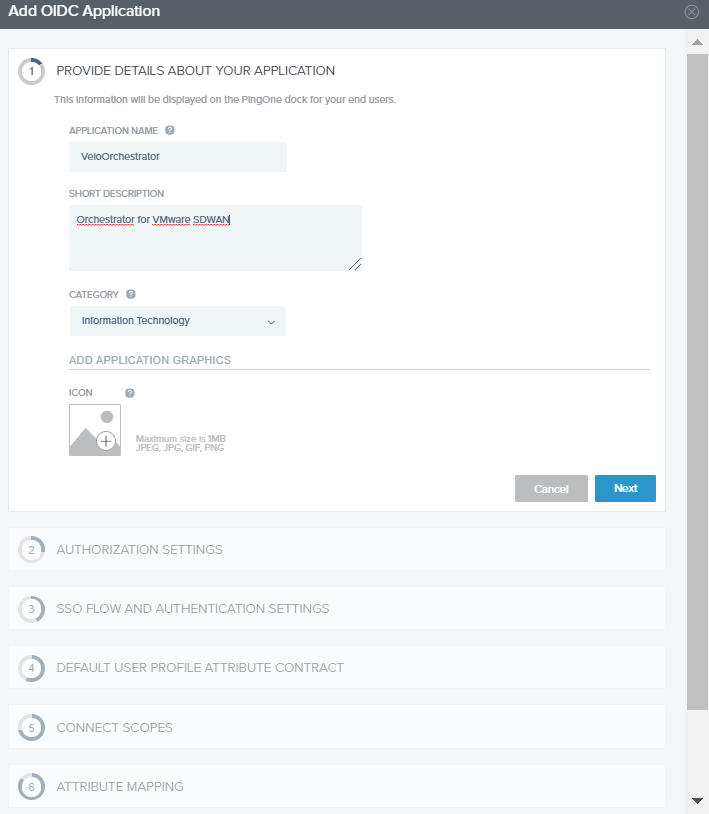
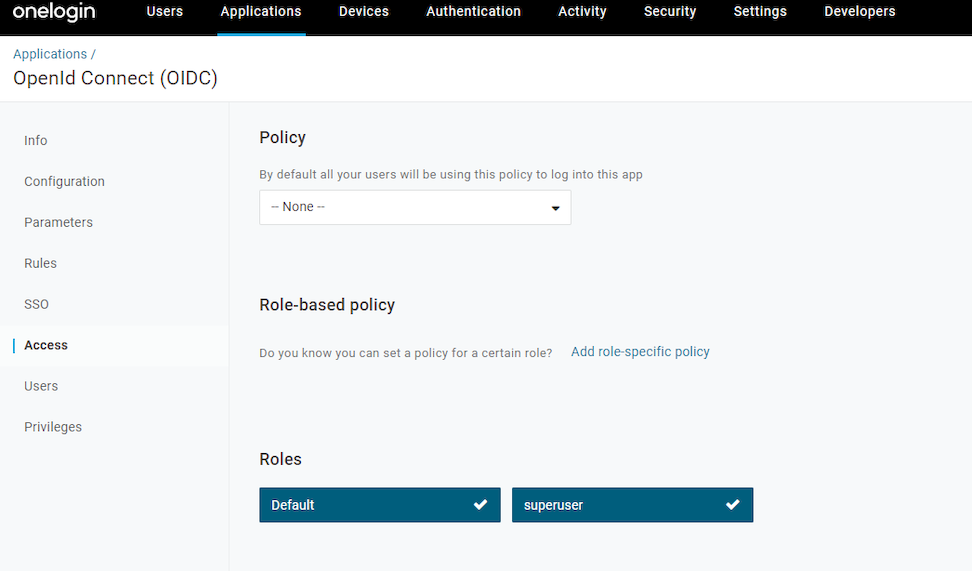
Configure OneLogin for Single Sign On
To set up an OpenID Connect (OIDC)-based application in OneLogin for Single Sign On (SSO), perform the steps below:
Ensure you have an active OneLogin account.
- In the Find Applications text box, search for OpenId Connect or oidc and then select the OpenId Connect (OIDC) app. The Add OpenId Connect (OIDC) screen appears.
Figure 29. Adding an OpenID Connection 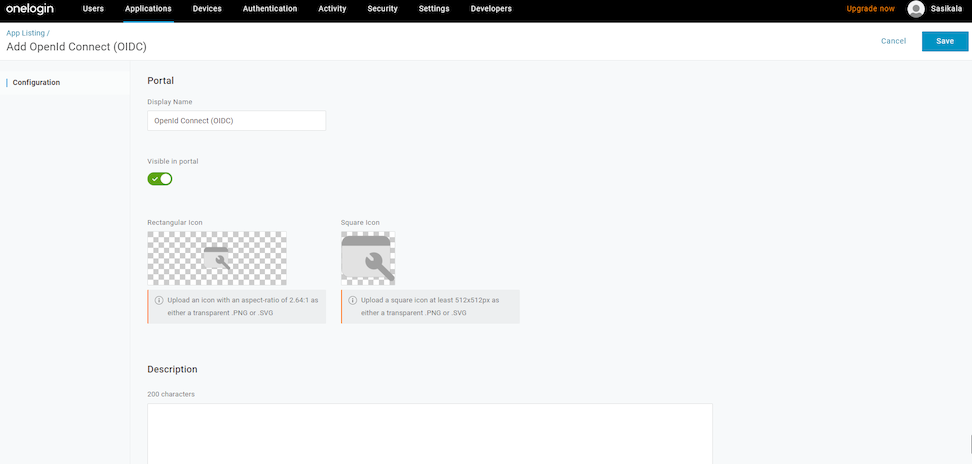
- On the Configuration tab, enter the Login URL, auto-login URL for SSO, and the Redirect URI that Orchestrator uses as the callback endpoint, and select Save.
- Login URL- The login URL has this format: https://<Orchestrator URL>/<Domain>/ login/doEnterpriseSsoLogin. Where, <Domain> is the domain name of your Enterprise that you must have already set up to enable SSO authentication for the Orchestrator. You can get the Domain name from the page.
- Redirect URI's- The Orchestrator redirect URL has this format: https://<Orchestrator URL>/login/ssologin/openidCallback. In the Orchestrator application, at the bottom of the Authentication screen, you can find the redirect URL link.
Figure 30. OpenId Connect 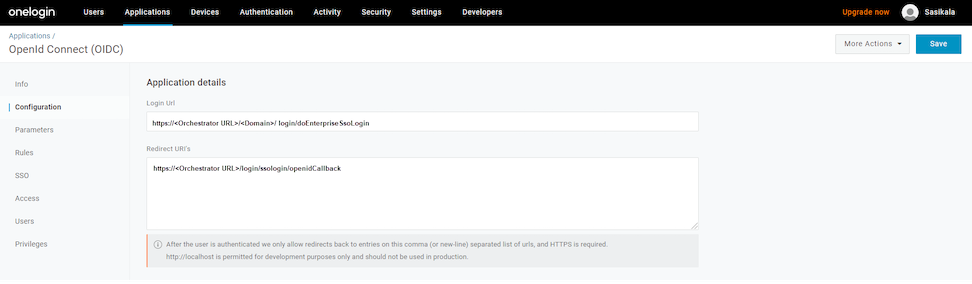
- On the Parameters tab, under OpenId Connect (OIDC), double-click Groups. Edit Field Groups appears.
Figure 31. Editing Field Groups 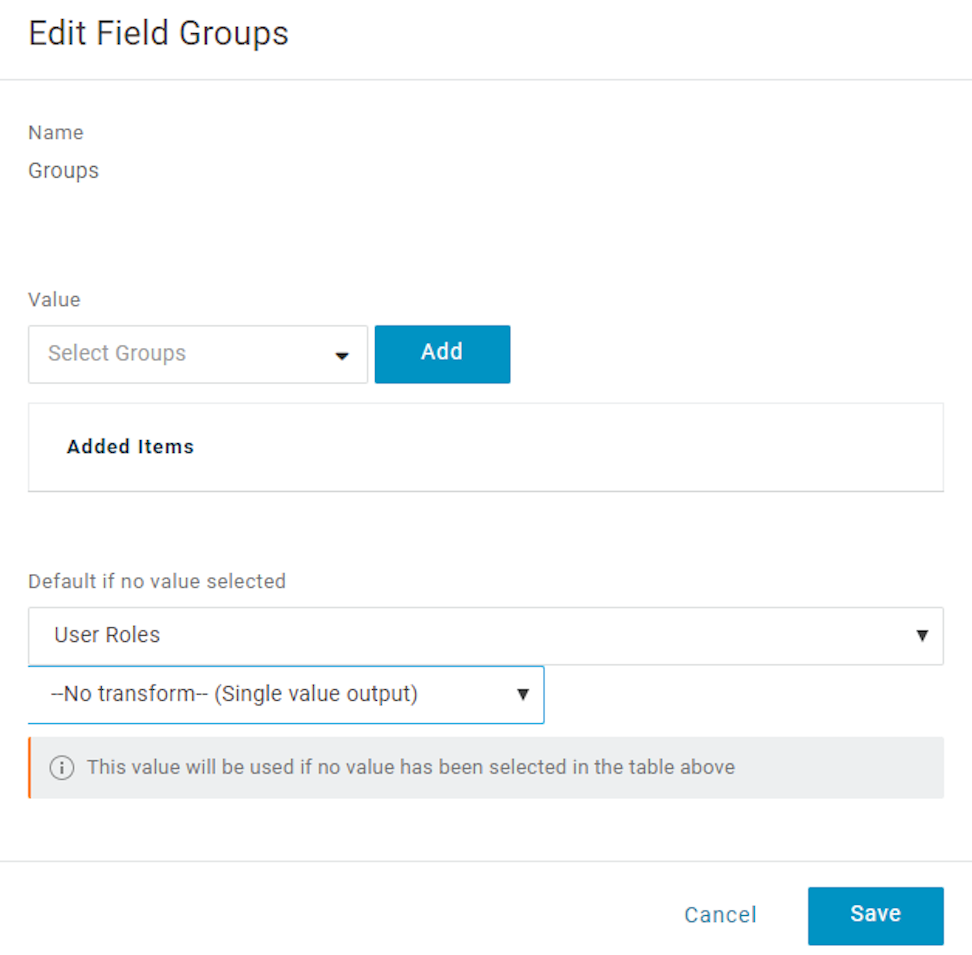
- From the Authentication Method menu, select POST as the Token Endpoint and select Save.
Also, note down the Client Credentials, Client ID and Client Secret, to be used during the SSO configuration in Orchestrator.
Figure 32. Authentication Method 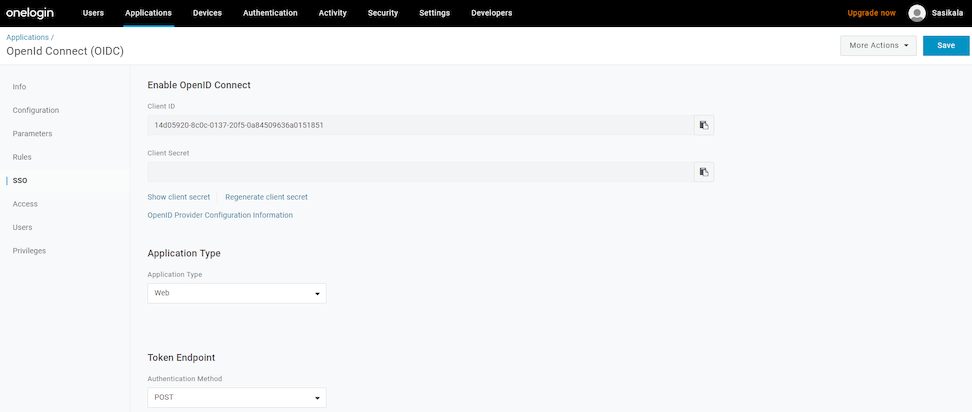
- On the Access tab, choose the roles allowed to login and select Save.
Figure 33. Access