
VeloCloud SD-WAN in Azure Virtual WAN Hub Deployment
The VeloCloud SD-WAN in Azure Virtual WAN (vWAN) Hub deployment describes the required configurations to manually deploy a Virtual Edge as a Network Virtual Appliance (NVA) in the Azure vWAN Hub network.
This topic contains the following sections:
About VeloCloud in Azure Virtual WAN Hub Deployment
The VeloCloud SD-WAN in Azure Virtual WAN (vWAN) Hub deployment describes manual deployment of a Virtual Edge as a Network Virtual Appliance (NVA) in the Azure vWAN Hub network.
Overview
During cloud migration, users encountered many challenges connecting remote locations to Azure vNets in a simple, optimized, and secure way across myriad connectivity options. VeloCloud SD-WAN addresses these problems by leveraging Dynamic Multipath Optimization™ (DMPO) technologies and distributed cloud gateway coverage worldwide. VeloCloud SD-WAN transforms unpredictable broadband transport into Enterprise-class quality connections, ensuring application performance from remote locations to the Azure Cloud.
To meet different deployment scenarios for customers deploying Azure Virtual WAN, VeloCloud SD-WAN has progressively added more capabilities to the solution. With this new integration, customers can now manually deploy VeloCloud Edges directly inside Azure Virtual WAN hubs, resulting in an offering that natively integrates Azure Virtual WAN customizable routing intelligence with VeloCloud SD-WAN optimized last-mile connectivity.
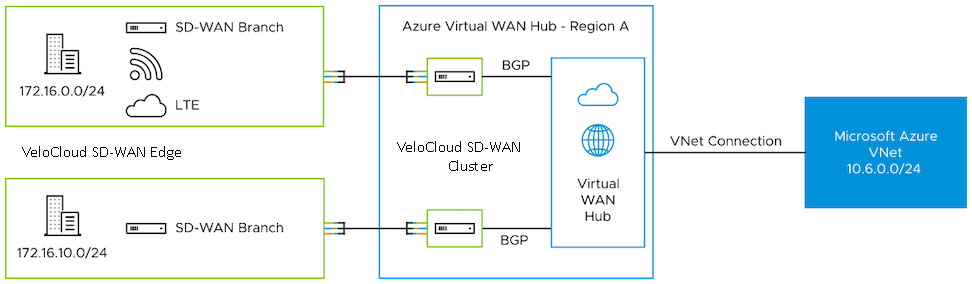
Deploy VeloCloud SD-WAN in Azure Virtual WAN Hub
To deploy VeloCloud Edges in a Virtual Hub manually, users must already have an Azure Resource Group, virtual WAN (vWAN), and virtual Hub (vHUB).
- Obtain Enterprise account access to VeloCloud Orchestrator.
- Obtain access to the Microsoft Azure portal with the appropriate IAM roles.
- Software image requirements for this deployment are as follows:
- VeloCloud Orchestrator - 6.4.0 and later.
- VeloCloud Gateway - 6.4.0 and later.
- VeloCloud Edges - 6.1.0.1 and later.
Note: The customer must either avoid upgrading to a different image post-activation or upgrade to version 6.1.0.0; otherwise, SSH access to the NVAs will fail due to a bug.
- Create an Azure Managed Identity. For steps, see Create Managed Identity.
- The Azure Support team manages SSH access to VeloCloud SD-WAN Azure NVAs. Azure enforces security policies that only allow the source IP address
168.63.129.16to SSH with Azure Virtual Edges. To allow a Virtual Edge to accept SSH from this source IP, navigate to , and add the IP address168.63.129.16under the Allow the following IPs field.SSH access is also available to customers when they upload their SSH public key.
Figure 2. Configure Edge Security  Note: Users can perform the Step 3 configuration on a Profile used by any or all of the Virtual Edges so that users do not need to do it for each individual Virtual Edge.
For additional details regarding this IP configuration, see Microsoft Azure.
- Login to the Azure portal and search for the Arista VeloCloud SD-WAN in vWAN application in the Azure Market place. The Arista VeloCloud SD-WAN in vWAN managed application page appears. Users can use this application to automate the deployment of Virtual Edges in Virtual WAN Hub.
Figure 3. Arista VeloCloud SD-WAN in vWAN Application 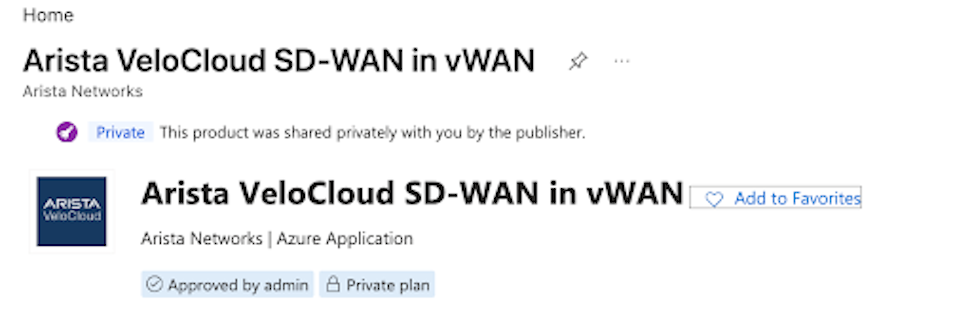
- Select Create on the managed application and enter the following details:
Figure 4. Create VeloCloud SD-WAN in a vWAN 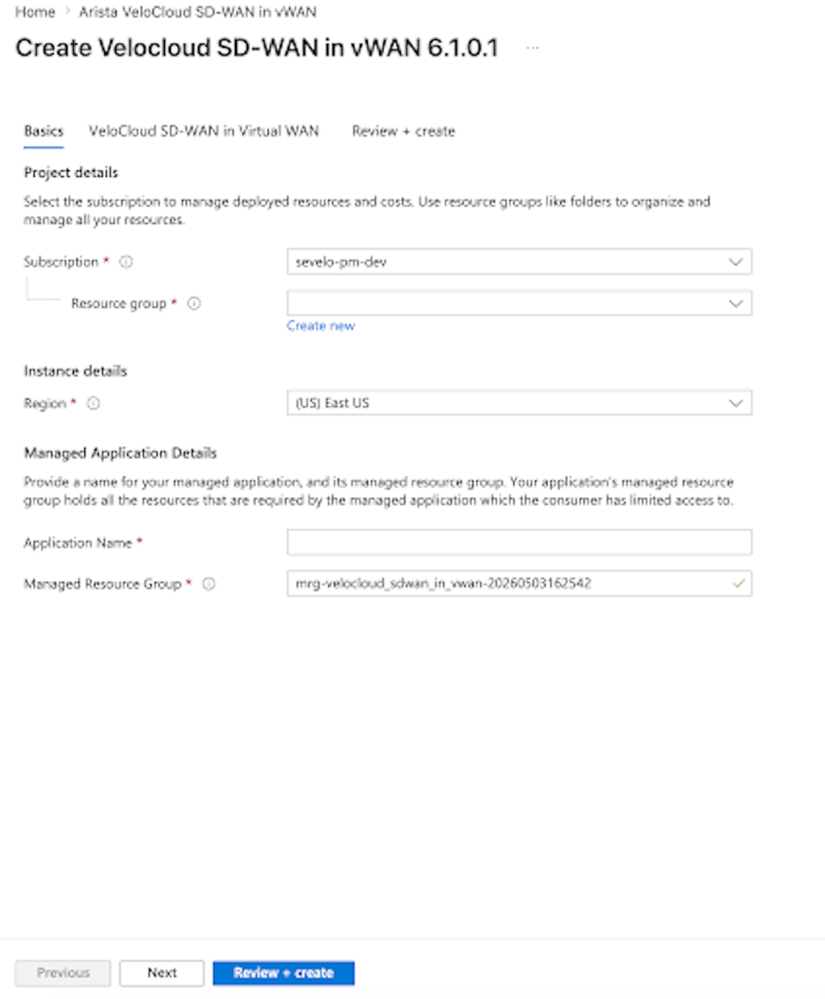
- Subscription - The subscription that created the vWAN hub.
- Resource Group - Create a new resource group or select the existing one.
- Region - Select the region where users created the vWAN Hub. Virtual Edges deploy in that vWAN Hub.
- Application Name - Enter a name for your managed application.
- Managed Resource Group - Provide the application managed resource group. The managed resource group contains all the resources required by the managed application with limited access for the consumer.
- On the VeloCloud SD-WAN in Virtual WAN tab, select Virtual WAN Hub in the selected region. The Virtual Edges deploy in this Hub.
Figure 5. Select the Virtual WAN Hub 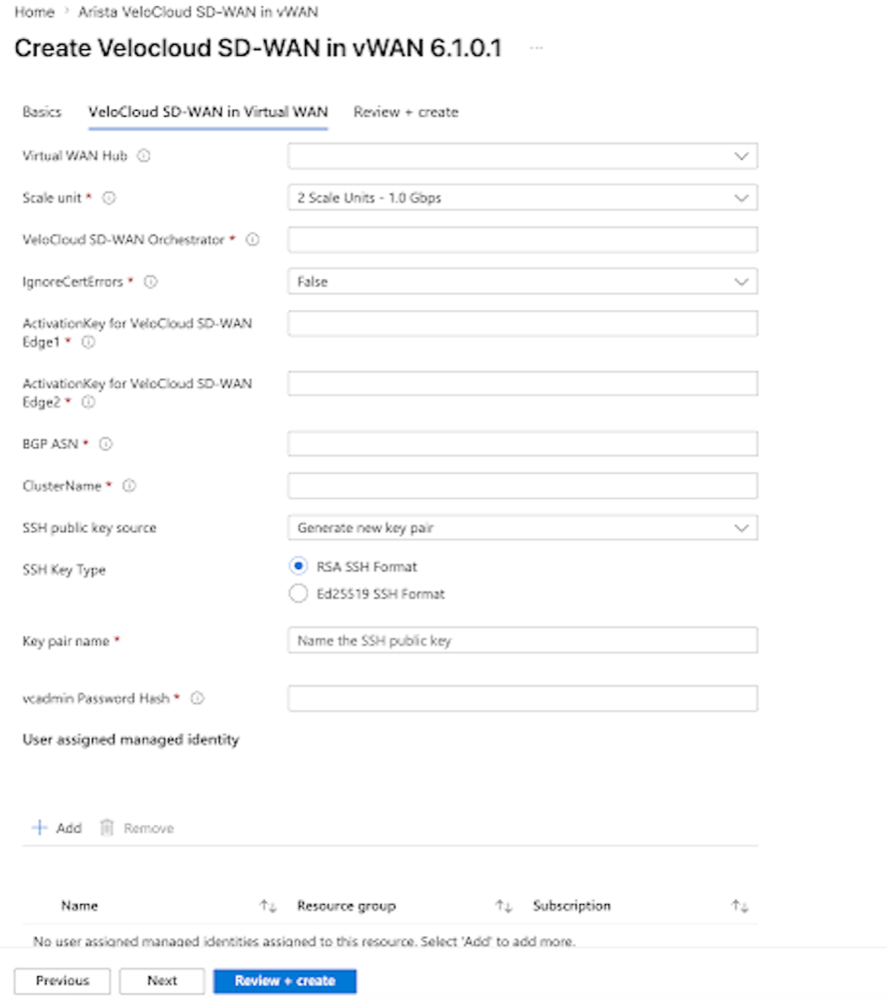
After users select a Virtual WAN Hub, the BGP neighbor IP Addresses and the ASN of the Virtual WAN Hub appear. Make a note of this information as users need it to configure BGP neighbors on the Orchestrator.
To deploy the NVA using the Managed Application, enter the following required details, and add the already created user-assigned managed identity. Then grant the Managed Application access to other existing resources. For steps on how to create an Azure Managed Identity, see Create Managed Identity.- Scale unit- Select the appropriate scale:
Table 1. Scale Units Scale Unit Instance Type 2 D2v5 * 2 Instances 4 D4v5 * 2 Instances 10 D8v5 * 2 Instances - VeloCloud SD-WAN Orchestrator - Copy and paste the Orchestrator URL from Step 3.
- IgnoreCertErrors - Set this flag to False. If this flag is set to True, users will not be able to use the Orchestrator URL, and the Orchestrator IP address must be provided.
- ActivationKey for Edge1 - Copy and paste the Activation Key from Step 3.
- ActivationKey for Edge2 - Copy and paste the second Activation Key from Step 3.
- SSH public Key source - Use existing Public Key.
- SSH Key Type - RSA or Ed25519.
- Key Pair Name - ‘Only if Generate new key pair’ option is chosen.
- vcadmin Password Hash - Provide a hash for the vcadmin password. Hash can be generated using the CLI on a Linux/Mac ‘openssl passwd -6 YourPassword’.
- BGP ASN - The ASN to configure on the Virtual Edges on the VeloCloud Orchestrator. Azure or IANA reserves the following ASNS:
- Azure reserved ASNs:
- Public ASNs - 8074, 8075, and 12076.
- Private ASNs - 65515, 65517, 65518, 65519, and 65520.
- IANA reserved ASNs:
- 23456, 64496-64511, 65535-65551, and 429496729.
- Azure reserved ASNs:
- ClusterName - Enter a unique name for the deployment that does not include special characters such as #, @, _,-, etc.
- User assigned managed identity - Select the identity to deploy the NVA by selecting +Add . In the Add user assigned managed identity section, select the previously created user assigned managed identity then select Add.
Figure 6. Add the User Assigned Managed Identity 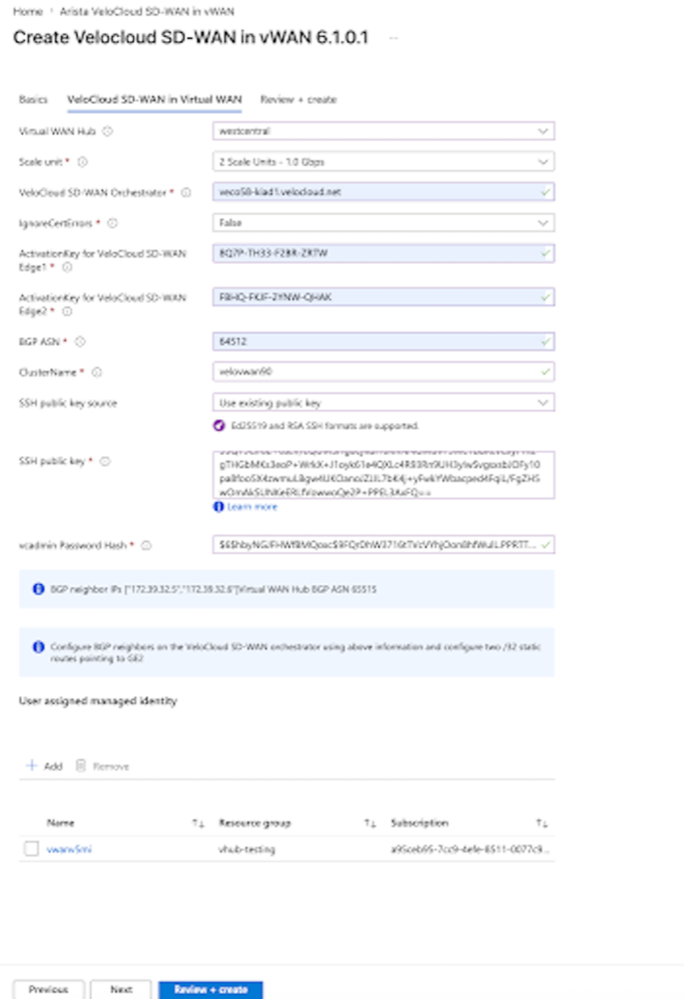
- Once added, the user assigned managed identity appears in the User assigned managed identity table.
Figure 7. Configured User Assigned Managed Identity 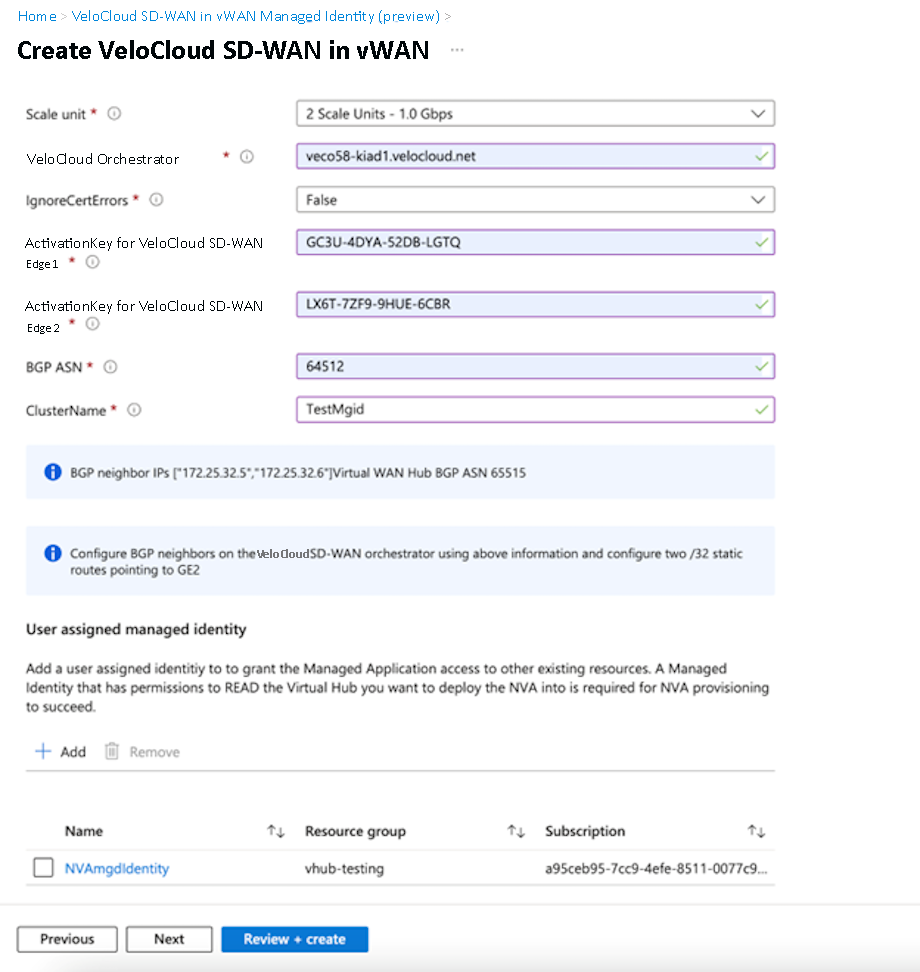
- Scale unit- Select the appropriate scale:
- Once all of the Virtual Edges are connected to the Orchestrator, users need to configure static routes and BGP neighbors so that the Virtual Edges can connect to the Azure Virtual WAN Hub.
- Configure Static Routes: Add enough
/32static routes for each unique route to point to the respective GE2 Interface on each Virtual Edge. To add a static route, the Orchestrator requires a next hop IP address. Acquire the next hop IP address by running the Remote Diagnostic Interface Status test on the Remote Diagnostics page of Orchestrator. Select the first IP address of the subnet assigned to GE2 and configure it as the next hop.The following example displays the output from diagnostic test and provides an IP address assigned to GE2 as
10.101.112.6/25and the first IP address of this subnet as10.101.112.1, used to configure the static route on the Orchestrator.Figure 8. Interface Status Test Output 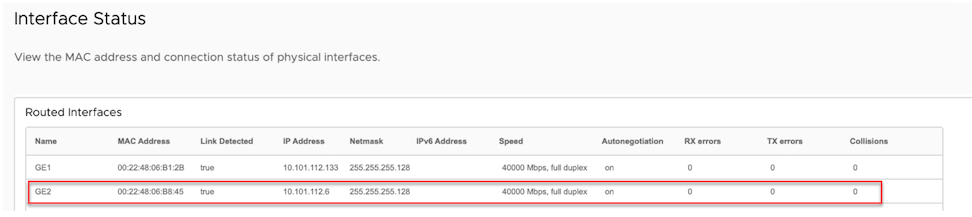
The output also displays two static routes configured on the Edge to reach BGP neighbors.
Figure 9. Monitor Static Routes 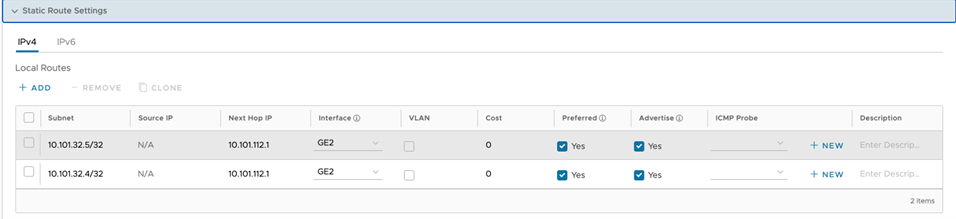
- Configure BGP neighbors for each Virtual Edge by using the BGP neighbor IPs and the ASN number as displayed in the information message in Step 7.
Figure 10. Monitor BGP Neighbors Configuration 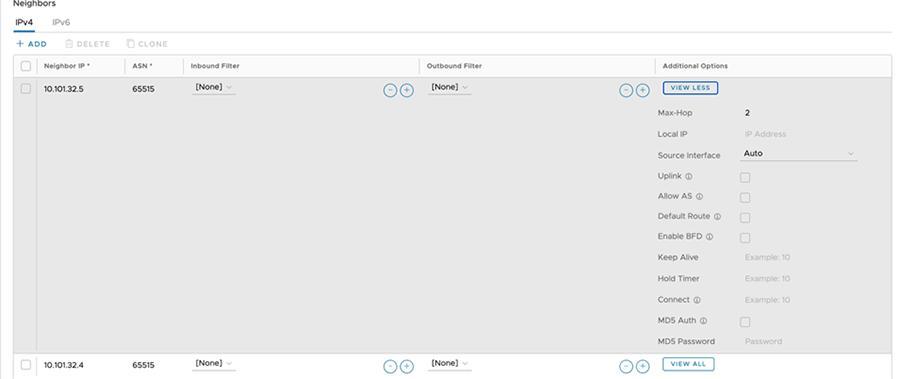
Once users configure the static routes and BGP neighbors, the Virtual Edges begin learning routes from the Azure Virtual WAN Hub. BGP neighbor status can be verified under .
- Configure Static Routes: Add enough
- (Optional) To add a Virtual Network Connection with the Virtual Networks (vNETs) to the vHub, go to Azure .
Figure 11. Add a vNET 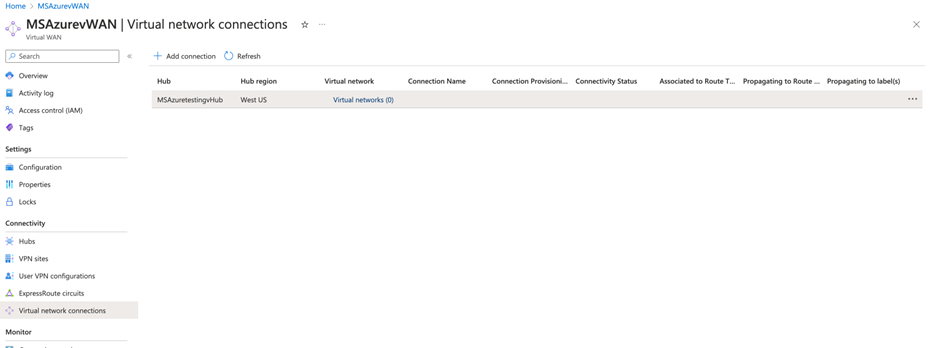
Select Add Connection and provide a Connection Name. Select the Hub, Subscription, and Resource Group. Select the vNET and the associated Route table to connect to the Hub. For example, the vNET uses the default route table.
Figure 12. Add a Connection 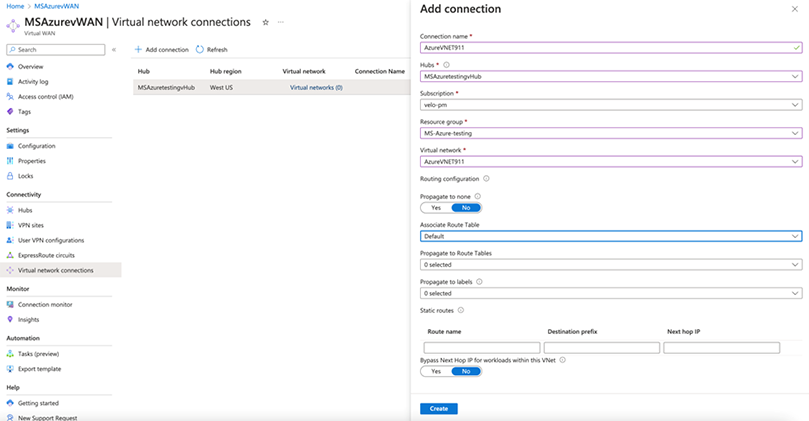
For the vWAN NVA Edge, the example uses a 2 NIC Deployment, and does not use the GE1 interface as the Management interface. This is unique to the vWAN NVA image.
On all other cloud Edges, the GE1 interface allocates as a Management interface and cannot be used for data traffic.
Accessing the Command Line of Virtual Edges Deployed into an Azure vWAN vHub
Azure vWAN operates as a managed service. With VeloCloud vWAN now offers the ability to associate a public key with the configured virtual machine (VM).Note: Users must use version 6.1.0.0 as the activation image for the VeloCloud Edges during the initial set up. This step is necessary to ensure SSH access to the Edges remains intact. After completing this first step, users can upgrade to any version of their choice. If a different activation image is used, SSH access may not function properly.For example:ssh -i <Key Name> vcadmin@<Edge IP Address> Authorized Users Only Enter passphrase for key '<Key Name>':
Alternatively, Edges can also be accessed via the vEdge CLI for troubleshooting and operational purposes, utilizing VeloCloud SD-WAN Secure Edge Access. This uses Orchestrator to create key-based, per-user SSH access to the vEdge CLI. Refer to Access SD-WAN Edges Using Key-based Authentication to enable Secure Edge Access.
Create Managed Identity
This section describes the steps to create an Azure Managed Identity.
- Under Subscription, create a Custom Role such as vWANNVACustomRole, with the following permissions.
"permissions": [ { "actions": [ "Microsoft.Network/publicIPAddresses/join/action", "Microsoft.Network/publicIPAddresses/read", "Microsoft.Network/networkVirtualAppliances/delete", "Microsoft.Network/networkVirtualAppliances/read", "Microsoft.Network/networkVirtualAppliances/write", "Microsoft.Network/networkVirtualAppliances/restart/action", "Microsoft.Network/networkVirtualAppliances/getDelegatedSubnets/action", "Microsoft.Network/virtualHubs/read" ], "notActions": [], "dataActions": [], "notDataActions": [] } ] - Create a new user-assigned managed identity such as NVAmgdIdentity in the desired Managed Group and Region.
Figure 13. Create User Assigned Managed Identity 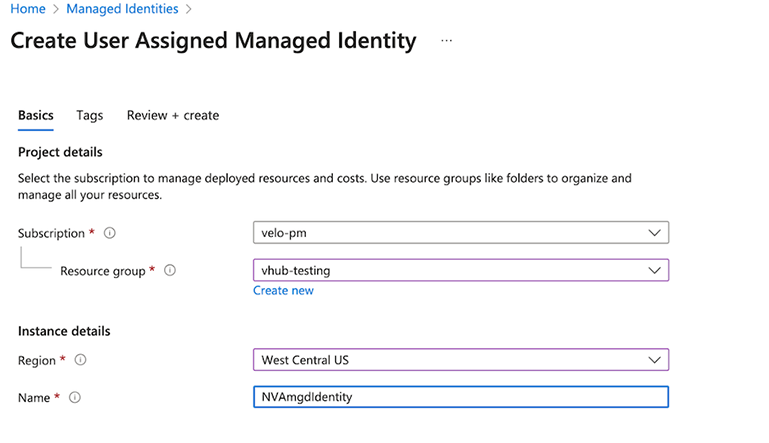
- Under the resource group where users deployed the vWAN Hub, assign the Managed Identity by navigating to .
In the Add role assignment screen, under the Role tab search for the custom role that users created, select vWANNVACustomRole.
Figure 14. Add Role Assignment 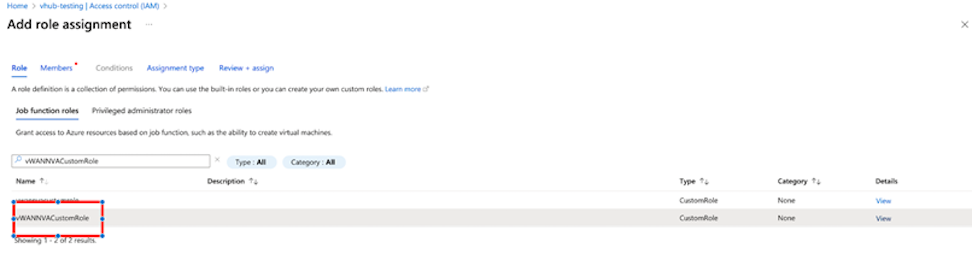
-
On the Members tab, select Managed Identity. In the Select managed identities section, select the user assigned managed identity, NVAmgdIdentity, that users previously created and select Select. The selected managed identity appears under the Selected Members area.
Figure 15. Select Managed Identities 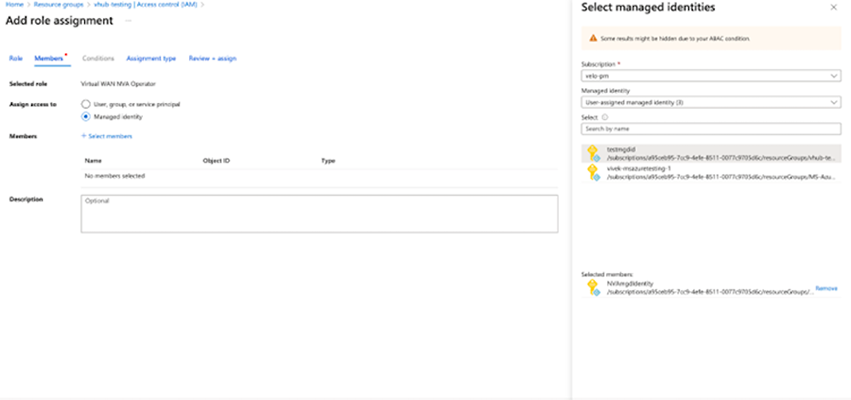
-
Select Review+Assign to assign the selected Managed Identity to the custom role with scope as the resource group in the deployed vWAN hub.