Arista VeloCloud Orchestrator supports the integration and automation of Azure Virtual Wide Area Network (WAN) from VeloCloud Gateway and VeloCloud Edge, enabling Branch-to-Azure Virtual Private Network (VPN) Connectivity.
Azure Virtual WAN IPsec Tunnel Automation Overview
Azure Virtual Wide Area Network (WAN) is a network service that facilitates optimized and automated Virtual Private Network (VPN) connectivity from enterprise branch locations to or through Microsoft Azure. Azure subscribers provision Virtual Hubs corresponding to Azure regions and connect branches (which may or may not be SD-WAN enabled) through Internet Protocol Security (IPsec) VPN connections.
To establish branch-to-Azure VPN connectivity, Orchestrator supports Azure Virtual WAN and VeloCloud SD-WAN integration and automation by leveraging the Azure backbone. Currently, the following Azure deployment options support the VeloCloud SD-WAN:
IPsec from the Gateway to the Azure virtual WAN hub with automation.
Direct IPsec from the Edge to the Azure virtual WAN hub with automation.
Azure Virtual WAN Gateway Automation
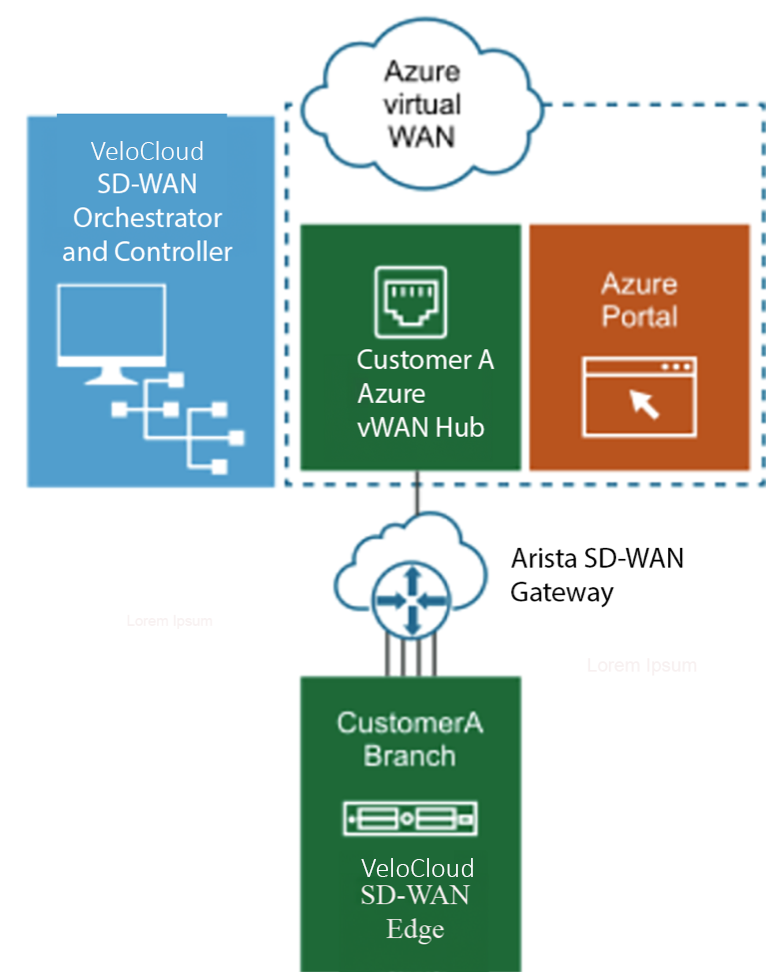
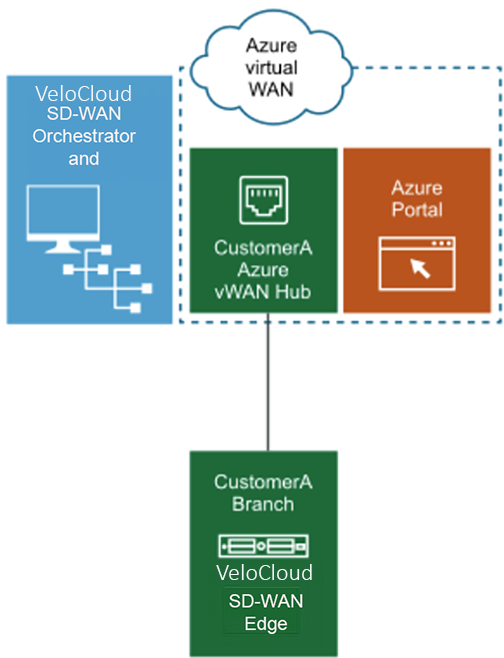
The following diagram illustrates the IPsec tunnel from the Gateway to the Azure virtual WAN hub.
Figure 1. Azure Virtual WAN IPsec Tunnel Deployment from Gateway
Azure Virtual WAN Edge Automation
The following diagram illustrates the IPsec tunnel directly from the Edge to the Azure virtual WAN hub.
Figure 2. Azure Virtual WAN IPsec Tunnel Deployment Directly from Edge
The following topics provide instructions for configuring the Orchestrator and Azure to enable branch-to-Azure VPN connectivity through the Gateway and Edge:
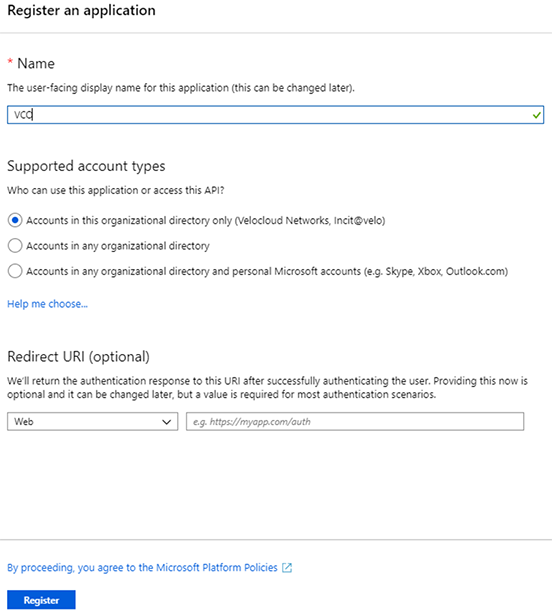
Enterprise network administrators must complete the following prerequisite configuration tasks at the Azure portal to ensure that the Orchestrator application can function as the Service Principal (identity for the application) for Azure Virtual Azure Virtual Wide Area Network (WAN) and Gateway integration.
Assign the Orchestrator Application to the Contributor Role
Users must assign the application to a role to access resources in the Azure subscription. Users can set the scope at the subscription, resource group, or resource level. Lower levels of scope inherit permissions.
Before you begin:
Make sure users have an Azure subscription. If not, create a free account.
To assign a Contributor role at the subscription scope:
Select All Services and search for Subscriptions.
From the list of subscriptions, select the subscription to which users want to assign an application. Select the global subscriptions filter if users do not see the subscription that they are looking for. Make sure the subscription users want is available for the portal.
Select Access control (IAM).
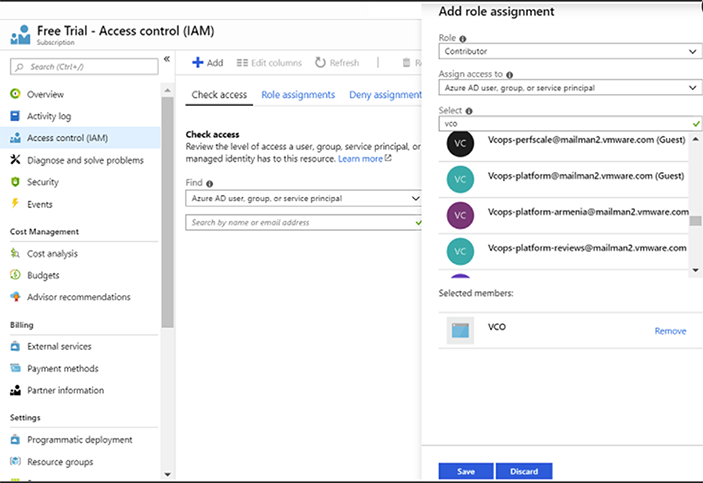
Select +Add > Add Role Assignment
Figure 4. Add Role Assignment
Select the Contributor role from the Role drop-down menu to assign to the application. To allow the application to execute actions like reboot, start, and stop instances, the system recommends that users assign the Contributor role to the App Registration.
Select Azure AD user, group, or service principal from the Assign access to drop-down menu. By default, Azure AD applications are not in the available display options. To locate the application, search for it by name.
Select Save.
After the administrator assigns the application to the Contributor role, the application appears in the list of users assigned to roles for that scope.
To download Virtual WAN Virtual Private Network (VPN) configurations, the Orchestrator requires a Blob Storage Account that acts as an intermediary data store from where users can download the configurations. The Orchestrator aims to create a seamless user experience by providing a transient storage account for each download task. To download VPN site configurations, users must manually register with Microsoft.Storage resource provider on the Azure Subscription. By default, Azure Subscriptions do not register the Microsoft.Storage resource provider.
Before you begin:
Make sure users have an Azure subscription. If not, create a free account.
Users have the Contributor or Owner roles permissions.
To register a resource provider for the subscription:
Log in to the Microsoft Azure account. The Microsoft Azure home screen appears.
Select All Services and search for Subscriptions.
From the list of subscriptions, select the subscription.
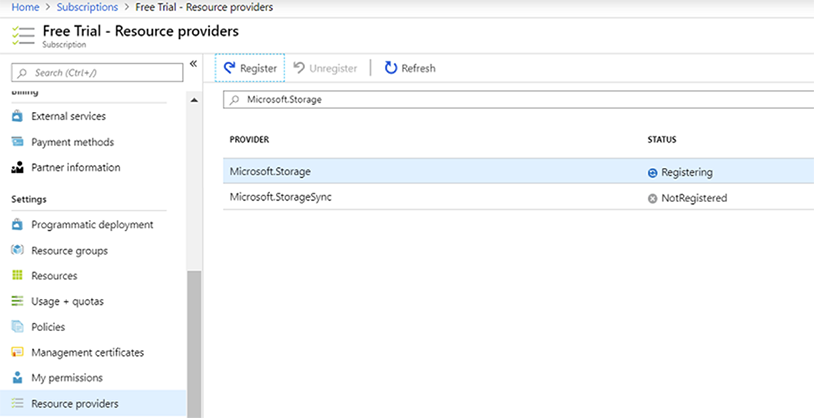
Go to Settings > Resource Providers.
Figure 5. Register a Resource Provider
Select Microsoft.Storage from the available resource providers and select Register.
The resource provider is registered and configures the user's subscription to work with the resource provider.
It creates a new client secret in Azure AD for authentication.
Before you begin:
Make sure users have an Azure subscription. If not, create a free account.
To create a new client secret in Azure AD:
Log in to the Microsoft Azure account. The Microsoft Azure home screen appears.
Select Azure Active Directory > App Registration.
Select the registered Orchestrator application on the Owned Application tab.
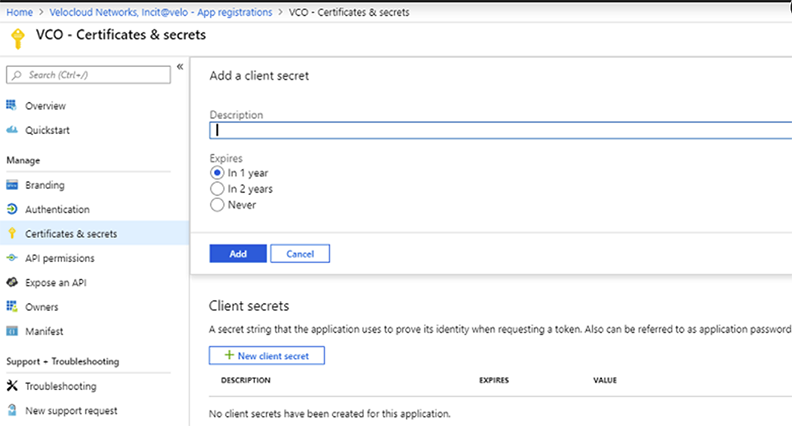
Select Certificates & Secrets > New Client Secret. The Add a Client Secret screen appears.
Figure 6. Create Certificates & Secrets
Provide details, such as a description and expiration value for the secret, and select Add. It creates a client secret from the registered application.
Note: Copy and save the new client secret value used during the Cloud Subscription in Orchestrator.
Configure Azure Virtual WAN for Branch-to-Azure VPN Connectivity
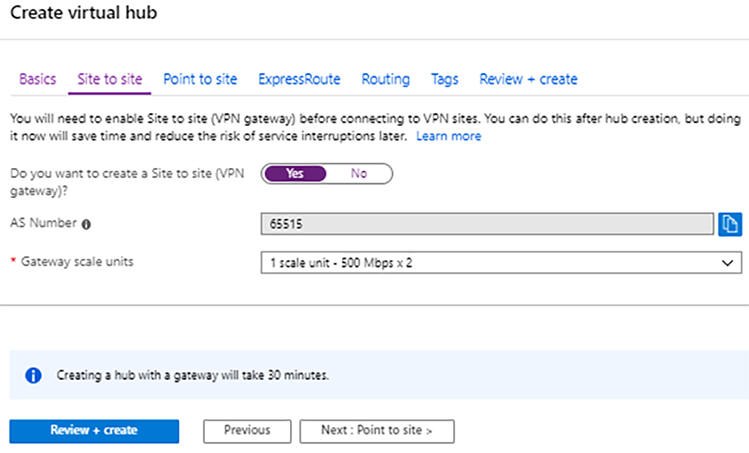
This section discusses the procedures for configuring Azure to integrate Azure Virtual WAN and Gateway, enabling branch-to-Azure VPN connectivity. As a pre-requisite, to configure the Azure Virtual WAN and the other Azure resources:
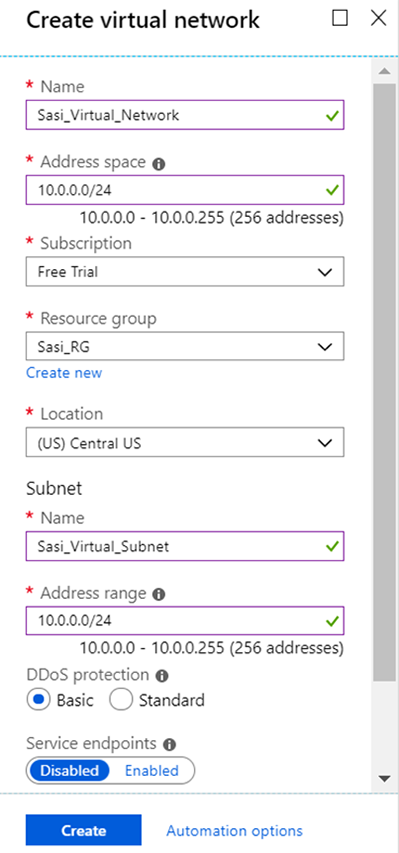
Verify that none of the subnets of the user's on-premises network overlap with the existing virtual networks that users want to connect to. The user's virtual network does not require a gateway subnet and cannot have any virtual network gateways. For instructions on creating a virtual network, see Create a Virtual Network.
Obtain an IP address range for the user's Hub region and ensure that the address range specified for the Hub region does not overlap with any of the existing virtual networks to which users connect.
Ensure users have an Azure subscription. If not, create a free account.
For step-by-step instructions about the various procedures in the Azure portal side for integrating Azure Virtual WAN and Gateway, see:
Describes the steps to create a resource group in Azure.
Before you begin:
Make sure users have an Azure subscription. If not, create a free account.
To create a resource group in Azure:
Log in to the Microsoft Azure account. The Microsoft Azure home screen appears.
Select All Services and search for Resource Groups.
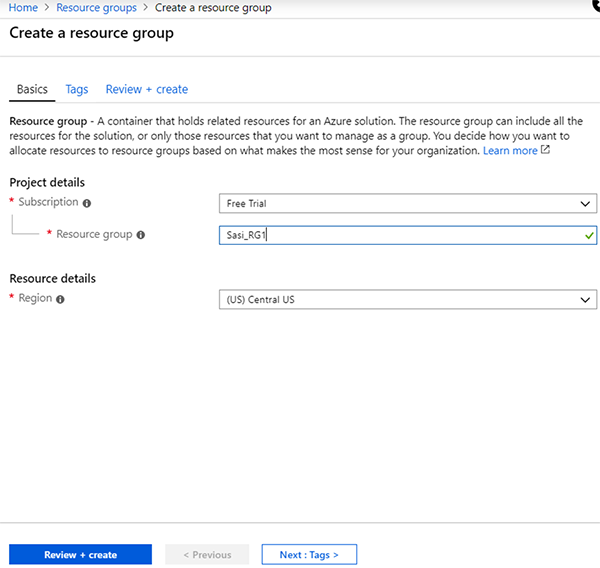
Select the desired Resource Group from the available options and select Add. The Create a Resource Group screen appears.
Figure 7. Create a Resource Group
From the Subscription drop-down menu, select the Microsoft Azure Subscription.
In the Resource group field, enter a unique name for the new Resource group.
A resource group name can include alphanumeric characters, periods (.), underscores (_), hyphens (-), and parentheses (), but the name cannot end with a period.
From the Region drop-down menu, select the location for the resource group, where most of the resources will reside.
Select Review+create and then select Create.
It creates a resource group and appears on the Azure portal dashboard.
Configure Orchestrator for Azure Virtual WAN IPsec Automation from the Gateway
Users can configure Orchestrator to integrate Azure Virtual Wide Area Network (WAN) and Gateway, enabling the branch-to-Azure VPN connectivity.
Note: By default, the Azure Virtual WAN feature is deactivated. To enable the feature, an Operator Super user must set the session.options.enableAzureVirtualWAN system property to true.
Note: The Non SD-WAN Destination (NSD) tunnel only supports static routes when using the Azure Virtual WAN Automation from Gateway feature. As a result, it is not currently compatible with Border Gateway Protocol (BGP) over Internet Protocol Security (IPsec).
Before beginning the Orchestrator configuration for Azure Virtual WAN - Gateway automation, make sure users complete all the steps explained in the Prerequisite Azure Configuration and Configure Azure Virtual WAN for Branch-to-Azure VPN Connectivity sections. For step-by-step instructions about the various procedures that users need to complete in the Orchestrator for integrating Azure Virtual WAN and Gateway, see:
To view the details of Non-SD-WAN Destinations network services configured for an enterprise, see Monitor Non-SD-WAN Destinations.
Associate a Microsoft Azure with an SD-WAN Profile
After configuring a Non SD-WAN Destination of Microsoft Azure Virtual Hub in Orchestrator, users must associate the non-SD-WAN Destination with the desired Profile to establish the tunnels between Gateways and Microsoft Azure Virtual Hub.
To associate a Non-SD-WAN Destination with a Profile, perform the following steps:
In the SD-WAN service of the Enterprise portal, go to Configure > Profiles. The Profiles page appears.
Select a profile with which users want to associate their Microsoft Azure Non-SD-WAN Destination, and then select the View link in the Device column.
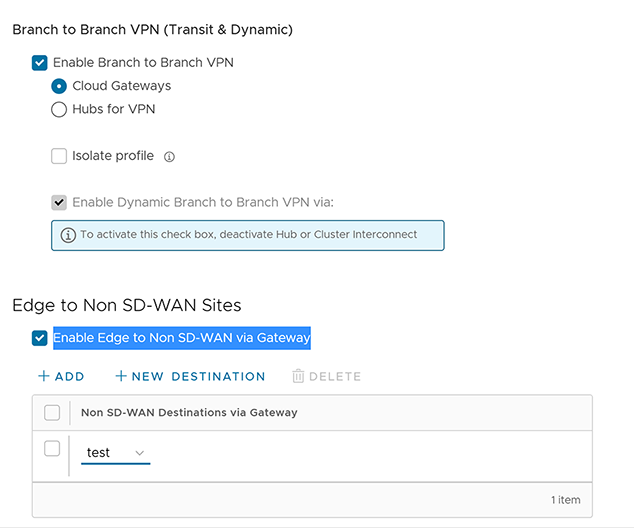
On the Device settings page, under VPN services, activate Cloud VPN by toggling the button to the ON position.
Figure 13. Associate a Microsoft Azure with an SD-WAN Profile
Under Edge to Non SD-WAN Sites, select the Enable Edge to Non SD-WAN via Gateway checkbox.
Select the Non-SD-WAN destination from the Microsoft Azure Virtual Hub drop-down menu to establish a VPN connection between the branch and the Microsoft Azure Non-SD-WAN destination.
Select Save Changes.
This establishes a tunnel between the branch and the Microsoft Azure Non-SD-WAN destination.
Edit a VPN Site
This task manually adds the SD-WAN routes into the Azure network.
Before you begin:
Users must complete provisioning the Azure Virtual Private Network (VPN) sites on the Orchestrator side.
To add SD-WAN routes to the Azure network:
Log in to the Microsoft Azure account. The Microsoft Azure home screen appears.
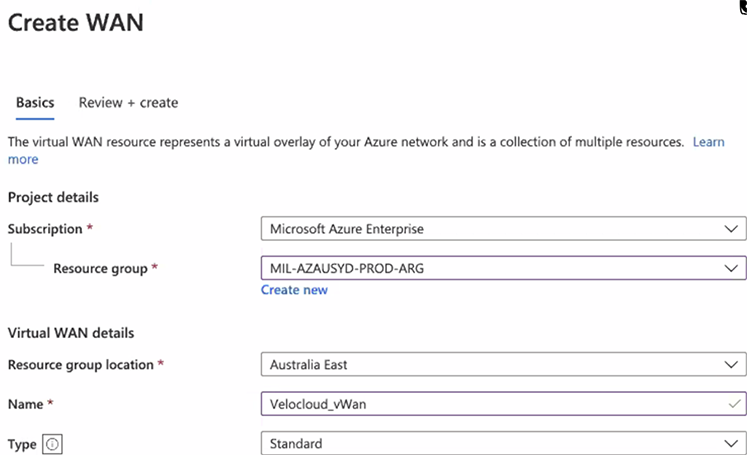
Select All Resources, then select the Virtual WAN that the user created earlier from the list of available resources.
Under the Virtual WAN Architecture area, select VPN sites.
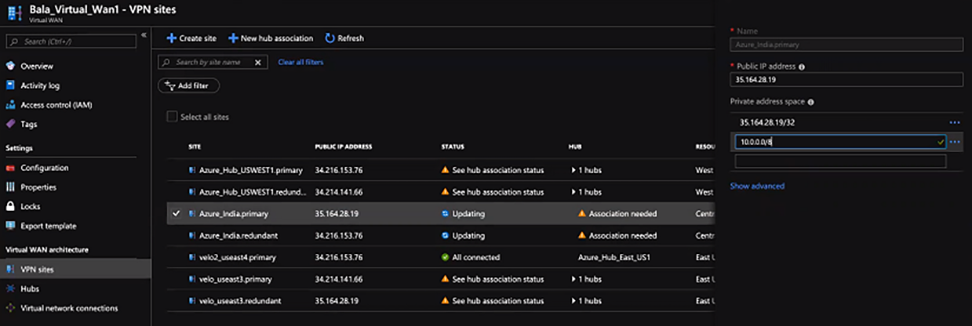
From the available list of VPN sites, select the VPN site (for example, Non SD-WAN Destination name.primary). The Orchestrator manages non-SD-WAN destination provisioning, requiring this additional configuration step.
Select the name of the desired VPN site, and from the top of the next screen, select Edit site.
Figure 14. Edit Virtual WAN - VPN Sites
On the Private address tab, enter the address range for the SD-WAN routes.
Select Confirm. Similarly, following the earlier steps, users can edit their Redundant VPN site.
Note: Currently, Azure vWAN supports only Active/Active tunnel mode, and it does not have the provision to specify priority or primary tunnel to the VPN site (Primary and Redundant sites), and therefore load balancing will be done by Azure on equal cost multi-path routing. It may cause asymmetric traffic flow and increase the latency for those flows. The workaround to avoid the asymmetric flow is to remove the Gateway redundancy on the Azure vWAN Hub NVS tunnel; however, removing redundant Gateway tunnels may not be acceptable for all deployments and needs to be handled with caution.
Configure a Non SD-WAN Destination of Type Microsoft Azure Virtual Hub
Perform the following steps to configure a Non SD-WAN Destination of type Microsoft Azure Virtual Hub in the Orchestrator.
In the SD-WAN service of the Enterprise portal, navigate to Configure > Network Services, and then under Non SD-WAN Destinations, expand Non SD-WAN Destinations via Gateway.
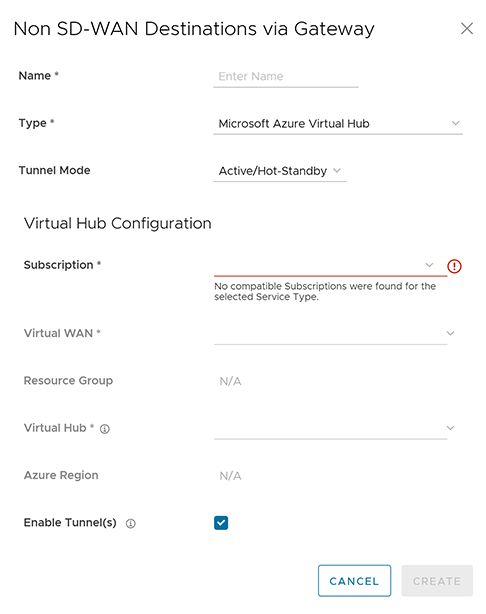
Select New, then enter the Name and select the Type of the Non SD-WAN destination.
After users enter the Type as Microsoft Azure Virtual Hub, a new Virtual Hub Configuration section is displayed.
Figure 15. Configure Non SD-WAN Destinations via Gateway
Configure the following settings:
Table 1. Non SD-WAN Destination Configuration Option Descriptions
Option
Description
Name
Edit the previously entered name for the Non SD-WAN Destination.
Type
Displays the type as Microsoft Azure Virtual Hub. Users cannot edit this option.
Tunnel Mode
Active/Hot-Standby mode supports setting up a maximum of 2 tunnel endpoints or Gateways.
Active/Active mode supports setting up a maximum of 4 tunnel endpoints or Gateways. All Active tunnels can send and receive traffic through Equal-Cost Multi-Path (ECMP).
ECMP Load Sharing Method
The Flow Load-Based (Default) algorithm maps the new flow to the path with the least number of flows mapped among the available paths to the destination.
The Hash Load-Based algorithm takes input parameters from a 5-tuple (Source IP, Destination IP, Source Port, Destination Port, Protocol). These inputs can be any or all or any subset of this tuple based on the user configuration. The system maps each flow to a path based on a hash value generated from selected inputs.
Subscription
Select a subscription from the drop-down menu.
Virtual WAN
The application dynamically fetches all available Virtual WANs from Azure. Select a virtual WAN from the drop-down menu.
Resource Group
The application auto-populates the resource group to which the selected Virtual WAN is associated.
Virtual Hub
Select a virtual Hub from the drop-down menu.
Azure Region
The application auto-populates the Azure region corresponding to the selected Virtual Hub.
Enable Tunnel(s)
Select the Enable Tunnel(s) checkbox to allow VPN Gateways to initiate VPN connections to the target Virtual Hub after the administrator successfully provisions the site.
Note:
Virtual Private Network (VPN) Gateways initiate the IKE negotiation only after the administrator configures the Non SD-WAN Destination on at least one profile.
For Microsoft Azure Non SD-WAN Destination, the default local authentication ID value used is the Gateway Interface Public IP.
Select Create.
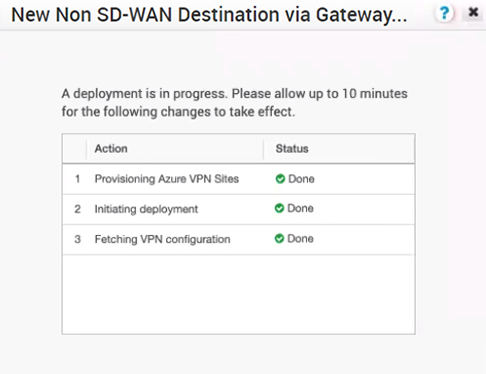
The Orchestrator automatically initiates deployment, provisions Azure VPN Sites, and downloads the VPN Site Configuration for the newly configured sites. It stores the configuration in the Orchestrator’s Non SD-WAN Destination configuration database.
Figure 16. New Non SD-WAN destination via Gateway
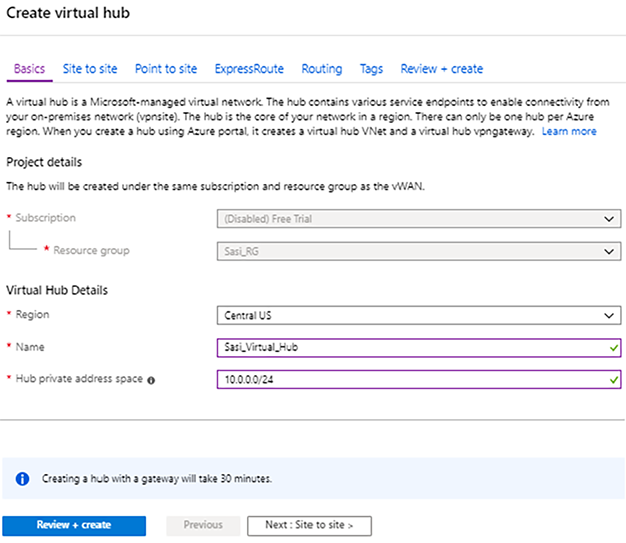
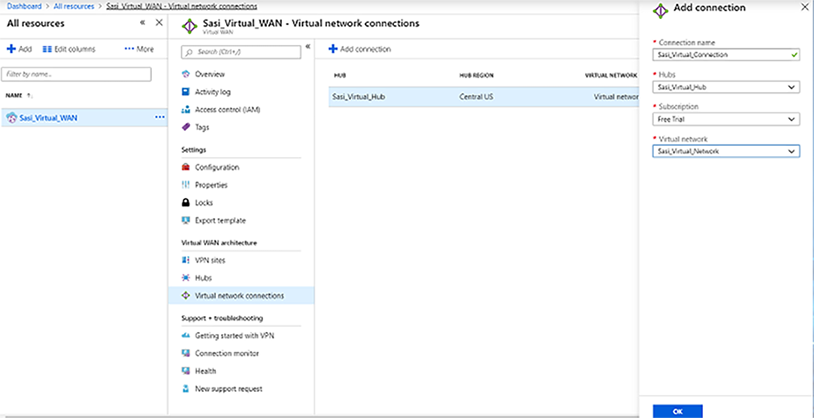
After the Azure VPN sites are provisioned at the Orchestrator side, users can view the VPN sites (Primary and Redundant) in the Azure portal by navigating to Virtual WAN > Virtual WAN architecture > VPN sites.
Perform the following steps to complete the other configurations:
Associate the Microsoft Azure Non SD-WAN destination to a Profile to establish a tunnel between a branch and Azure Virtual Hub. For additional information, see Associate a Microsoft Azure with an SD-WAN Profile.
Users must manually add SD-WAN routes to the Azure network. For additional information, see Edit a VPN Site.
After associating a Profile with the Microsoft Azure Non SD-WAN Destination, users can return to the Non SD-WAN Destinations via Gateway section by navigating to Configure > Network Services, and then configure the Border Gateway Protocol (BGP) settings for the Non SD-WAN Destination. Scroll to the name of the Non SD-WAN Destination, and then select the Edit link in the BGP column. For additional information, see Configure BGP Over IPsec from Gateways.
In the Non SD-WAN Destinations via Gateway area, select the Edit link in the BFD column for a Non SD-WAN Destination to configure the Bidirectional Forwarding Detection (BFD) settings. For additional information, see Configure BFD for Gateways.
After successful non-SD-WAN destination provisioning, if there are changes to the endpoint IP address of the Azure Hub or static routes, users must resynchronize the Azure Virtual Hub and non-SD-WAN destination configurations. Selecting the Resync configuration button in the Non-VeloCloud Sites will automatically fetch the VPN configuration details from the Azure portal and update the Orchestrator local configuration.
Configure Orchestrator for Azure Virtual WAN IPsec Automation from Edge
Administrators can configure Orchestrator to integrate Azure Virtual WAN and Edge to enable the branch-to-Azure VPN connectivity directly from Edge.
Note: When using the Azure Virtual WAN Automation from Edge feature, the Non-SD-WAN Destination (NSD) tunnel only supports static routes. As a result, this feature is not currently compatible with
Border Gateway Protocol (BGP) over Internet Protocol Security (IPsec).
Before beginning the Orchestrator configuration for Azure Virtual WAN - Edge automation, make sure users complete all the steps explained in the Prerequisite Azure Configuration and Configure Azure Virtual WAN for Branch-to-Azure VPN Connectivity sections. For step-by-step instructions about the various procedures users need to complete on the Orchestrator side for integrating Azure Virtual WAN and Edge, see:
Associate a Microsoft Azure with an SD-WAN Edge and Add Tunnels
After configuring a Non-SD-WAN Destination Microsoft Azure Virtual Hub from Edge, users must associate the Non-SD-WAN Destination with an Edge and configure tunnels to establish Internet Protocol Security (IPsec) tunnels between the Edge and Microsoft Azure Virtual Hub. At the Edge level, to associate a Non-SD-WAN Destination with an Edge, perform the following steps:
In the SD-WAN service of the Enterprise portal, go to Non-SD-WAN Destinations via Edge.
Select the Edge with which users want to associate their Microsoft Azure Non-SD-WAN Destination, then select the View link in the Device column.
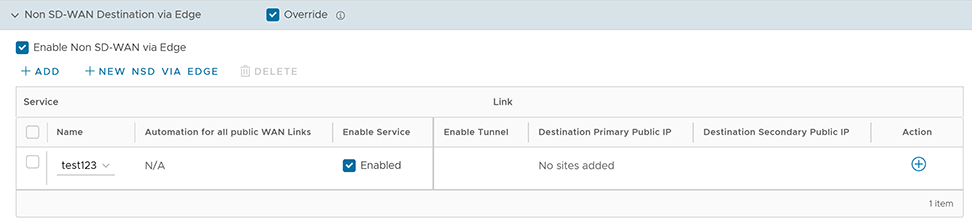
On the Device settings page, expand Non-SD-WAN Destinations via Edge under VPN services, then select the Override tab.
Now, select the Non-SD-WAN Destinations via Edge tab.
Figure 17. Associate a Microsoft Azure with an SD-WAN Edge
Select the Microsoft Azure Virtual Hub service from the Name drop-down menu to establish a VPN connection between the branch and the Microsoft Azure Non-SD-WAN Destination.
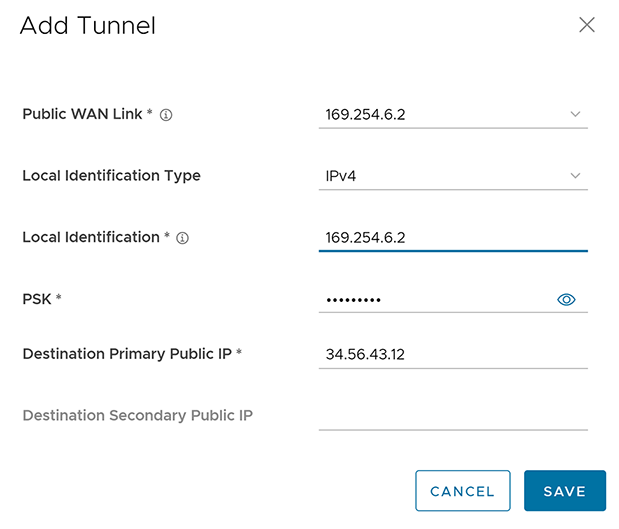
To configure Edge tunnels, select the + link under Action. The Add Tunnel dialog appears.
Figure 18. Add Tunnel
From the Public WAN Link drop-down menu, select a WAN link to establish an IPsec tunnel and click Save. For the WAN links to appear in the drop-down menu, users need first to configure the Wide Area Network (WAN) links for the Edges from the Configure > Edges > Device > WAN Settings page, and wait for the Edge’s WAN links to come up with the valid public IPs. The link’s public IP is the Local Identification value of the tunnel. Users can select only the WAN link with a Public IP address.
Azure APIs automatically establish a tunnel between the Edge and the Microsoft Azure Non SD-WAN Destination. After that, the Orchestrator sends the tunnel configuration to the Edge to establish a tunnel to the Azure service. Note that the automation for each tunnel takes about 1 to 5 minutes to complete. After the tunnel automation is complete, users can view the details of the configured tunnel and the Public WAN link.
After creating tunnels, users can perform the following actions at the Edge level:
Update a tunnel: When the Edge Public WAN link IP address of the tunnel changes, the Orchestrator automatically enqueues an automation job to update the Azure Virtual Private Network (VPN) site link and the VPN tunnel configurations. Under Action, select the + link to view the tunnel settings, such as PSK.
Delete a network service: Select a network service and click Delete.
Deactivate a network service: Under the Enable Service column, unselect the checkbox to deactivate a specific network service.
Select Save Changes.
Users can monitor the automated deployment status of the Microsoft Azure Non SD-WAN Destinations configured for an Enterprise from the Monitor > Network Services > Non-SD-WAN Destinations via Edge page in the SD-WAN service of the Enterprise portal. See Monitor Non-SD-WAN Destinations.
Monitor Non-SD-WAN Destinations
Users can view the details of Non-SD-WAN Destinations configured for the Enterprise from the Monitor Network Services page in the SD-WAN service of the Enterprise portal. On the Network Services page, Users can view:
Non-SD-WAN Destinations via Gateway - Displays the configured Non-SD-WAN Destinations, along with other configuration details such as the name of the Non-SD-WAN Destination, public IP address, status of the Non-SD-WAN Destination, tunnel status, number of Profiles and Edges that use the Non-SD-WAN Destination, last contacted date and time, and number of related state change Events.
Non-SD-WAN Destinations via Edge - Displays the configured Non-SD-WAN Destinations, along with other configuration details such as the name of the Non-SD-WAN Destination, public IP address, tunnel status, number of Profiles and Edges that use the Non-SD-WAN Destination, last contacted date and time, and deployment status.
Note: The Edge network service provides tunnel deployment status monitoring exclusively for Non-SD-WAN Destinations.
To monitor the automation deployment status of Microsoft Azure Non-SD-WAN Destinations via Edge:
In the SD-WAN service of the Enterprise portal, click Monitor > Network Services. The Network Services page appears.
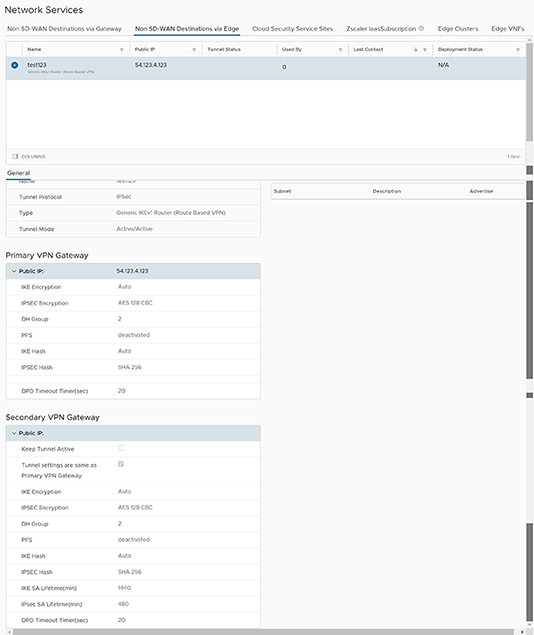
Under Non-SD-WAN Destinations via Edge, select the link in the Deployment Status column to view the deployment status of the Non-SD-WAN Destinations.
Figure 19. Monitor Non-SD-WAN Destinations
The following are the seven different states for an Edge action:
Enqueued: The Edge action is in the enqueued state.
Pending: When the Edge action waits for a backend worker process to pick it up and start working on it.
Notified: The Edge action is in this state after a backend worker process has picked up the Edge action and begun working on it.
Completed: The Edge enters this state after it completes the assigned action task.
Errored: The Edge action is in this state if an error has occurred.
Timed Out: The Edge action is in this state if it takes more than the expected amount of time to complete the Edge action task.
Pending Delete: The Edge action is in this state if it is pending deletion.

 After the Azure VPN sites are provisioned at the Orchestrator side, users can view the VPN sites (Primary and Redundant) in the Azure portal by navigating to .