
Object Groups
An Object Group is a group of Address groups and Service groups. Address groups are collections of IP addresses, IP address ranges, and domain names. Service groups are collections of ports, port ranges, service types, and codes. When users create business policies and firewall rules, users can define rules for a range of IP addresses or a range of TCP/UDP/ICMPv4/ICMPv6 ports by including object groups in the rule definitions.
Users can create Address groups to save the range of valid IP addresses and Service groups for the range of port numbers or service type and range of codes. Users can simplify policy management by creating object groups of specific types and reusing them in policies and rules.
- Manage policies easily.
- Modularize and reuse the policy components.
- Update all referenced business and firewall policies easily.
- Reduce the number of policies.
- Improve the policy debugging and readability.
- The maximum allowed number of object groups per Enterprise is 2000.
- The maximum allowed number of object group associations per Edge and its Profile is 1000.
Configure Object Groups
This section discusses how to configure Object Groups and Service Groups (formerly known as Port Groups).
For additional information on Object Groups, refer to Object Groups.
In the SD-WAN service of the Enterprise portal, to configure Object Groups, go to .
The Object Groups screen appears. Users can configure Address Group and Service Group from this screen.
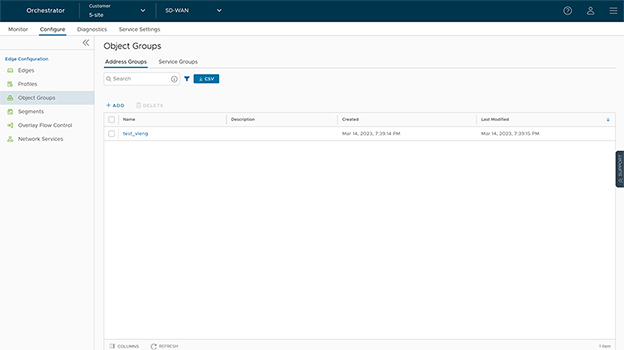
Address Groups
- On the Address Groups tab, click Add. The Configure Address Group window appears.
Figure 2. Configure Address Group 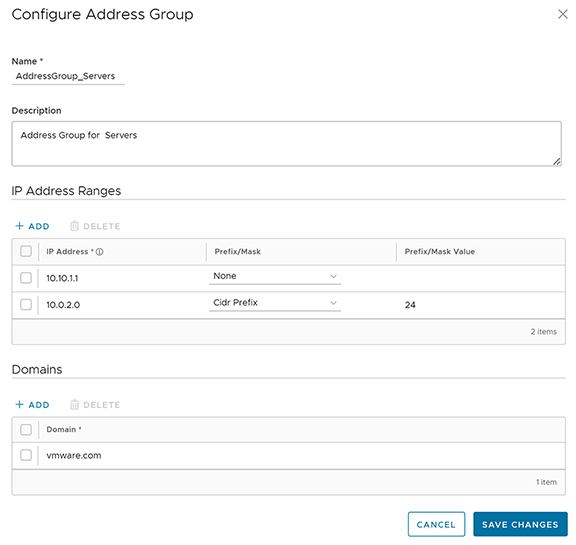
- Enter a Name and Description for the Address Group.
- Under IP Address Ranges, click +ADD and enter the range of IPv4 or IPv6 Addresses by selecting the Prefix or Mask options as: CIDR prefix, Subnet mask, or Wildcard Mask, as required.
- Under Domains, click +ADD and enter the domain names or FQDNs for the Address Group. The user can use the domain names defined in the Address Group as matching criteria for Business policies or Firewall rules. When traffic enters the Edge, the system compares the destination domain against the group to apply the correct policy.
Note: If the system finds an IP address match, it skips the domain name matching process. However, if the system finds no IP address match, it performs a domain name match within the Address Group.Important: The matching criteria may match basic wildcard patterns. For example, if the user configures a domain in an Address Group as google.com, then mail.google.com or http://www.google.com may also match this criteria. However, if the user configures http://www.google.com as the domain in an Address Group, then mail.google.com will not match this policy.
- Select Save Changes.
Service Groups (Formerly known as Port Groups)
- On the Service Groups tab, select Add. The Configure Service Group window appears.
Figure 3. Configure Service Group 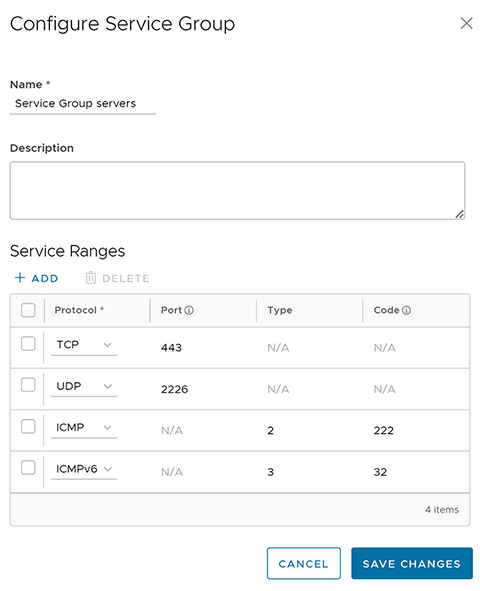
- Enter a Name and Description for the Service Group.
- Under Service Ranges, click +ADD and add Service ranges with the protocol as TCP or UDP, or ICMPv4 and ICMPv6, as required.
Note: For TCP and UDP, the user must enter a single port number or port range from 0 through 65535. For ICMP and ICMPv6, the user can optionally enter the Type and Code. The Type and Code value ranges from 0 through 254. The Code can be a single value or a range.
- Click Save Changes.
Users can define a business policy or a firewall rule with the Object Group to include the range of IP addresses and port numbers.
Select the link to the Address or Service Group to modify the settings. To delete an Address or Service Group, select the checkbox before the group and click Delete.
Configure Business Policies with Object Group
While configuring business policies at the Profile and Edge levels, the user selects the existing object groups to match the source or destination. Users can define rules for a range of IPv4 and IPv6 addresses or port numbers within the object groups.
- In the SD-WAN service of the Enterprise portal, go to . The Profiles page displays the existing Profiles.
- Select a Profile to configure a business policy, then select the Business Policy tab.
From the Profiles page, navigate to the Business Policy page directly by selecting the View link in the Biz. Pol column of the Profile.
- In the Configure Business Policy section and under Business Policy Rules, click + ADD. The Add Rule dialog box appears.
Figure 4. Add Rule 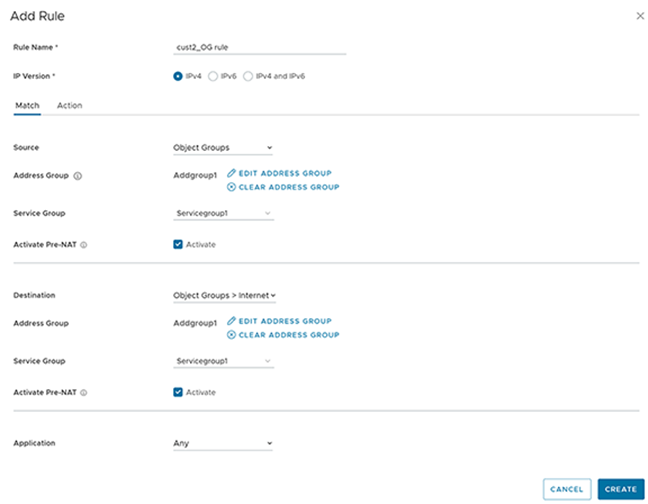
- In the Rule Name textbox, enter a unique name for the Rule.
- In the Match area, configure the match conditions for the rule:
- Select the IP version type for the rule. By default, IPv4 and IPv6 address types are selected. Users can configure the Source and Destination IP addresses according to the selected Address Type. Based on the IP version selected, the behavior will be as follows:
- The IPv4 Type Rule matches only IPv4 addresses in the selected Address Group.
- The IPv6 Type Rule matches only IPv6 addresses in the selected Address Group.
- The Mixed Type Rule matches both IPv4 and IPv6 addresses in the selected Address Group.
- From the Source drop-down menu, select Object Groups.
- Select the relevant Address Group and Service Group from the drop-down menu. If the selected address group contains any domain names, those domain names will be ignored when matching the source.
- If needed, select the Activate Pre-NAT option. This allows the business policy to match both pre-NAT and post-NAT IPv4 addresses on the LAN side for the Source IP.
Note: The Pre-NAT option is supported for IPv4 and mixed-mode object groups but not for IPv6 object groups.Note: When configuring domains as match criteria for an Address Group, the SD-WAN service first checks for an IP address match. If the system finds an IP address match, it skips the domain name matching process. However, if the system finds no IP address match, it performs a domain name match within the Address Group.Important: The matching criteria may match basic wildcard patterns. For example, if the user configures a domain in an Address Group as google.com, then mail.google.com or http://www.google.com may also match this criteria. However, if the user configures http://www.google.com as the domain in an Address Group, then mail.google.com will not match this policy.
- If required, select Address Groups and Service Groups, and activate Pre-NAT IP as a matching criterion for the destination as well.
- Select business policy actions as required and click Create.
For additional information on the match and action parameters, see Configure Business Policies.
- ClickSave Changes.
- Select the IP version type for the rule. By default, IPv4 and IPv6 address types are selected. Users can configure the Source and Destination IP addresses according to the selected Address Type. Based on the IP version selected, the behavior will be as follows:
The system automatically applies the business policy rules that users create for a Profile to all associated Edges. If required, create additional rules specific to the Edges or modify the inherited rule by navigating to , select an Edge, and select the Business Policy tab.
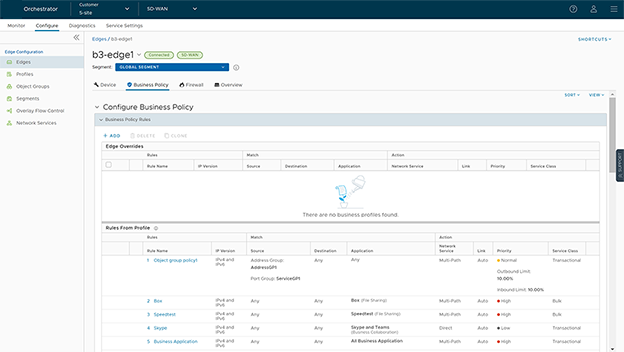
The Rules From Profile section displays the rules inherited from the profile, and they are read-only. If the user wants to override any Profile-level rule, then add a new rule. The added rule appears in the Edge Overrides section and can be modified or deleted if needed.
Users can modify object groups by adding additional IP addresses, port numbers, service types, and codes. The system automatically includes any changes in the business policy rules that use those object groups.
Configure Firewall Rule with Object Group
While configuring firewall rules at the Profile and Edge levels, the user can select the existing object groups to match the source or destination. Users can define rules for a range of IP addresses or a range of TCP/UDP/ICMPv4/ICMPv6 ports by including object groups in the rule definitions.
- In the SD-WAN service of the Enterprise portal, go to . The Profiles page displays the existing Profiles.
- Select a Profile to configure a firewall rule, and select the Firewall tab.
From the Profiles page, navigate to the Firewall page directly by selecting the View link in the Firewall column of the Profile.
- Go to the Configure Firewall section, then under Firewall Rules select + NEW RULE. The Configure Rule dialog appears.
Figure 6. New Rule 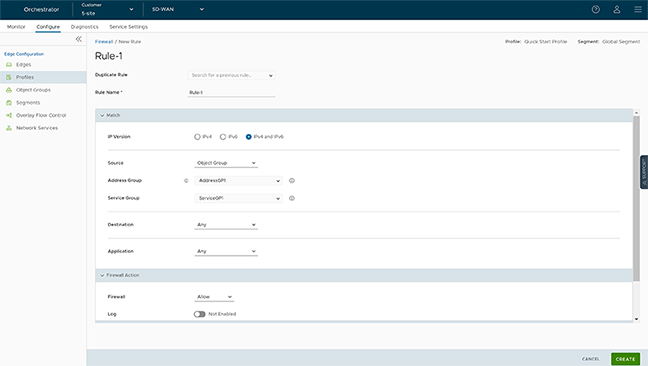
- In the Rule Name textbox, enter a unique name for the Rule. To create a firewall rule from an existing one, select the rule to clone from the Duplicate Rule drop-down menu.
- In the Match area, configure the match conditions for the rule:
- Select the IP address type for the rule. By default, IPv4 and IPv6 address types are selected. Users can configure the Source and Destination IP addresses according to the selected Address Type.
- From the Source drop-down menu, select Object Groups.
- Select the relevant Address Group and Service Group from the drop-down menu. If the selected address group contains any domain names, those domain names will be ignored when matching the source.
Click the Info icon next to the Address Group and Service Group drop-down to view the configuration details of the respective Address Group and Service Group.
Figure 7. Address Group Information 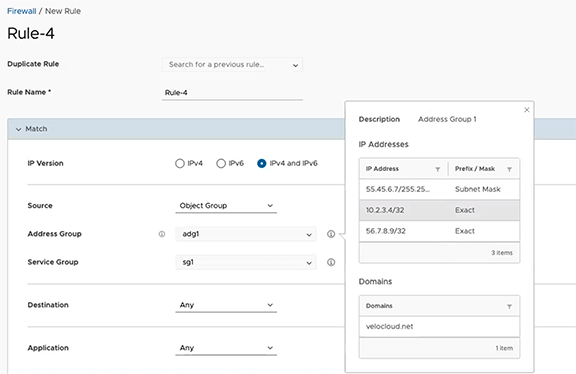
- If required, select the Address and Service Groups for the destination as well. Based on the address type selected, the behavior will be as follows:
- The IPv4 Type Rule matches only IPv4 addresses in the selected Address Group.
- The IPv6 Type Rule matches only IPv6 addresses in the selected Address Group.
- The Mixed Type Rule matches both IPv4 and IPv6 addresses in the selected Address Group.
- Select Firewall actions as required and click Create.
For additional information on the match and action parameters, see Configure Firewall Rule.
- Click Save Changes.
-
The system creates a firewall rule for the selected Profile, and it appears under the Firewall Rules area of the Profile Firewall page.
Note: At the Edge level, the Orchestrator does not allow updating rules created at the Profile level. To override the rule, the user must create the same rule at the Edge level with new parameters to override the Profile-level rule.In the Firewall Rules area of the Profile Firewall page, the user can perform the following actions:- DELETE: To delete existing Firewall rules, select the checkboxes before the rules and click DELETE.
- CLONE: To duplicate a Firewall rule, select the rule and click CLONE.
- COMMENT HISTORY: To view all comments added while creating or updating a rule, select the rule and click COMMENT HISTORY.
- Search for Rule: Allows searching for the rule by Rule name, IP address, Port/Port range, and Address group and Service group names.
The system automatically applies the Firewall rules the user creates for a Profile to all associated Edges. If required create additional rules specific to the Edges by navigating to , select an Edge, and select the Firewall tab.
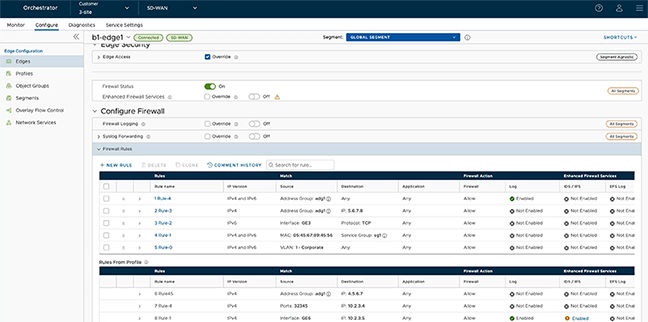
The Rules From Profile section displays the rules inherited from the profile, and they are read-only. To override any Profile-level rule, then add a new rule. The added rule appears in the table in the Rules From Profile section, and it can be modified or deleted if needed.
The user can modify object groups by adding additional IP addresses, port numbers, service types, and codes. The system automatically includes the changes in any firewall rules that reference those object groups.