To access this feature, from the Enterprise portal, select Configure > Custom Applications.
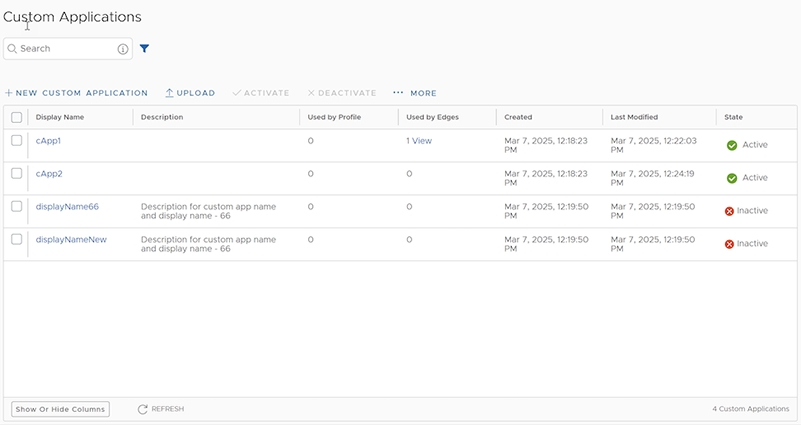
The following screen appears:
Figure 1. Custom Applications
Users can configure the following options:
Note: Only an Enterprise Admin and an Enterprise Superuser can configure these options. For Enterprise Customer Support, Orchestrator only displays the page.
Table 1. Custom Applications - Options and Descriptions
Select and upload an existing Custom Application. Users can either drag and drop, or browse and choose the application file to be uploaded.
Activate
Select to send the selected Custom Applications to Edges.
Deactivate
Select to remove the selected Custom Applications from Edges.
More
Select More, and then select Download JSON, to download and reuse the JSON file of the selected Custom Application for other Enterprise users. This reduces the effort of creating same Custom Applications across different Enterprise users.
Note: Configuring a Custom Application resets Edge network flows, which may cause a brief connection interruption.
The other options available on this screen include:
Table 2. Additional Options and Descriptions
Option
Description
Search
Enter a term to search for the matching text across the table. Use the advanced search option to narrow down the search results.
Show or Hide Columns
Select and select the columns to display or hide on the screen.
Refresh
Select to refresh the page to display the most current data.
Select Save Changes to save the Custom Applications.
Note:
The Save Changes button appears only after creating at least one Custom Application.
The maximum number of Custom Applications users can create for each Enterprise is 250.
Users cannot delete a Custom Application.
Next Steps
Use the new Custom Application to create Business Policy and Firewall rules at Edge or Profile level.
For Edge level creation, go to Configure > Edges. Select an Edge and then select Business Policy > Add. In the Application field, select Define, and select the Custom Application from the menu. Select Save Changes.
For Edge level creation, go to Configure > Edges. Select an Edge and then select Firewall > Configure Firewall. Under Firewall Rules, select New Rule. In the Application field, select Define, then select the Custom Application from the menu. Select Save Changes.
Note:
The Application menu lists all applications created through both the Application Maps and Custom Applications. A label displays with all custom applications for easy identification.
The above steps are for Edge level creation of Business Policy and Firewall rules. Users can follow the same steps for creating these rules at Profile level by navigating to Configure > Profiles.
The Used By Profile and Used By Edges columns on the Custom Applications main screen, display the details of the Profile and Edge(s) using the corresponding Custom Application. Users cannot deactivate Custom Applications associated with a Profile or an Edge.
To monitor the Custom Applications, go to Monitor > Events > Applications screen.
Create New Custom Application
Follow the procedure to create a new Custom Application:
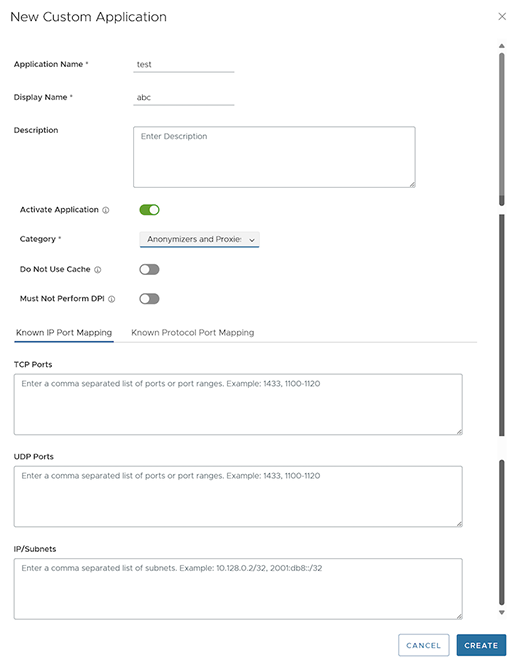
From the Enterprise portal, select Configure > Custom Applications > New Custom Application. The following screen displays:
Figure 2. New Custom Application
Enter details in the following fields:
Table 3. New Custom Application - Options and Descriptions
Option
Description
Application Name
Enter a unique name for the Custom Application.
Display Name
Enter a unique display name.
Description
Enter a description. (Optional)
Activate Application
Users can activate the application while creating it. Orchestrator sends an activated Custom Application directly to the Edge when users save it.
Category
Select a category from the menu.
Do Not Use Cache
Enable to activate slow-learning cache at Edge level. When activated, the Custom Applications do not use the cache, and the traffic classifies by Qosmos DPI, regardless of IP-port or protocol-port mappings.
Must Not Perform DPI
Deactivate DPI at Edge level. When activated, the application does not use DPI, even if users activate Do Not Use Cache if traffic matches the known IP-port or protocol-port mapping.
Known IP Port Mapping
Enter the TCP ports, UDP ports, and IP/Subnets in a valid format.
Known Protocol Port Mapping
Enter the TCP and UDP ports in a valid format.
Select Create to save the new Custom Application. This application then displays on the Custom Applications main screen. The State column indicates if the application has the status Active or Inactive.