Provision an Edge on the Orchestrator

To provision an Edge, perform the following steps:

Ensure you have the Orchestrator host name and admin account to login.

  1. Log in to the Orchestrator application as Admin user, with your login credentials.
  2. Go to Configure > Edges .
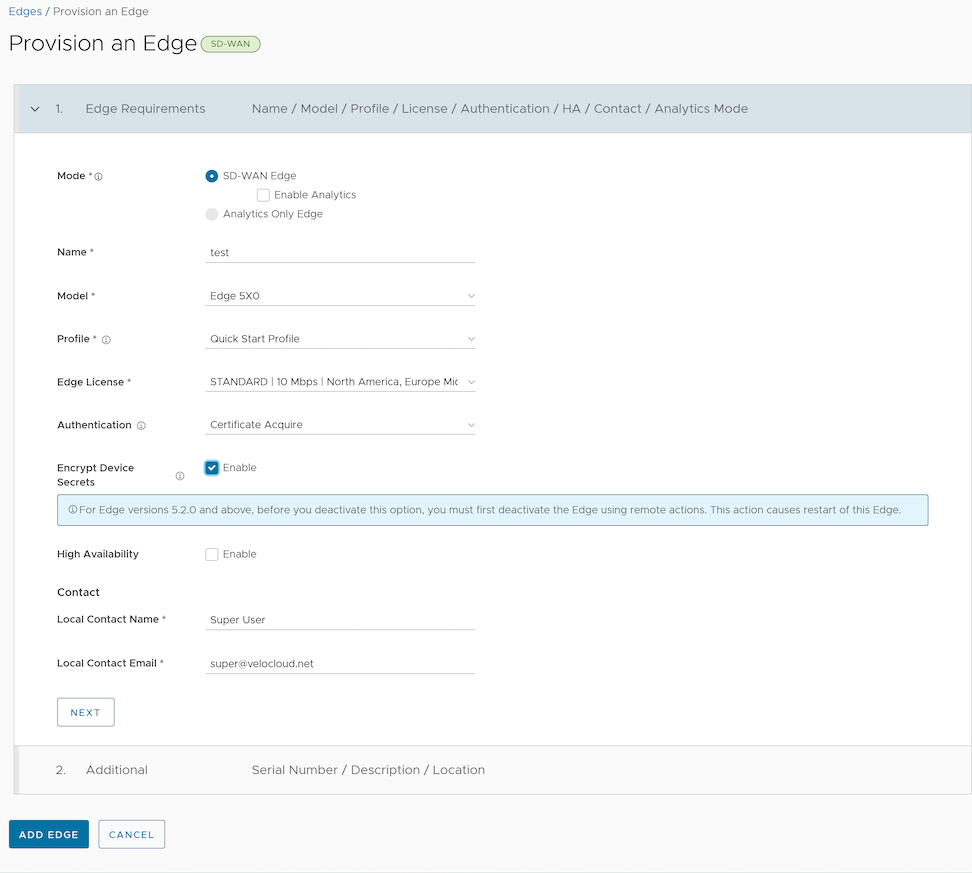
  3. In the Edges screen, select Add Edge. The Provision an Edge screen appears.
    Figure 1. Provisioning an Edge
  4. You can configure the following options:
    Table 1. Option Descriptions
    Option Description
    Mode By default, VeloCloud Edge (formerly known as SD-WAN Edge) mode is selected.
    Name Enter a unique name for the Edge.
    Model Select Virtual Edge from the menu.
    Profile Select Quick Start Profile from the menu.
    Note: If an Edge Staging Profile displays as an option due to Edge Auto-activation, it indicates that this Profile is used by a newly assigned Edge, but has not been configured with a production Profile.
    Edge License Select an Edge license from the menu. The list displays the licenses assigned to the Enterprise, by the Operator.
    Authentication Choose the mode of authentication from the drop-down menu:
    • Certificate Deactivated: In this mode, the Edge uses Pre-Shared Key (PSK) authentication to establish secure communication to the Hub/Gateways/Orchestrator.
      Warning: VeloCloud SD-WAN does not recommend this mode for any customer deployments.
      If users change the mode from Certificate Deactivated to:
      • Certificate Acquire: All tunnels are disconnected and reconnected based on the RSA mode.
      • Certificate Required: The Orchestrator does not directly allow this change. Users must first change the mode to Certificate Acquire and then to Certificate Required. This helps avoid heartbeat loss to the Orchestrator when Edge is assigned a certificate.
    • Certificate Acquire: In this mode, certificates are issued at Edge activation and automatically renewed. The Orchestrator instructs the Edge to acquire a certificate from the Orchestrator's certificate authority by generating a key pair and sending a certificate signing request to the Orchestrator. After acquisition, the Edge uses the certificate for authentication with the Orchestrator and for establishing VCMP tunnels.
      If users change the mode from Certificate Acquire to:
      • Certificate Deactivated All tunnels are disconnected and reconnected based on PSK mode.
      • Certificate Required For Edges/Gateways running versions older than 6.1.x, switching from Certificate Acquire to Certificate Required causes a tunnel flap. Edges/Gateways running version 6.1.x or newer will not experience a tunnel flap.

      When a Hub enters Certificate Acquire mode, it reestablishes certificate-based tunnels using a new certificate while leaving PSK-based tunnels unaffected.

      Note: After acquiring the certificate, VeloCloud SD-WAN recommends updating this option to Certificate Required. This is to prevent Hubs/Gateways from accepting tunnel requests using PSK.
    • Certificate Required: This is the recommended mode. This mode does not allow peers with a PSK to connect. This mode does not accept Edge heartbeats without a valid certificate.
      If users change the mode from Certificate Required to:
      • Certificate Deactivated: VeloCloud SD-WAN does not recommend transitioning the Edge’s authentication mode to Certificate Deactivated.
      • Certificate Acquire: An Edge that has been offline for an extended period after activation may be unable to connect to the Orchestrator when it tries to bring itself online if its certificate has expired or it never acquired one. In Certificate Required mode, the Orchestrator rejects connections from Edges without a valid certificate. Reactivation is not required for such cases. The Edge can be brought back online by temporarily switching it to Certificate Acquire mode to obtain a new certificate.
        Recovery Procedure:
        1. Verify with the Enterprise administrator that they expect the Edge to come back online.
        2. Move the Edge to Certificate Acquire mode in the Orchestrator.
        3. Turn on or reconnect the Edge. This will connect to the Orchestrator and acquire a new certificate.
        4. Confirm in the Orchestrator that the Edge has a valid certificate and is establishing tunnels.
        5. Switch the Edge back to Certificate Required mode.
    Encrypt Device Secrets Select Enable to allow the Edge to encrypt the sensitive data across all platforms. This option is also available on the Edge Overview page.
    Note: For Edge versions 5.2.0 and above, before you deactivate this option, you must first deactivate the Edge using remote actions. This causes restart of the Edge.
    High Availability Select Enable to apply High Availability (HA). Edges can be installed as a single standalone device or paired with another Edge to provide High Availability (HA) support.
    Local Contact Name Enter the name of the site contact for the Edge.
    Local Contact Email Enter the email address of the site contact for the Edge.
  5. Enter all the required details and select Next to configure the following additional options:
    Note: Next activates only when you enter all the required details.
    Table 2. Additional Option descriptions
    Option Description
    Serial Number Enter the serial number of the Edge. If specified, the Edge must display this serial number on activation.
    Note: When deploying virtual Edges on AWS Edges, make sure to use the instance ID as the serial number for the Edge.
    Description Enter an appropriate description.
    Location select the Set Location link to set the location of the Edge. If not specified, the location is auto-detected from the IP address when the Edge is activated.
  6. Select Add Edge. The Edge is provisioned, and the activation key is displayed on the top of the page. Make a note of the activation key to use it for launching the Edge from the AliCloud Console.
    Note: The activation key expires in one month if the Edge device is not activated with it.
  7. Configure Virtual Edge interfaces. The following steps are explained considering Topology A.
    1. Go to Configure > Edges . The Edges page displays the existing Edges.
    2. Select the link to an Edge or select the View link in the Device column of the Edge. The configuration options for the selected Edge are displayed in the Device tab.
    3. Go to the Interface Settings area.
    4. In the Connectivity category, expand Interfaces. Different types of Interfaces available for the selected Edge are displayed.
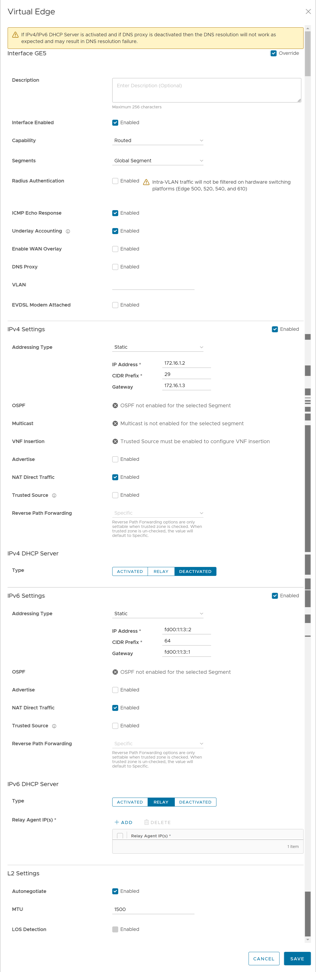
    5. Select Override Interface check box. Select the link to the GE2 Interface to edit the settings.
      Figure 2. Creating a Virtual Edge
    6. Now select the link to the GE3 Interface and select Override Interface check box.
    7. Deactivate WAN Overlay and NAT Direct Traffic, as this interface will be used LAN-side, and select Save. For more information, see the topic Configure Interface Settings for Edges in VeloCloud SD-WAN Administration Guide.
    Note: If you are using an Edge instance with only two interfaces as illustrated in Topology B, then the public interface (GE2) is used for both WAN and LAN connectivity. For the LAN network to point to the GE2 interface, under Static Route Settings, configure a static route on the Edge that points to the Private Subnet/VSwitch.
  8. Under the Configure VLAN area, edit the VLAN settings to update the Edge LAN IP Address.
  9. (Optional) If using a Jump Host and want to allow SSH access to the Edge from the jump server, make sure to activate the Support Access for the Jump Host server IP in the Firewall page.
  10. Select Save.

Create a Virtual Edge Instance on the ECS Console

Instances are the core components of Elastic Compute Service (ECS). This topic describes how to create a Pay-As-You-Go Edge instance on the ECS console.
  • Ensure you have an AliCloud account and login information.
  1. Log on to the ECS console.
  2. In the left-side navigation pane, select Instances & Images > Instances .
  3. On the Instances page, select Create Instance. The Custom Launch purchase page appears.
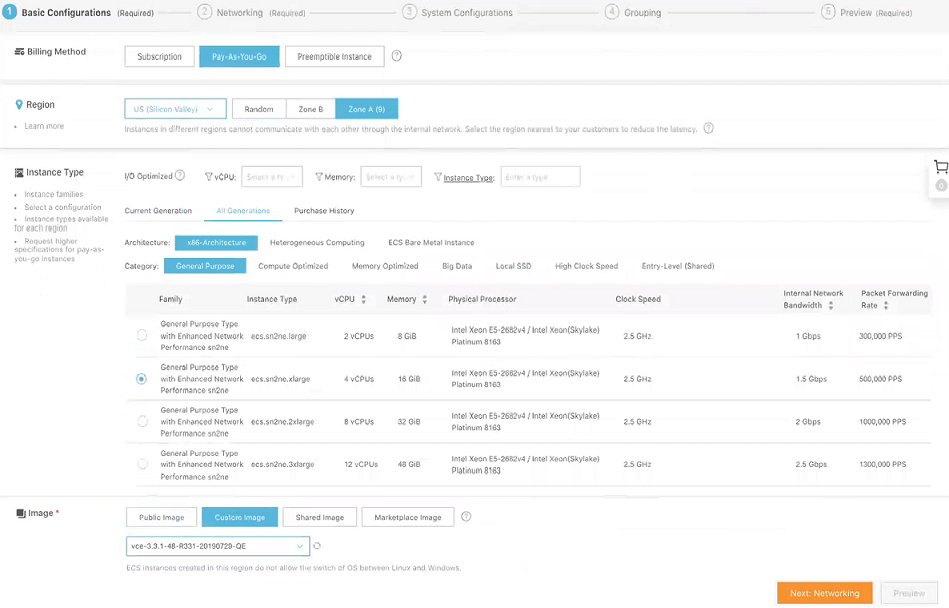
  4. Set up Basic Configurations by performing the following steps.
    1. Select a billing method. For example, Pay-As-You-Go.
    2. From Region menu, select a region. The system randomly allocates a zone by default.
      Note: After an instance is created, you cannot change its region or zone.
    3. In the Instance Typearea, go to All Generations > x86-Architecture > General Purpose and select the 4 vCPU + 16 GiB memory (ecs. sn2ne.xlarge) instance type. The selected region determines the available instance type family.
    4. In the Image area, select Custom Image and select an Edge image.
      Partners or Customers must contact the Arista Support Team to obtain the URL for the required image needed to create an AliCloud instance for deployment by sharing their AliCloud account details and the region.
    5. Select a storage space. By default, a 40 GiB Ultra Cloud Disk is selected.
      Figure 3. Basic Configuration
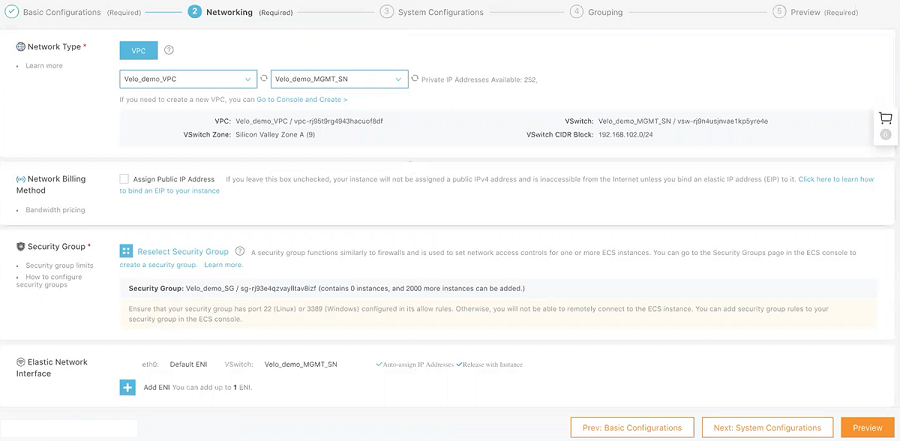
  5. Select Next: Networking to set up the networking and security group configuration.
    1. Select VPC as the network type and select the VPC where you are going to deploy your Edge and attach the Console interface of your Edge to MGMT_SN.
    2. Set the network billing method.
    3. Select your VPC-type security group.
    4. Add an Elastic Network Interface (ENI). You can skip this step if the selected instance type does not support ENI.
      Figure 4. Adding an ENI
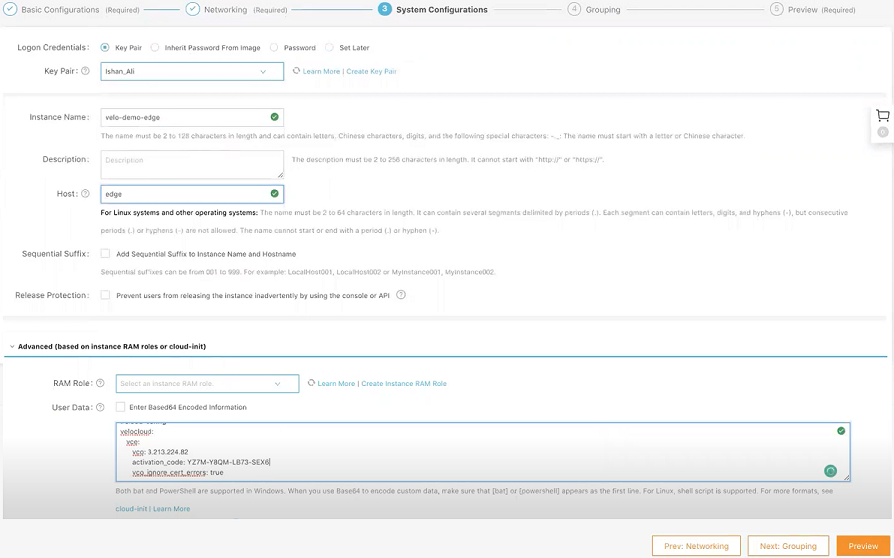
  6. Select Next: System Configurations.
    1. Configure Logon Credentialsby selecting one of the following options: Key Pair, Inherit Password From Image, and Password. By default, Set Lateroption is selected.
    2. In the Instance Name text box, enter a unique name for your Edge instance.
    3. Under the Advance area, you can provide the cloud-init user data for your edge in the following sample format for activation purpose. According to your Orchestrator set up, you must change the orchestrator name and activation code.
      #cloud-config velocloud: vce: vco: 1.211.224.11 activation_code: 12XX-ABC1-6DD3-3EFG vco_ignore_cert_errors: true
    Figure 5. System Configuration
  7. Select Next: Grouping and set the options as needed.
  8. Select Next: Preview and confirm the selected configuration. You can also select the edit icon to modify the configurations.
  9. Read and confirm Terms of Service, and then select Create Instance.
  10. Select Console to return to the ECS console. Select the refresh button to check if the Edge instance is created. If the newly created Edge instance is in a Running status, then the Edge is created successfully.