
Cloud Security Services
Cloud Security Service (CSS) is a cloud-hosted security service that protects an Enterprise branch and/or data center. The security services include firewalls, URL filtering, and other such services.
In CSS, define and configure a cloud security service instance and establish a secure tunnel directly from the Edge to the CSS.
- Simplifies configuration.
- Saves link bandwidth costs by offloading non-enterprise traffic to the Internet.
- Protects branch sites from malicious traffic by redirecting Internet traffic to a cloud security service.
This topic contains the following sections:
Configure a Cloud Security Service
- On the Network Services page, navigate to Non SD-WAN Destinations via , select New.
Figure 1. Configure New Cloud Security Service 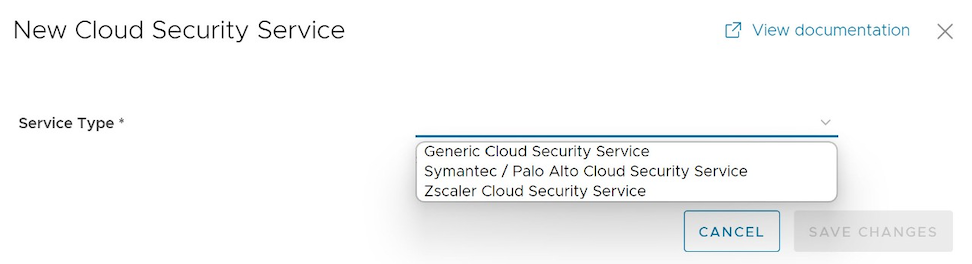
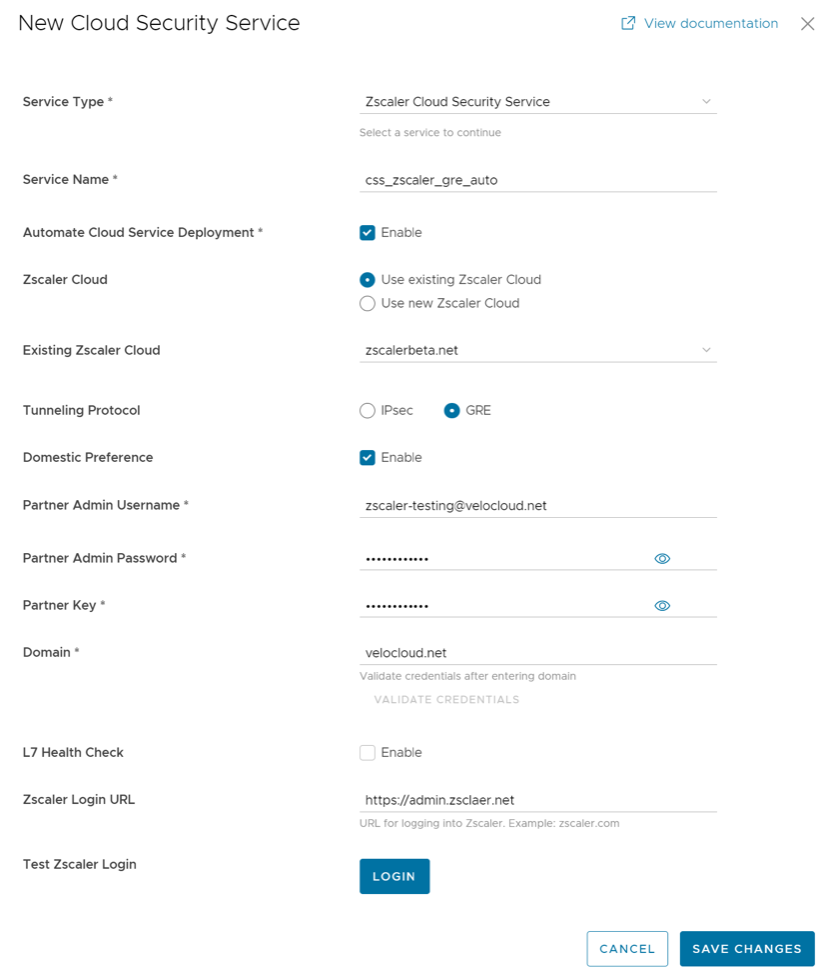
Configure Automatic Tunnels from SD-WAN Edge to Zscaler
Configure Manual Tunnels from SD-WAN Edge to Zscaler
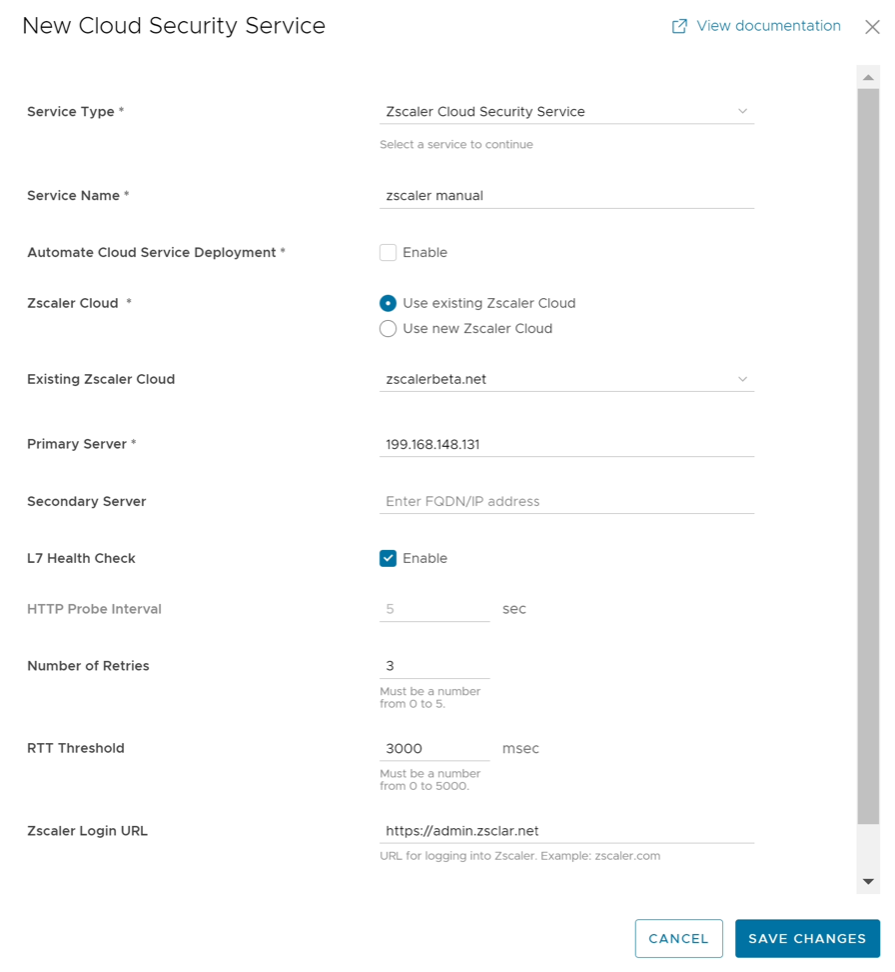
- Configure other parameters as desired, and then select Save Changes.
Note: If users select Zscaler Cloud Security Service and plan to assign a GRE tunnel, they must enter only IP addresses for Primary and Secondary Zscaler servers in GRE deployments. The GRE protocol does not support hostnames.The Orchestrator displays the configured cloud security services under the Cloud Security Service area in the Network Services window.
Figure 4. Configured Cloud Security Services 
Configure Cloud Security Services for Profiles
- Users must have access permission to configure Network Services.
- The Orchestrator version must be 3.3.x or above.
- Users must configure CSS Gateway endpoint IPs and FQDN credentials in the third party CSS.
- Configure the following settings:
Figure 5. Cloud Security Service Settings 
Table 4. Cloud Security Service Option Descriptions Option Description Cloud Security Service Select a cloud security service from the drop-down menu to associate with the profile. Users can also select New Cloud Security Service from the drop-down to create a new service type. For additional information about how to create a new CSS, see Configure a Cloud Security Service. Note: Configure the Zscaler login URL to enable the Login to Zscaler button in the CSS area. Selecting the Login to Zscaler button will redirect users to the Zscaler Admin portal of the selected Zscaler cloud.Tunneling Protocol This option is available only for the Zscaler cloud security service provider. For a manual Zscaler service provider, choose either IPsec or GRE as the tunneling protocol. By default, IPsec is selected. For an automated Zscaler service provider, users cannot configure the Tunneling Protocol field. It displays the protocol name used by the service provider. Hash Select the hash function as SHA 1 or SHA 256 from the drop-down. The default value is SHA 1. Encryption Select the encryption algorithm as AES 128 or AES 256 from the drop-down. The default value is None. Key Exchange Protocol Select the key exchange method as IKEv1 or IKEv2. The default value is IKEv2. This option is not available for Symantec cloud security service. Login to Zscaler Select Login to Zscaler to log in to the Zscaler Admin portal of the selected Zscaler cloud.
- Redirect only web traffic to the cloud security service.
- Redirect all Internet-bound traffic to the cloud security service.
- Redirect traffic based on business policy settings. This option is available only from release 3.3.1. If users choose this option, then the other two options are no longer available.
For new Profiles (release 3.3.1 or later), the Business Policy settings redirect the traffic by default. See Configure Business Policies with Cloud Security Services.
Configure Cloud Security Services for Edges
To override the CSS configuration for a specific Edge, perform the following steps:
Manual Zscaler CSS Provider Configuration for Edges
When configuring an IPsec tunnel manually, users must provide a Fully Qualified Domain Name (FQDN) and Pre-Shared Key (PSK) in addition to the inherited attributes.
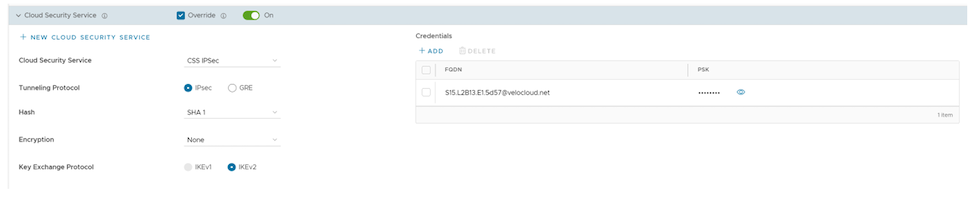
Manual GRE tunnel configuration requires manually setting the GRE tunnel parameters for the WAN interface designated as the GRE tunnel source. Follow the steps below to complete the configuration.
- Under GRE Tunnels, select +Add.
Figure 7. Add a GRE Tunnel - In the Configure Tunnel window, configure the following GRE tunnel parameters, and select Update.
Figure 8. Configure a GRE Tunnel 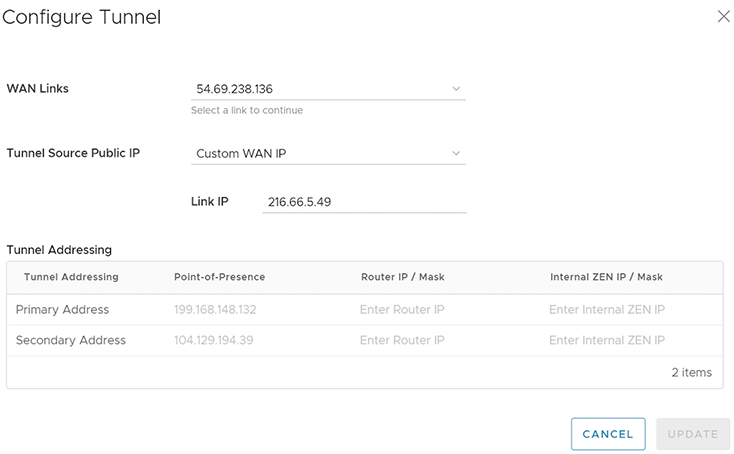
Table 5. GRE Tunnel Configuration Options Option Description WAN Links Select the WAN interface that will serve as the source for the GRE tunnel. Tunnel Source Public IP Choose the IP address that will serve as the public IP for the tunnel. Select either the WAN Link IP or a Custom WAN IP. For Custom WAN IP, enter the specific IP address. It is necessary to use a different source public IP for each segment when configuring a Cloud Security Service (CSS) on multiple segments. Primary Point-of-Presence Enter the primary Public IP address of the Zscaler Data center. Secondary Point-of-Presence Enter the secondary Public IP address of the Zscaler Data center. Primary Router IP/Mask Enter the primary IP address of Router. Secondary Router IP/Mask Enter the secondary IP address of Router. Primary Internal ZEN IP/Mask Enter the primary IP address of Internal Zscaler Public Service Edge. Secondary Internal ZEN IP/Mask Enter the secondary IP address of Internal Zscaler Public Service Edge. Note:- Zscaler provides the Router IP/Mask and ZEN IP/Mask.
- Each Enterprise supports only one Zscaler cloud and domain.
- The Orchestrator allows only one CSS with GRE per Edge. An Edge can support only one segment with Zscaler GRE automation enabled.
Scale Limitations
- GRE-WAN: Edge supports a maximum of 4 public WAN links for a Non SD-WAN Destination (NSD), and on each link, it can have up to 2 tunnels (primary/secondary) per NSD. Therefore, for each NSD, users can have a maximum of 8 tunnels and 8 BGP connections from a single Edge.
- GRE-LAN: Edge supports 1 link to Transit Gateway (TGW), and it can have up to 2 tunnels (primary/secondary) per TGW. Therefore, for each TGW, users can have a maximum of two tunnels and four BGP connections from one Edge (two BGP sessions per tunnel).
Automated Zscaler CSS Provider Configuration for Edges
- IPsec/GRE Tunnel Automation
- Zscaler Location/Sub-Location Configuration
IPsec/GRE Tunnel Automation
- From the Cloud Security Service drop-down menu, select an automated CSS provider, and then select Save Changes.
Figure 9. Automate IPsec and GRE Tunnel 
The automation creates a tunnel in the segment for each Edge public WAN link with a valid IPv4 address. Only one WAN link carries user data packets in a multi-WAN deployment. The Edge selects the WAN link with the best Quality of Service (QoS) score using bandwidth, jitter, loss, and latency as criteria. The Edge automatically creates the location after establishing a tunnel. The details of tunnel establishment and WAN links appear in the Cloud Security Service section.
Note: The system does not allow users to change providers on a segment once it establishes an automated Zscaler tunnel. To switch to a new provider from an automated Zscaler service, users must explicitly deactivate the Cloud Security Service for that Edge and segment before reactivating it with the new provider.
Zscaler Location and Sub-Location Configuration
- Verify that the Edge has established the tunnel and has automatically created the location. The Orchestrator enables Sub-location creation only after users configure the VPN credentials or GRE options for the Edge. Review the sub-location features and limitations before beginning the configuration. See https://help.zscaler.com/zia/understanding-sublocations.
- Match the Cloud Subscription to the one used during the Automatic CSS set up.
To update the Location or create Sub-locations for the selected Edge, perform the following steps:
- Go to the Zscaler section, and then turn on the toggle button.
Figure 10. Update a Zscaler Configuration 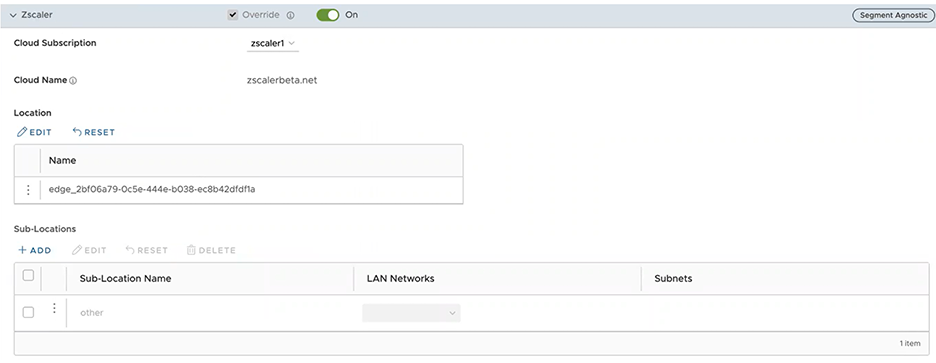
- Select Save Changes.
Figure 11. Save the CSS Changes 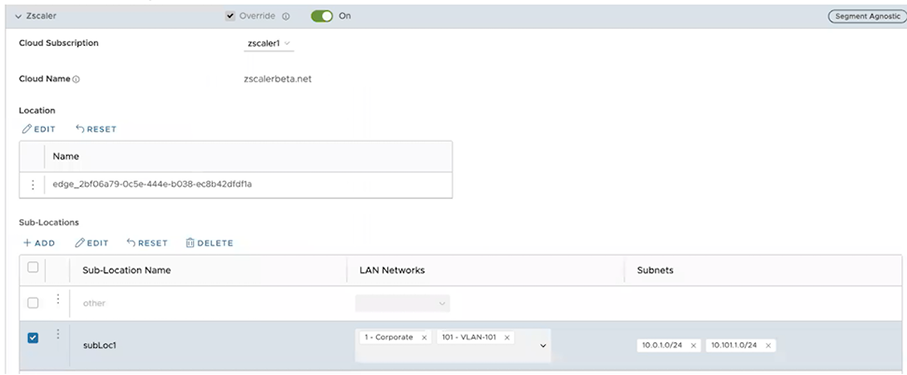 Note: After creating at least one sub-location in the Orchestrator, Zscaler automatically generates an 'Other' sub-location, which the Orchestrator UI then displays. Users can also configure the “Other” Sub-location’s Gateway options by selecting the Edit button under Gateway Options in the Sub-Locations table.
Configure Zscaler Gateway Options and Bandwidth Control
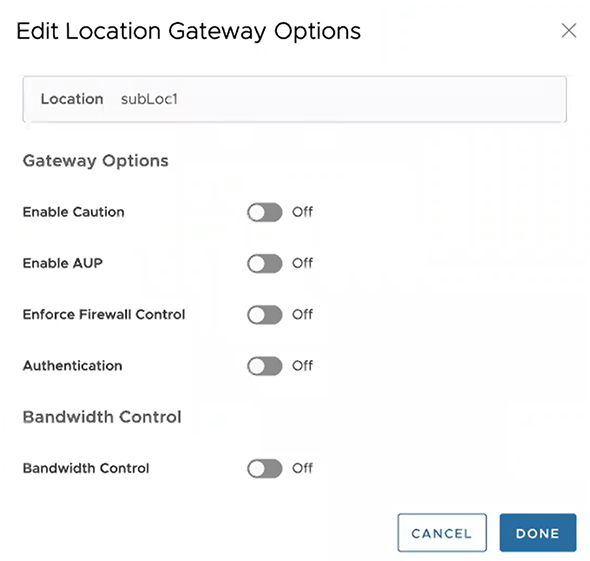
Configure the Gateway options and Bandwidth controls for the Location and Sub-location, as needed, and select Save Changes.
| Option | Description |
|---|---|
| Gateway Options for Location/Sub-Location | |
| Use XFF from Client Request | Enable this option when the location uses proxy chaining to forward traffic; this allows the service to discover the client IP address from the X-Forwarded-For (XFF) headers inserted by the on-premises proxy server. The XFF header identifies the client IP address, which the service uses to determine the client’s sub-location. Using the XFF headers, the service can apply the appropriate sub-location policy to the transaction. When users turn on the Enable IP Surrogate option for the location or sub-location, the system applies the appropriate user policy to the transaction. When the service forwards the traffic to its destination, it removes the original XFF header. It replaces it with an XFF header that contains the IP address of the client gateway (the organization’s public IP address), ensuring that the organization's internal IP addresses are never exposed externally.
Note: The Orchestrator restricts this Gateway option to the parent Location level.
|
| Enable Caution | If Authentication remains inactive, enable this feature to display a caution notification for unauthenticated traffic. |
| Enable AUP | If Authentication remains inactive, enable this feature to display an Acceptable Use Policy (AUP) for unauthenticated traffic and require acceptance. Activating this feature triggers the following:
|
| Enforce Firewall Control | Select this option to enable the service's firewall control.
Note: Before enabling this option, users must ensure that their Zscaler accounts have "Firewall Basic" subscriptions.
|
| Enable IPS Control | When Enforce Firewall Control is active, select this option to enable the service's IPS controls.
Note: Before enabling this option, users must ensure that their Zscaler accounts have "Firewall Basic" and "Firewall Cloud IPS" subscriptions.
|
| Authentication | Activating this option enforces service authentication for the Location or Sub-location. |
| IP Surrogate | When Authentication is active, select this option if users want to map users to device IP addresses. |
| Idle Time for Dissociation | When IP Surrogate is active, specify how long after a completed transaction, the service retains the IP address-to-user mapping. Users can specify the Idle Time for Dissociation in Mins (default), or Hours, or Days.
|
| Surrogate IP for Known Browsers | Enable this option to use the existing IP address-to-user mapping (acquired from the surrogate IP) to authenticate users sending traffic from known browsers. |
| Refresh Time for re-validation of Surrogacy | When Surrogate IP for Known Browsers is active, specify the length of time that the Zscaler service can use IP address-to-user mapping for authenticating users sending traffic from known browsers. After the defined period of time elapses, the service will refresh and revalidate the existing IP-to-user mapping so that it can continue to use the mapping for authenticating users on browsers. Users can specify the Refresh Time for re validation of Surrogacy in minutes (default), or hours, or days.
|
| Bandwidth Control Options for Location | |
| Bandwidth Control | Enable this option to enforce bandwidth controls for the location., and then specify the maximum bandwidth limits for Download (Mbps) and Upload (Mbps). All sub-locations will share the bandwidth limits assigned to this location. |
| Download | When Bandwidth Control is active, specify the maximum bandwidth limits for Download in Mbps. The allowable range is from 0.1 through 99999. |
| Upload | When Bandwidth Control is active, specify the maximum bandwidth limits for Upload in Mbps. The allowable range is from 0.1 through 99999. |
Bandwidth Control Options for Sub-Location (if Bandwidth Control is enabled on Parent Location)
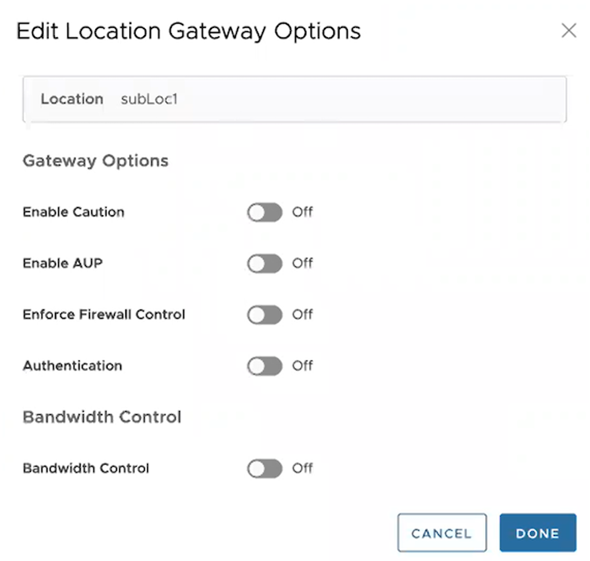 Note: The Orchestrator enables specific bandwidth control options for Sub-locations only when the parent Location has bandwidth control active. If the parent Location lacks active bandwidth control, the Sub-location provides the same standard options as a Location (Bandwidth Control, Download, and Upload).
|
|
| Use Location Bandwidth | Enabling bandwidth control on the parent Location allows the selection of this option, which applies the parent's download and upload maximum bandwidth limits to the Sub-location. |
| Override | Select this option to enable bandwidth control on the sub-location and then specify the maximum bandwidth limits for Download (Mbps) and Upload (Mbps). The Sub-location uses this dedicated bandwidth exclusively and does not share it with other Sub-locations. |
| Disabled | Select this option to exempt the traffic from any Bandwidth Management policies. Sub-location with this option can only use up to a maximum of available shared bandwidth at any given time. |
Limitations
- In release 4.5.0, the Orchestrator automatically saves an 'Other' Sub-location upon the creation of any new Sub-location. Earlier Orchestrator versions did not save the Zscaler 'Other' Sub-location. After upgrading the Orchestrator to release 4.5.0, the system automatically imports the 'Other' sub-location only after the user creates a new normal (non-'Other') sub-location using automation.
- Zscaler Sub-locations cannot have overlapping IP addresses (subnet IP ranges). Attempting to edit (add, update, or delete) multiple Sub-locations with conflicting IP addresses may cause the automation to fail.
- Users cannot update the bandwidth of Location and Sub-location at the same time.
- Sub-locations support the Use Location Bandwidth option only when users enable bandwidth control on the parent location. When the user turns off the Location bandwidth control on a Parent Location, the Orchestrator does not proactively check or update the Sub-location bandwidth control option.
Configure Business Policies with Cloud Security Services
Users can create business policies to redirect the traffic to a Cloud Security Service.
- Select Action and from the Network Service menu, select Internet Backhaul and select a Cloud Security Service. It is necessary to associate the cloud security service to the Profile before selecting it.
Figure 14. Add a Business Policy Rule 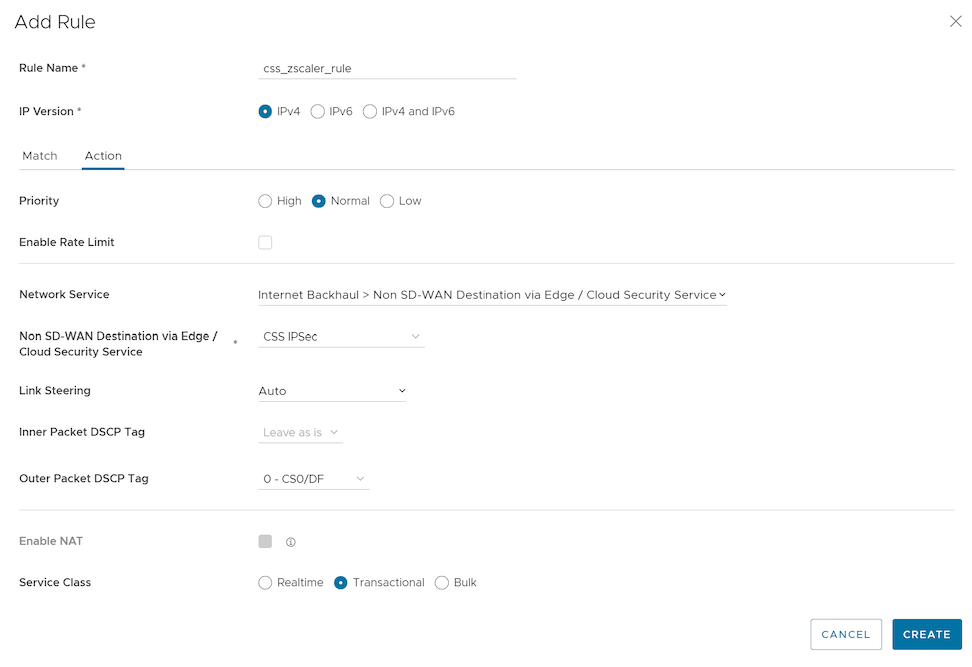
Monitor Cloud Security Services
To monitor the cloud security service sites:
- Select the Cloud Security Service Sites to view all the CSS configured for the Enterprise along with the following configuration details.
Figure 15. Monitor Cloud Security Service Site 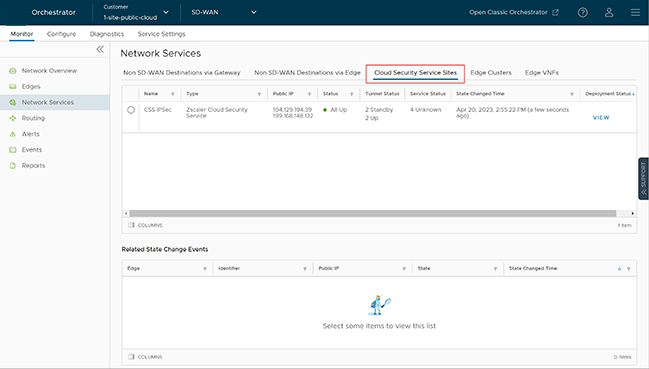
Table 7. Cloud Security Service - Options and Descriptions Option Description Name The name of the CSS provider. Type The type of the CSS provider. Public IP The Public IP address of the CSS provider. Status The overall status of the CSS provider: - White- Specifies two possible states:
- ALL_STANDBY- A CSS provider enters this state once all its associated tunnels transition to STANDBY mode.
- UNKNOWN- The CSS provider enters this state if the system fails to determine its overall status.
- Green- The CSS provider is in ALL_UP state if all the tunnels associated with the CSS provider are UP.
- Red- The CSS provider is in ALL_DOWN state if all the tunnels associated with the CSS provider are DOWN.
- Amber- The CSS provider is in PARTIAL state if the tunnels associated with the CSS provider are partially UP, DOWN, or in STANDBY mode.
Tunnel Status The status of tunnels created from the CSS provider from different Edges: - White- Specifies two possible states:
- UNKNOWN- The tunnel enters this state when the tunnel remains unestablished.
- NOT ENABLED- The tunnel enters this state when the configuration disables it.
- Gray- The tunnel associated with the CSS provider is in STANDBY mode.
- Green- Specifies two possible states:
- ALL_UP- All the tunnels associated with the CSS provider are UP.
- UP- A specific tunnel associated with the CSS provider is UP.
- Red- Specifies two possible states:
- ALL_DOWN- All the tunnels associated with the CSS provider are DOWN.
- DOWN- A specific tunnel associated with the CSS provider is DOWN.
Service Status The status of the external service as recorded by each Edge: - Green- The Layer 7 (L7) Health status of external service is UP.
- Red- The L7 Health status of external service is DOWN.
- Red- The L7 Health status of external service is DOWN due to one of the following reasons:
- The Zen service does not respond to 'N' (Default = 3) consecutive HTTP probe messages.
- The HTTP response (200 OK) time exceeds the set time (Default = 300 milliseconds).
- The Zen server responds with 4xx HTTP error code.
- Amber- The L7 Health status of external service is DEGRADED if the HTTP load time exceeds 'N' seconds (Default = 3 seconds).
- Gray- The L7 Health status of external service is UNKNOWN.
State Changed Time The date and time when the state changes. Deployment Status Deployment status of the CSS provider. - White- Specifies two possible states:
- Select a CSS provider name to view the related state change events.
Figure 16. Review Related State Change Events 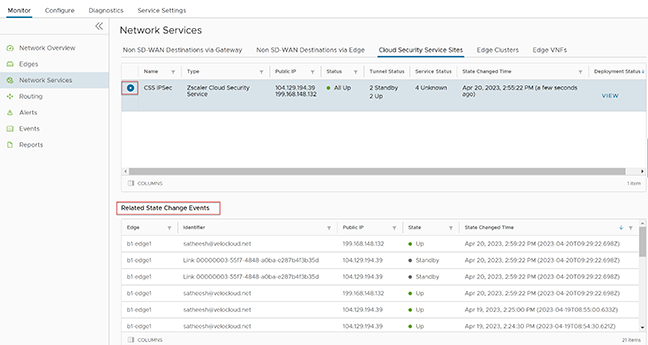
- Select View in the Deployment Status column to view the deployment status of the CSS provider.
Figure 17. Cloud Security Service Automated Deployment Status 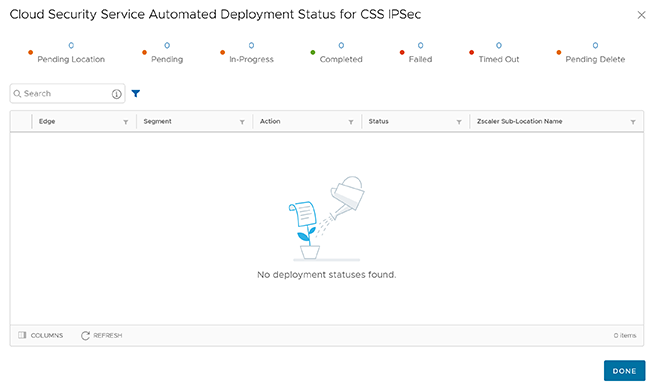 The following are the seven different states for an Edge action:
- Pending Location - The Edge action remains in this state until the system creates the Zscaler location. This state is only applicable for Sub-location Edge actions.
- Pending - The Edge action is in this state while it waits for a backend worker process to pick it up and begin processing.
- In Progress - The Edge action is in this state after a backend worker process picks up the Edge action and begins working on it.
- Completed - The Edge action is in this state if the Edge completes the task.
- Failed - The Edge action is in this state if the system encounters an error.
- Timed Out - The Edge action is in this state if it takes more than the expected amount of time to complete the Edge action task.
- Pending Delete - The Edge action is in this state if it is pending deletion.
Note: Currently, the Pending Location and Pending Delete states are non-functional.
Monitor Cloud Security Service Events
Users can view the events related to cloud security services from the screen.
In the SD-WAN service of the Enterprise portal, select .
To view the events related to cloud security service sites, use the Search and Filter options. Select Filter and to filter either by the Event or by the Message column.
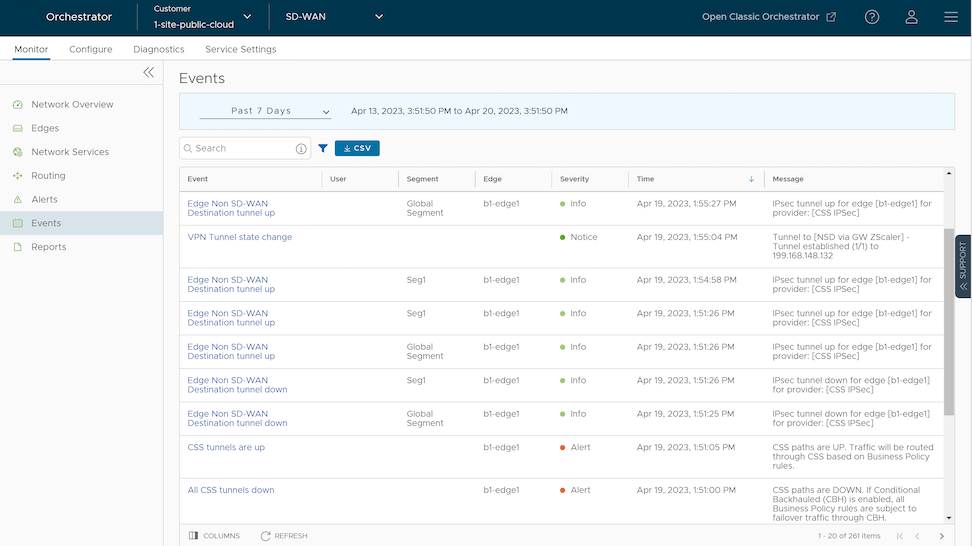
The below table includes the Enterprise events which help track various Edge actions related to CSS deployment, Location and Sub-location automation.
| Events | Description |
|---|---|
| Call made to external API | The Edge made an API call to some external service. |
| CLOUD_SECURITY_PROVIDER_ADDED | The Edge added a new CSS provider. |
| CLOUD_SECURITY_PROVIDER_UPDATED | The Edge updated a new CSS provider. |
| CLOUD_SECURITY_PROVIDER_REMOVED | The Edge removed a CSS provide. |
| Cloud Security Service site creation enqueued | The Edge enqueued a CSS site creation task. |
| Cloud Security Service site update enqueued | The Edge enqueued a CSS site update task. |
| Cloud Security Service site deletion enqueued | The Edge enqueued a CSS site deletion task. |
| Network Service created | The Edge created a CSS site. |
| Network Service updated | The Edge updated a CSS site. |
| Network Service deleted | The Edge deleted a CSS site. |
| CSS tunnels are up | The CSS paths are UP. The traffic routes through CSS based on the configured Business policy rules. |
| All CSS tunnels are down | The CSS paths are DOWN. |
| Edge Non SD-WAN Destination tunnel up | The tunnel is UP for the Edge. |
| Edge Non SD-WAN Destination tunnel down | The tunnel is DOWN for the Edge. |
| Zscaler Location creation enqueued | The Edge enqueued an action to create a location. |
| Zscaler Location update enqueued | The Edge enqueued an action to update a location. |
| Zscaler Location deletion enqueued | The Edge enqueued an action to delete a location. |
| Zscaler Location object created | The Edge created a Zscaler location object. |
| Zscaler Location object updated | The Edge enqueued an action to update a sub-location. |
| Zscaler Location object deleted | The Edge enqueued an action to delete a sub-location. |
| Zscaler Sub Location creation enqueued | The Edge enqueued an action to create a sub-location. |
| Zscaler Sub Location update enqueued | The Edge enqueued an action to update a sub-location. |
| Zscaler Sub Location deletion enqueued | The Edge enqueued an action to delete a sub-location. |
| Zscaler Sub Location object created | The Edge created a Zscaler Sub-location object. |
| Zscaler Sub Location object updated | The Edge updated a Zscaler Sub-location object. |
| Zscaler Sub Location object deleted | The Edge deleted a Zscaler Sub-location object. |