Managing SNMP
This chapter describes how to manage SNMP services on a DANZ Monitoring Fabric (DMF) Controller.
SNMP Overview
SNMP provides a method for communication between an NMS or other client and agents (servers) on network devices, which send reports, called traps, regarding their operation and configuration. An SNMP agent manages and organizes the information as a collection of objects called MIBs.
In SNMPv3, an engineID identifies the agent (SNMP server), which helps prevent unauthorized SNMPv3 messages, such as traps, from being accepted or intercepted by unauthorized receivers. The engineID of the SNMP agent is required when configuring an SNMPv3 trap receiver to receive messages from an agent, including a DMF Controller or fabric switch.
In DMF, the engineID is auto-generated for the Controller and fabric switches. The engineID of the DMF Controller is configured for the local node. This configuration must be entered separately on the active and standby Controllers. The acceptable practice recommends configuring a different engineID for each Controller.
Using the DMF GUI to Configure SNMP
- Local Configuration
- Global Configuration
- Controller Traps
- Switch Traps
- Select from the DMF main menu.
Figure 1. Configuring SNMP 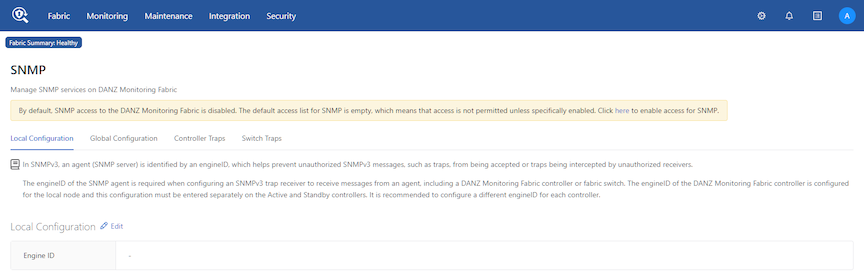 Note: By default, SNMP access is disabled.
 - To enable access to SNMP for the Controller, click the link and enter the required fields, ID, Source, and Action (permit), in the Edit Access Control section.
Figure 2. Edit Access Control 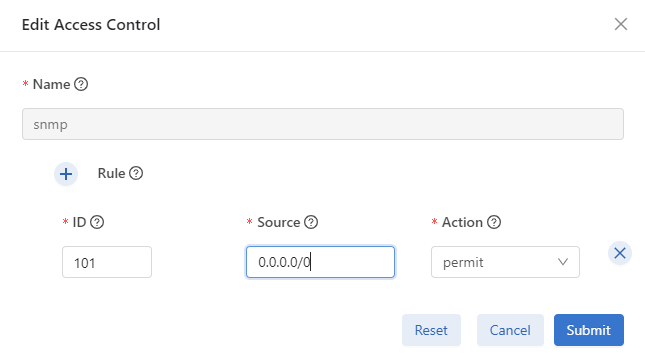
- Click Submit to continue.
Figure 3. SNMP Enabled 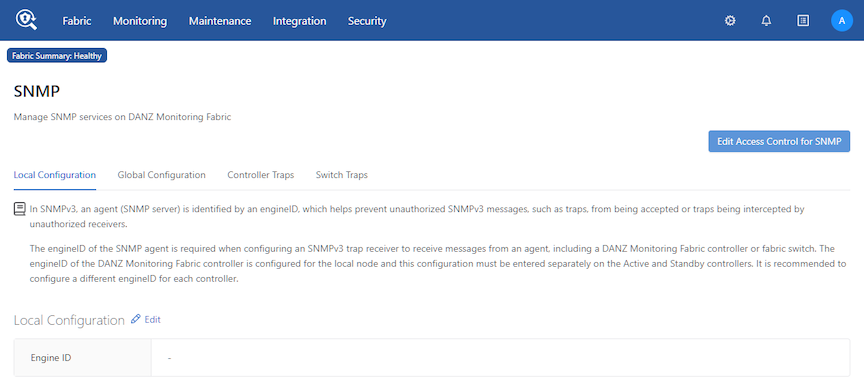
- Under Local Configuration, click Edit and enter an Engine ID value, as required.
Figure 4. Edit SNMP Local Configuration 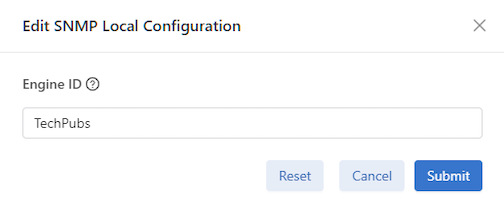
- Click Submit to continue.
Tip: Use the Reset button to clear the Engine ID value, if required.
Figure 5. Local Configuration 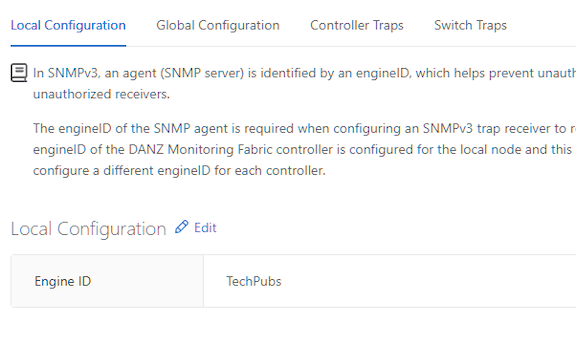
- To enable SNMP traps, select Global Configuration.
Figure 6. Global Configuration 
- Click Edit and enter the Contact and Location details. Enable Trap Enabled by moving the selector switch to the right.
Figure 7. Edit SNMP Global Configuration 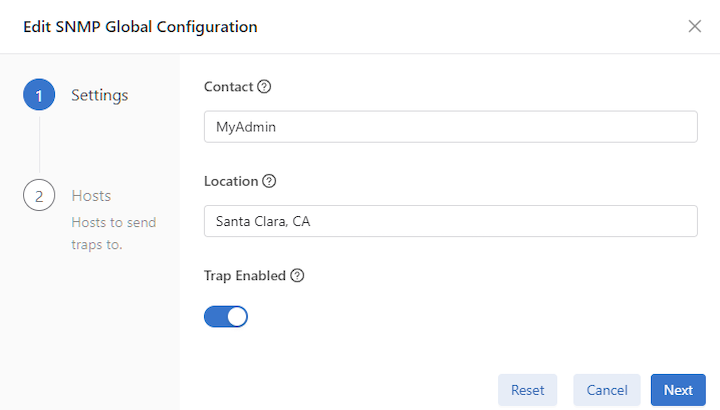
- Enter the Trap Host details for the Server and UDP Port (162 by default) using the Provision control (+) button.
Figure 8. SNMP Trap Host 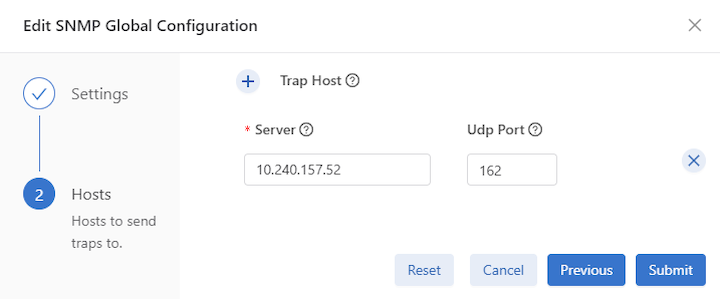
- Click Submit. The dashboard displays the information and confirms Trap Enabled.
Figure 9. Global Configuration Trap Enabled 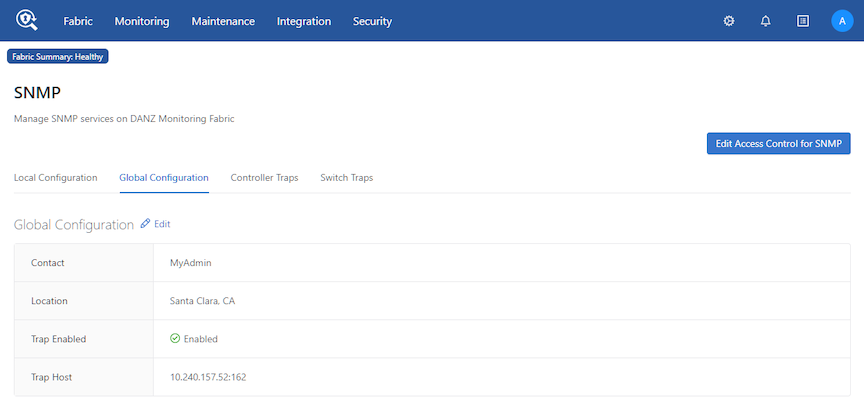
- To create a new Community, select the Actions button under Communities and click + Add Community.
Figure 10. Add Community 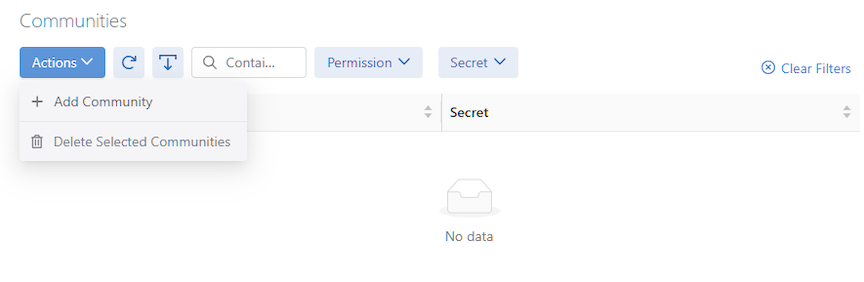
- Select the Permission type (read-only) from the drop-down and enter the Secret.
Figure 11. Add Community Details 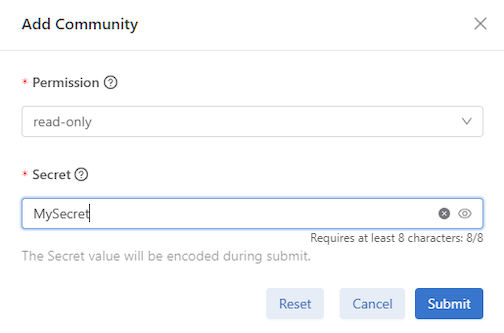
- Click Submit—the dashboard updates with the Community details.
Figure 12. Communities 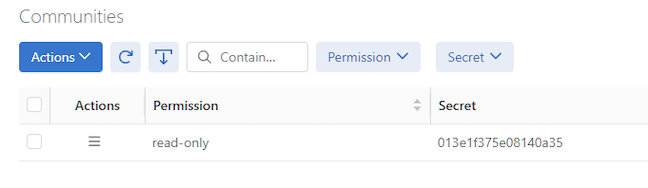
- To create an SNMPv3 user, select the Actions button under Users and click + Add User.
Figure 13. Add Users 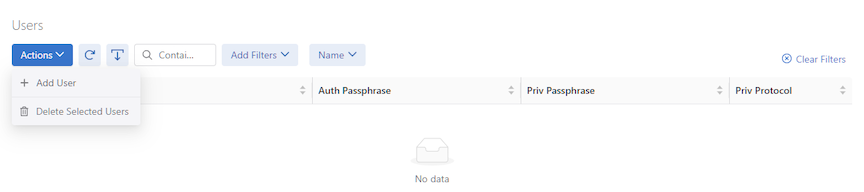
- Enter the required information, such as the Name of the user, the Authentication Passphrase for the user, and the Privacy Passphrase. Use the Privacy Protocol drop-down to select Advanced Encryption Standard (AES) or Data Encryption Standard (DES) encryption to encrypt the SNMP messages between the SNMP agent and the manager.
Figure 14. User Details and Encryption 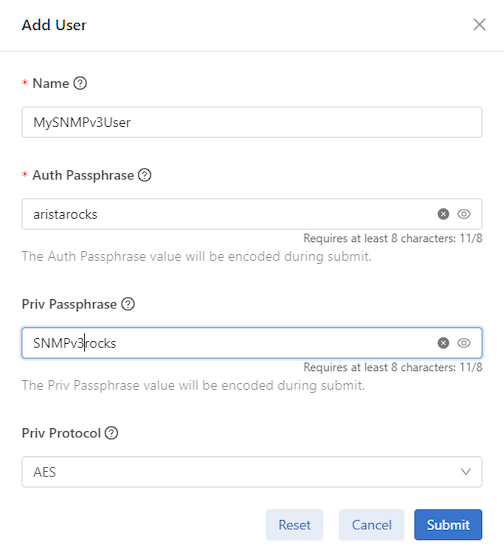
- Click Submit to continue—the dashboard updates with the User details.
Figure 15. Users 
Configuring SNMP Traps
- Select Controller Traps on the SNMP landing page.
Figure 16. Controller Traps 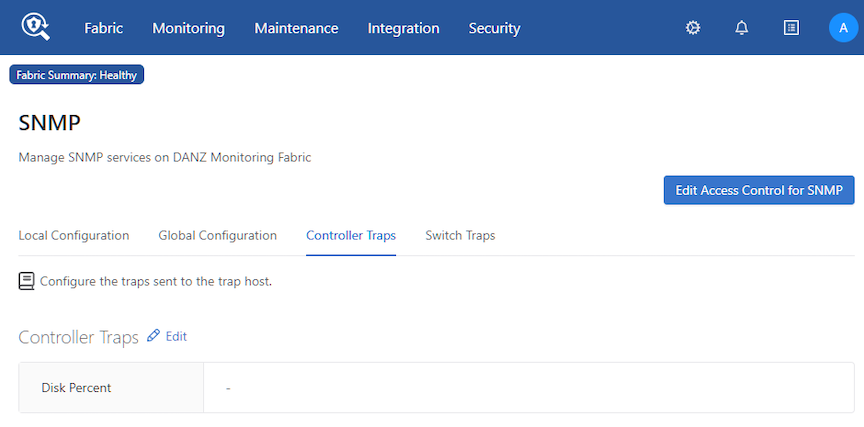
- Click Edit and enter the Disk Percent value.
Figure 17. Edit SNMP Controller Traps 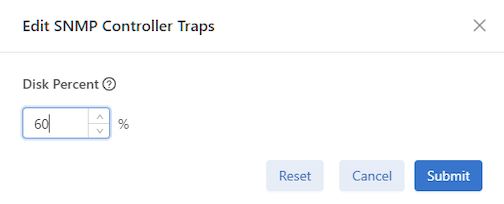
- Click Submit. The dashboard displays the Disk Percent value.
Figure 18. Disk Percent 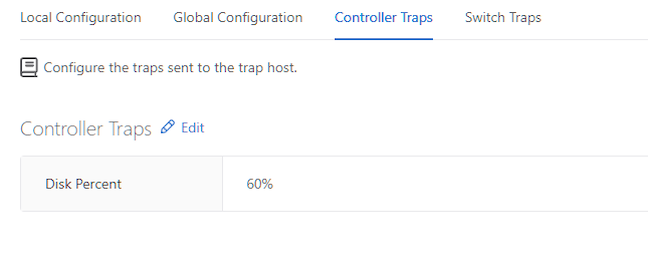
- Select Switch Traps on the SNMP landing page.
Figure 19. Switch Traps 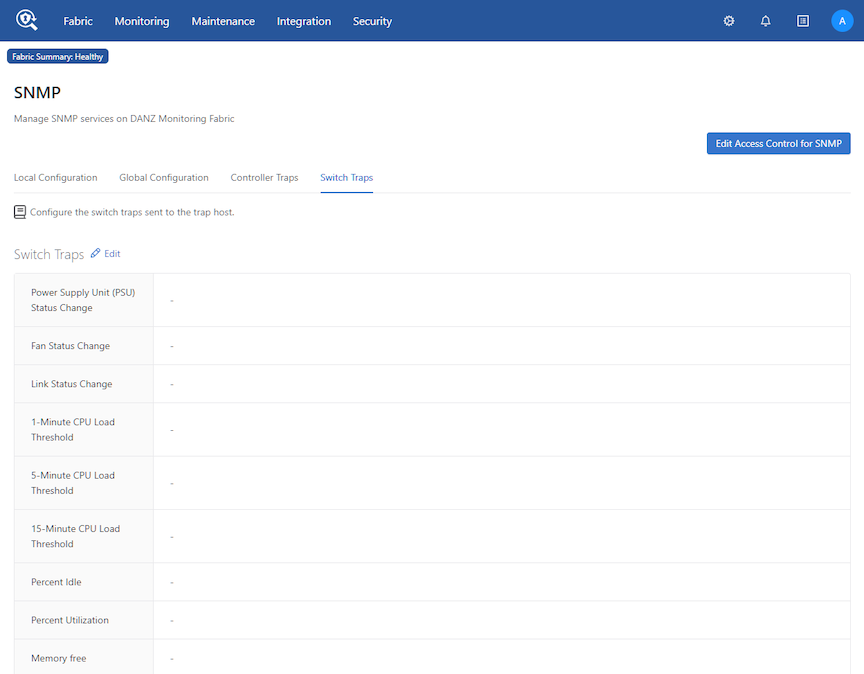
- Click Edit and enter the Events values:
- PSU Status Change in seconds(s).
- Fan Status Changein seconds(s).
- Link Status Change in seconds(s).
Enable Authentication Failure by moving the selector switch to the right.
Figure 20. Edit SNMP Switch Traps - Events 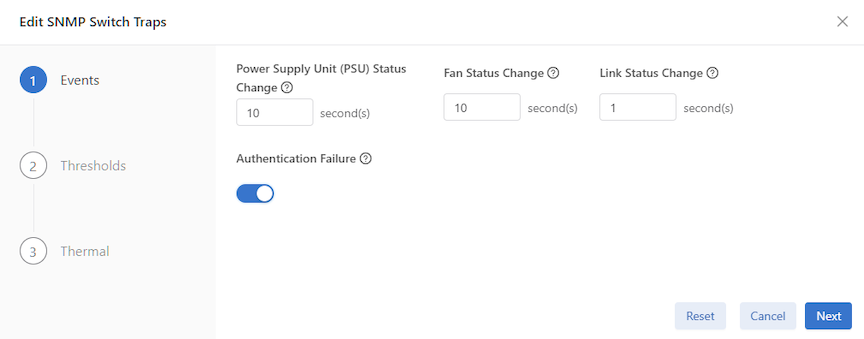
- Enter the Thresholds values:
- 1-Minute CPU Load Threshold in percentage.
- 5-Minute CPU Load Threshold in percentage.
- 15-Minute CPU Load Threshold in percentage.
- Percent Idle in percentage.
- Percent Utilization in percentage.
- Memory Free in bytes.
- Full-Match Flow Table in percentage.
Figure 21. Edit SNMP Switch Traps - Thresholds 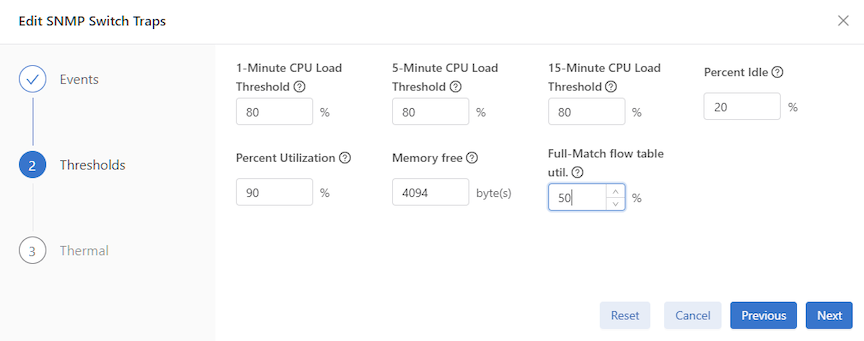
- Enter the Thermal values:
- Min in degrees Celsius.
- Max in degrees Celsius.
- Interval in seconds(s). It must be equal to or greater than 10.
- Status from the drop-down list (None, All, Failed, Good, Missing).
Figure 22. Switch Traps - Thermal 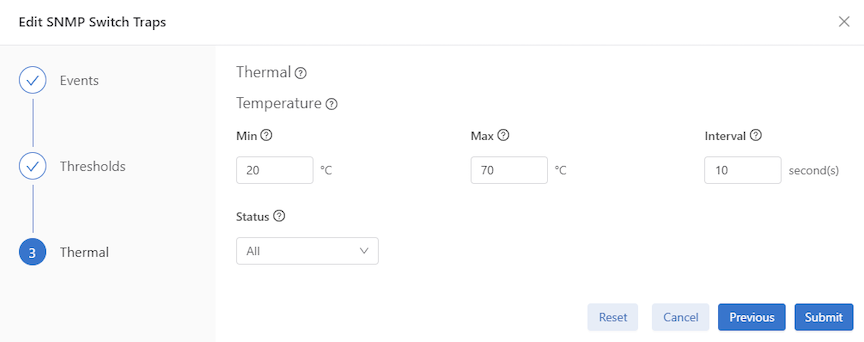
- Click Submit. The dashboard displays the Switch Traps values.
Figure 23. Switch Traps Values 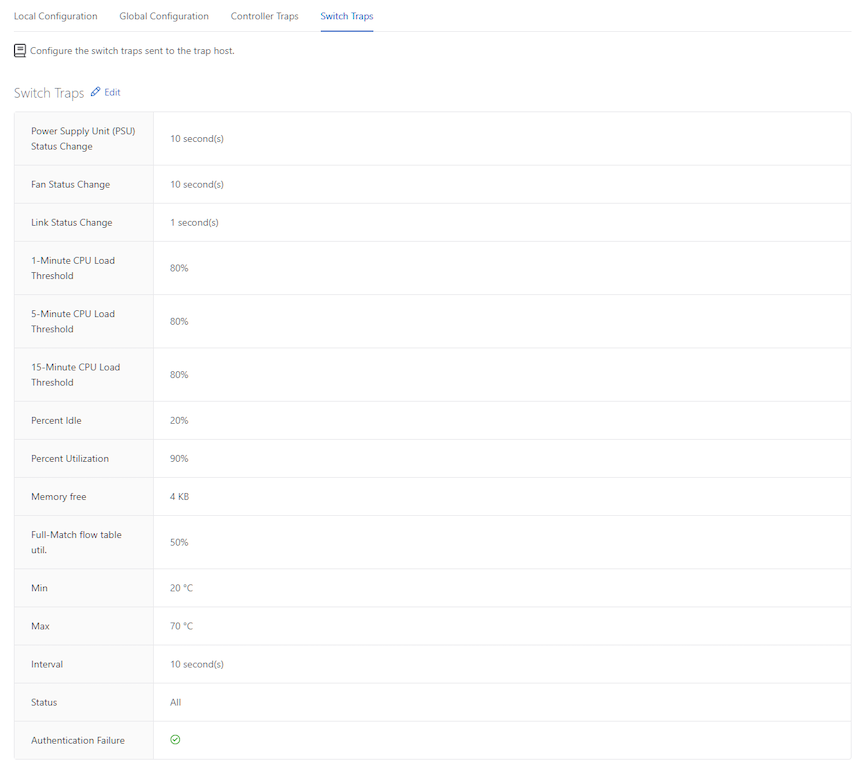
Configuring the System Name
- Select Local Configuration on the SNMP landing page.
Figure 24. Local Configuration 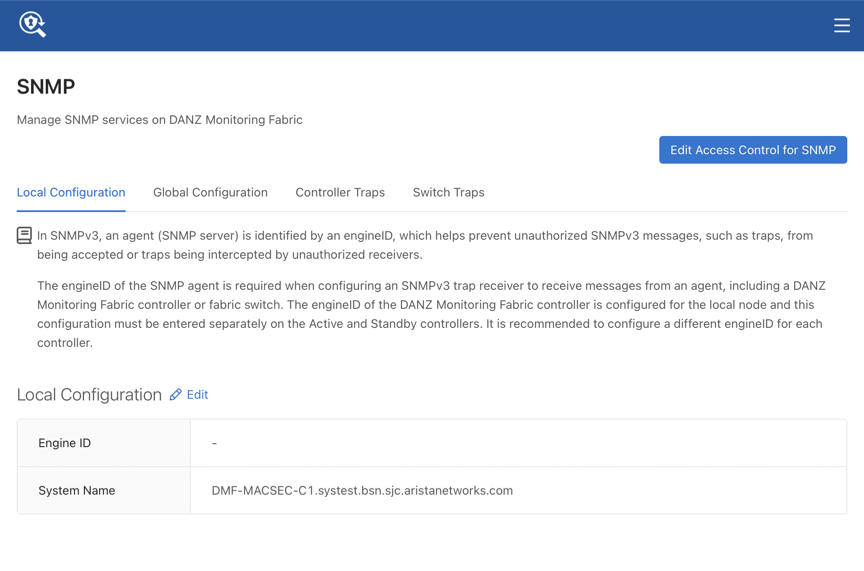
Using the CLI to Configure SNMP
This section describes using the CLI to configure and manage SNMP settings for the DMF Controller cluster.
Configuring SNMP Access to the Controller
By default, SNMP access to the Controller is disabled. The default SNMP access list is empty, meaning access is not permitted unless specifically enabled.
controller-1(config)# controller
controller-1(config-controller)# access-control
controller-1(config-controller-access)# access-list snmp
controller-1(config-controller-access-list)# 10 permit from 10.8.67.0/24/0
permit command enables access to the Controller from an SNMP client in the subnetwork 10.8.67.0.
controller-1(config)# controller
controller-1(config-controller)# access-control
controller-1(config-controller-access)# access-list snmp
controller-1(config-controller-access-list)# 10 permit from 0.0.0 .0/0
controller-1(config-controller-access-list)# 20 permit from ::/0
Configuring SNMP Access to the Analytics Node
To allow SNMP walk to the Analytics Node, use the steps highlighted in the section Configuring SNMP Access to the Controller above.
Identifying the SNMP Trap Receiver
controller-1(config)# snmp-server host <ipaddress> [udp-port <udp-port>]
controller-1(config)# snmp-server host 192.168.17.150 udp-port 162
UDP port 162 is the default for SNMP trap messages; UPD port 161 is the default port for general SNMP messages.
Name OID Trap generation
--------------------------------------------------------------------------
cpuload .1.3.6.2.4.1.2021.10.1.5.1 when load (average over 1 minute) > %90
memtotalfree .1.3.6.2.4.1.2021.4.11.0 when freemen (of entire Linux OS) < 50K
cputemp .1.3.6.2.2.1.99.1.1.1.4.1001 when CPU core temp > vendor
specified threshold value
ambienttemp .1.3.6.2.2.1.99.1.1.1.4.2001 when chassis inlet temp >
vendor specified threshold value
powersupply .1.3.6.2.2.1.99.1.1.1.4.3001 when power consumption >
vendor specified threshold value
fan**speed .1.3.6.2.2.1.99.1.1.1.4.40** when fan speed < vendor
specified threshold
controller-1(config)# snmp-server trap
disk-percent set logging partition space use percentage at which to send trap
<disk-percent> Percent disk utilization (1..100)
controller-1(config)# snmp-server trap disk-percent 75
monitor -r 30 -I dskPercent .1.3.6.2.4.1.2021.9.1.9.1 > 75
Configuring SNMP Settings
To set the SNMP community string, which is a password used by a management application for accessing SNMP information, enter the snmp-server community command from config mode, as in the following example:
ro or read-only and rw or read-write types of community strings, DANZ Monitoring Fabric supports only the ro option.
controller-1(config)# snmp-server community ro <string>
controller-1(config)# snmp-server location <location>
controller-1(config)# snmp-server contact <contact>
To monitor the Controller’s /var/log and root partitions, configure the following trap:
disk-percent percent: Replace percent with the percentage that triggers a trap when exceeded.Note: Configuring the disk-percent trap on the Analytics Node will monitor the /var/lib/analytics/data folder, the /var/log folder, and therootpartition.
To set the SNMP system name string to a desired value such as a fully qualified domain name (FQDN), the Controller configuration must be updated in the local node mode and hence must be done individually for each Controller node in the cluster.
You can enter a chosen string as shown in the example below:
controller-2# conf
controller-2(config)# local node
controller-2(config-local)# snmp-server
engine-id       Value for the SNMP engine ID, a text string up to 27 characters long
system-name     SNMP system name to expose (sysName)
DMF-MACSEC-2(config-local)# snmp-server system-name
<System-name>      <String>
controller-2(config-local)# snmp-server system-name DMF-C2.aristanetworks.com
controller-2(config-local)# end
controller-2# show run local

! local
local node
  hostname controller-2
  snmp-server system-name DMF-C2.aristanetworks.com
  interface management
    !
    ipv4
      ip 10.240.189.233/27 gateway 10.240.189.225
      method manual
      dns search qa.bsn.sjc.aristanetworks.com
      dns server 10.240.48.6
    !
    ipv6
      method manual
host ~ % snmpwalk -v2c -c bigswitch 10.240.189.233 sysName.0
SNMPv2-MIB::sysName.0 = STRING: DMF-C2.aristanetworks.com
Without the above configuration, an snmpwalk command would return the hostname in the sysName parameter, as shown in the following:
controller-2# conf
controller-2(config)# local node
controller-2(config-local)# no snmp-server system-name DMF-C2.aristanetworks.com
controller-2(config-local)# end
controller-2#
host ~ % snmpwalk -v2c -c bigswitch 10.240.189.233 sysName.0
SNMPv2-MIB::sysName.0 = STRING: controller-2
Configuring SNMP Switch Trap Thresholds
To configure the thresholds for the SNMP traps generated by fabric switches, use the following command:
[no] snmp-server switch trap {cpu-load <cpu-load>| cpu-load 5min <cpu-load5>| cpu-load 15min <cpu-load15>| fm-flow-table-util <util>| mem-free <mem-free>| percent-idle <percent> | percent-utilization <percent>| psu-status <psu-status>| fan-status <fan-status> | link- status <link-status> | auth-fail | thermal [all | failed | good | missing | <interval> <min-temp> <max- temp>]
- auth-fail: Sends a trap when an authentication attempt fails.
- cpu-load cpu-load: Replace cpu-load with the threshold for CPU utilization.
- fan-status: Sends a trap when the fan status changes. Set the interval for monitoring between 10 and 100,000 seconds.
- fm-flow-table-util util: Replace util with the percentage that triggers a trap when exceeded.
- link-status: Sends a trap when the status of a link changes. Set the interval for monitoring between 1 and 100,000 seconds.
- mem-free mem-free: Replace mem-free with the threshold (in bytes) for memory utilization.
- percent-idle percent: Replace percent with the percentage of CPU idle utilization that triggers a trap when exceeded.
- percent-utilization percent: Replace percent with the with the percentage of CPU utilization that triggers a trap when exceeded.
- psu-status: Generate a trap when PSU status changes. Set the interval for monitoring between 10 and 100,000 seconds.
- thermal: Sends a trap when the thermal sensor status changes as specified using the following options.
- all: Includes failed, good, and missing.
- failed: Sends a trap when the thermal sensor fails.
- good: Sends a trap when the thermal environment is normal.
- missing: Sends a trip when the thermal sensor is not present.
- interval: Sends the trip after the expiry of the specified interval. The range is 10 to 100,000 seconds.
- [ min-temp | max-temp ]: A trap is generated when the temperature in degrees Celsius is less than min-temp or greater than max-temp.
Note: It is highly recommended to use percent-idle or percent-utilization instead of cpu-load trap.
SNMP Traps for DMF Service Node Appliance
- PSU failed/recovered
- Fan failed/recovered
- Temp exceeded some threshold or came back to normal
- Interfaces up/down
- SN inaccessible by the Controller
- SN NetFlow GW is inaccessible
- Percent (%) packet drop exceeded some threshold
Managing the SNMPv3 Engine ID for Trap Receivers
SNMPv3 adds authentication and encryption to the features provided by earlier versions of SNMP (v1 and v2). DANZ Monitoring Fabric (DMF) supports the SNMPv3 user-based security model (USM) for message security through authentication and encryption.
In SNMPv3, an engineID identifies the agent (SNMP server), which helps prevent unauthorized SNMPv3 messages, such as traps, from being accepted or intercepted by unauthorized receivers. The engineID of the SNMP agent is required when configuring an SNMPv3 trap receiver to receive messages from an agent, including a DMF Controller or fabric switch.
controller-1> show switch <switch-name> running-config
snmp-server engine-id
string
command from the config-local-node submode, as in the following example:
controller-1(config)# local node
controller-1(config-local)# snmp-server engine-id controller-1_EngineID
snmp-server
engine-id
command.
snmp-server engine-id command sets the engine-ID for the Controller using the following format:
0x80001f8804 + <hex string>
xxd:
$ echo "abcdef--g" | xxd -ps
6162636465662d2d670a
snmp-server engine-id Controller2_Engine_ID
workstation$ echo "Controller2_Engine_ID" | xxd -ps
436f6e74726f6c6c6572325f456e67696e655f49440a
workstation$
0a removed.
0x80001f8804
workstation:~$ sudo cat /var/lib/snmp/snmpd.conf | grep old
oldEngineID 0x80001f8804436f6e74726f6c6c6572325f456e67696e655f4944 <--------
Configuring SNMPv3 Users
Use the snmp-server user command in config mode to create a user account for SNMP v3 access. When running an snmpwalk (snmpget, snmpgetnext,
snmpbulkget) from a shell, passphrases should be enclosed in single quotes. Entering the passphrase with double quotes (” “), may result in an error. This command has the following syntax:
[no] snmp-server user <name> {auth [0] <cleartext passphrase> | 7 <auth-passphrase>} [ priv {aes | des}{[0] <cleartext passphrase> | 7 <priv-passphrase>}]
The following is the meaning of each keyword:
- auth | auth 0 | auth 7: Use a plaintext passphrase or a type 7 encoded passphrase.
- cleartext-passphrase: A cleartext passphrase from 8 to 64 alphanumeric characters including dash (“-” and space). A dash or whitespace is not allowed at the beginning or end of the passphrase. Other special characters are not allowed.
- private-passphrase: A type 0 encoded passphrase from 8 to 64 alphanumeric characters including dash (“-”) and space. A dash or whitespace is not allowed at the beginning or end of the passphrase. Other special characters are not allowed.
- type-7-passphrase: A type 7 encoded passphrase from 8 to 128 alphanumeric characters including dash (“-”) and space. The maximum text string length that can be used with a Type 7 encoder, which can be found online, is 64. A dash or whitespace is not allowed at the beginning or end of the passphrase. Other special characters are not allowed.
- priv {aes | des}: Optional keyword to perform Advanced Encryption Standard (AES) or Data Encryption Standard (DES) encryption of the following passphrase, which is used as an encryption key to encrypt the SNMP messages between the SNMP agent and the manager.
- user username: Up to 32 alphanumeric characters including dash (“-“) and underscore (“_”) Spaces are not permitted. After you configure the username with a plaintext passphrase, the output from the show snmp-server command displays the passphrases in Type7 encoded strings. The Controller's configuration gets pushed through zero touch networking (ZTN) to the connected fabric switches.
Note: DANZ Monitoring Fabric (DMF) only supports the
roorread-onlytype of community string option.
SHA-256 and AES-256 Support For SNMPv3
Starting from DMF release 8.9.0, SHA-256 and AES-256 support for SNMPv3 implements 256-bit authentication and encryption on the DMF Controller and managed devices. Configuring the SHA-256 authentication and AES-256 privacy protocol options enhances the User-based Security Model (USM) by enforcing 256-bit authentication and encryption standards.
Configuration
You can configure SHA-256 for SNMPv3 using the CLI, GUI, or REST API.
With the CLI you can specify the auth sha256 option like so:
dmf-controller-c1(config)# snmp-server user testuser auth sha256 password123 priv aes password123
Access rules may need updating: e.g.:controller; access-control ; access-list snmp; 1 permit from 0.0.0.0/0
dmf-controller-c1(config)# show run snmp
! snmp-server
snmp-server user testuser auth sha256 7 0216054818110033481f5b4a priv aes 7 0216054818110033481f5b4a
sha is the default option when unspecified.
You can also configure AES-256 for SNMPv3 using the CLI, GUI, or REST API.
With the CLI you can specify the priv aes256 option like so:
dmf-controller-c1(config)# snmp-server user testuser auth sha password123 priv aes256 password123
Access rules may need updating: e.g.:controller; access-control ; access-list snmp; 1 permit from 0.0.0.0/0
dmf-controller-c1(config)# show run snmp
! snmp-server
snmp-server user testuser auth sha 7 0216054818110033481f5b4a priv aes256 7 0216054818110033481f5b4a
aes (which means AES-128) is the default option when unspecified.
REST API Changes
You can configure SHA-256 and AES-256 for SNMPv3 using the REST API, which has been expanded to support the new parameters:
POST /api/v1/data/controller/os/config/global/snmp/user
{
  "name": "test-user",
  "auth-passphrase": "0216054818110033481f5b4a",
  "auth-protocol": "sha256",
  "priv-passphrase": "0216054818110033481f5b4a",
  "priv-protocol": "aes"
}

POST /api/v1/data/controller/os/config/global/snmp/user
{
  "name": "test-user",
  "auth-passphrase": "0216054818110033481f5b4a",
  "auth-protocol": "sha",
  "priv-passphrase": "0216054818110033481f5b4a",
  "priv-protocol": "aes256"
}
SNMP Schema Changes
The SNMP schema includes the auth-protocol option, which adds support for the SHA-256 algorithm. In addition, the priv-protocol option adds support for the AES-256 algorithm, expanding the encryption options beyond the previous aes parameter.
leaf auth-protocol {
   description "The encryption protocol used for authentication.
                Protocol is assumed SHA if unspecified.";
   type enumeration {
       enum sha;
       enum sha256;
   }
   default "sha";
}

leaf priv-protocol {
   description
    "The encryption protocol used for messages.
     Protocol is assumed AES if unspecified.";
   type enumeration {
       enum aes;
       enum aes256;
   }
   default "aes";
}
Troubleshooting
-
Verify the ZTN state and the SNMP configuration synchronization by running the
show managed-devices all zerotouchcommand:dmf-controller-c1# show managed-devices all zerotouch # Name Device Ip address Platform Serial number Last update Zerotouch state -|-----|-----------------------------|--------------|--------------------|--------------------------------|------------------------------|---------------| 2 core2 52:54:00:5f:f9:a8 (Linux KVM) 10.243.254.214 x86_64-cloudeos-eos 49E66AEBA5054CA1D825B37D5B534FF6 2025-09-19 12:19:48.985000 UTC ok 3 rn1 52:54:00:88:17:cc (Linux KVM) 10.243.254.38 Not Specified 2025-09-19 12:19:33.533000 UTC ok 4 sn1 52:54:00:c6:66:a7 (Linux KVM) 10.243.253.62 Not Specified 2025-09-19 12:19:32.534000 UTC ok
-
Validate the SNMP configuration by querying the managed device with the
snmpwalkcommand, using the correct security name and authentication/privacy details, like so:admin@c1:~$ snmpwalk -v 3 -l authPriv -a SHA256 -A password123 -x AES256 -X password123 -u testuser 10.243.254.176 SNMPv2-MIB::sysDescr.0 SNMPv2-MIB::sysDescr.0 = STRING: DANZ Monitoring Fabric 8.9.0-alpha (master #16341)
SNMPv3 Command Examples
controller-1(config)# snmp-server user snmp_1 auth authauth1
controller-1(config)# snmp-server user snmp-2 auth 0 authauth2
controller-1(config)# snmp-server user snmp11 auth 0 authauth11 priv des 0 privpriv11
controller-1(config)# snmp-server user snmp21 auth 0 authauth21 priv aes 0 privpriv21
controller-1(config)# snmp-server user snmp1 auth 7 0207114f03071a35441f
controller-1(config)# snmp-server user snmp20 auth 7 0207114f03071a35441c59 priv des 7 021616521d161d285a1c59
controller-1(config)# snmp-server user snmp30 auth 7 0207114f03071a35441d59 priv aes 7 021616521d161d285a1d59
Configuring SNMP on a Specific Switch
Using the GUI to Configure SNMP on a Specific Switch
- Select and click the link for a specific switch.
Figure 25. Fabric Switches 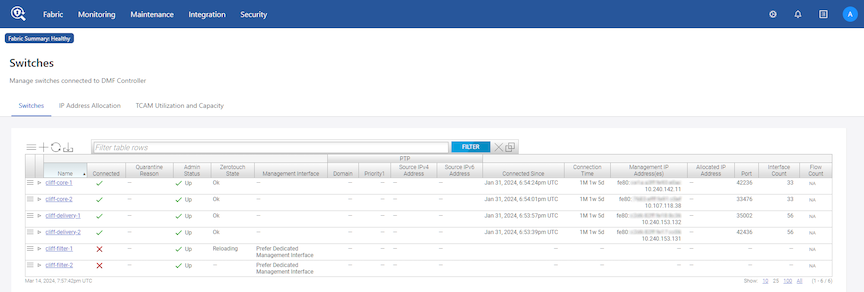
- On the Switches page, click the Actions control followed by Configure Switch.
Figure 26. Configure Switch Dialog 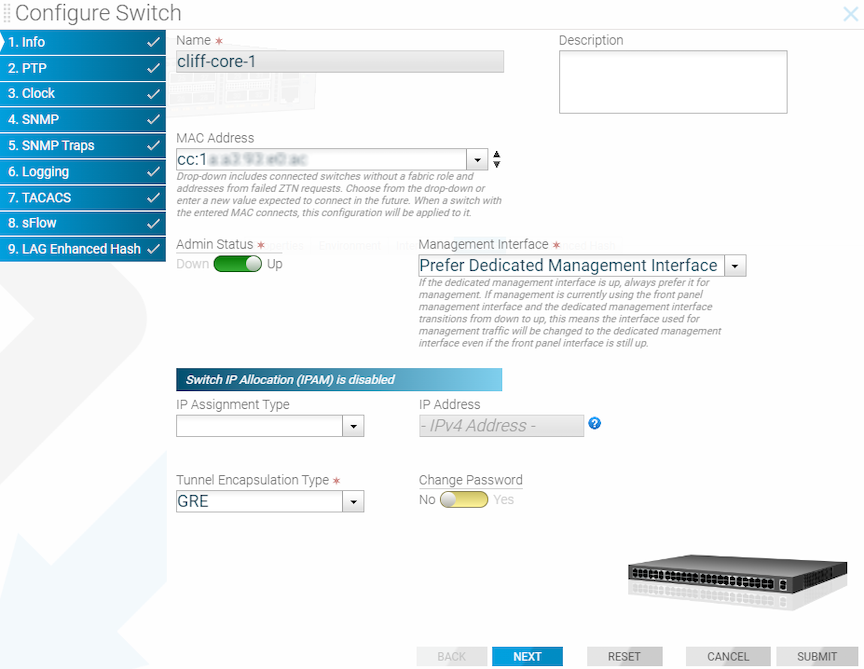 This page allows merging and overriding the default configuration pushed from the DANZ Monitoring Fabric (DMF) Controller with switch-specific SNMP configuration.
 - To merge or override the configuration for SNMP traps, click the SNMP Traps link and choose from the SNMP Switch Trap Settings drop-down to either Merge with Global Config or Override Global Config.
Figure 27. SNMP Traps 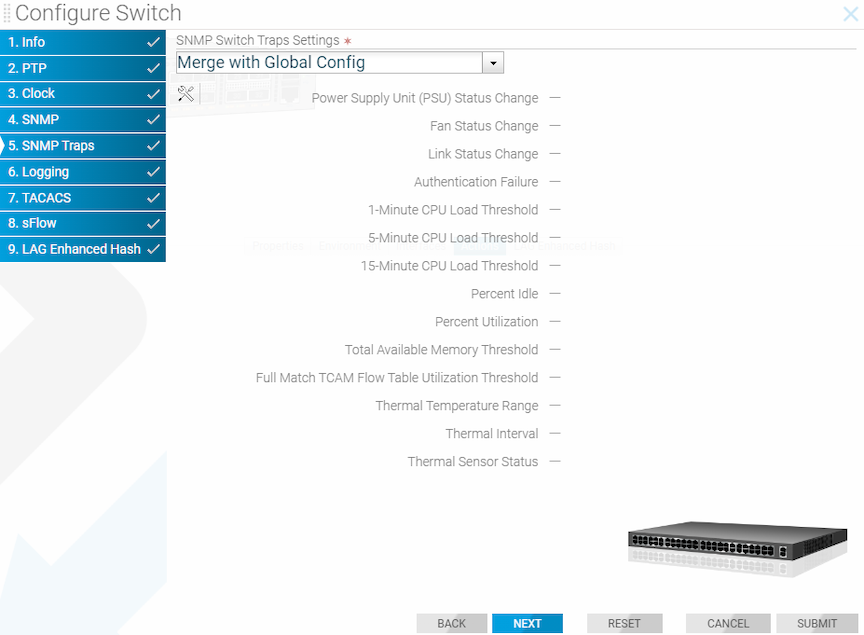
Using the CLI to Configure SNMP on a Specific Switch
- When using the config-switch submode for a specific switch, configuration changes, including SNMP, do not affect the Controller or other switches. Otherwise, the configuration is similar to configuring SNMP in config mode at the Controller level.
- Entering the snmp-server enable traps command in config mode pushes snmp-server enable configuration to each connected fabric switch. Verify the switch configuration by entering the
show effective-config switch
switch-name snmp
from the CLI, as in the following example.controller-1(config)# snmp-server enable traps
- From the switch CLI:
controller-1(config)# show effective-config switch switch-btsw-1 snmp
! switch
switch switch-btsw-1
snmp-server enable traps
Like the GUI, use the CLI to merge or override the default SNMP configuration with switch-specific SNMP configuration. To do so, complete the following steps:
SNMP Clear Trap
SNMP trap messages are sent whenever a threshold is reached, or an HW failure happens, like PSU failure/removal. An SNMP clear trap message is sent whenever a threshold is less than the specified range or the HW failure is fixed, such as when the PSU starts working.
There is no command to enable this feature. This feature is automatically enabled when configuring the SNMP trap on the Controller.
SNMP clear trap messages are not supported on DMF switches running EOS.
- switch trap cpu-load
- switch trap fm-flow-table-util
- switch trap mem-free
- switch trap percent-idle
- switch trap percent-utilization
These are the appliance (Controller, Service Node, Recorder Node, Analytic Node) traps for which clear traps will be sent.
|
|
|
|
|
|
|
|
|
|
|
|
|
|
|
|
|
|
|
The number of fans on an appliance varies. Depending on the number of fans on the appliance, fanspeed clear traps are sent.
Fan speed traps are named fan1Aspeed, fan1Bspeed, etc. |
|
|
|
SNMP Trap Generation for Packet Drops and Link Saturation
Users wishing to be notified about packet drops or high link saturation in the DANZ Monitoring Fabric (DMF) fabric can receive SNMP traps for these events.
Specifically, when trap generation is enabled, the following events will send an SNMP trap to the configured trap collector:
- Transmit packet drop counter increase at a switch interface managed by DMF.
- Traffic saturation levels above the high water mark of 90% on a link managed by DMF.
- A drop in traffic saturation levels below the low water mark of 70% if the link was previously saturated.
SNMP Trap Generation for Packet Drops and Link Saturation introduces the following OIDs:
| OID | Type | Description |
|---|---|---|
| .1.3.6.1.4.1.37538.68.77.70 | none | Root of the tree for custom DMF extensions. |
| .1.3.6.1.4.1.37538.68.77.70.1 | none |
Subtree root for link saturation warnings based on data from the endpoint applications/dmf/info/warnings/link-saturation. |
| .1.3.6.1.4.1.37538.68.77.70.1.1.0 | integer | The number of new link saturation warnings that have been detected since the last polling interval (15 seconds). |
| .1.3.6.1.4.1.37538.68.77.70.1.2.0 | integer | The number of link saturation warnings that have cleared since the last polling interval (15 seconds). |
| .1.3.6.1.4.1.37538.68.77.70.1.3.0 | oidref |
The OID to the start of the table containing all known link saturation warnings. Always holds the value: .1.3.6.1.4.1.37538.68.77.70.1.5 This object is sent as a varbind in the trap newLinkSaturationWarnings to indicate to the trap collector that this OID should be used in a walk for the updated list of warnings. |
| .1.3.6.1.4.1.37538.68.77.70.1.4.0 | oidref |
The OID to the start of the table containing all cleared link saturation warnings since the last polling interval. Always holds the value: .1.3.6.1.4.1.37538.68.77.70.1.6 This object is sent as a varbind in the trap linkSaturationWarningsCleared to indicate to the trap collector that this OID should be used in a walk for the updated list of cleared warnings. |
| .1.3.6.1.4.1.37538.68.77.70.1.5 | string | Start/root of the table of link saturation warnings. Holds the string: "Table of current warnings" |
SNMP Trap Generation for Packet Drops and Link Saturation OIDs (cont’d):
| OID | Type | Description |
|---|---|---|
| .1.3.6.1.4.1.37538.68.77.70.1.5.1 | string |
[Table row 1] A string summarizing a link saturation warning as a dot-separated tuple of switch DPID, interface name, and traffic direction (either ‘RX’ or ‘TX’). Example: "00:00:52:54:00:a2:d8:9d.ethernet2.TX" Indicates that port ethernet2 on the switch identified by DPID 00:00:52:54:00:a2:d8:9d has experienced transmit link saturation levels above 90%. |
| .1.3.6.1.4.1.37538.68.77.70.1.6 | string | Start/root of the table of cleared link saturation warnings. Holds the string: "Table of cleared warnings" |
| .1.3.6.1.4.1.37538.68.77.70.1.6.1 | string |
[Table row 1] A string summarizing a recently-cleared link saturation warning as a dot-separated tuple of switch DPID, interface name, and traffic direction (either ‘RX’ or ‘TX’). Example: "00:00:52:54:00:a2:d8:9d.ethernet2.TX" Indicates that the transmit link saturation warning for port ethernet2 on the switch identified by DPID 00:00:52:54:00:a2:d8:9d has cleared (dropped below the low watermark of 70%). |
| .1.3.6.1.4.1.37538.68.77.70.2 | None |
Subtree root for packet drop warnings which are issued when the TX drop counter of an interface increases. Based on the data from the endpoint |
| .1.3.6.1.4.1.37538.68.77.70.2.1.0 | integer | The number of interfaces that have experienced an increase in the transmit drop counter since the last polling interval (15 seconds). |
| .1.3.6.1.4.1.37538.68.77.70.2.2.0 | oidref |
The OID to the start of the table containing all of the interfaces that have seen its transmit drop counter increase since the last polling interval. Always holds the value: .1.3.6.1.4.1.37538.68.77.70.2.3 This object is sent as a varbind in the trap newPacketDropsWarnings to indicate to the trap collector that this OID should be used in a walk for the updated list of interfaces with increased counters. |
| .1.3.6.1.4.1.37538.68.77.70.2.3 | string | Start/root of the table of interfaces. Holds the string: "Table of interfaces with incremented drop counters" |
| .1.3.6.1.4.1.37538.68.77.70.2.3.1 | string |
[Table row 1] A string representing an interface that has experienced a transmit drop counter increase. Example: “00:00:52:54:00:a2:d8:9d.ethernet2” represents interface ethernet2 on the switch identified by DPID 00:00:52:54:00:a2:d8:9d. |
| .1.3.6.1.4.1.37538.68.77.70.2.3.2 | counter64 | [Table row 2] An unsigned integer holding the current counter value. |
- newLinkSaturationWarnings
- When new link saturation warnings are generated, in addition to its name, the trap contains the following varbinds:
- .1.3.6.1.4.1.37538.68.77.70.1.1.0
- .1.3.6.1.4.1.37538.68.77.70.1.3.0
- When new link saturation warnings are generated, in addition to its name, the trap contains the following varbinds:
- linkSaturationWarningsCleared
- When one or more existing link saturation warnings are cleared, in addition to its name, the trap contains the following varbinds:
- .1.3.6.1.4.1.37538.68.77.70.1.2.0
- .1.3.6.1.4.1.37538.68.77.70.1.4.0
- When one or more existing link saturation warnings are cleared, in addition to its name, the trap contains the following varbinds:
- newPacketDropsWarnings
- When packet drop counters are seen incrementing on one or more managed interfaces, in addition to its name, the trap contains the following varbinds:
- .1.3.6.1.4.1.37538.68.77.70.2.1.0
- .1.3.6.1.4.1.37538.68.77.70.2.2.0
- When packet drop counters are seen incrementing on one or more managed interfaces, in addition to its name, the trap contains the following varbinds:
snmpwalk and the corresponding response may resemble the following:
$ snmpwalk -v2c -c example 192.0.2.1 .1.3.6.1.4.1.37538.68.77.70
iso.3.6.1.4.1.37538.68.77.70.1.1.0 = INTEGER: 0
iso.3.6.1.4.1.37538.68.77.70.1.2.0 = INTEGER: 0
iso.3.6.1.4.1.37538.68.77.70.1.3.0 = OID: iso.3.6.1.4.1.37538.68.77.70.1.5
iso.3.6.1.4.1.37538.68.77.70.1.4.0 = OID: iso.3.6.1.4.1.37538.68.77.70.1.6
iso.3.6.1.4.1.37538.68.77.70.1.5 = STRING: "Table of current warnings"
iso.3.6.1.4.1.37538.68.77.70.1.5.1.1 = STRING: "00:00:52:54:00:a2:d8:9d.ethernet2.TX"
iso.3.6.1.4.1.37538.68.77.70.1.5.1.2 = STRING: "00:00:5c:54:00:f2:81:03.ethernet0.RX"
iso.3.6.1.4.1.37538.68.77.70.1.5.1.3 = STRING: "00:00:12:b0:03:22:07:a2.ethernet1.RX"
iso.3.6.1.4.1.37538.68.77.70.1.5.1.4 = STRING: "00:00:50:ef:0c:a2:16:f6.ethernet3.TX"
iso.3.6.1.4.1.37538.68.77.70.1.6 = STRING: "Table of cleared warnings"
iso.3.6.1.4.1.37538.68.77.70.2.1.0 = INTEGER: 2
iso.3.6.1.4.1.37538.68.77.70.2.2.0 = OID: iso.3.6.1.4.1.37538.68.77.70.2.3
iso.3.6.1.4.1.37538.68.77.70.2.3 = STRING: "Table of interfaces with incremented drop counters"
iso.3.6.1.4.1.37538.68.77.70.2.3.1.1 = STRING: "00:00:52:54:00:a2:d8:9d.ethernet2"
iso.3.6.1.4.1.37538.68.77.70.2.3.1.2 = STRING: "00:00:52:a4:31:f2:81:56.ethernet0"
iso.3.6.1.4.1.37538.68.77.70.2.3.2.1 = Counter32: 11
iso.3.6.1.4.1.37538.68.77.70.2.3.2.2 = Counter32: 1
iso.3.6.1.4.1.37538.68.77.70.1.1.0 = INTEGER: 0
iso.3.6.1.4.1.37538.68.77.70.1.2.0 = INTEGER: 0
iso.3.6.1.4.1.37538.68.77.70.1.3.0 = OID: iso.3.6.1.4.1.37538.68.77.70.1.5
iso.3.6.1.4.1.37538.68.77.70.1.4.0 = OID: iso.3.6.1.4.1.37538.68.77.70.1.6
iso.3.6.1.4.1.37538.68.77.70.1.5 = STRING: "Table of current warnings"
iso.3.6.1.4.1.37538.68.77.70.1.6 = STRING: "Table of cleared warnings"
iso.3.6.1.4.1.37538.68.77.70.2.1.0 = INTEGER: 0
iso.3.6.1.4.1.37538.68.77.70.2.2.0 = OID: iso.3.6.1.4.1.37538.68.77.70.2.3
iso.3.6.1.4.1.37538.68.77.70.2.3 = STRING: "Table of interfaces with incremented drop counters"
Using the CLI to Configure the SNMP Traps
(config)# snmp-server enable traps
(config)# snmp-server community ro example
(config)# snmp-server host 192.0.2.10
(config)# no snmp-server enable traps
CLI Show Commands
show command.
# show running-config snmp

! snmp-server
snmp-server host 192.0.2.10
snmp-server enable traps
snmp-server community ro 7 02031c5a06160324
The configuration entry snmp-server enable traps indicates that trap support, including this feature, is enabled.Syslog Messages
SDCACHE7001: Error while refreshing cache for Query{<query>, includedStateTypes=[LOCAL_CONFIG, GLOBAL_CONFIG, OPERATIONAL]}
-
<query>is one of:-
basePath=/applications/dmf/info/warnings/link-saturation
-
basePath=/core/switch, selectedPaths=[dmf-stats/interface]
-
-
Generated when the statistics collected and monitored for this feature could not be cached. The message is logged along with a stack trace containing further details.
SDCACHE7002: Query for data failed for Query{<query>, includedStateTypes=[LOCAL_CONFIG, GLOBAL_CONFIG, OPERATIONAL]}
-
<query>is one of:-
basePath=/applications/dmf/info/warnings/link-saturation
-
basePath=/core/switch, selectedPaths=[dmf-stats/interface]
-
-
Generated when the periodic query to the Controller for collecting the statistics monitored when evaluating if traps should be sent failed. The message is logged along with a stack trace containing further details.
SNMPEXT4001: Could not disable configuration <configuration>
-
<configuration>is one of:-
dmf_trap_monitors
-
dmf_warning_extensions
-
-
Generated when the SNMP configurations associated with a trap, named [configuration], could not be disabled. The message is logged along with a stack trace containing further details.
SNMPEXT4002: Could not enable configuration <configuration>
-
<configuration>is one of:-
dmf_trap_monitors
-
dmf_warning_extensions
-
-
Generated when the SNMP configurations associated with a trap, named [configuration], could not be enabled. The message is logged along with a stack trace containing further details.
Troubleshooting
- Traps are enabled.
- A community or user is configured, and
- A trap host is configured.
> show logging controller | grep ‘SDCACHE\|SNMPEXT’
- Traps are not sent from a system with known link saturation or packet drop warnings, e.g., via the CLI or GUI.
- A query, e.g.,
snmpwalkfor OIDs rooted under 1.3.6.1.4.1.37538.68.77.70 does not result in responses or return errors.
Considerations
- The user cannot specify the link saturation trap thresholds. Traps are sent when link saturation levels cross the 90% threshold and are cleared once levels drop below 70%.
- The tree associated with this feature is only available through polling with
snmpwalkwhen traps are enabled. - The OIDs do not have resolvable names.
- Polling of link and interface states happens at a fixed interval; there may be a several-second delay between the occurrence of a trap-triggering event and sending the trap.