
User Management-Operator
The User Management feature allows you to manage users, their roles, service permissions (formerly known as Role Customization), and authentication.
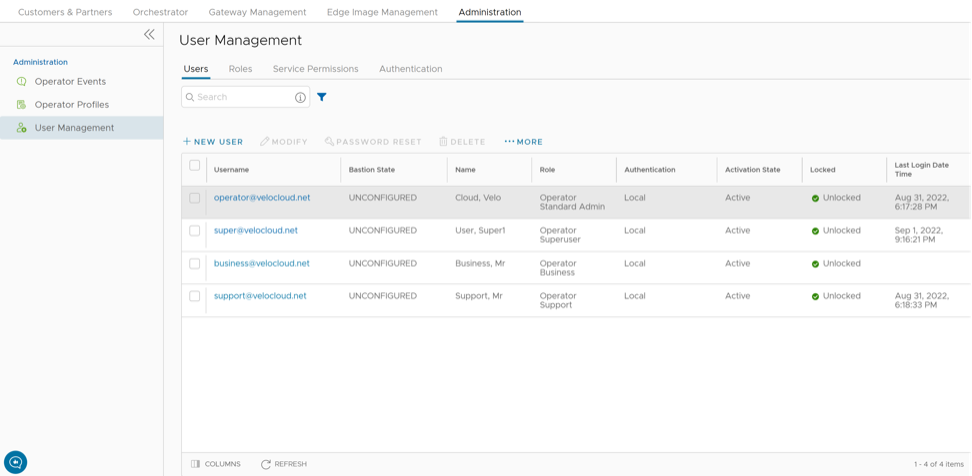
Users
To access the Users tab:
- From the left menu, select User Management. It displays the Users tab by default.
Figure 2. Users - Operator 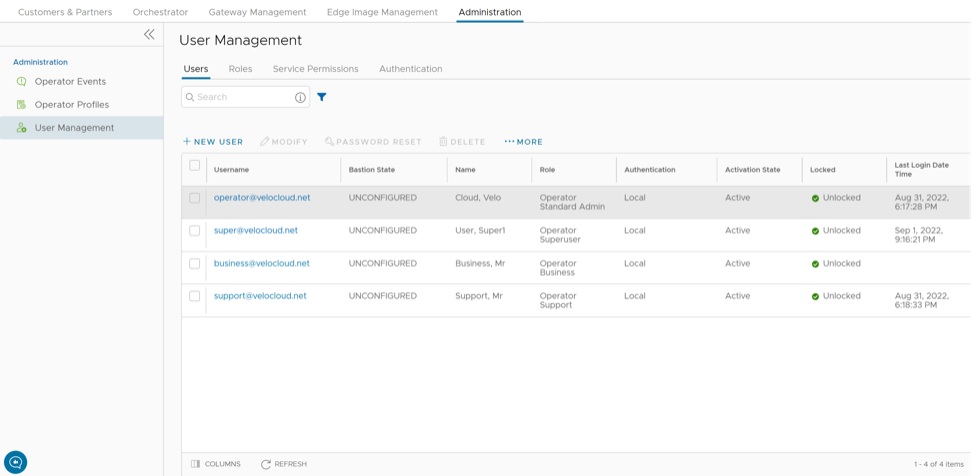
Add New User
- Select New User. The following screen appears:
Figure 3. Add New User 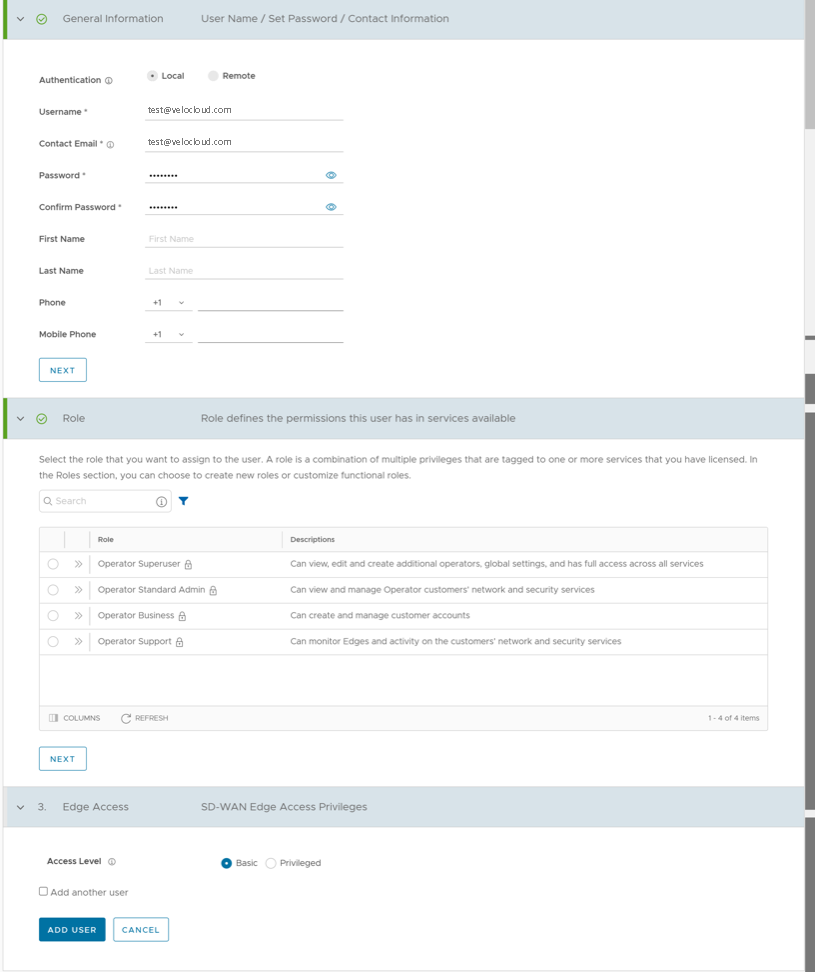
API Tokens
session.options.enableApiTokenAuth as False.
The users can create, revoke, and download the tokens based on their roles.
To manage the API tokens:
- Select a user, then select Modify or select the link to the username. Go to the API Tokens section.
Figure 4. API Tokens 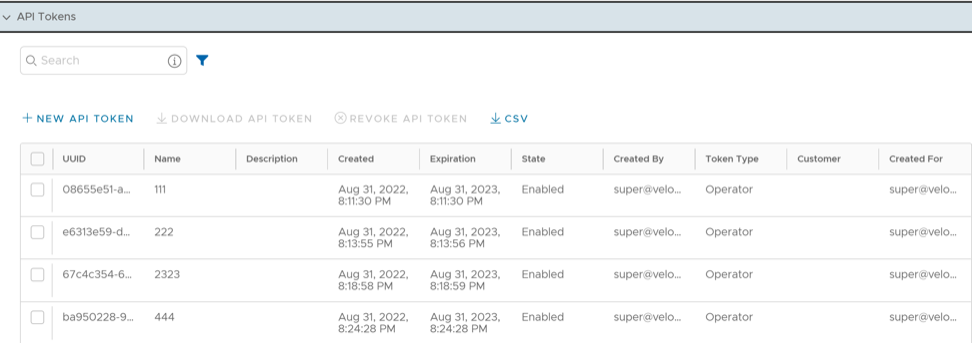
- Select New API Token.
Figure 5. New API Token 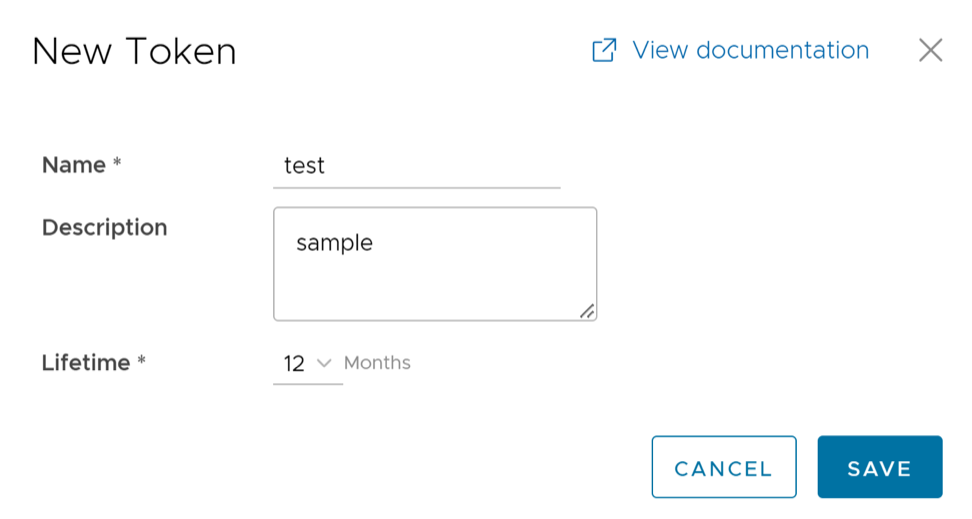
Roles
- Privileges – Privileges are a set of roles relevant to a functionality. A privilege can be tagged to one or more services. Users require privileges to carry out business processes. For example, a Customer support role in SD-WAN is a privilege required by an SD-WAN user to carry out various support activities. Every service defines such privileges based on its supported business functionality.
- Roles – The privileges from various categories can be grouped to form a role. By default, the following roles are available for an Operator user:
Table 5. Roles Role SD-WAN Service Global Settings Service Operator Standard Admin SD-WAN Operator Admin Global Settings Operator Admin Operator Superuser Full Access Full Access Operator Business SD-WAN Operator Business Global Settings Operator Business Operator Support SD-WAN Operator Support Global Settings Operator Support If required, you can customize the privileges of these roles. For additional information, see Service Permissions.
As an Operator, you can view the list of existing standard roles and their corresponding descriptions. You can add, edit, clone, or delete a new role. However, you cannot edit or delete a default role.
To access the Roles tab:
- From the left menu, select User Management, then choose the Roles tab. The following screen appears:
Figure 6. Roles-Operator 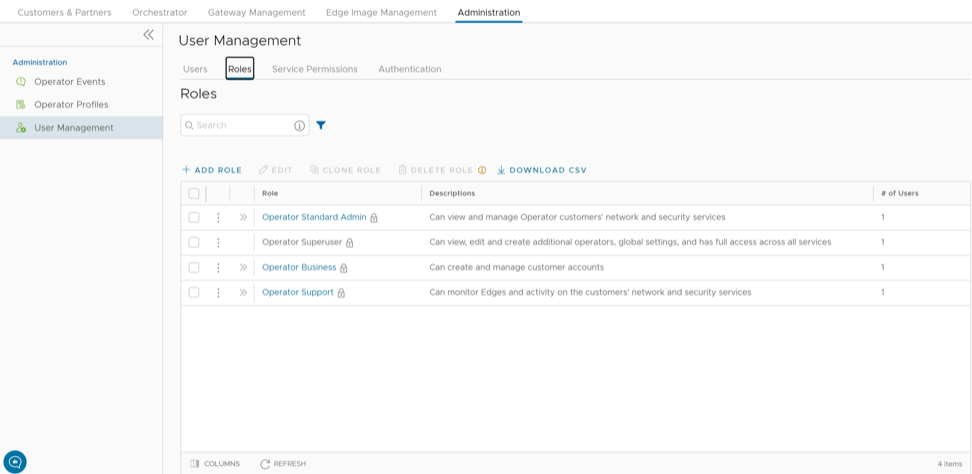
- Select >> displayed before the Role link, to view additional details about the selected Role, as shown below:
Figure 7. Role Details 
Add Role
- Select Add Role. The following screen appears:
Figure 8. Add Role 
Enterprise Security Admin Role
- SD-WAN Enterprise Security Admin
- Global Settings Enterprise Admin
You can either create these new permissions or directly upload these permissions using JSON files. Both these methods are explained below:
- Create a Permission
- Select New Permission. The following screen appears:
Figure 9. Configure Enterprise Security Admin 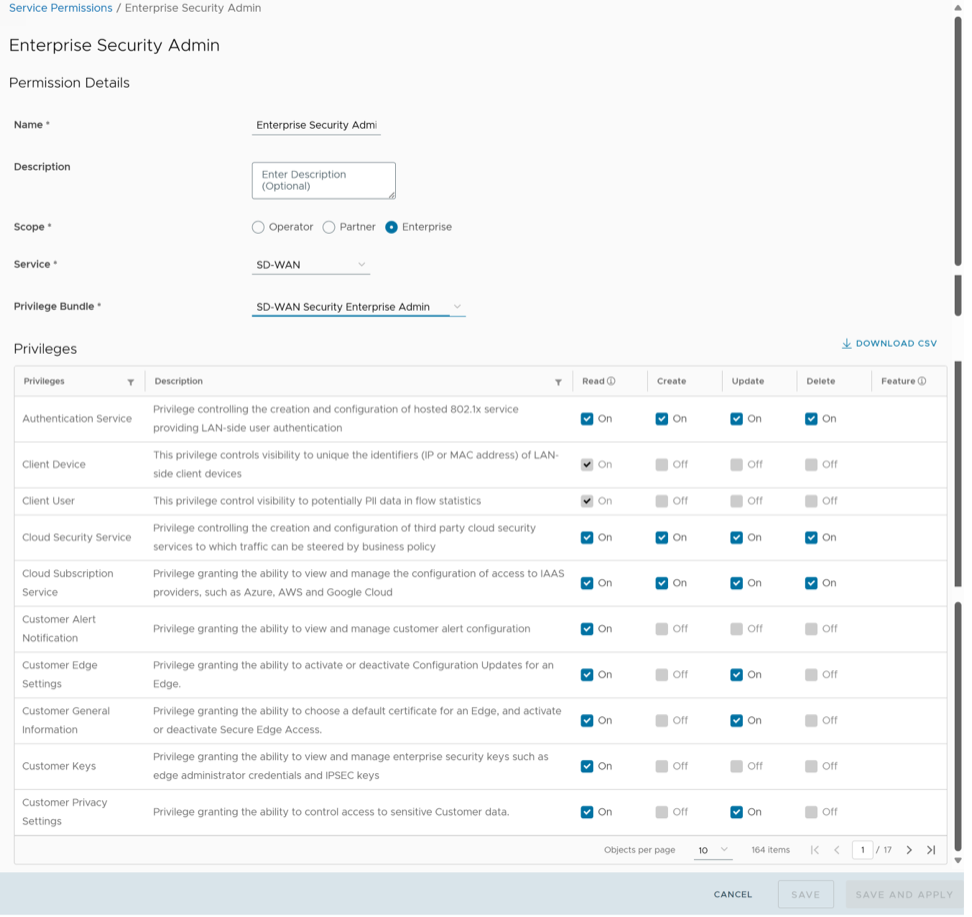
- Select New Permission. The following screen appears:
Service Permissions
- Starting from the 5.1.0 release, Role Customization is renamed as Service Permissions.
- To activate this feature, an Operator user must navigate to , then check the Role Customization checkbox.
Roles can be customized by changing the service permissions held by each role. You can customize both default roles and new roles. Roles are created based on the selected default role. Operator, Partner, and Enterprise roles are defined separately. So, there are default roles for each level, such as Operator Superuser, Partner Standard Admin, and Enterprise Support.
When customizing a role, you must select both, the user level and the role. Typically, Operator roles have more privileges by default than Partners or Enterprise Customers. When creating a user, you must assign a role to the user. Any change to that specific role's privileges is immediately applied to all users assigned to that role. Role customizations only apply to one role at a time. For example, changes to Operator Standard Admin roles do not get applied to Enterprise Standard Admin roles.
For additional information, see the topic Roles.
- The customizations done at the Enterprise level override the Partner or Operator level customizations.
- The customizations done at the Partner level override the Operator level customizations.
- Only when there are no customizations done at the Partner level or Enterprise level, the customizations made by the Operator are applied globally across all users in the Orchestrator.
- From the left menu, select User Management, then choose the Service Permissions tab. The following screen appears:
Figure 10. Service Permissions-Operator 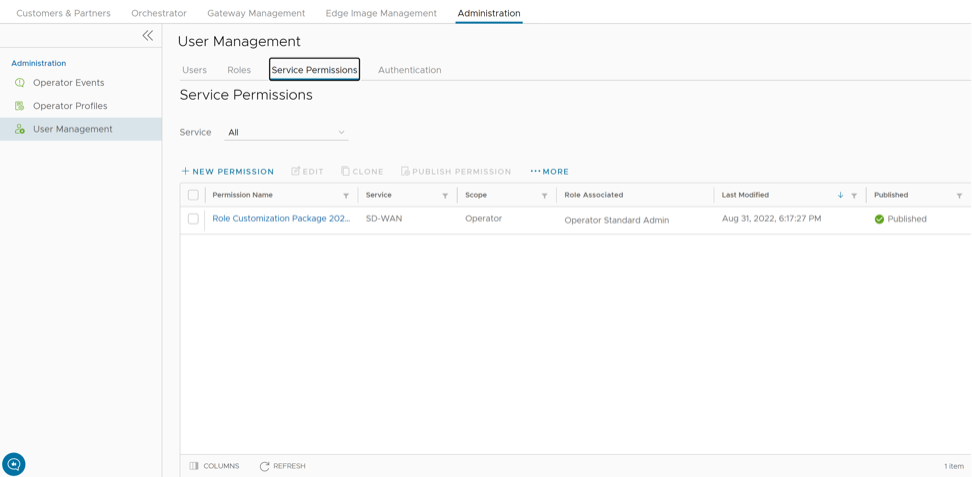
New Permission
To add a new permission, perform the following steps:
- Select New Permission. The following screen appears:
Figure 11. New Permission 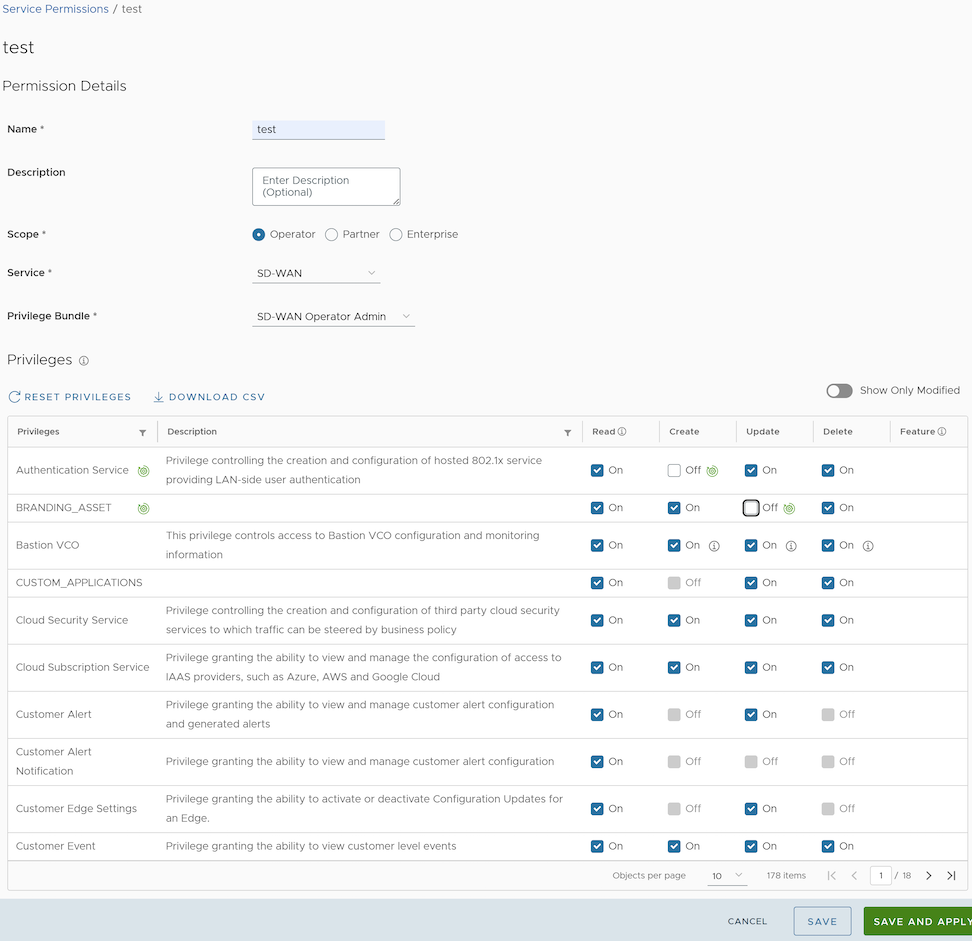
List of User Privileges
This section lists all the privileges available in the Operator portal.
- Allow Privilege – Do the privileges have allow access?
- Deny Privilege – Do the privileges have deny access?
- Customizable – Is the privilege available for customization in the Service Permissions tab?
| Feature | Name of the Privilege | Description | Allow Privilege | Deny Privilege | Customizable |
|---|---|---|---|---|---|
| Manage Customers | Create Customer | Grants ability to view and manage Enterprise Customers as an Operator or a Partner | Yes | No | No |
| Read Customer | |||||
| Update Customer | Yes | Yes | |||
| Delete Customer | No | No | |||
| Manage Customer | |||||
| Manage Partners | Create Partner | Grants ability to view and manage Partners | Yes | No | No |
| Read Partner | |||||
| Update Partner | |||||
| Delete Partner | |||||
| Manage Partner | |||||
| Software Images | Create Software Package | Grants access to upload and assign Edge Software Images and Application Maps | Yes | Yes | Yes |
| Read Software Package | |||||
| Update Software Package | |||||
| Delete Software Package | |||||
| Manage Software Package | |||||
| System Properties | Create System Property | Grants access to view and manage System Properties | Yes | Yes | No |
| Read System Property | Yes | ||||
| Update System Property | No | ||||
| Delete System Property | No | ||||
| Manage System Property | Yes | ||||
| Edit Restricted System Properties | Controls the ability of the user to edit restricted system properties | Yes | No | No | |
| Operator Events | Create Operator Event | Grants ability to view Operator events | Yes | Yes | Yes |
| Read Operator Event | |||||
| Update Operator Event | |||||
| Delete Operator Event | |||||
| Manage Operator Event | |||||
| Operator Profiles | Create Operator Profile | Grants ability to view and manage Operator profiles | Yes | Yes | Yes |
| Read Operator Profile | |||||
| Update Operator Profile | |||||
| Delete Operator Profile | |||||
| Manage Operator Profile | |||||
| View Tab Operator Profile | Controls ability of the user to view and configure within the Operator profile menu | No | Yes | Yes | |
| Operator Users | Create Operator User | Grants ability to view and manage Operator administrative users | Yes | Yes | No |
| Read Operator User | Yes | ||||
| Update Operator User | No | ||||
| Delete Operator User | No | ||||
| Manage Operator User | Yes | ||||
| Create Operator Token | Grants ability to view and manage the operator Authentication Tokens | Yes | No | No | |
| Read Operator Token | |||||
| Update Operator Token | |||||
| Delete Operator Token | |||||
| Manage Operator Token | |||||
| Gateway Pools Gateways Gateway Diagnostic bundles | Create Gateway | Grants ability to view and manage Gateway pools and Gateways as an Operator or a Partner | Yes | Yes | Yes |
| Read Gateway | |||||
| Update Gateway | |||||
| Delete Gateway | |||||
| Manage Gateway | |||||
| View Tab Gateway List | Controls the ability ofthe user to view the list of Gateways | No | Yes | Yes | |
| Create Operator PKI | Grants ability to view and manage Operator level PKI configuration including Gateway certificates and certificate authority | Yes | Yes | No | |
| Read Operator PKI | Yes | ||||
| Update Operator PKI | No | ||||
| Manage Operator PKI | Yes | ||||
| Download Gateway Diagnostics | Grants ability to download Gateway Diagnostics | No | Yes | Yes | |
| Application Maps | Create Software Package | Grants access to upload and assign Edge software images and Application Maps | Yes | Yes | Yes |
| Read Software Package | |||||
| Update Software Package | |||||
| Delete Software Package | |||||
| Manage Software Package | |||||
| Service Permissions | Create Service Permissions Package | Grants access to manage Service Permissions packages | Yes | No | No |
| Read Service Permissions Package | |||||
| Update Service Permissions Package | |||||
| Delete Service Permissions Package | |||||
| Manage Service Permissions Package | |||||
| Edge Licensing | Create License | Grants ability to view and manage Edge licensing | Yes | No | No |
| Read License | Yes | Yes | |||
| Update License | |||||
| Delete License | No | No | |||
| Manage License | |||||
| Read Operator PKI | Grants ability to view and manage operator level PKI configuration including Gateway certificates and certificate authority | Yes | Yes | Yes | |
| Delete Operator PKI | No | ||||
| Manage Operator PKI | Yes | ||||
| Read Customer PKI | Grants ability to view and manage Enterprise PKI settings | Yes | No | No | |
| Delete Customer PKI | |||||
| Manage Customer PKI | |||||
| Create Operator Authentication | Grants ability to view and manage Operator authentication mode, like SSO, RADIUS, or Native | Yes | Yes | Yes | |
| Read Operator Authentication | |||||
| Update Operator Authentication | |||||
| Delete Operator Authentication | |||||
| Manage Operator Authentication | |||||
| Create Customer Authentication | Grants ability to view and manage Customer authentication mode, like RADIUS or Native | Yes | Yes | Yes | |
| Read Customer Authentication | |||||
| Update Customer Authentication | |||||
| Delete Customer Authentication | |||||
| Manage Customer Authentication | |||||
| Replication | Create Replication | Grants access to view and configure Orchestrator disaster recovery | Yes | Yes | No |
| Read Replication | Yes | ||||
| Update Replication | No | ||||
| Delete Replication | |||||
| Manage Replication | Yes | ||||
| Create Orchestrator Diagnostics | Grants access to request and view Orchestrator diagnostic bundles | Yes | Yes | Yes | |
| Read Orchestrator Diagnostics | |||||
| Update Orchestrator Diagnostics | |||||
| Delete Orchestrator Diagnostics | |||||
| Manage Orchestrator Diagnostics | |||||
| Orchestrator Upgrade for Standalone | Create Software Package | Grants access to upload and assign Edge software images and Application Maps | Yes | Yes | Yes |
| Read Software Package | |||||
| Update Software Package | |||||
| Delete Software Package | |||||
| Manage Software Package | |||||
| Orchestrator Upgrade for DR Setup | Create Replication | Grants access to view and configure Orchestrator disaster recovery | Yes | Yes | No |
| Read Replication | Yes | ||||
| Update Replication | No | ||||
| Delete Replication | |||||
| Manage Replication | Yes | ||||
| User Agreements | Create User Agreement | Grants access to configure the customer user agreement | Yes | No | No |
| Read User Agreement | |||||
| Update User Agreement | |||||
| Delete User Agreement | |||||
| Manage User Agreement | |||||
| Orchestrator Owners Manage Orchestrators Edge Inventory | Create Edge Inventory | Grants ability to view and manage Edge inventory as needed for Redirect configuration | Yes | No | No |
| Read Edge Inventory | |||||
| Update Edge Inventory | |||||
| Delete Edge Inventory | |||||
| Manage Edge Inventory |
When the corresponding user privilege is denied, the Orchestrator window displays the 404 resource not found error.
| Navigation Path in the Enterprise Portal | Name of the Tab | Name of the Privilege | Description |
|---|---|---|---|
| Overview | Assign Edge Profile | Grants ability to assign a Profile to Edges | |
| Firewall | Configure Edge Firewall Logging | Grants ability to configure Edge level firewall logging | |
| Firewall | Configure Profile Firewall Logging | Grants ability to configure Profile level firewall logging | |
| Deactivate Edge | Grants ability to reset the device configuration to its factory default state | ||
| Enforce PCI Compliance | Deny PCI Operations | Denies access to sensitive Customer data including PCAPs, etc. on the Edges and Gateways, for all users including Arista Support | |
| Download Edge Diagnostics | Grants ability to download Edge Diagnostics | ||
| Download Gateway Diagnostics | Grants ability to download Gateway Diagnostics | ||
| Duplicate | Duplicate Customer Profile | Grants ability to edit duplicate customer level Profiles | |
| Segments drop-down menu | Edit Tab Segments | Grants ability to edit within the Segments tab | |
| Device | Enable HA Cluster | Grants ability to configure HA Clustering | |
| Device | Enable HA Active/Standby Pair | Grants ability to configure active/standby HA | |
| Device | Enable HA VRRP Pair | Grants ability to configure VRRP HA | |
| Clear ARP Cache | Remote Clear ARP Cache | Grants ability to clear the ARP cache for a given interface | |
| Cloud Traffic Routing (drop-down menu) | Remote Cloud Traffic Routing | Grants ability to route cloud traffic remotely | |
| DNS/DHCP Service Restart | Remote DNS/DHCP Restart | Grants ability to restart the DNS/DHCP service | |
| Flush Flows | Remote Flush Flows | Grants ability to flush the Flow table, causing user traffic to be re-classified | |
| Flush NAT | Remote Flush NAT | Grants ability to flush the NAT table | |
| LTE Switch SIM Slot
Note: This is for 610-LTE and 710 5G devices only.
|
Remote LTE Switch SIM Slot | Grants ability to activate the SIM Switchover feature. After the test is successful, you can check the status from Monitor > Edges > Overview tab | |
| List Paths | Remote List Paths | Grants ability to view the list of active paths between local WAN links and each peer | |
| List current IKE Child SAs | Remote List current IKE Child SAs | Grants ability to use filters to view the exact Child SAs you want to see | |
| List current IKE SAs | Remote List Current IKE SAs | Grants ability to use filters to view the exact SAs you want to see | |
| MIBs for Edge | Remote MIBS for Edge | Grants ability to dump Edge MIBs | |
| NAT Table Dump | Remote NAT Table Dump | Grants ability to view the contents of the NAT table | |
| Remote Rebalance Hub Cluster | Grants ability to either redistribute Spokes in Hub Cluster or redistribute Spokes excluding this Hub | ||
| Remote Reset SFP Firmware Configuration | Grants ability to reset the SFP Firmware Configuration | ||
| Reset USB Modem | Remote Reset USB Modem | Grants ability to execute the Edge USB modem reset remote action | |
| Scan for Wi-Fi Access Points | Remote Scan for Wi-Fi Access Points | Grants ability to scan the Wi-Fi functionality for the VeloCloud Edge | |
| System Information | Remote System Information | Grants ability to view system information such as system load, recent WAN stability statistics, monitoring services | |
| VPN Test | Remote VPN Test | Grants ability to execute the Edge VPN test remote action | |
| WAN Link Bandwidth Test | Remote WAN link Bandwidth Test | Grants ability to re-test the bandwidth of a WAN link | |
| Shutdown Edge | Grants ability to execute the Edge shutdown remote action | ||
| Update Customer SMS Alert | Grants ability to configure SMS alerts at the customer level | ||
| Top Sources | View Edge Sources | Grants ability to view the Monitor Edge Sources tab | |
| Firewall Logging | View Firewall Logs | Grants ability to view collected firewall logs | |
| Top Sources | View Flow Stats | Grants ability to view collected flow statistics | |
| Firewall Logs | View Profile Firewall Logging | Grants ability to view the details of firewall logs originating from VeloCloud Edges | |
| Firewall | View Stateful Firewall | Grants ability to view collected flow statistics | |
| View Syslog Forwarding | Grants ability to view logs that are forwarded to a configured syslog collector | ||
| Gateways | View Tab Gateway List | Grants ability to view the Gateway list tab | |
| Operator Profiles | View Tab Operator Profile | Grants ability to view and configure settings within the Operator Profile menu tab | |
| Top Sources | View User Identifiable Flow Stats | Grants ability to view potential user identifiable flow source attributes |
Authentication
The Authentication feature allows users to set the authentication modes for Operators and Enterprise users. Users can also view the existing API tokens.
- In the Operator portal, select Administration from the top menu.
- From the left menu, select User Management, then choose the Authentication tab. The following screen appears:
Figure 12. Authentication-Operator 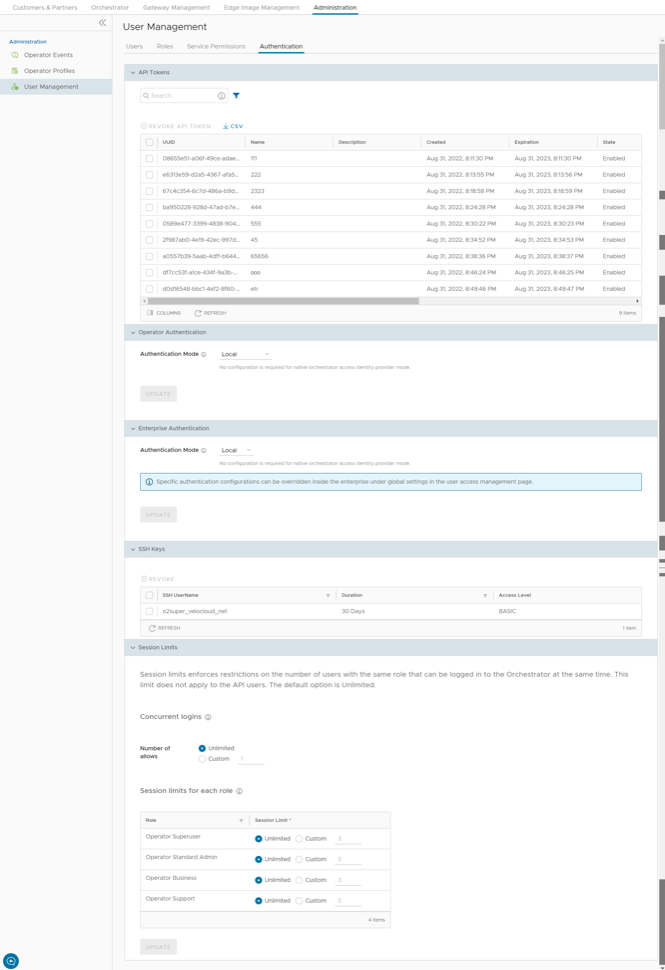
The various sections in the Authentication tab are explained below:
API Tokens
Users can access the Orchestrator APIs using token-based authentication, irrespective of the authentication mode. Operator Administrators with the right permissions can view the API tokens issued to Orchestrator users, including tokens issued to the Partner and Customer users. If required, an Operator Administrator can revoke the API tokens.
By default, the API Tokens are activated. To deactivate them, go to , and set the value of the system property session.options.enableApiTokenAuth to False.
| Option | Description |
|---|---|
| Search | Enter a search term to search for the matching text across the table. Use the advanced search option to refine the search results. |
| Revoke API Token | Select the token and select this option to revoke it. Only an Operator Super User or the user associated with an API token can revoke the token. |
| CSV | Select this option to download the complete list of API tokens in a .csv file format. |
| Columns | Selects the columns to be displayed or hidden on the page. |
| Refresh | Select to refresh the page to display the most current data. |
An Operator Superuser can manage the API tokens for Enterprise users. For information on creating and downloading API tokens, see API Tokens.
Operator Authentication/Enterprise Authentication
- Local: This is the default option. Starting from the release 7.0.0, the Local authentication mode introduces a more secure two-factor authentication option: TOTP.
Note: Activating TOTP prevents users from switching back to the SMS option. For more information, see Time-Based One Time Passcode (TOTP).
- Single Sign-On: Operator users with Superuser permission can set up and configure Single Sign On (SSO) in Orchestrator. Single Sign-On (SSO) is a session and user authentication service that allows users to log in to multiple applications and websites with one set of credentials. Integrating an SSO service with Orchestrator enables the Orchestrator to authenticate users from an OpenID Connect (OIDC)-based Identity Providers (IdPs).
Note: Beginning in Release 6.1.0, the Orchestrator supports multiple IdPs, so a Partner on their Dedicated Orchestrator can configure an IdP independently of the VeloCloud SD-WAN TechOPS team. As a result, the Partner with Operator-level access can log in to their Dedicated Orchestrator using an integrated Single Sign-On service.Pre-requisites:
- Users must have the Operator Superuser permission.
- Before setting up the SSO authentication in Orchestrator, users must set up Users, Service Permissions, and OpenID connect (OIDC) application for Orchestrator in the preferred identity provider’s website.
Note:- The Single Sign-On mode is available only for Operator Authentication in the Operator portal.
- Token-based authentication is deactivated for SSO users.
To enable Single Sign On (SSO) for Orchestrator, users must enter the Orchestrator application details into the Identity Provider (IdP). See the following topics in the Arista VeloCloud SASE Global Settings Guide for step-by-step instructions to configure the following supported IdPs:- Azure AD
- Okta
- OneLogin
- PingIdentity
The Operator Authentication screen for Single Sign-On with Optional Multiple IdPs
With the new Multiple IdP feature in Release 6.1.0, the Single Sign-On screen changes from displaying one configuration screen for one Single Sign On account to displaying a table where multiple IdPs can be configured and tracked.
Figure 13. Configure Operator Authentication 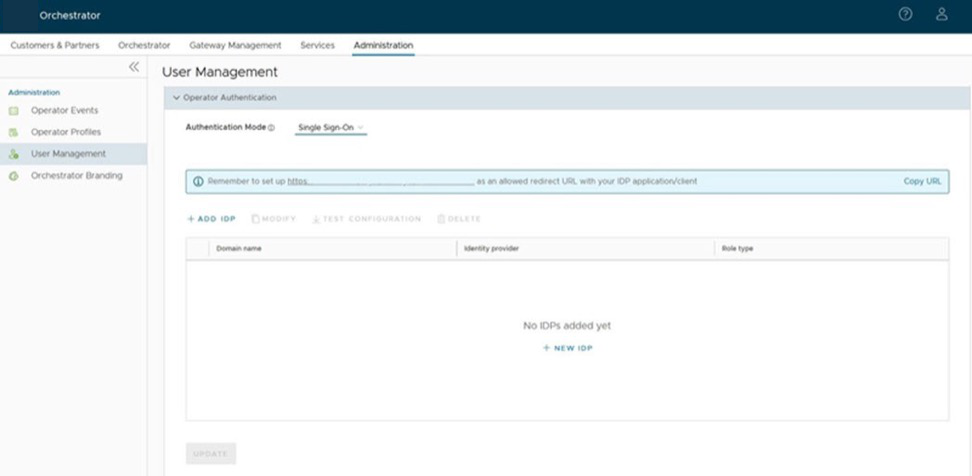
With this new format, a Superuser Operator must select + NEW IDP to add an IdP. Only then will the Single Sign-On Setup screen appear for configuring that particular IdP.
The workflow for configuring a Single Sign-On changes slightly with a user seeing two screens.
Figure 14. Single Sign-On Setup 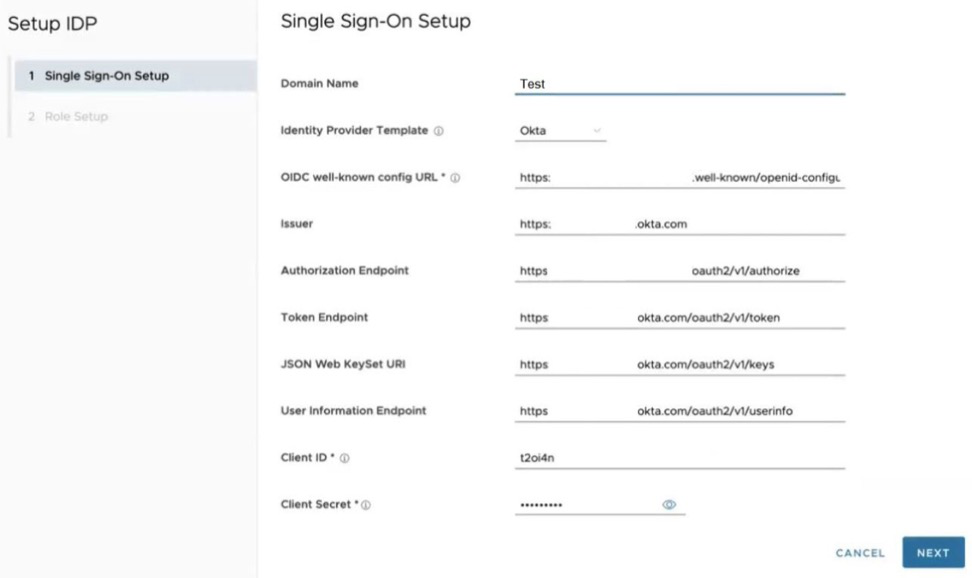
On the Single Sign-On Setup screen, configure the following options:
Table 18. Single Sign-On Setup - Options and Descriptions Option Description Identity Provider Template From the drop-down menu, select your preferred Identity Provider (IdP) configured for Single Sign On. This populates fields specific to your IdP. OIDC well-known config URL Enter the OpenID Connect (OIDC) configuration URL for your IdP. For example, the URL format for Okta will be: https://{oauth-provider-url}/.well-known/openid-configuration. Issuer This field is auto-populated based on your selected IdP. Authorization Endpoint This field is auto-populated based on your selected IdP. Token Endpoint This field is auto-populated based on your selected IdP. JSON Web KeySet URI This field is auto-populated based on your selected IdP. User Information Endpoint This field is auto-populated based on your selected IdP. Client ID Enter the client identifier provided by your IdP. Client Secret Enter the client secret code provided by your IdP, that is used by the client to exchange an authorization code for a token. Scopes This field is auto-populated based on your selected IdP. Once the Single Sign-On Setup is complete, the Operator needs to configure the Role Setup section.
Figure 15. Role Setup-Use Default Role 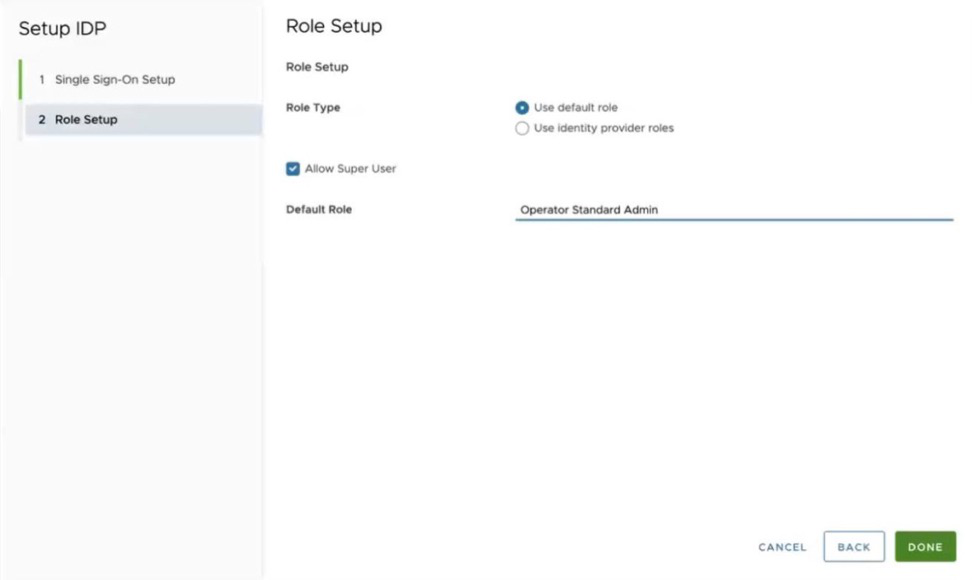
Figure 16. Role Setup-Use Identity Provider Roles (Default) 
On the Role Setup screen, configure the following options.
Table 19. Role Setup - Options and Descriptions Option Description Role Type Select one of the following two options: - Use default role
- Use identity provider roles
Allow Super User This option is for the Partner adding a second IdP. Unchecked this option as a Partner cannot have a Super User role on a Dedicated Orchestrator managed by Arista VeloCloud. In addition, remove the Super User role on the Use identity provider roles screen. Role Attribute Enter the name of the attribute set in the IdP to return roles. Operator Role Map Map the IdP-provided roles to each of the Operator user roles. CAUTION: If configuring a second IdP for a Partner on an Orchestrator hosted by VeloCloud (Dedicated Orchestrator), the configuration must not include an Operator Superuser role.Role Setup for a Partner-added second IdP where the Allow Super User checkbox is unchecked: This screen also shows that if users enter Operator Superuser as a default role, the Orchestrator displays an error when that box is unchecked. The Default Role should be Operator Standard Admin for Partner Operator users.Figure 17. Allow Super User 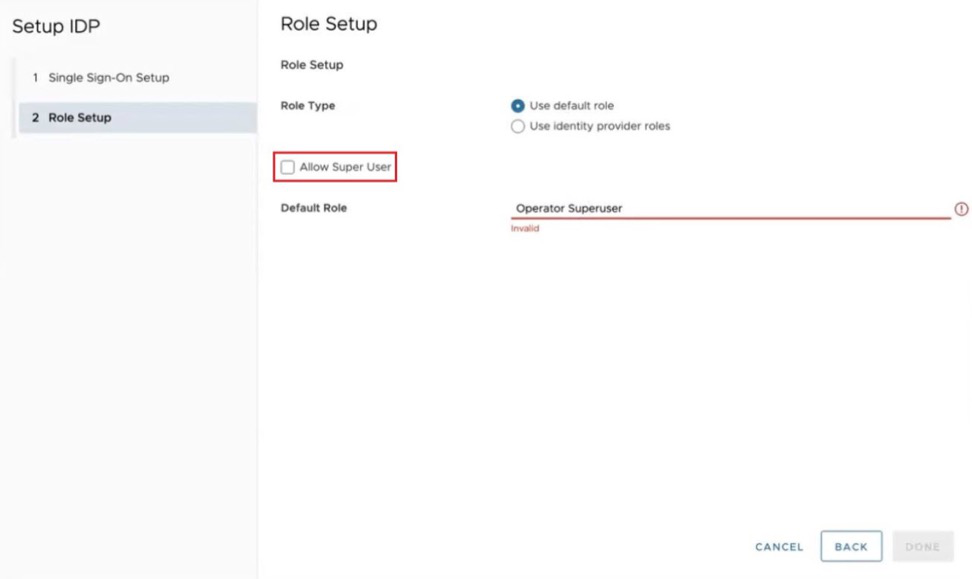 Role Setup for a Partner-added second IdP, where the Operator Superuser role must be removed.
Figure 18. Remove Operator Superuser Role 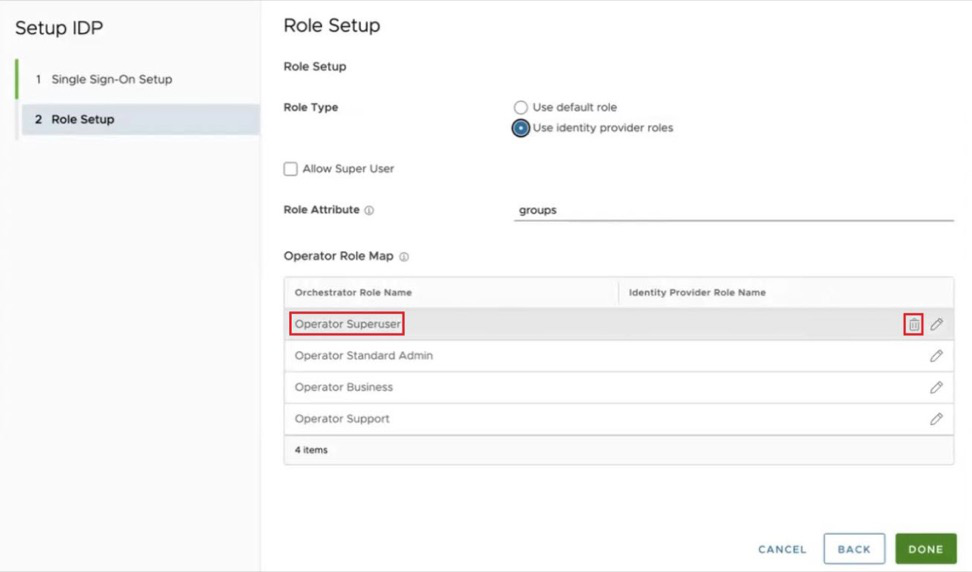 The Operator user can also test the configuration for a particular Single Sign-On/IdP configuration, by selecting the Test Configuration option
Figure 19. Test Configuration 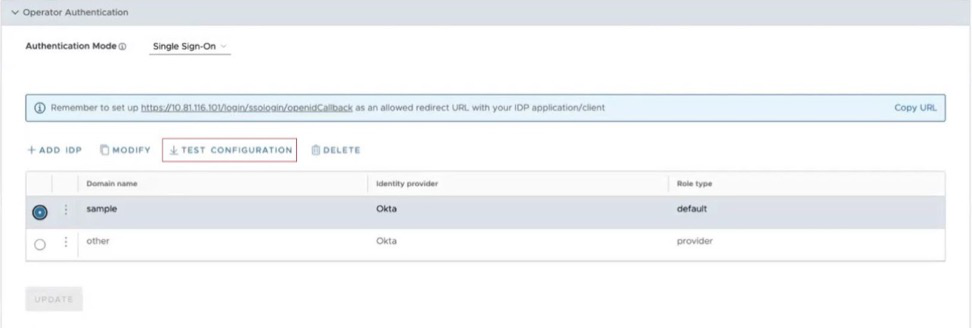 Successful SSO Configuration Test: The "Partial Success" message only indicates this configuration does not have a refresh token configured. It is still a valid configuration.
Figure 20. SSO Configuration Test 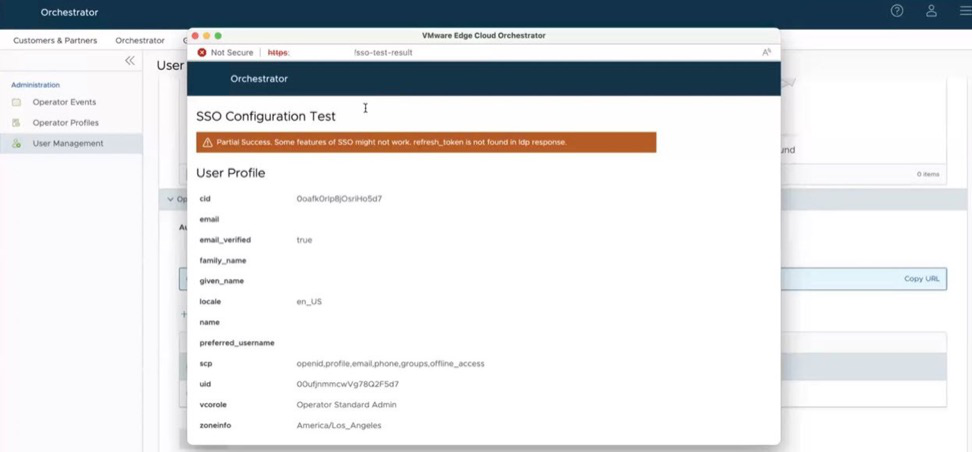
Logging in as a Partner with an Operator Role using your own IdP: A partner with an IdP configured can login to their Orchestrator by pulling up a browser and entering in the usual URL except they would add /operator to that URL. This pulls up the Operator login screen and includes a button SIGN IN WITH YOUR IDENTITY PROVIDER. On an Orchestrator with just one SSO IdP configured, selecting that button logs them in assuming the Operator user has the proper IdP credentials.
The Operator login screen has/operatorin the URL and includes the 'Sign In With Your Identity Provider' button. Select this button to move on to the SSO screen.Figure 21. Orchestrator Operator Login Screen 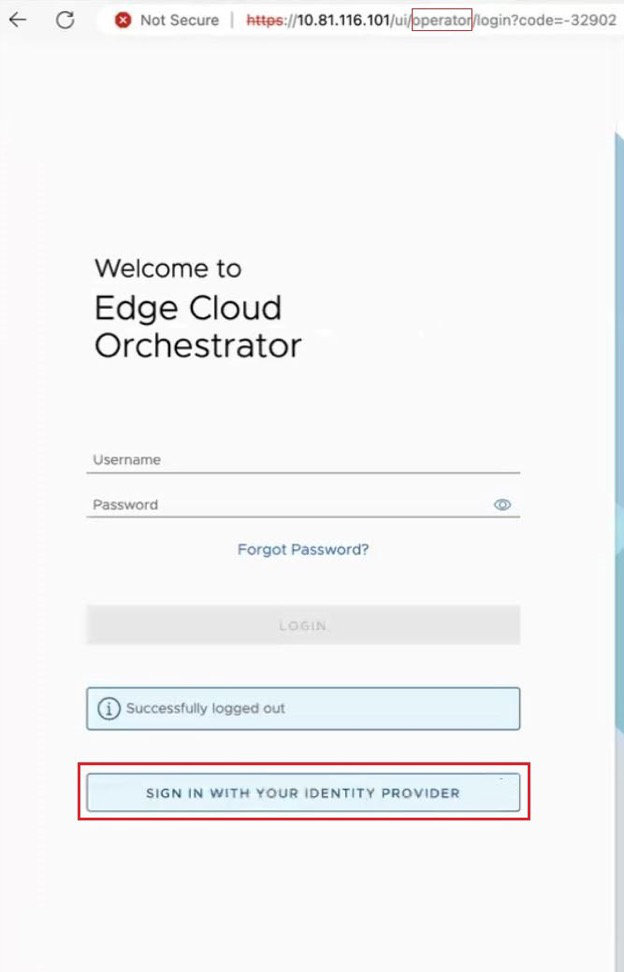
On an Orchestrator with multiple IdPs configured, selecting that button takes users to a new screen for SSO sign-in. This is where the Partner Operator would enter in the Domain Name configured for the IdP. Once entered, select Sign In to log into the Orchestrator.
Where there are multiple IdPs configured, all users including the Partner are moved to this screen. The URL includes the text stringdomainFinder, but where it reads Organization Domain, enter your Domain Name for the IdP as configured earlier.Figure 22. Sign In Using Identity Provider 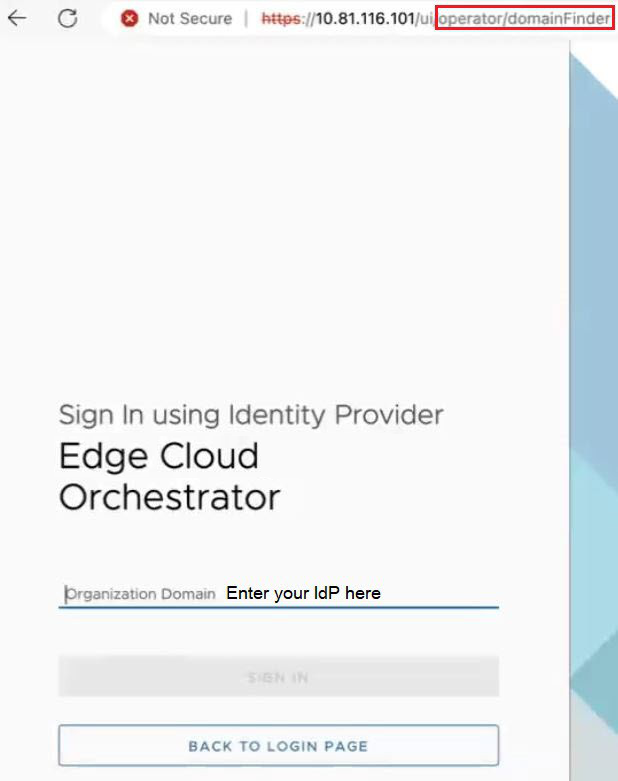 Note: An easier method for a Partner using their own IdP is to bookmark the following their Orchestrator URL with this format: https://orchestrator hostname or IP address/ui/operator/login?domain=IdP Domain Name. This automatically takes users to the login screen and pre-populate the IdP Domain Name. For example for an Orchestrator with hostname vco11-usor1.velocloud.net where the IdP Domain Name is Acme, the Partner Operator could bookmark: https://vco11-usor1.velocloud.net/ui/operator/login?domain=Acme and when they selected that bookmark, the browser would still go to the Operator login screen. The difference is that now when they select SIGN IN WITH YOUR IDENTITY PROVIDER, the user is immediately logged in the Orchestrator with no extra step, as the domain is already provided in the URL.
For all configurations of an IdP, select Update to save the entered values. The SSO authentication setup is complete in the SD-WAN Orchestrator.
- RADIUS: Remote Authentication Dial-In User Service (RADIUS) is a client-server protocol that enables remote access servers to communicate with a central server. RADIUS authentication provides a centralized management for users. Configure the Orchestrator Authentication in RADIUS mode, so that the Operator and Enterprise Customers log into the portals using the RADIUS servers.
Note: Copy the attributes required by the Radius server from the following directory:
/usr/share/node/node_modules/velocloud/lib/radius/raddb/dictionary.velocloud. This file contains the necessary attributes, vendor name, and vendor ID.To configure the Orchestrator Authentication in RADIUS mode, enter appropriate details in the following fields:
Figure 23. Configure Radius Authentication Mode 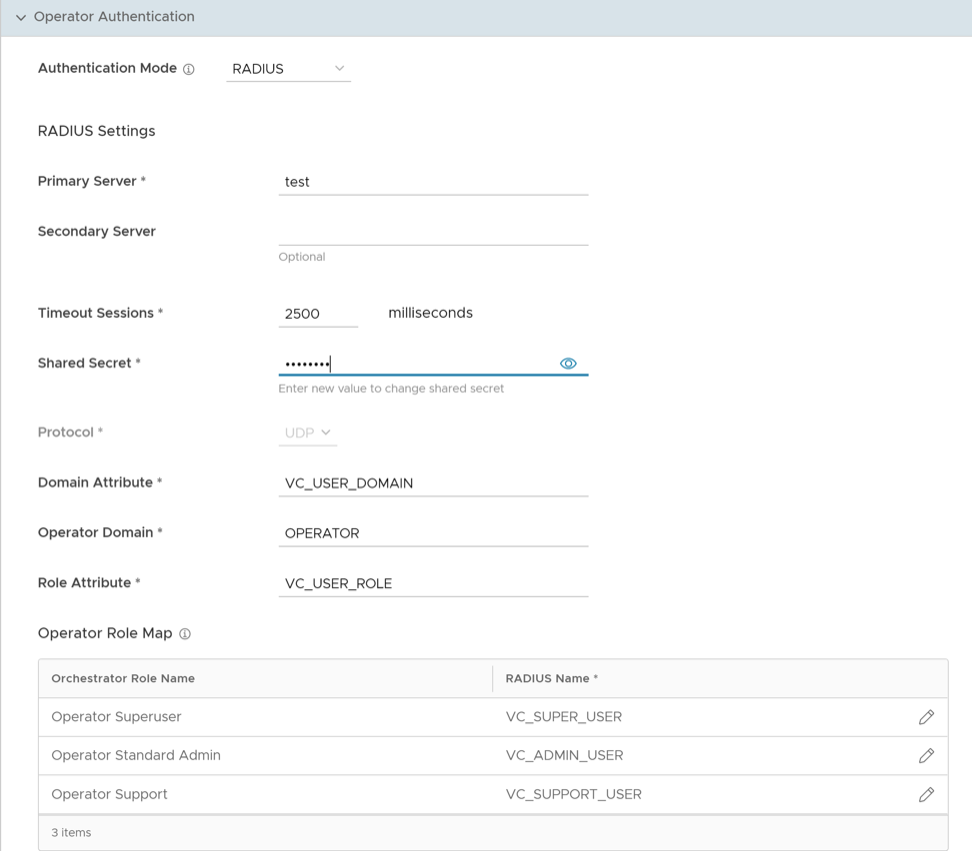
- Edit the Protocol value only in the System Properties. Navigate to , and edit the protocol in the Value field of the system property
vco.operator.authentication.radius. - The Operator Domain field is available only for Operators.
- In the Operator Role Map / Enterprise Role Map section, map the RADIUS server attributes to each of the Operator or Enterprise user roles. This role mapping is used to determine the role users would be assigned when they log in to the Orchestrator using the RADIUS server for the first time.
- Select Update to save the entered values.
- Edit the Protocol value only in the System Properties. Navigate to , and edit the protocol in the Value field of the system property
SSH Keys
Create only one SSH Key per user. Select the User Information icon located at the top right of the screen, then choose to create an SSH Key.
Operators can also revoke an SSH Key.
Select the Refresh option to refresh the section to display the most current data.
For additional information, see Configure User Account Details.
Session Limits
session.options.enableSessionTracking to True.| Option | Description |
|---|---|
| Concurrent logins | Allows setting a limit on concurrent logins per user. By default, Unlimited is selected, indicating that unlimited concurrent logins are allowed for the user. |
| Session limits for each role | Allows setting a limit on the number of concurrent sessions based on user role. By default, Unlimited is selected, indicating that unlimited sessions are allowed for the role.
Note: The roles that are already created by the Operator on the Roles tab are displayed in this section.
|
Select Update to save the selected values.
Time-Based One Time Passcode (TOTP)
Release 7.0.0 introduces a new feature, the Time-based One-Time Passcode (TOTP) mechanism, for Two Factor Authentication (2FA). This feature replaces the current text-based 2FA mechanism (SMS) and mandates all future 2FA to use TOTP. Arista recommends selecting the TOTP authentication because it is more secure than the SMS-based authentication.
When a user enables TOTP under , the Orchestrator prompts all users who log in to either enroll (if not already enrolled) or provide the TOTP to complete authentication.
The procedure below explains the enrollment flow.
- After enabling the TOTP, re-login to the VeloCloud Orchestrator.
The following screen appears if the user has not completed the TOTP enrollment.
Figure 24. TOTP Enrollment 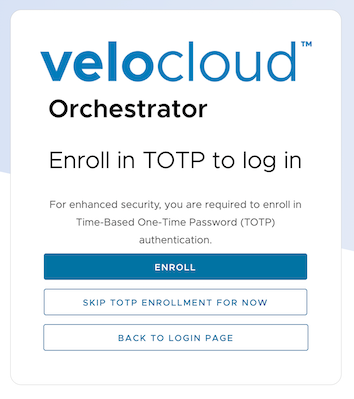
- Enroll: Perform the below steps.
- Select Verify.
Figure 25. Setup the Authenticator App 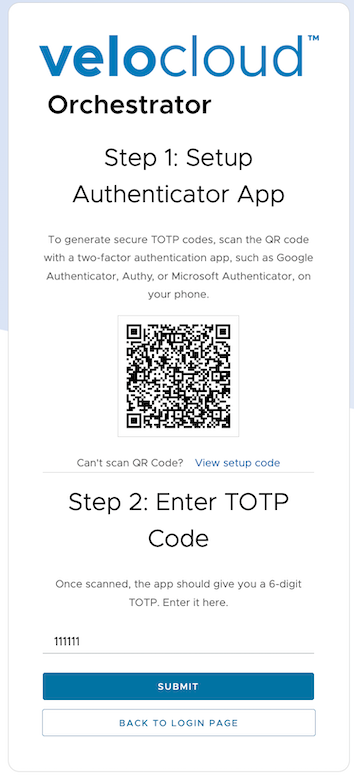
- Enter the new TOTP generated on the authenticator application, and then select Submit.
Figure 26. Enter TOTP Details 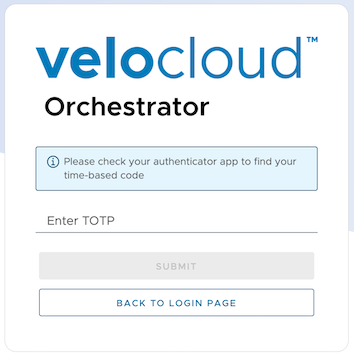 Note: The Authenticator application generates a new TOTP every 30 seconds.
- Select Verify.