Advanced System Settings
Advanced system settings are system-level operations typically performed from the SYSTEM tab in CV-CUE. The settings apply to the entire network.
This chapter contains the following topics:
- License Settings for On-Premises Users
- Language Settings
- High Availability Status
- System Status
- Cluster Configurations
- NTP Configuration
- Upgrade Server
- Base URLs for APIs
- Import Devices
- Password Policy
- System Backup and Restore
- Hotspot SSIDs
- Vulnerable SSIDs
- Automatic Frequency Coordination
- Allow Arista to Upgrade Access Points
- Certificate Management
- Configuring Proxy for On-Premise Deployments
License Settings for On-Premises Users
You can apply licenses from CV-CUE for on-premises users. After you upload the license file, you need to log out and then log in again for the license to be effective.
- Got to SYSTEM > Advanced Settings > License.
- (Optional) Click Download License to download the existing license details in a text file format.
- Click Select License File and select the license file from your local or shared drive. Licences must be in the json file format.
- Apply the license.
- When prompted, log out and then log in again to successfully activate the license.
Language Settings
You can define the system language that is used by CV-CUE as a mode of communication. CV-CUE uses the system language to send default messages from the application. For example, alerts and notifications are communicated using the system language. The default system language is English.
- Got to
- Select the system language and the SSID encoding language.
- Save the changes.
High Availability Status
If you have enabled the High Availability (HA) service, you can see the HA status and configuration details of the servers. For example, you can see whether the HA service is running or stopped or disabled. If you have not configured the HA service, you will see the status as Disabled. This is a read-only page; you can not configure anything on this page. Configure the HA service using the CLI.
To see the HA status from CV-CUE, go to
System Status
You can see the status of the Wi-Fi server and other system-related information from You can also start and stop system services from the System Status page.
- Server ID
- Server Access URL
- Managed Device Communication Port
- Maximum Managed Devices Allowed (Physical Devices)
- Allowed Mode of Operation — Indicates whether Wi-Fi or WIPS or both services are enabled on the server.
- Software Version — Indicates the software version of CV-CUE
- Software Build — Indicates the software build version of CV-CUE
- Operating System
- Appliance Model
- IPv4 — Indicates the IPv4 address, if available
- IPv6 — Indicates the IPv4 address, if available
Cluster Configurations
A server cluster or a cluster is a group of CV-CUE. A cluster comprises a parent CV-CUE (parent server) and one or more child CV-CUE (child servers). A cluster is created to manage multiple servers using a single server. This managing server is called the parent server and the servers that are managed from the parent server are called the child servers. A server can be part of only one cluster at any given time. A child server cannot be a parent of any other server in the cluster. Creating a cluster helps in managing multiple servers together. For example, you can create a policy and implement it across different servers using a cluster.
- Setup and Manage Server Cluster - For details on setting up server clusters
- Server Config Shell Commands- For details on server cluster commands.
View Cluster Configurations
- Go to
- Click the Cluster Configuration tile. All the existing servers in a cluster are displayed.
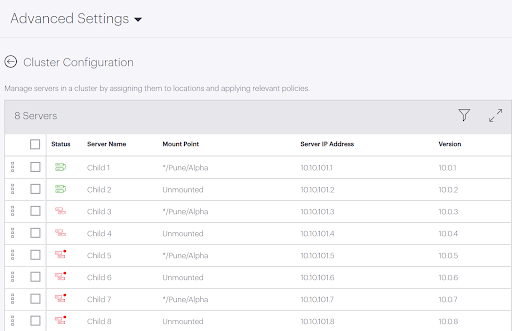
| Field | Description | ||||||||
|---|---|---|---|---|---|---|---|---|---|
| Status | The status of the
server. The icons mean the following:
|
||||||||
| Server Name | Name of the CV-CUE instance | ||||||||
| Mount Point | Mount location of CV-CUE | ||||||||
| Server IP Address | IP Address of CV-CUE | ||||||||
| Version | Software Version number of CV-CUE |


- Mount or Unmount the server
- Change mount location
- Copy Policies
- Fix version mismatch
- Fix License
Mount or Unmount the Child Server
To view the server cluster data or to copy the parent server’s policy, you need to mount the individual child servers on the parent server location tree. Before you mount the child server, ensure that you have applied a valid license to it and it has the same build version as the parent server.
- Select the child server. Click Mount from the three-dot menu next to it.
- Select the mount location and click Save.
The child server is mounted on the selected location.
Note: When you mount a child server, the parent server policies are not inherited by the child server automatically. The child server continues to use its existing policies. You need to explicitly apply the parent server’s policy.
Similarly, you can umnount the child server from the parent server by clicking Unmountfrom the three-dot menu next to it.
Change the Mount Point of the Child Server
You can change the mount point of a child server and mount it to another location. Before you change the mount point of a server, ensure that a valid license is applied to it.
- Select the child server. Click Change Mount from the three-dot menu next to it. The Change Mount Point pane appears.
- Select the new mount point and click Save.
Copy Policies
- Account Suspension
- Password Policy
- Language Setting
- Audit Logs
- Auto Deletion
- SMTP Configuration
- RADIUS Configuration
- Server Upgrade
- Certificate
- LDAP Configuration
- AP Server Key (Device Communication Key)
- ArcSight Integration
- Banned APs
- Banned Clients
- License
- Reports Look and Feel
- SysLog Integration
- SNMP
You can copy a single policy or copy multiple policies at once.
- Navigate to
- Click the Cluster Configuration tile. Alternatively, you can also navigate to the particular policy setting that you want to copy.
- Click Copy Policies.
- The Copy Policy pane is displayed. Select your To and From Servers.
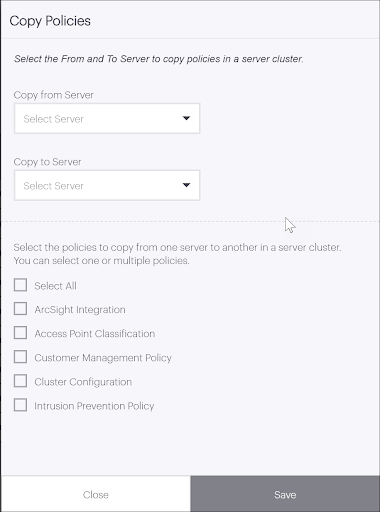
- Select the policies to copy.
- Click Save. The Confirm Copy Policy dialog box appears.
- Click Confirm.
Fix Mismatched Version of the Child Server
The parent server and the child servers in a cluster must have the same software versions. If there is a mismatch between the versions of the parent server and the child server, you need to upgrade your child server to match the version of the parent server.
- Click Fix Version Mismatch from the three-dot menu next to it. The fix version mismatch pane opens.
- Upgrade your child server. For more information on upgrading your server, refer to Upgrade Server.
Fix Invalid License of the Child Server
The child servers in a cluster must have a valid license. In case of a missing license or an expired license, you need to fix the license of the child server.
Note: This feature is available for on-premise setup only.
- Click Fix License from the three-dot menu next to it. The fix license pane opens.
- Select the appropriate license file from your local storage and click Apply License.
NTP Configuration
- Go to
- Click the Enable NTP check box.
- Add the NTP servers. You must add at least one NTP server.
- Click Check Drift to check the time drift between NTP servers.
- Sync and save the settings
Upgrade Server
Prerequisites for Upgrade
- TCP Port 8080 of the server is accessible from your computer.
- Popups are not blocked.
Upgrading your Server
Before you start, ensure that you have downloaded the upgrade bundle to your computer. Also note that you cannot abort or cancel the server upgrade process once the server upgrade is in progress. The upgrade process continues even if you close the browser window.
- Go to The Upgrade Server screen displays the current build details.
- Click Check for Upgrade to check if upgrades are available. You can download the upgrade bundle from Arista’s support website.
- (Optional) Select the Check Server upgrade availability at each login checkbox to check for available upgrades on every login.
- Click Select File and select the upgrade bundle from your local storage.
- Click Check Compatibility and verify that the upgrade bundle is compatible with the server.
- Click Upload and Upgrade. The Confirm Upgrade screen displays the current build and upgrade build details.
- Click Confirm to initiate the server upgrade. Once the upload is complete, the server upgrade starts automatically.
- Refresh your browser and log in to CV-CUE after the server is upgraded.
Parent-Child or Multi Server Setup
If you have a Parent-Child or a Multiple Server setup and you are upgrading a child server, only the child server is inaccessible while it is upgrading. You will be redirected to the dashboard of the parent server and you can access the parent server.
If you are upgrading the parent server, wait for a few minutes for the server to reboot and log in again to access the server. While the parent server is upgrading, you can access the child server(s).
Base URLs for APIs
Since the Wireless Manager (WM) UI is deprecated, you canot access the WM directly. However, you can view the WM host URL in CV-CUE and use the URL to test APIs offered by CV-CUE or create your own applications. Similarly, if you use the Guest Manager sevices, you can also view the URL for guest analytics (Guest Manager) from CV-CUE.
To view the base URLs, navigate to .
The URLs for both guest analytics, and configuration and management are static links. For more information on availale APIs, see the API Help Portal. The URL for specific end point is available in the API Help Portal. The base URL is available in CV-CUE. For example, if the API endpoint is client, then the URL is <CV-CUE_base_url>/wifi/api/clients.
Import Devices
You can import an authorized AP List, and an authorized or unauthorized client list in CV-CUE. The Import Device feature is an efficient alternative to manual movement and classification of these devices.
You must have administrator privileges to import a device list. Import devices is a location specific feature and cannot be inherited from the parent location folder.
You can import Authorized AP List, Rogue AP List, Authorized Client List, Guest Client List, and Rogue Client List.
- Go to .
- Click the Import Device tile.
- Download the CSV Template.
- In the downloaded CSV file, delete the sample data and enter your device list by providing a comma-separated list of MAC Address, IP Address, and Device Name. Save the CSV file.
- In the UI, select the Device Type.
- Click Select File and select your saved file.
- Click Import.
Password Policy
For on-premises deployments, you can configure the minimum requirements for a password in the Password Policy tab. The password settings apply to all user roles - Superuser, Administrator, Operator, and Viewer. If you change the password settings, older passwords are not affected. Only those passwords that are created after you change the settings are subject to the new password settings. This setting applies only to local authentication and does not apply to LDAP and RADIUS authentication.
- Go to
- Specify the number of characters required for the password. Minimum number of characters is 4, maximum number of characters is 15.
- Select the check boxes if you want numeric and special characters respectively in the password.
- Save the changes.
System Backup and Restore
System Backup
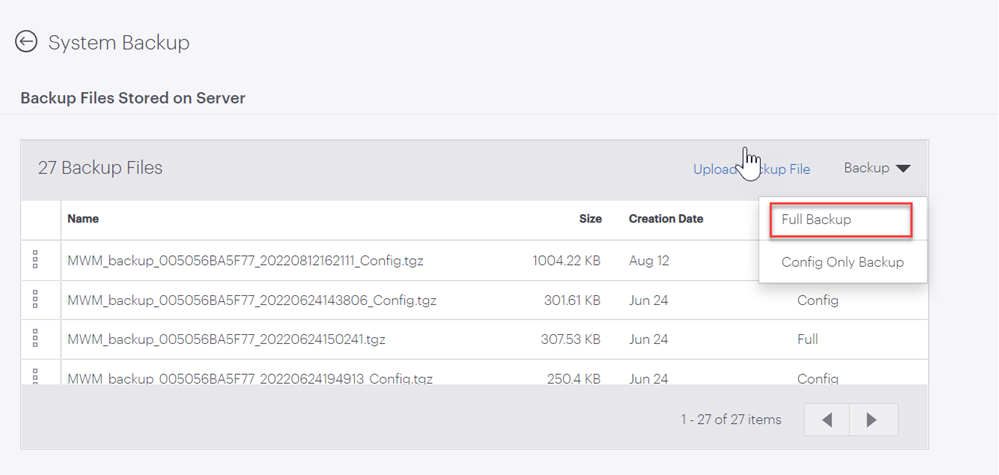
CV-CUE provides two types of backup — full backup and configuration-only backup. The full backup takes a complete backup of the configuration and data. In a configuration-only backup, data related to events, performance, analytics, etc are not backed up.
When you perform a system backup, a TGZ file and an MD5 file are generated. Backup is taken in the form of a TGZ file and the MD5 file is used to verify the data integrity.
Perform a Backup
- Go to
- Click the System Backup tile.
- Click Full Backup or Config Only Backup from the Backup drop-down menu.
- Provide a custom file name and click Continue.
Renaming a Backup File
- Click the System Backup tile.
- Click Rename from the more menu next to the backup file entry in the Backup Files table.
- Provide the new file name and click Ok.
System Restore
If you have taken a backup of the Arista server database, you can restore the Arista server to a last known working state, in the case of a server failure. You can restore the database or configuration files from a list of backup files available on the server or you can upload a backup file and use it to restore the server.
Before you perform the restore, ensure that the TGZ and MD5 files are present in the same folder.
Restore Database from Available Backups
- Go to
- Click the System Backup tile.
- Click the more menu next to the backup file entry in the Backup Files table.
- Click Restore Backup.
- In the pop-up, select Restore Licenses if you want to restore the licenses of the backup file as well.
- Click OK.
Restore Database by Uploading a Restore Bundle
You can upload a restore bundle from an external location to restore the database on the server. The uploaded file is validated before it is used to restore the database.
- Go to
- Click the System Backup tile.
- Click Upload Backup Files.
- Select your .TGZ and .MD5 files and click Save.
Hotspot SSIDs
APs with Hotspot SSIDs can be present in the neighborhood. When an enterprise client probes for common Hotspot SSIDs, it is at risk of connecting to the neighborhood AP, without the user knowing about it. You can classify such SSIDs with a higher chance of undesirable connections as Hotspot SSIDs.
To add Hotspot SSIDs,
- Go to
- Click Hotspot SSIDs.
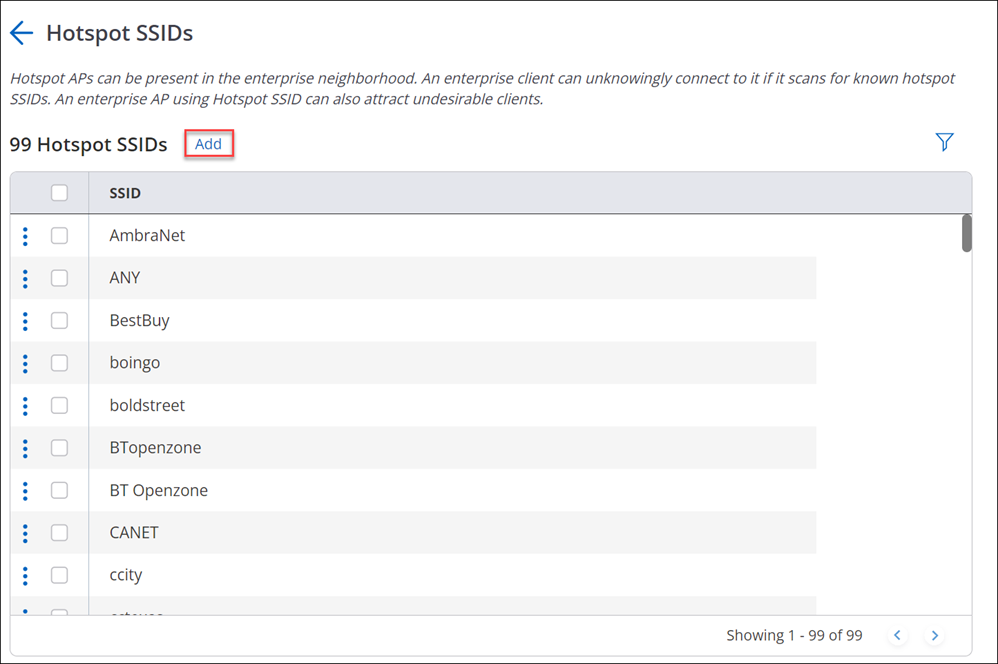
- Click Add.
- Enter your SSID name and click Ok.
You can edit, delete, and search Hotspot SSIDs from the created list. You can also copy the list of Vulnerable SSIDs across servers present in the same cluster, by using the Copy Policy feature.
Vulnerable SSIDs
Access Points (APs) have default SSIDs. Many users do not change these SSIDs before deploying the APs. Therefore, it is very likely that APs using default SSIDs are present in the enterprise neighborhood. If an enterprise client probes for default SSIDs, it is at risk of connecting to the neighborhood AP, without the user knowing about it. Such SSIDs with a higher risk of undesirable connections are classified as Vulnerable SSIDs.
To add Vulnerable SSIDs,
- Go to
- Click Vulnerable SSIDs.
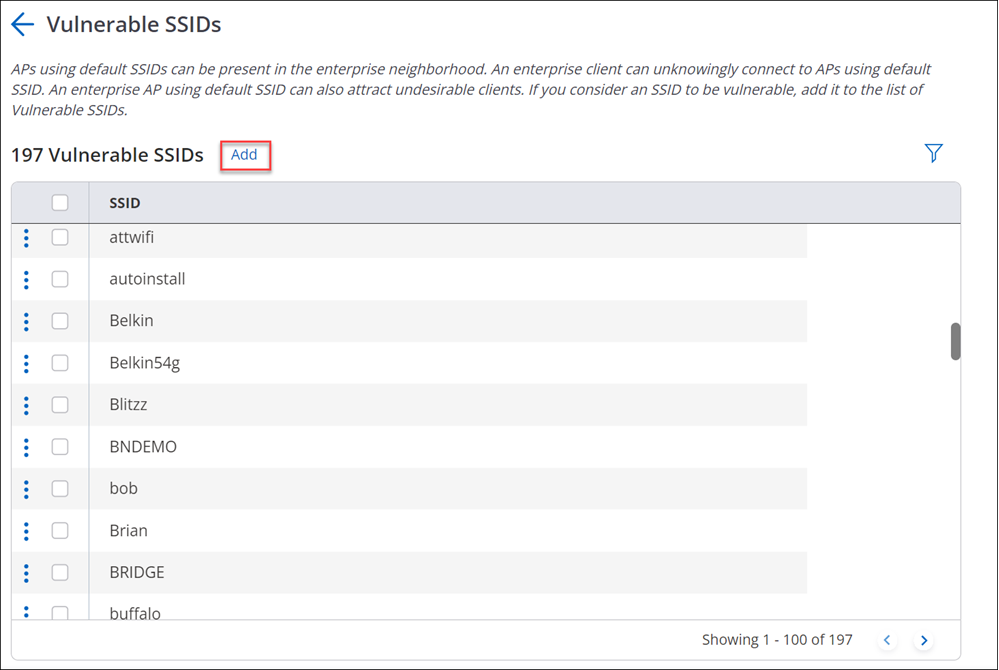
- Click Add.
- Enter your SSID name and click Ok.
You can edit, delete, and search Vulnerable SSIDs from the created list. You can also copy the list of Vulnerable SSIDs across servers present in the same cluster, by using the Copy Policy feature.
Automatic Frequency Coordination
The Federal Communications Commission (FCC) mandates that operations in the 6 GHz band require all Access Points (APs) operating at standard power to communicate their geolocation to an Automatic Frequency Coordination (AFC) system. The AFC system evaluates this geolocation data to ensure compliance with regulatory requirements by providing the APs with the permissible frequencies and the maximum allowable transmission power for each frequency range at their specific locations. This process helps avoid interference with licensed users operating in the 6 GHz spectrum, such as satellite and fixed wireless systems.
AFC is mandatory for all outdoor and external antenna model APs.
Currently, Arista APs communicate with the AFC system using the proxy mode through CV-CUE.
Configuring AFC in CV-CUE
Arista APs support AFC in proxy mode using the Qualcomm AFC system to retrieve the list of permissible frequencies and the maximum permissible power in each frequency range at their locations. The query timeout parameter specifies how long CV-CUE waits for a response from the Qualcomm AFC system before sending another request.
- Navigate to System > Advanced Settings. Click the Automatic Frequency Coordination (AFC) tab.
- Select the AFC Server Endpoint. Currently, CV-CUE only supports Qualcomm.
- Select the Query Timeout duration.
- Click Save.
For on-prem deployments, you also need to set the value of afc_proxy_endpoint as follows using the set config parameters CLI command:
- Enter parameter name: afc_proxy_endpoint
- Enter parameter value:www.cv-prod-us-central1-b.arista.io:443
- Enter configid: 5
Once the config parameters are set, ensure that you restart the server using set server CLI command.
[config]$ set config parameter
Sets a configuration parameter directly in the database. You must know the exact
name, ID and value of the database parameter to use this command.

Enter parameter name: afc_proxy_endpoint
Enter parameter value: www.cv-prod-us-central1-b.arista.io:443
Enter configid: 5

Current value of parameter [afc_proxy_endpoint] is [www.cv-play.corp.arista.io:443]

Do you want to update [afc_proxy_endpoint] to [www.cv-prod-us-central1-b.arista.io:443] in configid [5]? (y/n):y
Value of parameter [afc_proxy_endpoint] has been updated successfully.
Note: Ensure that the endpoint is reachable by CV-CUE.
Enabling AFC for an AP
- Navigate to CONFIGURE > Device > Access Points.
- Under the General tab, select Automatic Frequency Coordination.
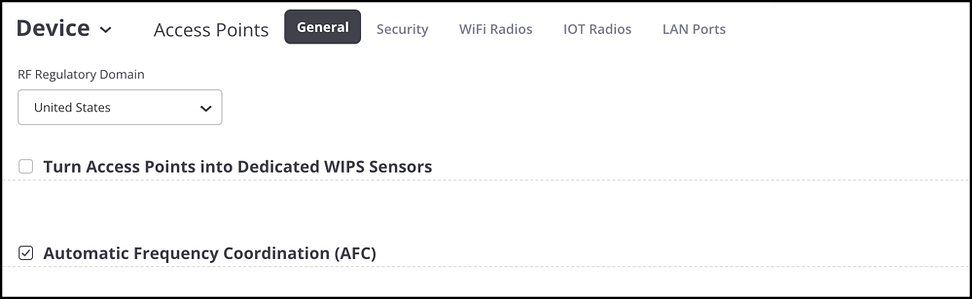
- Click Save.
This is a location-specific setting. After you have enabled it for your location, navigate to the device listing page to set the height of your AP.
Note: AFC feature is not available for APs deployed in staging environment. Move the AP from staging to your required location.
Note: If you disable AFC, the AP stops operating in the 6 GHz band.
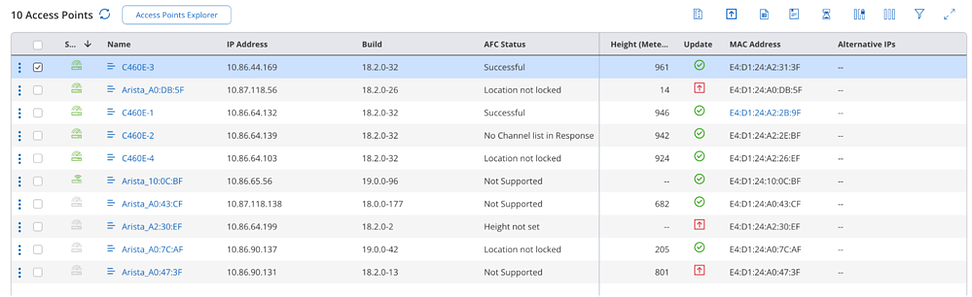
Setting the height of APs
Once you have enabled AFC, ensure that you set the height of the APs. If the AP is deployed with external antenna connectors, then enter the height of the antenna.
Note: Only a Certified Professional Installer can configure AP’s height information.
You can set the height individually for each AP or via a bulk update using a csv file.
- Navigate to MONITOR > WiFi > APs.
- Right-click the AP and click Customize > Height Above Mean Sea Level.
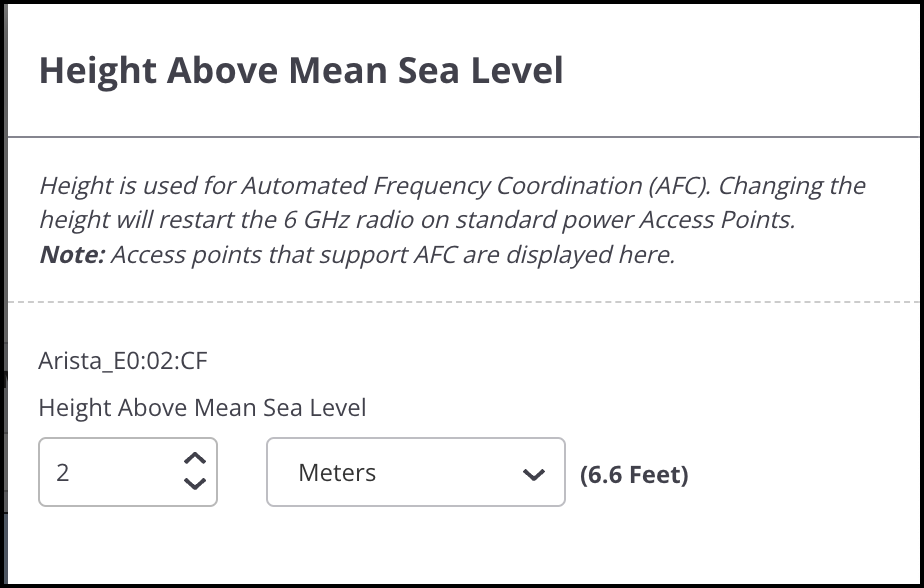
- Set the Height Above Mean Sea Level and click Save.
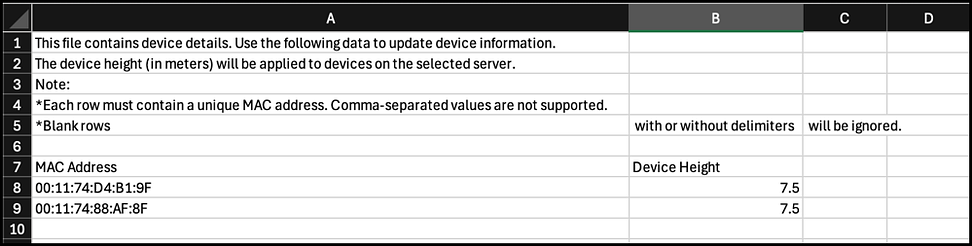
Setting the height of APs in bulk
From the AP listing page, click AFC Height. Click Upload and select a CSV containing the APs' MAC Addresses and Heights.
Once the height is set successfully, it takes a few minutes for the AP to bring up the 6 GHz radio and send an AFC request to the AFC System. You can view the AFC Logs to view AFC Request and Response.
Note: Height of the AP resets if you change the AP location.
AFC Communication Flow
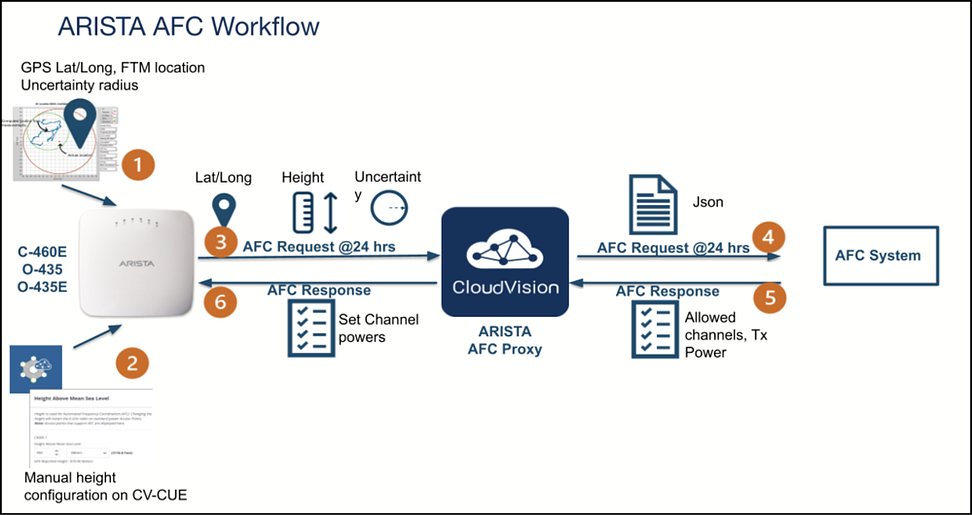
Once you set the AP height and enable Automatic Frequency Coordination (AFC), the AP sends a request to the AFC system via Arista’s cloud-based AFC proxy.
- Every 24 hours,
- Whenever the AP powers on, and
- Whenever the AP’s height or geo-location change
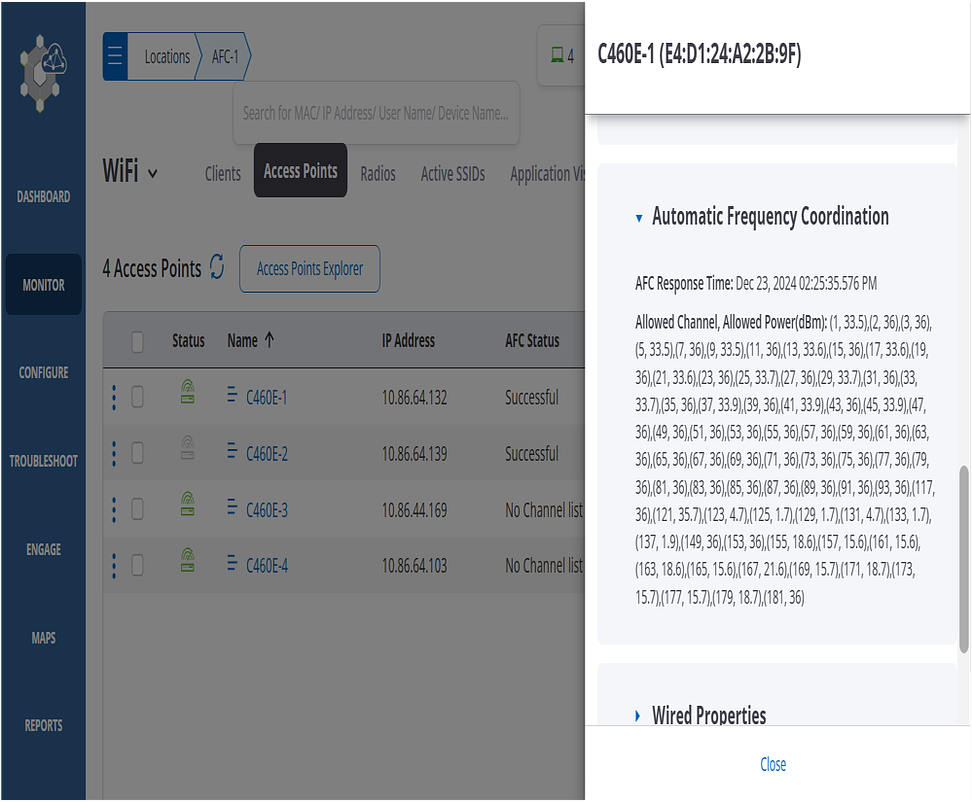
The AFC system evaluates the request and provides a list of permissible channels and power levels. The AP sets the allowed transmit power for all the channels received in the AFC response.
The channels received in the AFC response take precedence over the configured channel list. That is, the AP can only be configured on a channel that is present in the AFC response. When the AFC response expires, the AP automatically initiates a new request. If no response is received, the AP continues using the channels from the last successful AFC response until 11:59 PM on the same day (grace period). Thereafter, the AP will shut down the 6 GHz radio if it doesn’t receive AFC response during the grace period. This mechanism ensures continuous operation while adhering to AFC policies, even during temporary communication disruptions with the AFC system.
AP AFC Status
Troubleshooting AFC
You can view and download AFC logs to troubleshoot AFC issues.
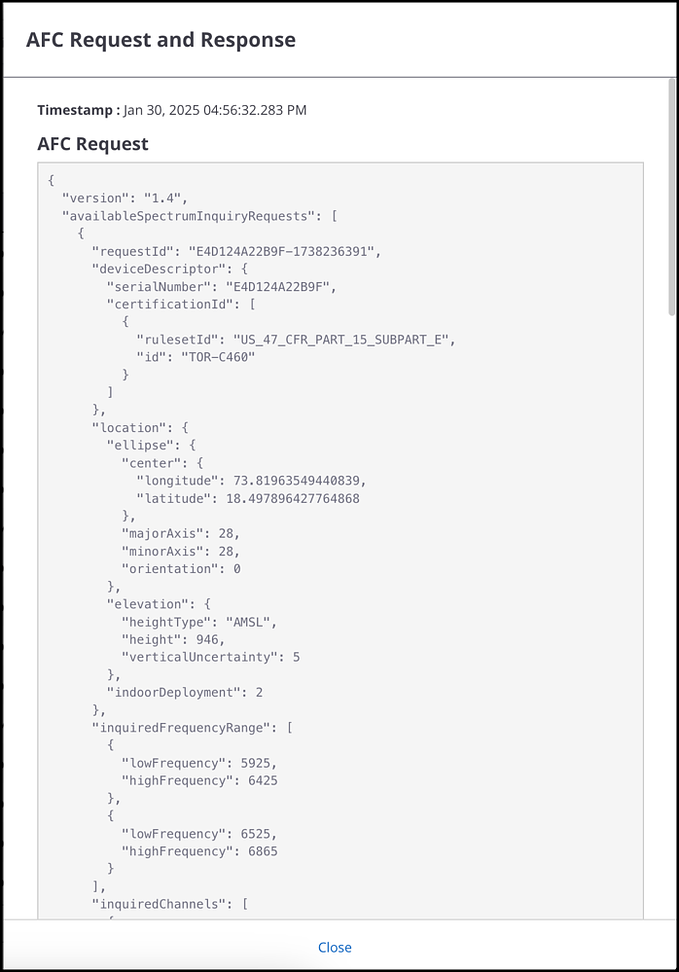
To view AFC Logs:
- Navigate to TROUBLESHOOT > AFC Logs.
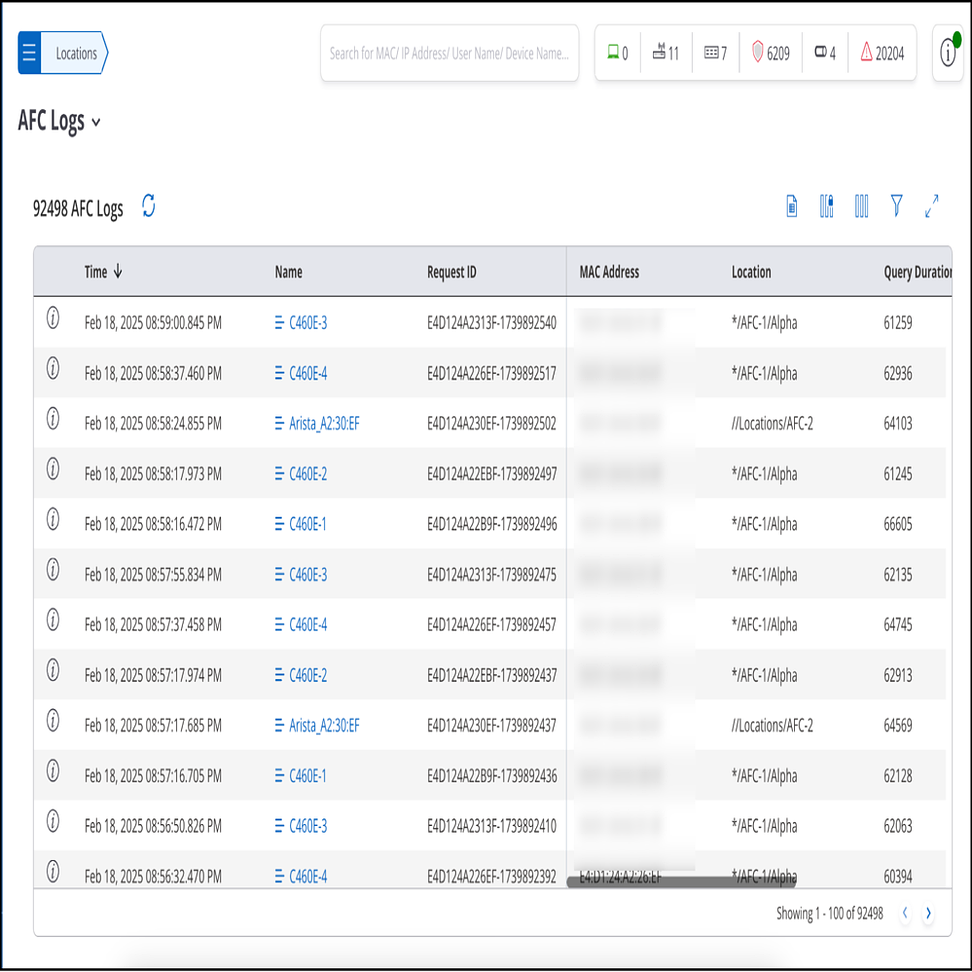
- Click ⓘ next to the AFC log entry to view the JSON containing the AFC request and
response.
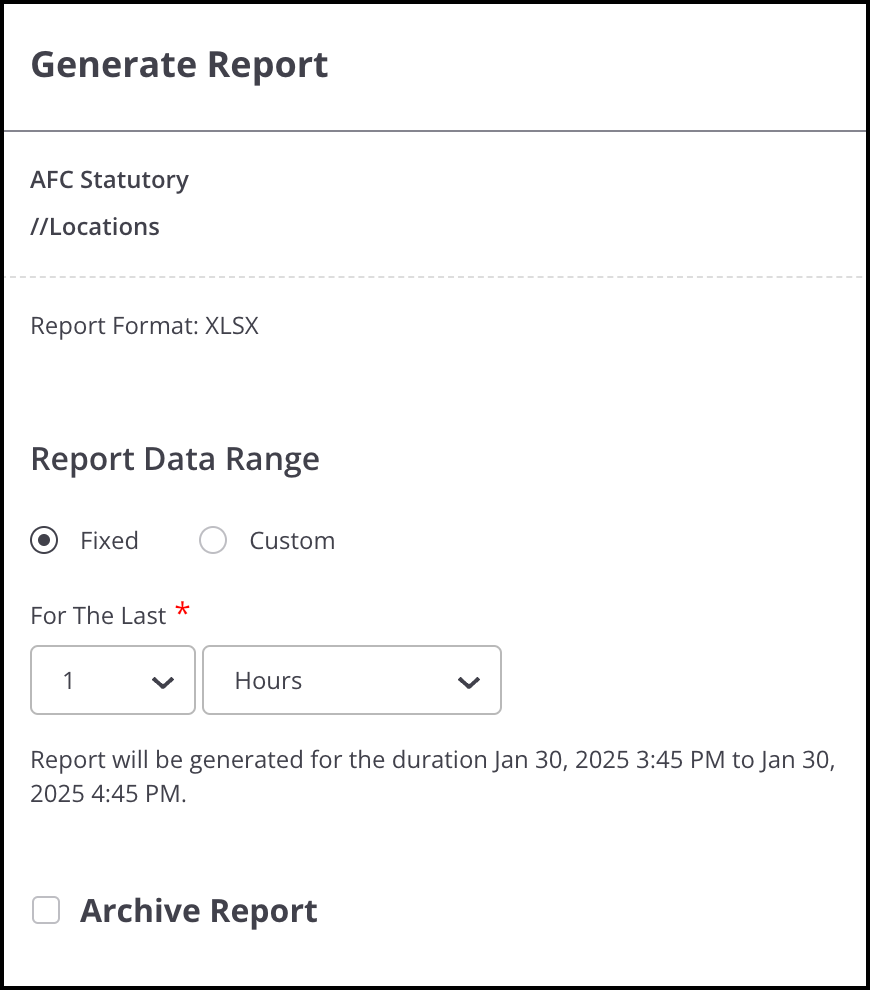
AFC Reports
You can generate on-demand reports or scheduled reports. AFC reports contain information present on the AFC Logs page.
- Go to REPORTS > WiFi > AFC.
- Click Schedule Report or Generate Report.
Allow Arista to Upgrade Access Points
Allow Arista Networks to upgrade the Access Point (AP) firmware whenever a new version becomes available. Enabling this feature ensures the AP firmware stays up to date with the latest CV-CUE version.
Selecting the Allow Arista to Upgrade Access Points checkbox allows Arista to upgrade your AP firmware. If you don’t have any Scheduled Updates configured for any location in CV-CUE, Arista will notify you of the schedule for when they will perform the firmware upgrade for that location's APs. If you already have Scheduled Updates configured, the firmware upgrade will occur according to the schedule you have defined in CV-CUE. Arista will not interfere with your pre-configured schedule.
Alternatively, you can manage the firmware upgrade yourself by deselecting the checkbox. By deselecting the checkbox, you notify Arista that you will manually upgrade the APs to the available version you prefer. The upgrade will still follow the schedule that you may have defined in your Scheduled Update settings.
- Previous Opt-Outs: If you have previously contacted Arista to opt out of automatic upgrades, this setting is preemptively turned off for your account.
- Default Status: This feature is disabled by default, and you have to manage the AP firmware yourself. Turn it on to allow Arista to manage your AP upgrades.
- Existing Schedules: If you allow Arista to upgrade your APs, and you already have a preconfigured Scheduled Update for some locations, Arista will not upgrade any APs for those locations. Such locations will continue to follow the schedule configured by customers.
- Select .
- Select Enable.
Certificate Management
Manage your CA Certificates, Certificate Revocation List, and common certificate settings such as SAN or CN validation.
Certificate Revocation List
Configure the Certificate Revocation List (CRL) in CV-CUE to facilitate secure communication between the Access Points (AP) and the RadSec or Rsyslog server. A Certificate Revocation List (CRL) contains a list of digital certificates, typically provided as URLs, that the issuing authority has revoked before their scheduled expiration date. You can provide a maximum of 10 URLs for CRL
When the CRL download fails, you can configure CV-CUE to accept or deny the connection request. If you accept the connection request despite the CRL download failure, the connection will proceed without verifying the RadSec or Syslog server.
Configuring the CRL Refresh Interval specifies the frequency with which CV-CUE checks for an updated CRL. Only if there’s an update, the RadSec or Syslog server restarts to initiate the verification with the new CRL. If the URL doesn't change, the RadSec and Rsyslog servers don't restart.
- Navigate to .
- Select the Certificate Revocation tab.
- In the Access Point section, select the Certificate Revocation check box.
- Select Deny or Accept as the action to perform when the Certificate Revocation List download fails.
- Select the Certificate Revocation List Refresh Interval to define how often (range 1 to 7 days) the system should fetch the updated list from the URLs. The default value is 1 day.
- Provide the list of Certificate Revocation List URLS. Each URL must start with http:// or https://. IPv6 addresses must be enclosed in brackets, for example, http://[2001:db8::1]/crl.
- (Applicable for on-premises deployment only) You can apply the same settings to the Server as the Access Point or define server-specific settings.
- Save the settings.
Validate SAN or CN for Server Identity
Network Administrators can enable identity validation to ensure that Access Points (APs) establish secure RadSec and Rsyslog connections only with verified and trusted servers. When enabled, the AP verifies the server's identity during the TLS handshake for RadSec and Rsyslog communication by matching the server's hostname against the Subject Alternative Name (SAN) or Common Name (CN) fields in the server’s certificate. If both the fields are present, then SAN takes priority over CN. CN validation happens only if SAN is not provided.
If there’s a mismatch between the SAN value presented by the AP and the server certificate, then APs can’t connect to the RadSec or Rsyslog server.
- Navigate to .
- Click the General tab.
- Select Validate SAN or CN.
- Save the settings.
Configuring Proxy for On-Premise Deployments
CV-CUE utilizes several external cloud-hosted services to enable key features, including AFC, Ekahau integration, Webhooks, and Arista Firmware Repositories.
In a standard on-premises deployment, CV-CUE often resides within a restricted network with no direct access to the Internet. To use and leverage the cloud-dependent features while maintaining security policies, CV-CUE supports the proxy server configuration. This service allows CV-CUE to communicate with specific external services via a customer-managed proxy server.
Prerequisites
- Proxy Server Availability: A forward proxy reachable from the CV-CUE cluster host.
- HTTPS Tunneling: The proxy must be configured to support the HTTP CONNECT method for secure HTTPS tunneling.
- Authentication: If your proxy requires authentication, have the Username and Password ready.
- Network Path:
- IPv4/Dual Stack: Ensure the CV-CUE host can route traffic to the Proxy IP/FQDN.
- IPv6-only: If your environment is pure IPv6, a NAT64/DNS64 gateway must be configured in your network to translate requests to the IPv4-based Arista cloud services.
Configuring Forward Proxy
To configure the proxy server:
- Navigate to System > Advanced Settings.
- Click the Proxy Server tile.
- Provide the Proxy Server details as follows:
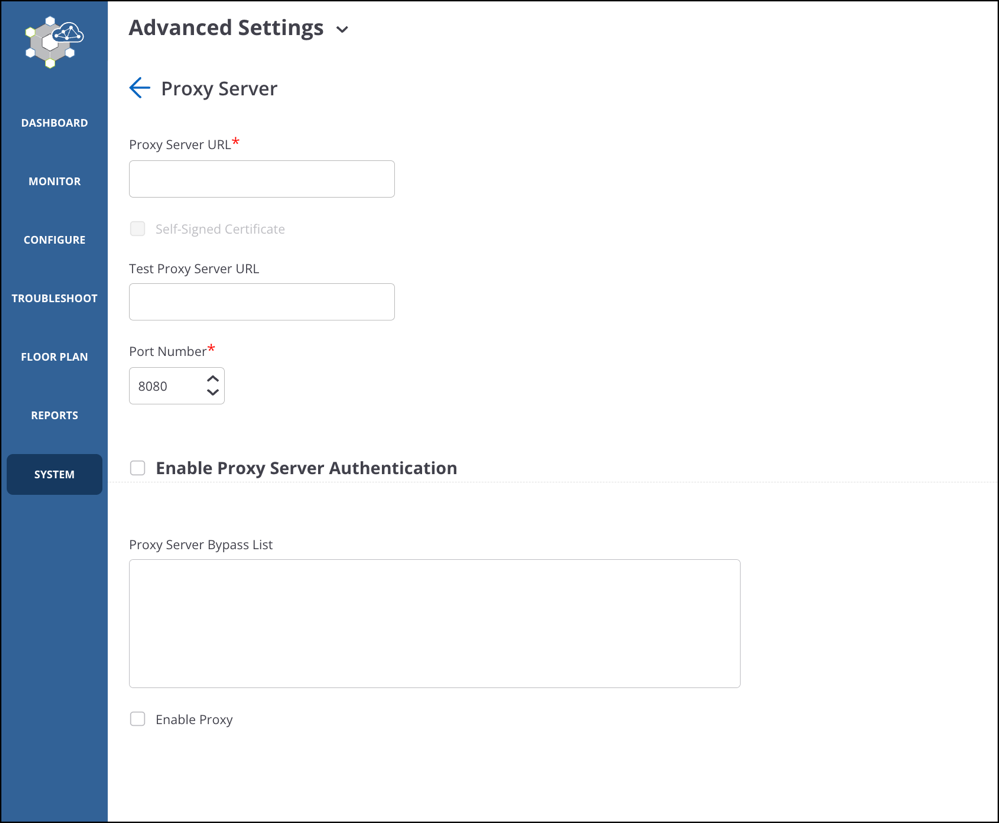
- Proxy Server URL: Enter the IP address or FQDN of the proxy server, starting with http:// or https://
- Self-Signed Certificate: Enable it if you are using an HTTPS proxy address with a private CA.
- Test Proxy Server URL: Enter the IP or FQDN of the test proxy server, starting with http:// or https://
- Port Number: Enter the port used by the proxy server.
- Enable Proxy Server Authentication (Optional): Select this option if the proxy server requires authentication. Provide the required credentials.
- Proxy Server Bypass List: Enter a list of IP addresses that CV-CUE server can contact directly without using the proxy server.
- Enable Proxy: Select it to enable the forward proxy.
- Click Save.
When you save these settings, CV-CUE performs a real-time connectivity test to the test Proxy Server URL you provide or to the default Arista Repository, if no test server URL is provided. If the proxy rejects this connection due to restricted ACLs, incorrect credentials, or firewall rules, the configuration is not applied.
Troubleshooting
- Connection Refused: Verify that the Proxy Server is running and that the CV-CUE server's IP address is in the proxy's Access Control List (ACL).
- SSL Errors: If you are using HTTPS, ensure the Self-Signed Certificate field includes the full chain if the proxy uses a private CA.
- Validation Failed: Ensure the proxy allows traffic to your test URL and that the HTTP CONNECT method is enabled for port 443.
Caveats
Extended AP Upgrade Duration
AP upgrade operations may take slightly longer than usual when the cloud repository path is temporarily inaccessible during the build collection phase. In such scenarios, the system performs the configured retry attempts before automatically falling back to the local build path. Once the fallback is completed, the remaining upgrade process continues within the normal expected timeframe. This limitation also applies to bulk AP upgrade operations.
AFC Proxy IPv6 Support
AFC Proxy currently does not support IPv6, while the Qualcomm server operates over IPv4. This limitation is applicable only to pure IPv6 deployments.