Mesh Network
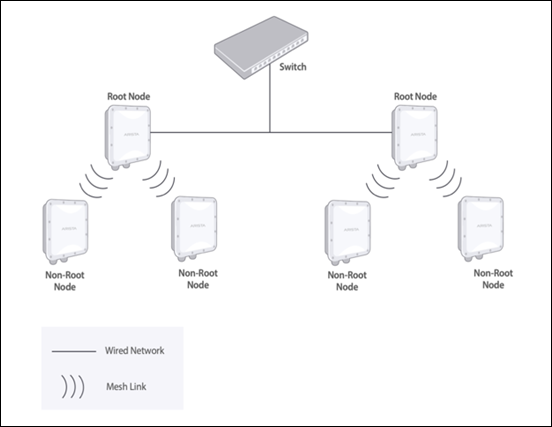
Thus, in a mesh, root nodes are directly connected to a switch, whereas the other APs connect to the wired network via one or more wireless hops to the root node. Each hop introduces a drop in the throughput, so a mesh network deployment requires careful planning.
CV-CUE (CV-CUE) supports mesh configuration via mesh profiles. The following sections describe key characteristics of Arista mesh networks, and the prerequisites and steps to set up a mesh.
Key Characteristics of Arista Mesh
- CV-CUE supports mesh only for groups, and not for folders (locations). You cannot create a mesh profile in a folder.
- When setting up a mesh network for the first time, make sure that all participating APs are connected to CV-CUE.
- A root node must be active and available at all times for a mesh network to work.
- APs in a mesh automatically find the path and connect to the best root node. So once the individual APs are up, it takes some time for the mesh network to be up and running.
- A mesh AP periodically checks if its root node is reachable; if not, it automatically sets up a different path to a root node.
- We recommend that for mesh links you use the 5 GHz band because it has more non-overlapping channels and for 802.11ac APs, the mesh can leverage 802.11ac capabilities on the 5 GHz band.
- Only one AP radio can be configured in mesh mode.
- For the mesh link, APs use a randomized PSK and with the WPA2 security. The PSK is not exposed, and it is system-generated.
Prerequisites for Mesh Access Points
- Mesh APs must have Background Scanning turned off. Note: Background scanning is automatically turned off when you enable a mesh profile for a group. To manually turn background scanning off, go to in the group where the mesh profile is defined and set Background Scanning to Off under General tab.
- For APs in a mesh, Channel Selection must be set to Manual on the band to be used for mesh links (we recommend that you use the 5 GHz band for mesh links). Under Under Channel Settings in WiFi Radios tab, set the Channel Selection to Manual and select the channel that APs will use to set up mesh links.
- Mesh cannot operate on Dynamic Frequency Selection (DFS) channels. When selecting a 5 GHz channel for mesh APs, make sure that it is not a DFS channel.
- A mesh profile is basically a special kind of SSID—one that has a mesh configuration. To join a mesh network, i.e., for a mesh profile to be enabled on it, an AP radio can run a maximum of six other (non-mesh) SSIDs. Thus, if AP1 is to be part of a 5 GHz band mesh, it can run a maximum of six other (non-mesh) 5 GHz SSIDs.
- Only one mesh profile can be enabled per group.
Features Affected By Mesh Mode
- When you enable a mesh profile for a group, background scanning (including VoIP-aware scanning) is automatically turned off on the mesh radios of APs in that group.
- Automatic Channel Selection is not supported on the mesh radio of an AP; the other radios can select channels automatically.
- Link Aggregation (LAG) is not supported in mesh mode.
Note that the multi-function radio of an AP continues to scan (for WIPS, etc.) even if one of the other radios is a mesh radio.
Set Up Mesh Network
To set up a mesh network, you need to enable the mesh profile on all participating APs and define the root nodes before deploying the APs. You can then deploy them at their respective locations and connect the root nodes to the wired network.
- Connect all participating APs to the wired network and thereby to CV-CUE. Info:As mentioned in the Prerequisites section, for a mesh profile to be enabled on an AP, it must be connected to the WM. Keep all the mesh APs connected to the wired network until you have enabled the mesh profile on them.
- In CV-CUE, go to and click on the “+” icon to create a group for the mesh network. Note:CV-CUE supports mesh only for groups and not for folders (locations). You cannot create a mesh profile in a folder. To create a mesh profile, you must first create a group, add the mesh APs to that group, and then create a mesh profile.
- In select the APs you want to add to the mesh, right-click and select Assign/Re-assign to a Group, and add the mesh APs to the group you created.
- Decide which APs you want to use as root nodes. Note down the MAC addresses of these APs.
- From Navigator (or Locations), select the mesh group you created.
- Select and select Add Mesh Profile. The following figure shows a mesh
profile in a mesh group.
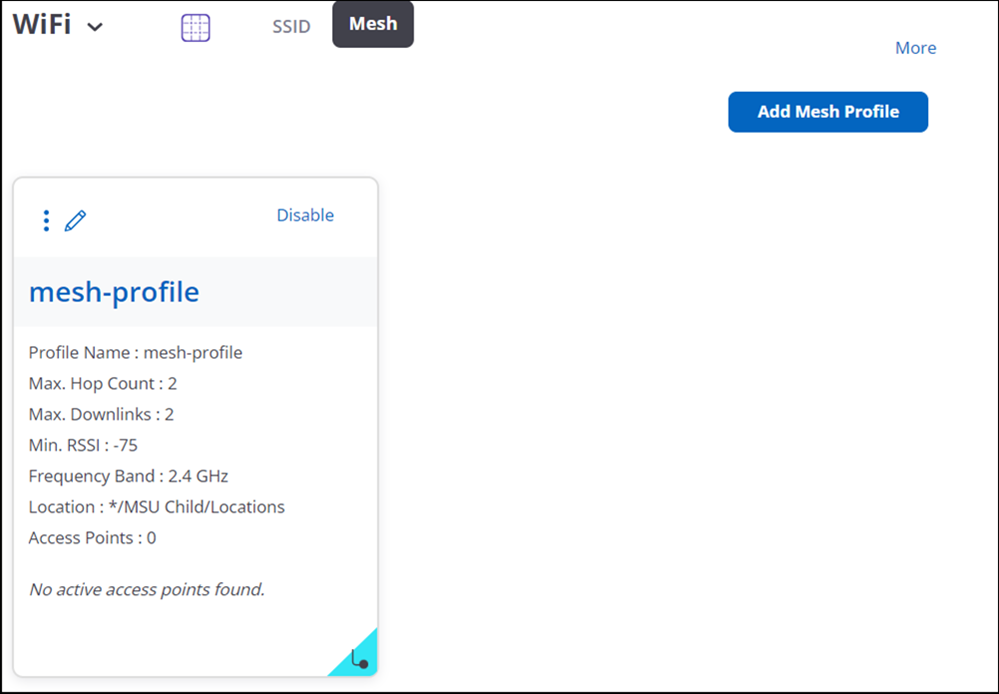
- Configure the fields shown in the following table:
Field Description Mesh SSID Name The external name for the mesh link that APs use when setting up mesh links. Mesh Profile Name Internal to the system. It is used to identify a mesh profile. Max Hop Counts The maximum number of wireless hops between a non-root AP and its root node. Note: The maximum allowed value is 8.
Max Downlink The maximum number of APs downlink of an AP, i.e., the maximum number of “child” APs an AP can have. Note: The maximum allowed value is 5.
Min RSSI The minimum RSSI required for APs to form mesh links with each other. - Save the mesh profile.
- Go back to Enable on the mesh profile. The Enable Mesh wizard opens up.
- The Enable Mesh wizard takes you through the AP configuration steps needed to enable the mesh network. For example, it prompts you to select the frequency band and the channel to be used for mesh links (5 GHz is the better one). The exact steps in the wizard depend on the prerequisites that the mesh APs meet.
- In the final step of the wizard, click Enable Mesh. This activates the mesh
mode for APs in the group. To verify this, go to and confirm that the Mesh Mode column shows “Enabled” for these
APs.
Note: APs reboot when mesh is enabled on them. So it takes some time (could be a few minutes) for the Mesh Mode column to show “Enabled”. Once you have verified that the APs are in mesh mode, we recommend that you disconnect the non-root APs from the wired network to avoid VLAN congestion (but keep the root nodes connected to the network).
- The next step is to select root nodes from the Select Root Node right panel.
Select APs that have a wired connection and Save them as root nodes.
Note: Do not disconnect the root node APs until you have saved them as root nodes.
Deployment and Post-Deployment
If you have planned the mesh network properly (taking coverage and the number of mesh links per AP into account), the deployment process is straightforward. You can connect the root nodes to the wired network and place the non-root nodes within a minimum RSSI radius from APs with which they are supposed to form mesh links. Make sure that no AP ends up having more “child” APs than the max downlink value. Arista mesh is self-actuating and self-healing: non-root APs automatically find the best path to a root node, both initially and in the event of a link failure.
For any post-deployment changes to the mesh group configuration, CV-CUE pushes the configuration to the root nodes. The root nodes then push it to the non-root nodes, which in turn push it to their “child” APs, and so on.
Note: You need to add your service SSIDs (the ones you want Wi-Fi clients to use) to the mesh group so that they get pushed to all the APs in the mesh.