Role Profile
- About Role Profile
- Configure a Role Profile
- Configure Inherit from SSID in Role Profile
- Configure VLAN in Role Profile
- Configure Firewall Rules in Role Profile
- Configure User Bandwidth Control in Role Profile
- Configure Redirection in Role Profile
- Edit a Role Profile
- Create a Copy of Role Profile
- Delete a Role Profile
About Role Profile
A Role Profile defines restrictions such as VLAN, Firewalls and Bandwidth control for users to whom the role is assigned.
Role Profiles are an Arista way to implement Role Based Access Control (RBAC). RBAC enables network administrators to restrict system access to authorized users. Users are granted controlled access to network resources based on the roles assigned to them or the groups to which they belong. RBAC often involves a RADIUS server that propagates policies to the network.
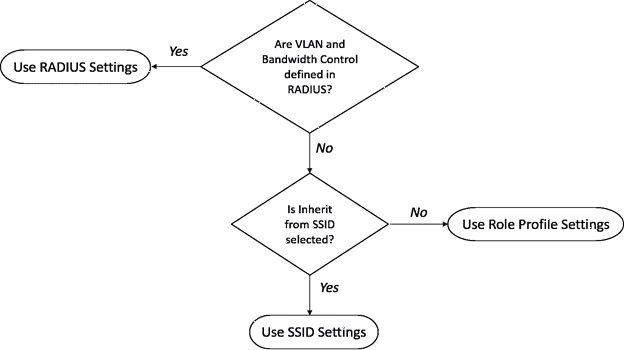
- RADIUS settings, if configured, always trump both Role Profile settings and SSID settings
- Role Profile settings trump SSID settings unless you select Inherit from SSID.
One way to understand this precedence is to look at the scope of the three contenders: the RADIUS server and the Role Profile are defined at the level of a location, which could cover multiple SSIDs, while the SSID settings obviously apply only to a single SSID.
- Inherit from SSID: If you select this option, you can give the SSID settings preference over the Role Profile. But remember: if these settings are defined in the RADIUS server, then those always trump any other settings. By default, it is always RADIUS, Role Profile, and SSID Settings in decreasing order of precedence — this option is the only way you can modify the default behavior by having the Role Profile inherit its settings from the SSID. You would choose to inherit the SSID settings if you do not want to enforce an alternate setting. For example, if you have set the firewall rules in the SSID > Access Control tab, and want the same rules to be applied to all users, then you can select this option in the role profile and you need not configure the firewall rules in the role profile.
Note: Not selecting the Inherit from SSIDoption has some consequences that you should keep in mind. Suppose you do not select the Inherit from SSID option and you do not specify any firewall rules. Then, because Role Profile settings trump SSID settings, no firewall rules are applied to the user at all, even if you have defined rules in the SSID settings.
- VLAN: If you do not configure this setting in the Role Profile, then you must select the Inherit from SSID option, since the role must have at least one VLAN assigned. Conversely, if you do not select the Inherit from SSID, then you must select VLAN.
- Bandwidth Control: If you configure Bandwidth Control in the role profile, then you must select Enable per user bandwidth control in the SSID > Traffic Shaping & QoS tab.
| Setting | SSID Profile | Role Profile | Inherit from SSID | Precedence |
|---|---|---|---|---|
| VLAN | Yes/No 1 | Yes | Yes/No | Role Profile |
| VLAN | Yes | No | Yes 2 | SSID Profile |
| Bandwidth Control | Yes/No | Yes | Yes/No | Role Profile |
| Bandwidth Control | Yes | No | Yes | SSID Profile |
| Bandwidth Control | Yes | Yes 3 | Yes | Role Profile/ SSID Profile 3 |
| Bandwidth Control | Yes | Yes/No 4 | No | Role Profile |
| Firewall Rules | Yes/No | Yes | Yes/No | Role Profile |
| Firewall Rules | Yes | No | Yes | SSID Profile |
| Firewall Rules | Yes | Yes 5 | Yes | Role Profile/ SSID Profile 5 |
| Firewall Rules | Yes | Yes/No 6 | No | Role Profile |
| Redirection | Yes | Yes | Yes/No | Role Profile |
| Redirection | Yes 7 | No | Yes | SSID Profile |
| Redirection | Yes | No | No | Role Profile |
- If no VLANs are configured in the SSID, the default value of 0 indicating untagged VLAN is set.
- If you have not enabled Inherit from SSID, then you must define VLAN settings in the role profile.
- In Bandwidth Control, you can set the upload and download bandwidth limits. If you do not set any of these values in the Role Profile, then, because Inherit from SSID is "Yes", the corresponding value in the SSID > Traffic Shaping & QoS settings is applied to a user's session.
- In Bandwidth Control, you can set the upload and download bandwidth limits. If any of these values are not set in the Role Profile, then, because Inherit from SSID is "No", only values defined in the Role Profile are applied to the user's session. Any corresponding values defined in the SSID settings are ignored.
- In Firewall, you can enable and configure L3-4 and application firewall rules. If you have not configured either of the firewalls in the Role Profile tab, then, because Inherit from SSID is "Yes", the corresponding configuration in the SSID settings is applied to the user's session.
- In Firewall, you can enable and configure L3-4 and application firewall rules. If you have not configured either of the firewalls in the Role Profile tab, then, because Inherit from SSID is "No", only the firewall rules defined in the Role Profile are applied to the user's session. Any firewall rule defined in the SSID settings is ignored.
- Redirection in Role Profile maps to Access Control or Captive Portal configuration on the SSID. You can configure either Redirection in Access Control, or Captive Portal settings in an SSID, but not both. If you do not select Redirection on the Role Profile tab, then, because Inherit from SSID is "Yes", any Redirection or Captive Portal configuration defined in the SSID settings is applied to the user's session.
Configure a Role Profile
A Role Profile is created to enforce Role Based Access Control on Wi-Fi users. Role Profiles defined at a specific location is visible at all its child locations. Whereas vice versa is not true. Role Profile listing is available in Card Grid View layout.
- Navigate to
- Click Add New Role Profile.
- Enter the role name in Enter Role Name field. You can use the same role name that you have defined in your RADIUS server for ease of mapping.
- Enter a profile name in Enter Profile Name field.
- Click Save.
Configure Inherit from SSID in Role Profile
All of the above listed configurations are also available in the SSID profile and apply to user that connect to the SSID profile. You can choose to inherit the configurations from the SSID profile for one or more of the above listed settings, if you do not want to enforce an alternate setting. For example, if you have set the firewall rules in the SSID profile and want the same to be applied to all users, then you can select this option in the role profile and need not configure the firewall rules in the role profile.
- Navigate to
- For a particular Role Profile, select Use SSID Settings in absence of Role-Specific Settings to inherit the role attributes from the SSID profile. You can optionally choose to inherit the role profile settings from the SSID profile in which the role profile is added to a role based control rule.
- Click Save.
Configure VLAN in Role Profile
You can specify one or more VLANs that the user to whom the profile is assigned can access over the WLAN network. Any VLAN setting configured in the role profile will override the corresponding setting in the SSID profile, when the role is assigned to a Wi-Fi user.
| SSID Profile | Role Profile | Inherit from SSID | Precedence | Notes |
|---|---|---|---|---|
| Yes / No | Yes | Yes / No | Role Profile | If no VLANs are configured in the SSID, the default value of 0 indicating untagged VLAN is set. |
| Yes | No | Yes | SSID Profile | If Inherit from SSID is not enabled in the role profile, then VLAN settings must be configured in the role profile. |
- Navigate to
- In the VLAN section, enable VLAN.
- Specify a VLAN ID that the user can access if the role profiles is assigned to the user.
Info:The VLAN ID range is between 0 to 4094. To map to untagged VLAN in switch port, enter VLAN ID = 0, irrespective of what VLAN ID is assigned to untagged VLAN in switch.
- Click Save.
Configure Firewall Rules in Role Profile
You can define two sets of firewall rules. The L3 firewall rules that define whether communication to a host/IP:port is allowed or disallowed using a particular protocol. The communication can be blocked/allowed to or from the client device or in both directions. The second set of firewall rules define which applications in each system-defined application category that the client device can access. The rule can be defined for allowing and disallowing such access. Additionally, you can define the default rule that must be applied on the client device if none of the defined rules are applicable. The default rule is common for L3 and application firewall.
| SSID Profile | Role Profile | Inherit from SSID | Precedence | Notes |
|---|---|---|---|---|
| Yes / No | Yes | Yes / No | Role Profile | - |
| Yes | No | Yes | SSID Profile | - |
| Yes | Yes | Yes | Role Profile / SSID Profile | In Firewall Rule, you can enable and configure L3 and application firewall rules. If either of the firewall is not configured in the Role Profile, then the corresponding configuration in the SSID Profile is applied to the user session. |
| Yes | Yes / No | No | Role Profile | In Firewall Rule, you can enable and configure L3 and application firewall rules. If either of the firewall is not configured in the Role Profile, then only the firewall rules defined in the Role Profile are applied to the user session. Any firewall rule defined in the SSID Profile is not applied to the user session. |
- Navigate to
- Scroll down to Firewall section.
Info: Enable Firewall and define the L3 firewall rules. For specifying application firewall rules, enable Application Firewall. If you enable Application Firewall, you must select Application Visibility in the SSID profile.
- Enable and define L3 Firewall Rules.
- Enable and define Application Firewall rules.
Note:If you enable Application Firewall, you must select Application Visibility in the SSID profile.
- In Default Rule section provide an Action.
Info:Action can be one of the following, Allow, Block and Allow and Mark.
- Click Save.
Configure User Bandwidth Control in Role Profile
Bandwidth control lets you define the limits to be applied on the upload and download bandwidth available to a user. This can range from 0 Kbps through to 1024 Mbps.
If you configure Bandwidth Control in the role profile then Enable per user bandwidth control must be selected in the Traffic Shaping & QoS section of the SSID Profile.
| SSID Profile | Role Profile | Inherit from SSID | Precedence | Notes |
|---|---|---|---|---|
| Yes / No | Yes | Yes / No | Role Profile | - |
| Yes | No | Yes | SSID Profile | - |
| Yes | Yes / No | No | Role Profile | In Bandwidth Control, you can set the upload and download bandwidth. If any of these values are not set it the Role Profile, then only values defined in the Role Profile are applied to the user session. Any corresponding values defined in the SSID Profile are ignored. |
| Yes | Yes | Yes | Role Profile / SSID Profile | In Bandwidth Control, you can set the upload and download bandwidth. If any of these values are not set it the Role Profile, then the corresponding value configured in the SSID Profile is applied to the user session. |
- Navigate to
- Scroll down to User Bandwidth Control section.
- Select Limit the maximum upload bandwidth per user to set the upload limit.
- Enter upload limit value in Kbps. A value between 0 -1024 should be entered over here.
- Select Limit the maximum download bandwidth per user to set the download limit.
- Enter download limit value in Kbps. A value between 0 - 1024 should be entered over here.
- Click Save.
Configure Redirection in Role Profile
You can specify whether a user to whom the profile is assigned must be redirected to a static or dynamic URL whenever the user accesses the SSID. This URL can host an informative page stating what the access the user has or does not have on the WLAN network. Additionally, you can specify sites in the Walled Garden that such a user can access. Any site that is not in the Walled Garden list will not be accessible to the user.
| SSID Profile | Role Profile | Inherit from SSID | Precedence | Notes |
|---|---|---|---|---|
| Yes / No | Yes | Yes / No | Role Profile | - |
| Yes | No | Yes | SSID Profile | Redirection in Role Profile maps to BYOD or Captive Portal configuration on the SSID Profile. You can configure eith BYOD or Captive Portal settings in an SSID Profile, not both. If Redirection is not configured and Inherit from SSID is selected in the Role Profile, then any BYOD or Captive Portal configuration defined in the SSID Profile is applied to the user session. |
| Yes | No | No | Role Profile | - |
- Navigate to
- Navigate to a role profile and enable Redirection. Select Static Redirection
- Enter Redirect URL.
- Select HTTPS Redirection if you wish to move to secure version of HTTP.
Enabling HTTPS Redirection enables three fields, these three fields provide the information of the customer using the certificate.
- Common Name: Identifies the host name associated with the certificate.
- Organization: Name of an organization.
- Organization Unit: Name of an organizational unit.
Dynamic URL Redirection
You can redirect onboarding clients to a dynamic URL defined by the RADIUS. If the RADIUS access-accept request has a role and a redirection URL for a client, access points (AP) can redirect such client’s HTTP or HTTPS requests.
- The access-accept request for a client must contain the URL along with the role that is configured with the dynamic redirection option. The RADIUS must send the URL in the given VSA:
- Vendor -id : 16901 Arista WiFi
- Attribute-Id: 8
- Data-type: string
- Attribute Name: arista-portal-url
- Add all the hostnames and IP addresses to Websites That Can Be Accessed Before Authorization. The website address must include the IP or hostname of the host hosting the Portal.
To configure the Dynamic URL, select Dynamic Redirection option under and add the list of websites that the client can access before authorization.
Edit a Role Profile
An existing Role profile can be edited at the location it was created. Changes made in profile created on parent location reflect in the inherited profile on child location.
- Click on the options tab (three vertical dots), of the Role Profile that is to be edited.
- Select Edit. Choose from:
- If you are at a specific location where profile was created, then directly go to step 3.
- If you are on the child location and the profile is an inherited profile, then choose the appropriate option.
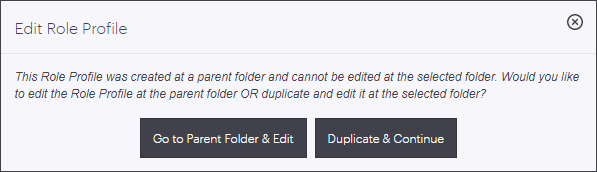
Option Description If you select GO to Parent Folder and Edit Then perform the Step 2 again and then perform step 3 If you select Duplicate & Continue Then a duplicate profile gets created and then you can edit the profile on the child location by performing step 2 and then step 3 on the duplicate profile
- Make the necessary changes.
- Click Save.
Create a Copy of Role Profile
Any existing Role profile and an inherited profile both can be copied to same or different locations. The process, creates an exact copy of an existing Role Profile. The copy of a profile contains name and configured properties as that of the original profile. The copy of a profile created on parent location exists on child location as well, whereas the vice versa is not true.
- Click on the options tab (three vertical dots), of the Role profile that is to be duplicated.
- Select Create a Copy.
- Select the option dependent on location where you would like to copy the Role Profile.
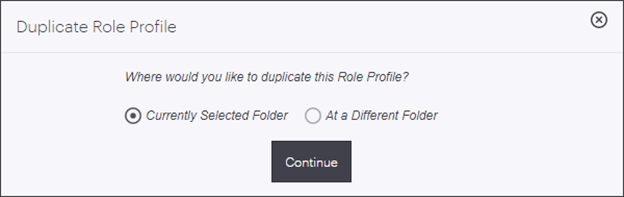
Choose from:- If you select Currently Selected Folder in the above step, then the Role profile gets copied to the current location.
- If you select At a Different Folder in the above step, then select the new location from the Create a Copy window, at which the Role profile is to be copied.
- Click on Copy.
Delete a Role Profile
An existing Role profile and a duplicate Role profile both can be deleted using the delete option. The profile once deleted is removed permanently from its specific location and its child location as well. Inherited profiles can not be deleted from the child location. Profiles can be deleted only on the location, where they were created.
You cannot delete a Role Profile that is currently in use on an SSID. You need to disable / remove the Role Profile from the SSID configuration before you delete it.
- Click on the options tab (three vertical dots), of the Role profile that is to be deleted.
- Select Delete.
- Perform the below location dependent actions:
- If you are on the specific location where you had created the Role profile, then select Delete
- If you are on the child location and profile to be deleted is an inherited profile then click on Go to Parent Folder & Delete.
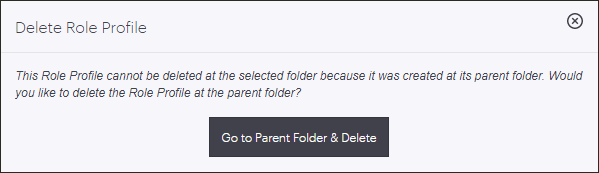
This action will divert you to its parent location, with an appropriate message. Once you are diverted to the parent location, perform the step 3 again.
- If you are on the specific location where you had created the Role profile, then select Delete