Firewall Overview
A firewall is a network security device that monitors incoming and outgoing network traffic and decides whether to allow or block specific traffic based on a defined set of security rules. Orchestrator supports configuration of Stateless, Stateful, and Enhanced Firewall Services (EFS) rules for Profiles and Edges.
Stateful Firewall
A Stateful firewall monitors and tracks the operating state and characteristics of every network connection coming through the firewall and uses this information to determine which network packets to allow through the firewall. The Stateful firewalls build a state table and use this table to allow only returning traffic from connections currently listed in the state table. After a connection is removed from the state table, no traffic from the external device of this connection is permitted.
- Prevent attacks such as denial of service (DoS) and spoofing
- More robust logging
- Improved network security
- Matching is directional. For example, you can allow hosts on VLAN 1 to initiate a TCP session with hosts on VLAN 2 but deny the reverse. Stateless firewalls translate into simple ACLs (Access lists) which do not allow for this kind of granular control.
- A stateful firewall is session aware. Using TCP's 3-way handshake as an example, a stateful firewall will not allow a SYN-ACK or an ACK to initiate a new session. It must start with a SYN, and all other packets in the TCP session must also follow the protocol correctly or the firewall will drop them. A stateless firewall has no concept of a session and instead filters packets based purely on a packet by packet, individual basis.
- A stateful firewall enforces symmetric routing. For instance, it is very common for asymmetric routing to happen in a network where traffic enters the network through one Hub but exits through another. Leveraging third-party routing, the packet is still able to reach its destination. With a stateful firewall, such traffic would be dropped.
- Stateful firewall rules get rechecked against existing flows after a configuration change. So, if an existing flow has already been accepted, and you configure the stateful firewall to now drop those packets, the firewall will recheck the flow against the new rule set and then drop it. For those scenarios where an "allow" is changed to "drop" or "reject", the pre-existing flows will time out and a firewall log will be generated for the session close.
- The VeloCloud Edge must be using Release 3.4.0 or later.
- By default, the Stateful Firewall feature is a customer capability activated for new customers on an Orchestrator using 3.4.0 or later releases. Customers created on a 3.x Orchestrator will need assistance from a Partner or SD-WAN Support to activate this feature.
- The Orchestrator allows the enterprise user to activate or deactivate the Stateful Firewall feature at the Profile and Edge level from the respective Firewall page. To deactivate the Stateful Firewall feature for an enterprise, contact an Operator with Super User permission.
Note: Asymmetric routing is not supported in Stateful Firewall activated Edges.
Enhanced Firewall Services
Enhanced Firewall Services (EFS) provide additional EFS security functionalities on VeloCloud Edges. The Security powered EFS functionality supports Intrusion Detection System (IDS) and Intrusion Prevention System (IPS) services on VeloCloud Edges. The Edge Enhanced Firewall Services (EFS) protect Edge traffic from intrusions across Branch to Branch, Branch to Hub, or Branch to Internet traffic patterns.
Currently, Edge Firewall provides stateful inspection along with application identification without additional EFS security features. While the stateful Firewall Edge provides security, it is not adequate and creates a gap in providing EFS security integrated natively with VeloCloud SD-WAN. Edge EFS address these security gaps and offers enhanced threat protection natively on the Edge in conjunction with VeloCloud SD-WAN.
Firewall Logs
- When a flow is created (on the condition that the flow is accepted)
- When the flow is closed
- When a new flow is denied
- When an existing flow is updated (due to a firewall configuration change)
- Hosted Firewall Logging: Allows you to turn ON or OFF the Firewall Logging feature at the Enterprise Edge level to send Firewall logs to the Orchestrator.
Note: Starting with the 5.4.0 release, for Hosted Orchestrators, the Enable Firewall Logging to Orchestrator capability is activated by default for new and existing Enterprises. At the Edge level, customers must activate Hosted Firewall Logging to send Firewall logs from the Edge to the Orchestrator. For On-Prem Orchestrators, customers must contact their Operators to activate the Enable Firewall Logging to Orchestrator capability.
You can view the Edge Firewall logs in Orchestrator from the Logs page. For more information, see Monitor Firewall Logs Monitor Firewall Logs.
- Syslog Forwarding: Allows you to view the logs by sending the logs originating from enterprise Edge to one or more configured remote servers. By default, the Syslog Forwarding feature is deactivated for an enterprise. To forward the logs to remote Syslog collectors, you must:
- Activate Syslog Forwarding feature under tab.
- Configure a Syslog collector under . For steps on how to configure Syslog collector details per segment in the Orchestrator, see Configure Syslog Settings for Profiles.
Configure Profile Firewall
A Firewall is a network security device that monitors incoming and outgoing network traffic and decides whether to allow or block specific traffic based on a defined set of security rules. Orchestrator supports configuration of stateless and stateful Firewalls for Profiles and Edges.
For more information on Firewall, see Firewall Overview.
Configure Profile Firewall
- In the SD-WAN service of the Enterprise portal, select . The Profiles page displays the existing Profiles.
- To configure a Profiles Firewall, select the link to the Profile and select the Firewalltab. Alternatively, you can select the View link in the Firewall column of the Profile.
- The Firewall page appears.
Figure 1. Firewall Page 
- From the Firewall tab, you can configure the following Edge Security and Firewall capabilities:
Table 1. Edge Security and Firewall Fields Field Description Edge Access Allows you to configure a Profile for Edge access. You must make sure to select the appropriate option for Support access, Console access, USB port access, SNMP access, and Local Web UI access under Firewall settings to make the Edge more secure. This will prevent any malicious user from accessing the Edge. By default, Support access, Console access, SNMP access, and Local Web UI access are deactivated for security reasons. For more information, see Configure Edge Firewall. Firewall Status Allows you to turn ON or OFF the Firewall rules, configure Firewall settings, and in-bound ACLs for all Edges associated with the Profile. Note: By default, this feature is activated. You can deactivate the Firewall function for Profiles by turning the Firewall Status to OFF.Attention: At the Edge level, once you override the inherited Firewall Status settings, the Edge will stop inheriting any further Firewall Status setting changes from the associated Profile even when the setting is changed at the associated Profile level or when assigned to a different Profile. However, if the Firewall Status setting is turned off in the Profile, this setting will be inherited by the Edge, and it will be deactivated even if the Firewall Status is enabled on the Edge.Enhanced Firewall Services Allows you to turn ON or OFF the Enhanced Firewall Services (EFS) feature for all Edges associated with the Profile. Note: By default, this feature is not activated.For more information, see Configure Enhanced Security ServicesFirewall Logging Allows you to turn ON or OFF the Firewall Logging feature for all Edges associated with the Profile. By default, Edges cannot send their Firewalls logs to Orchestrator. Note: For Firewall Logging to Orchestrator to work make sure the SD-WAN Edges are running on version 5.2 and above.Note: For an Edge to send the Firewall logs to Orchestrator, ensure that the Enable Firewall Logging to Orchestrator customer capability is activated at the Customer level under “Global Settings” UI page. Customers must contact your Operator if you would want the Firewall Logging feature to be activated.You can view the Edge Firewall logs in Orchestrator from the page. For more information, see Monitor Firewall Logs.Syslog Forwarding By default, the Syslog Forwarding feature is deactivated for an Enterprise. To collect Orchestrator bound events and Firewall logs originating from Enterprise Edge to one or more centralized remote Syslog collectors (Servers), an Enterprise user must activate this feature at the Edge/Profile level. To configure Syslog collector details per segment in the Orchestrator, see Configure Syslog Settings for Profiles. Note: You can view both IPv4 and IPv6 Firewall logging details in a IPv4-based Syslog Server.Firewall Rules The existing pre-defined Firewall rules are displayed. You can select + NEW RULE to create a new Firewall rule. For more information, see Configure Firewall Rule. To delete existing Firewall rules, select the checkboxes prior to the rules and select DELETE. To duplicate a Firewall rule, select the rule and select CLONE. While creating or updating a Firewall rule, you can add comments about the rule in the New Comment field in the Comment History tab. A maximum of 50 characters is allowed and you can add any number of comments for the same rule. Stateful Firewall By default, the Stateful Firewall feature is deactivated for an Enterprise. Orchestrator allows you to set session timeout for established and non-established TCP flows, UDP flows, and other flows at the Profile level. Optionally, you can also override the Stateful firewall settings at the Edge level. For more information, see Configure Stateful Firewall Settings. Network & Flood Protection To secure all connection attempts in an Enterprise network, Edge Cloud Orchestrator allows you to configure Network and Flood Protection settings at the Profile and Edge levels, to protect against the various types of attacks. For more information, see Configure Network and Flood Protection Settings.
Configure Edge Access
- In the SD-WAN service of the Enterprise portal, select .
- Under Edge Security, select the Edge Access expand icon.
Figure 2. Edge Access 
- You can configure one or more of the following Edge Access options, and select Save Changes:
Table 2. Edge Access Options Field Description Log Edge Access When activated, all access to the Edge is logged, including successful and failed attempts. Support Access Select Allow the following IPs if you want to explicitly specify the IP addresses from where you can SSH into this Edge. You can enter both IPv4 and IPv6 addresses separated by comma (,). By default, Deny All is selected. Console Access Select Allow to activate Edge access through Physical Console (Serial Port or Video Graphics Array (VGA) Port). By default, Deny is selected and Console login is deactivated after Edge activation. Note: Whenever the console access setting is changed from Allow to Deny or vice-versa, the Edge must be rebooted manually.Enforce Power-on Self Test When activated, a failed Power-on Self Test will deactivate the Edge. You can recover the Edge by running factory reset and then reactivate the Edge. USB Port Access Select Allow to activate and select Deny to deactivate the USB port access on Edges. This option is available only for Edge models 510, 6x0, and 7x0. Note: Whenever the USB port access setting is changed from Allow to Deny or vice-versa, you must reboot the Edge manually if you have access to the Edge and if the Edge is in a remote site, restart the Edge using Orchestrator. For instructions, refer to Perform Remote Actions with new Orchestrator UI.SNMP Access Allows Edge access from routed interfaces/WAN through SNMP. Select one of the following options: - Deny All - By default, SNMP access is deactivated for all devices connected to an Edge.
- Allow All LAN - Allows SNMP access for all devices connected to the Edge through a LAN network.
- Allow the following IPs - Allows you to explicitly specify the IP addresses from where you can access the Edge through SNMP. Separate each IPv4 or IPv6 addresses with a comma (,).
Local Web UI Access Allows Edge access from routed interfaces/WAN through a Local Web UI. Select one of the following options: - Deny All - By default, Local Web UI access is deactivated for all devices connected to an Edge.
- Allow All LAN - Allows Local Web UI access for all devices connected to the Edge through a LAN network.
- Allow the following IPs - Allows you to explicitly specify the IP addresses from where you can access the Edge through Local Web UI. Separate each IPv4 or IPv6 addresses with a comma (,).
Local Web UI Port Number Enter the port number of the local Web UI from where you can access the Edge. The default value is 80.
Configure Stateful Firewall Settings
- In the SD-WAN service of the Enterprise portal, select .
- Under Configure Firewall, turn on the Stateful Firewall toggle button and then select the expand icon. By default, the timeout sessions are applied for IPv4 addresses.
Figure 3. Stateful Firewall Settings 
- You can configure the following Stateful Firewall settings, and select Save Changes:
Table 3. Stateful Firewall Field Descriptions Field Description Established TCP Flow Timeout (seconds) Sets the inactivity timeout period (in seconds) for established TCP flows, after which they are no longer valid. The allowable value ranges from 60 seconds through 15999999 seconds. The default value is 7440 seconds. Non Established TCP Flow Timeout (seconds) Sets the inactivity timeout period (in seconds) for non-established TCP flows, after which they are no longer valid. The allowable value ranges from 60 seconds through 604800 seconds. The default value is 240 seconds. UDP Flow Timeout (seconds) Sets the inactivity timeout period (in seconds) for UDP flows, after which they are no longer valid. The allowable value ranges from 60 seconds through 15999999 seconds. The default value is 300 seconds. Other Flow Timeout (seconds) Sets the inactivity timeout period (in seconds) for other flows such as ICMP, after which they are no longer valid. The allowable value ranges from 60 seconds through 15999999 seconds. The default value is 60 seconds. Note:The configured timeout values apply only when the memory usage is below the soft limit. Soft limit corresponds to anything below 60 percent of the concurrent flows supported by the platform in terms of memory usage.
Configure Network and Flood Protection Settings
- Denial-of-Service (DoS) attack
- TCP-based attacks - Invalid TCP Flags, TCP Land, and TCP SYN Fragment
- ICMP-based attacks - ICMP Ping of Death and ICMP Fragment
- IP-based attacks - IP Unknown Protocol, IP Options, IPv6 Unknown Protocol, and IPv6 Extension Header.
| Attack Type | Description |
|---|---|
| Denial-of-Service (DoS) attack | A denial-of-service (DoS) attack is a type of network security attack that overwhelms the targeted device with a tremendous amount of bogus traffic so that the target becomes so preoccupied processing the bogus traffic that legitimate traffic cannot be processed. The target can be a firewall, the network resources to which the firewall controls access, or a specific hardware platform or operating system of an individual host. The DoS attack attempts to exhaust the target device's resources, making the target device unavailable to legitimate users. There are two general methods of DoS attacks: flooding services or crashing services. Flood attacks occur when the system receives too much traffic for the server to buffer, causing them to slow down and eventually stop. Other DoS attacks simply exploit vulnerabilities that cause the target system or service to crash. In these attacks, input is sent that takes advantage of bugs in the target that subsequently crash or severely destabilize the system. |
| Invalid TCP Flags | Invalid TCP flags attack occurs when a TCP packet has a bad or invalid flag combination. A vulnerable target device will crash due to invalid TCP flag combinations and therefore it is recommended to filter them out. Invalid TCP flags guards against:
|
| TCP Land | A Land attack is a Layer 4 DoS attack in which, a TCP SYN packet is created such that the source IP address and port are set to be the same as the destination IP address and port, which in turn is set to point to an open port on a target device. A vulnerable target device would receive such a message and reply to the destination address effectively sending the packet for reprocessing in an infinite loop. Thus, the device CPU is consumed indefinitely causing the vulnerable target device to crash or freeze. |
| TCP SYN Fragment | The Internet Protocol (IP) encapsulates a Transmission Control Protocol (TCP) SYN segment in the IP packet to initiate a TCP connection and invoke a SYN/ACK segment in response. Because the IP packet is small, there is no legitimate reason for it to be fragmented. A fragmented SYN packet is anomalous, and as such suspect. In a TCP SYN fragment attack, a target server or host is flooded with TCP SYN packet fragments. The host catches the fragments and waits for the remaining packets to arrive so it can reassemble them. By flooding a server or host with connections that cannot be completed, the host's memory buffer overflows and therefore no further legitimate connections are possible, causing damage to the target host's operating system. |
| ICMP Ping of Death | An Internet Control Message Protocol (ICMP) Ping of Death attack involves the attacker sending multiple malformed or malicious pings to a target device. While ping packets are generally small used for checking reachability of network hosts, they could be crafted larger than the maximum size of 65535 bytes by attackers. When a maliciously large packet is transmitted from the malicious host, the packet gets fragmented in transit and when the target device attempts to reassemble the IP fragments into the complete packet, the total exceeds the maximum size limit. This could overflow memory buffers initially allocated for the packet, causing system crash or freeze or reboot, as they cannot handle such huge packets. |
| ICMP Fragment | An ICMP Fragmentation attack is a common DoS attack which involves the flooding of fraudulent ICMP fragments that cannot be defragmented on the target server. As defragmentation can only take place when all fragments are received, temporary storage of such fake fragments takes up memory and may exhaust the available memory resources of the vulnerable target server, resulting in server unavailability. |
| IP Unknown Protocol | IP Unknown Protocols refers to any protocol not listed in IANA: https://www.iana.org/assignments/protocol-numbers/protocol-numbers.xhtml.
Enabling IP Unknown Protocol protection blocks IP packets with the protocol field containing a protocol ID number of 143 or greater, as it could lead to crash if not handled properly on the end device. A cautious stance would be to block such IP packets from entering the protected network. |
| IP Options | Attackers sometimes configure IP option fields within an IP packet incorrectly, producing either incomplete or malformed fields. Attackers use these malformed packets to compromise vulnerable hosts on the network. Exploitation of the vulnerability may potentially allow for arbitrary code execution. The vulnerability may be exploited after processing a packet containing a specific crafted IP option in the packet's IP header. Enabling IP Insecure Options protection blocks transit IP packets with incorrectly formatted IP option field in the IP packet header. |
| IPv6 Unknown Protocol | Enabling IPv6 Unknown Protocol protection blocks IPv6 packets with the protocol field containing a protocol ID number of 143 or greater, as it could lead to crash if not handled properly on the end device. A cautious stance would be to block such IPv6 packets from entering the protected network. |
| IPv6 Extension Header | IPv6 Extension Header attack is a DoS attack that occurs due to mishandling of extension headers in an IPv6 packet. The mishandling of IPv6 extension headers creates new attack vectors that could lead to DoS, and which can be exploited for different purposes, such as creating covert channels and routing header 0 attacks. Enabling this option would drop IPv6 packet with any extension header except fragmentation headers. |
- In the SD-WAN service of the Enterprise portal, select .
- Under Configure Firewall, turn on the Stateful Firewall toggle button
- Select the Network & Flood Protection expand icon.
Figure 4. Network & Flood Protection Settings 
- You can configure the following Network and Flood Protection settings, and select Save Changes:
Note: By default, the network and flood protection settings are applied for IPv4 addresses.
Table 5. Network and Flood Protection Settings Field Description New Connection Threshold (connections per second) The maximum number of new connections that is allowed from a single source IP per second. The allowable value ranges from 10 percentage through 100 percentage. The default value is 25 percentage. Denylist Select the checkbox to block a source IP address, which is violating the new connection threshold by sending flood traffic either due to misconfiguration of network or malicious user attacks. Detect Duration (seconds) Before blocking a Source IP address, it is the grace time duration for which the violating source IP is allowed to send traffic flows. If a host sends flood traffic of new connection requests (port scan, TCP SYN flood, etc.,) exceeding the maximum allowed connection per second (CPS) for this duration, it will be considered as eligible for denylisting instead of immediately denylisting it as soon as it exceeds the CPS per source once. For example, consider that the maximum allowed CPS is 10 with detect duration of 10 seconds, if the host floods new connection requests greater than 100 requests for 10 seconds, then the host will be denylisted. The allowable value ranges from 10 seconds through 100 seconds. The default value is 10 seconds.
Denylist Duration (seconds) The time duration for which the violated source IP is blocked from sending any packets. The allowable value ranges from 10 seconds through 86400 seconds. The default value is 10 seconds. TCP Half-Open Threshold Per Destination The maximum number of half-open TCP connections that is allowed per destination. The allowable value ranges from 1 percentage through 100 percentage. TCP Based Attacks Supports protection from the following TCP-based attacks by enabling the respective checkboxes: - Invalid TCP Flags
- TCP Land
- TCP SYN Fragment
ICMP Based Attacks Supports protection from the following ICMP-based attacks by enabling the respective checkboxes: - ICMP Ping of Death
- ICMP Fragment
IP Based Attacks Supports protection from the following IP-based attacks by enabling the respective checkboxes: - IP Unknown Protocol
- IP Options
- IPv6 Unknown Protocol
- IPv6 Extension Header
Configure Edge Firewall
By default, all the Edges inherit the Firewall rules, Security Features settings, Stateful Firewall settings, Network and Flood Protection settings, Firewall Logging, Syslog Forwarding, and Edge access configurations from the associated Profile.
- In the SD-WAN service of the Enterprise portal, select .
- Select the Edges for which you want to override the inherited Firewall settings and select the Firewall tab.
- Select the Override checkbox against the various Firewall settings if you want to modify the inherited Firewall rules and settings for the selected Edge.
Note: The Edge override rules will take priority over the inherited Profile rules for the Edge. Any Firewall override match value that is the same as any Profile Firewall rule will override that Profile rule.
Figure 5. Configure Global Segment 
- At the Edge level, you can configure Port Forwarding and 1:1 NAT IPv4 or IPv6 rules individually by navigating to .
Note:By default, the Edge blocks all inbound traffic except for self-destined traffic unless the user configures Port Forwarding and 1:1 NAT Firewall Rules. The outside IP will always be that of the WAN IP or the IP address from the WAN IP subnet.Note: Edge firewalls apply to traffic passing through the Edge, but do not apply to self-originating or self-destined traffic.Note: When configuring IPv6 Port Forwarding and 1:1 NAT rules, you can enter only Global or Unicast IP addresses and cannot enter Link Local Address.
Port Forwarding and 1:1 NAT Firewall Rules
Port Forwarding and 1:1 NAT firewall rules gives Internet clients access to servers connected to an Edge LAN interface. Access can be made available through either Port Forwarding Rules or 1:1 NAT (Network Address Translation) rules.
Port Forwarding Rules
Port forwarding rules allow you to configure rules to redirect traffic from a specific WAN port to a device (LAN IP/ LAN Port) within the local subnet. Optionally, you can also restrict the inbound traffic by an IP or a subnet. Port forwarding rules can be configured with the Outside IP which is on the same subnet of the WAN IP. It can also translate outside IP addresses in different subnets than the WAN interface address if the ISP routes traffic for the subnet towards the Edge.
The following figure illustrates the port forwarding configuration.

- In the Name text box, enter a name (optional) for the rule.
- From the Protocol drop-down menu, select either TCP or UDP as the protocol for port forwarding.
- From the Interface drop-down menu, select the interface for the inbound traffic.
- In the Outside IP text box, enter the IPv4 or IPv6 address using which the host (application) can be accessed from the outside network.
- In the WAN Ports text box, enter a WAN port or a range of ports separated with a dash (-), for example 20-25.
- In the LAN IP and LAN Port text boxes, enter the IPv4 or IPv6 address and port number of the LAN, where the request will be forwarded.
- From the Segment drop-down menu, select a segment the LAN IP will belong to.
- In the Remote IP/subnet text box, specify an IP address of an inbound traffic that you want to be forwarded to an internal server. If you do not specify any IP address, then it will allow any traffic.
- Select the Log check box to activate logging for this rule.
- Select Save Changes.
1:1 NAT Settings
These are used to map an Outside IP address supported by the Edge to a server connected to an Edge LAN interface (for example, a web server or a mail server). It can also translate outside IP addresses in different subnets than the WAN interface address if the ISP routes traffic for the subnet towards the Edge. Each mapping is between one IP address outside the firewall for a specific WAN interface and one LAN IP address inside the firewall. Within each mapping, you can specify which ports will be forwarded to the inside IP address. The '+' icon on the right can be used to add additional 1:1 NAT settings.
The following figure illustrates the 1:1 NAT configuration.

- In the Name text box, enter a name for the rule.
- In the Outside IP text box, enter the IPv4 or IPv6 address with which the host can be accessed from an outside network.
- From the Interface drop-down menu, select the WAN interface where the Outside IP address will be bound.
- In the Inside (LAN) IP text box, enter the actual IPv4 or IPv6 (LAN) address of the host.
- From the Segment drop-down menu, select a segment the LAN IP will belong to.
- Select the Outbound Traffic check box, if you want to allow traffic from LAN Client to Internet being NATed to Outside IP address.
- Enter the Allowed Traffic Source (Protocol, Ports, Remote IP/Subnet) details for mapping in the respective fields.
- Select the Log check box to activate logging for this rule.
- Select Save Changes.
Configure Firewall Rule
You can configure Firewall rules at the Profile and Edge levels to allow, drop, reject, or skip inbound and outbound traffic. If the stateful firewall feature is activated, the firewall rule will be validated to filter both inbound and outbound traffic. With a stateless firewall, you can only filter outbound traffic. The firewall rule matches parameters such as IP addresses, ports, VLAN IDs, Interfaces, MAC addresses, domain names, protocols, object groups, applications, DSCP tags, URL categories, URL reputation score, and Security Service groups. When a data packet matches the match conditions, the associated action or actions are taken. If a packet matches no parameters, then a default action is taken on the packet.
- In the SD-WAN service of the Enterprise portal, select . The Profiles page displays the existing Profiles.
- To configure a Profiles Firewall, select the link to the Profile and select the Firewall tab. Alternatively, you can select the View link in the Firewall column of the Profile.
- Go to the Configure Firewall section and under the Firewall Rules area, select + NEW RULE. The New Rule page appears.
Figure 10. New Rule Page 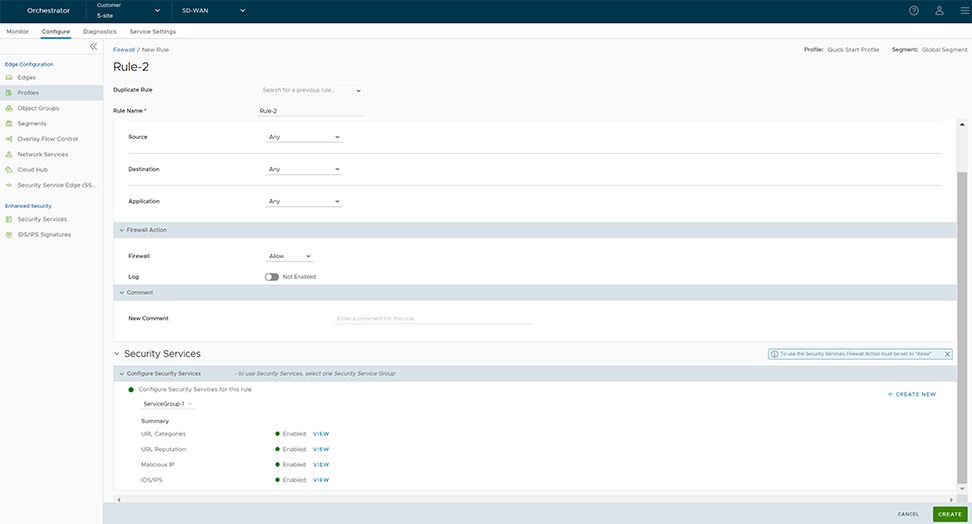
- In the Rule Name text box, enter a unique name for the Rule. To create a firewall rule from an existing rule, select the rule to be duplicated from the Duplicate Rule drop-down menu.
- In the Match section, configure the match conditions for the rule:
Table 6. Rule Field Descriptions Field Description IP Version By default, the IPv4 and IPv6 address type is selected. You can configure the Source and Destination IP addresses according to the selected Address Type, as follows: - IPv4 – Allows to configure only IPv4 addresses as Source and Destination.
- IPv6 – Allows to configure only IPv6 addresses as Source and Destination.
- IPv4 and IPv6 – Allows to configure both IPv4 and IPv6 addresses in the matching criteria. If you choose this mode, you cannot configure the Source or Destination IP address.
Note: When you upgrade, the firewall rules from previous versions are moved to IPv4 mode.Source Allows to specify the source for packets. Select any of the following options: - Any- Allows all source addresses by default.
- Object Group- Allows you to select a combination of address group and service group. For more information, see Object Groups and Configure Firewall Rule with Object Group.
Note: In a Firewall policy, when using an Object Group to match the Source traffic, domain-based address group is not supported.
- Define- Allows you to define the source traffic to a specific VLAN, Interface, IPv4 or IPv6 Address, MAC Address, or Transport Port. Select one of the following options:
-
- VLAN- Matches traffic based on the specified VLAN and VLAN Type. You can select either one of the VLAN types:
- End-to-End- This option allows for VLAN tags on both local branches and remote sites to be used by the firewall engine as part of VLAN rule matches in a firewall policy.
- Local- This option allows for VLAN tags on local branches to be used by the firewall engine as part of VLAN rule matches in a firewall policy, and ignores remote VLAN tags.
- VLAN- Matches traffic based on the specified VLAN and VLAN Type. You can select either one of the VLAN types:
- Interface and IP Address - Matches traffic from the specified interface and IPv4 or IPv6 address, selected from the drop-down menu.
Note: If an interface cannot be selected, then the interface is either not activated or not assigned to this segment.Note: If you select IPv4 and IPv6 (Mixed mode) as the Address Type, then the traffic is matched based on only the specified interface.Along with the IP address, you can specify one of the following address types to match the source traffic:
- CIDR prefix- Choose this option if you want the network defined as a CIDR value (for example: 172.10.0.0 /16).
- Subnet mask- Choose this option if you want the network defined based on a Subnet mask (for example, 172.10.0.0 255.255.0.0).
- Wildcard mask- Choose this option if you want the ability to narrow the enforcement of a policy to a set of devices across different IP subnets that share a matching host IP address value. The Wildcard mask matches an IP, or a set of IP addresses based on the inverted Subnet mask. A '0' within the binary value of the mask means the value is fixed and a '1' within the binary value of the mask means the value is wild (can be 1 or 0). For example, a Wildcard mask of 0.0.0.255 (binary equivalent = 00000000.00000000.00000000.11111111) with an IP Address of 172.0.0, the first three octets are fixed values, and the last octet is a variable value. This option is available only for IPv4 addresses.
- Mac Address- Matches traffic based on the specified MAC address.
- Transport Port- Matches traffic from the specified source port or port range.
-
Destination Allows to specify the destination for packets. Select any of the following options: - Any- Allows all destination addresses by default.
- Object Group- Allows you to select a combination of address group and service group. For more information, see Object Groups and Configure Firewall Rule with Object Group.
- Define- Allows you to define the destination traffic to a specific VLAN, Interface, IPv4 or IPv6 Address, Domain Name, Protocol, or Port. Select one of the following options:
- VLAN- Matches traffic based on the specified VLAN and VLAN Type. You can select either one of the VLAN types:
- End-to-End- This option allows for VLAN tags on both local branches and remote sites to be used by the firewall engine as part of VLAN rule matches in a firewall policy.
- Local- This option allows for VLAN tags on local branches to be used by the firewall engine as part of VLAN rule matches in a firewall policy, and ignores remote VLAN tags.
Note: When using a VLAN to match source or destination traffic in a firewall policy, the VLAN type must be the same for both source and destination. - Interface- Matches traffic from the specified interface, selected from the drop-down menu.
Note: If an interface cannot be selected, then the interface is either not activated or not assigned to this segment.
- IP Address- Matches traffic for the specified IPv4 or IPv6 address and Domain name.
Note: If you select IPv4 and IPv6 (Mixed mode) as the Address Type, then you cannot specify the IP address as the destination.
Along with the IP address, you can specify one of the following address types to match the source traffic: CIDR prefix, Subnet mask, or Wildcard mask.
Note: Use the Domain Name field to match the entire domain name or a portion of the domain name. For example, \"salesforce\" will match traffic to \" Mixed \". - Transport- Matches traffic from the specified source port or port range. Protocol- Matches traffic for the specified protocol, selected from the drop-down menu. The supported protocols are GRE, ICMP, TCP, and UDP.
Note: ICMP is not supported in Mixed mode (IPv4 and IPv6).
- VLAN- Matches traffic based on the specified VLAN and VLAN Type. You can select either one of the VLAN types:
Application Select any of the following options: - Any- Applies the firewall rule to any application by default.
- Define- Allows to select an application and Differentiated Services Code Point (DSCP) flag to apply a specific firewall rule.
Note: When creating firewall rules matching an application, the firewall depends on the DPI (Deep Packet Inspection) Engine to identify the application to which a particular flow belongs. The DPI will not be able to determine the application based on the first packet. The DPI Engine usually needs the first 5-10 packets in the flow to identify the application, but the firewall needs to classify and forward the flow from the very first packet. This may cause the first flow to match a more generalized rule in the firewall list. Once the application has been correctly identified, any future flows matching the same tuples will be reclassified automatically and hit the correct rule.For more information on specific use cases matching FTPv6 Firewall/Business policy rule, see Edge Firewall Support for FTPv6.
- In the Firewall Action section, configure the actions to be performed when the traffic matches the defined criteria.
Table 7. Firewall Action Field Descriptions Field Description Firewall Select any of the following actions the firewall should perform on packets when the conditions of the rule are met: - Allow- Allows the data packets by default.
- Drop- Drops the data packets silently without sending any notification to the source.
- Reject- Drops the packets and notifies the source by sending an explicit reset message.
- Skip- Skips the rule during lookups and processes the next rule. However, this rule will be used at the time of deploying SD-WAN.
Note: You will be able to configure the Reject and Skip actions only if the Stateful Firewall feature is activated for Profiles and Edges.
Log Select this checkbox if you want a log entry to be created when this rule is triggered. - While creating or updating a Firewall rule, you can add comments about the rule in the New Comment field in the Comment section. A maximum of 50 characters is allowed and you can add any number of comments for the same rule.
- In the Security Services section, configure the security service for the rule by selecting a Security Service Group from the drop-down menu. A summary of all the security services configured within the Security Service Group will be displayed. You can select the View button against each of the security services to view the configuration details.
From the Firewall page, you can create a new Security Service Group, by selecting the + Create New link on the right side of the Security Services section.
Note: Security services can be activated in the rule only if the Firewall action is Allow. If the Firewall action is anything other than Allow, Security services will be deactivated. - After configuring all the required settings, select Create.
A Firewall rule is created for the selected Profile, and it appears under the Firewall Rules area of the Profile Firewall page.
Note: The rules created at the Profile level cannot be updated at the Edge level. To override the rule, user needs to create the same rule at the Edge level with new parameters to override the Profile level rule.In the Firewall Rules area of the Profile Firewall page, you can perform the following actions:- DELETE- To delete existing Firewall rules, select the checkboxes prior to the rules and select DELETE.
- CLONE- To duplicate a Firewall rule, select the rule and select CLONE.
- COMMENT HISTORY- To view all comments added while creating or updating a rule, select the rule and select COMMENT HISTORY.
- Search for Rule- Allows to search the rule by Rule name, IP address, Port/Port range, and Address group and Service group names.
Edge Firewall Support for FTPv6
File Transfer Protocol version 6 (FTPv6) is an updated version of the classic FTP protocol that enables the transfer of files between a client and a server over an Internet Protocol version 6 (IPv6) network. It builds upon the principles of FTPv4 while adding support for IPv6, which provides a larger address space and improved network routing capabilities.
- Allowing FTPv6 traffic from specific/random hosts
- Blocking FTPv6 traffic from specific/random hosts
- Allowing FTPv6 traffic on specific/random ports
- Blocking FTPv6 traffic on specific/random ports
Use Case: Identifying Passive FTPv6 Traffic and Applying FTP Firewall Rules
In this scenario, Passive FTPv6 mode uses random port numbers for data transfer, making it challenging to identify FTP traffic as it does not use standard ports 20 and 21. An efficient Deep Packet Inspection (DPI) solution is required to detect passive FTPv6 traffic and apply appropriate firewall rules for allowing or denying access.
The release 5.4 supports application identification for both FTPv4/FTPv6 Active and Passive modes when using VeloCloud SD-WAN service. This enables customers to easily identify and permit passive FTPv6 traffic using a generic FTP firewall rule. This streamlined process benefits the customer by simplifying the management of FTPv6 traffic while ensuring secure and controlled access.
- In the SD-WAN service of the Enterprise portal, select . The Edges page displays the existing Edges.
- Select an Edge to configure a firewall rule matching the FTP application, and select the Firewall tab.
- Go to the Configure Firewall section and under the Firewall Rules area, select + NEW RULE. The New Rule page appears.
- In the Rule Name text box, enter a unique name for the Rule.
- In the Match section, from the Applications drop-down menu select Define. This allows you to select the Application Category and Application to apply a specific firewall rule.
Figure 11. Apply a Specific Rule 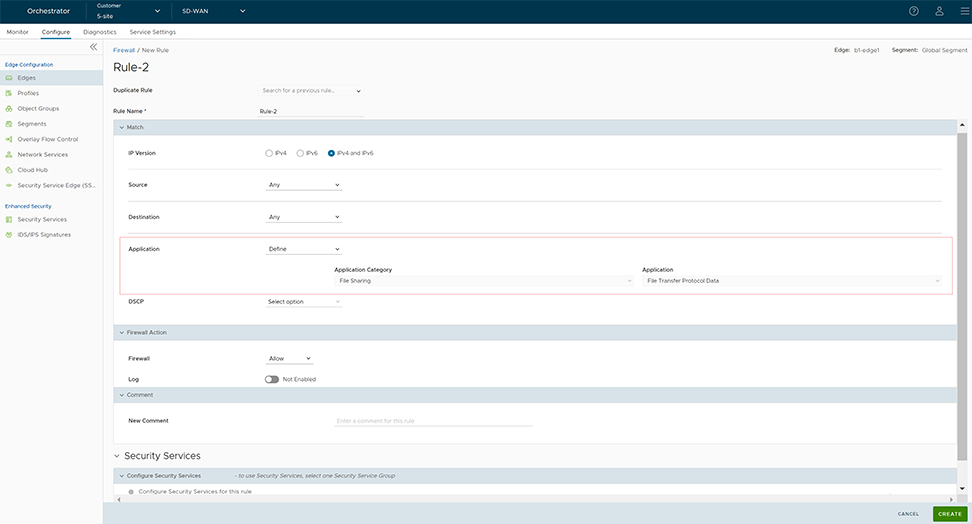
- From the Applications Category menu, select File Sharing, and from the Applications drop-down menu select either File Transfer Protocol (for Control connection) or File Transfer Protocol Data (for Data connection).
- Select Create. A firewall rule matching the FTP application is created at the Edge level and it appears in the Firewall Rules area as shown in the following screenshot.
Figure 12. Create a Firewall Rules 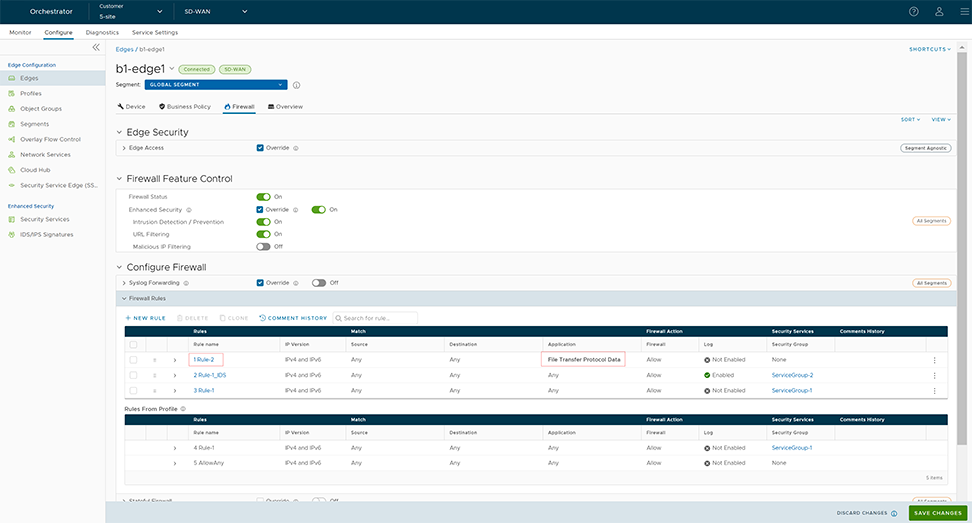
Enhanced Firewall Services
This section provides details on how to configure and monitor Enhanced Firewall Services (EFS).
Enhanced Firewall Services Overview
Enhanced Firewall Services (EFS) provide additional EFS security functionalities on VeloCloud Edges. The Security powered EFS functionality supports URL Category filtering, URL Reputation filtering, Malicious IP filtering, Intrusion Detection System (IDS) and Intrusion Prevention System (IPS) services on VeloCloud Edges. The Edge Enhanced Firewall Services (EFS) protect Edge traffic from intrusions across Branch-to-Branch, Branch-to-Hub, or Branch-to-Internet traffic patterns.
Currently, Edge Firewall provides stateful inspection along with application identification without additional EFS security features. While the stateful Firewall Edge provides security, it is not adequate and creates a gap in providing EFS security integrated natively with VeloCloud SD-WAN. Edge EFS addresses these security gaps and offers enhanced threat protection natively on the Edge in conjunction with VeloCloud SD-WAN.
Customers can configure and manage the EFS features using the Firewall functionality in VeloCloud Orchestrator. Customers can configure Firewall Rules to block web traffic based on IDS/IPS Signature matching, category, and/or reputation of the URL or IP.
Limitations
When EFS is activated and IDS/IPS is configured, if you use the dynamic addressing with the address range outside the private address range in the case of IPv4 and the ULA address range in the case of IPv6 described in RFC1918, rule matching might not happen due to the address not being part of HOME_NETWORK setting in suricata.yaml.
Configure Enhanced Security Services
A customer with the Enhanced Firewall Services (EFS) functionality activated at the Global Settings level in the Edge Cloud Orchestrator can now individually configure and manage Security services such as URL Filtering (URL Category filtering, URL Reputation filtering), Malicious IP filtering, Intrusion Detection System (IDS) and Intrusion Prevention System (IPS). To block user traffic based on IDS/IPS Signature matching, category, and/or reputation of the URL or IP, the customer must create a Security Service Group using the pre-configured security services and associate that Security Service Group with the Firewall rules.
Before You Begin
- Ensure the Edge version is 6.0.0 for the URL Filtering (URL Category and URL Reputation) and Malicious IP filtering to work as expected. For the IDS and IPS service configuration, ensure the Edge version is 5.2.0 and later.
- Ensure the EFS feature is activated at the Enterprise level. Contact your Operator if you would want the EFS feature to be activated. An Operator can activate the EFS feature from the UI page.
- URL Categories
- URL Reputation
- Malicious IP
- IDS/IPS
- Security Service Group
Configure URL Categories Service
URL Categories service consists of assigning one or more categories to URLs/Domains. As there are hundreds of millions of websites and URLs, it is very tedious to configure the policy for individual URLs, so these URLs are already mapped to a specific category, and then filtering policy is applied over the categories.
Currently, there are more than 80 URL categories including Social Networking, Financial Services, Phishing, and so on.
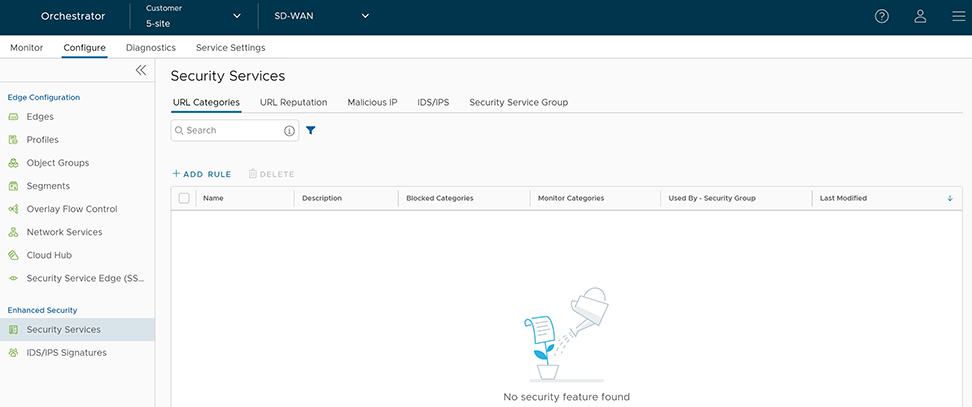
- In the SD-WAN service of the Enterprise portal, to configure Security Services, select . The Security Services page appears.
- Select the URL Categories tab and select +ADD RULE. The Configure URL Category Service pop-up window appears.
Figure 14. Configure URL Category Service 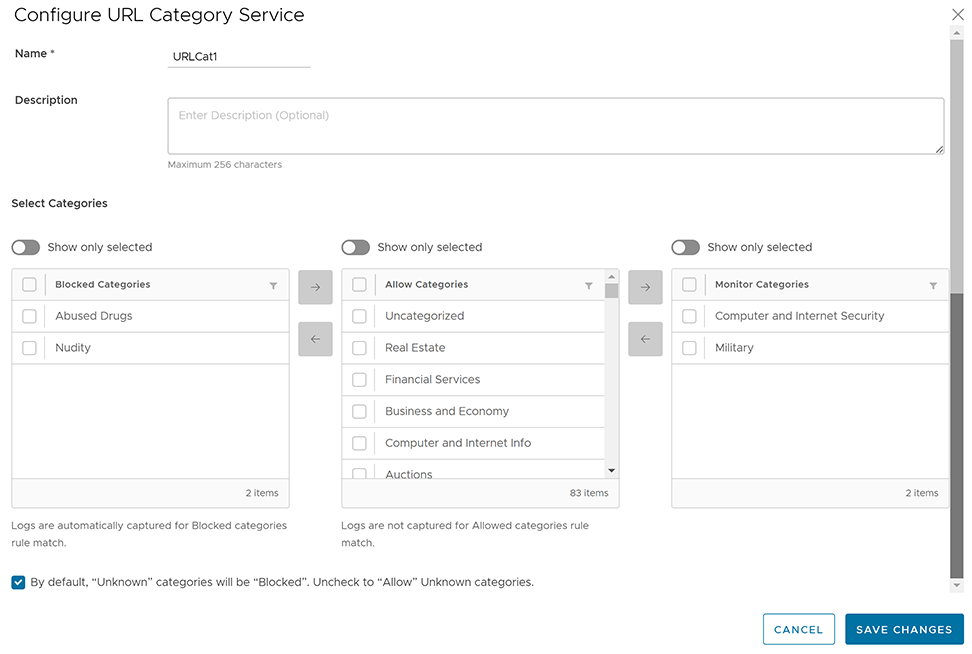
- Enter a unique name for the URL Categories service and provide a description as needed.
- From the Allow Categories list, you can select the categories that you want to block and move it to the Blocked Categories list by using the Left arrow button. Similarly, you can select the categories that you want to allow and log and move it to the Monitor Categories list by using the Right arrow button.
Note: Logs are captured automatically for firewall rules that match the Blocked and Monitor Categories. For Allow Categories, traffic is allowed but not logged.
- To allow URLs with Unknown categories, unselect the checkbox at the bottom.
Note: By default, Unknown categories will be blocked.
- Select Save Changes. A URL Category service rule is created, and it appears in the table in the URL Categories page.
Figure 15. Creating URL Categories 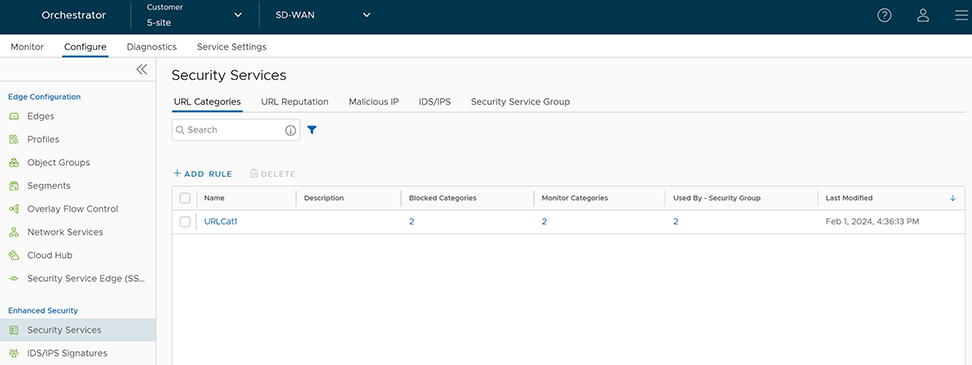
- Select the link to the Security Service to modify the settings. To delete a Security Service, select the checkbox before the group and select Delete.
Note: Security Services in use cannot be deleted. If you want to delete a Security Service, it must first be removed from the associated Security Service Group and firewall rules.
To view the list of blocked categories, monitor categories, and security groups associated with the security service, select the respective links under the Blocked Categories, Monitor Categories, and Used By- Security Group columns.
Configure URL Reputation Service
- 81-100: Trustworthy
- 61-80: Low risk
- 41-60: Medium risk
- 21-40: Suspicious
- 01-20: High risk
-
Note: Trustworthy is the safest Reputation and has the least amount of risk.
URL Reputation service looks up the score of destination URLs and blocks the Edge traffic if their scores indicate a threat.
- In the SD-WAN service of the Enterprise portal, to configure Security Services, select . The Security Services page appears.
- Select the URL Reputation tab and select +ADD RULE. The Configure URL Reputation Service pop-up window appears.
Figure 16. Configure URL Reputation Service 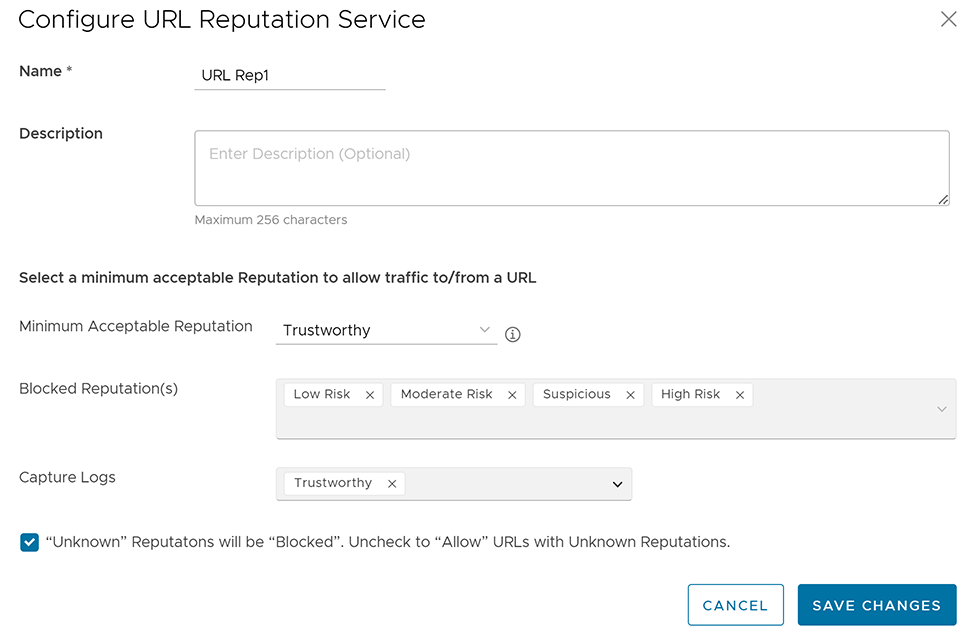
- Enter a unique name for the URL Reputation service and provide a description as needed.
- From the Minimum Acceptable Reputation drop-down menu, select an acceptable reputation to allow traffic to/from a URL. Once you configure the minimum acceptable reputation, all the other Reputations that need to be blocked are automatically listed in the Blocked Reputation(s) box. Traffic to/from any URL below the selected URL reputation level will be blocked and logged automatically, and traffic above the selected URL reputation level will be allowed but not logged automatically. You can specify the reputations to log using the Capture Logs drop-down menu.
- To allow URLs with Unknown Reputations, unselect the checkbox at the bottom. An URL is classified as having an "Unknown" reputation when there is no reputation information available from the URL Filtering service.
Note: By default, Unknown Reputations will be blocked.
- Select Save Changes. A URL Reputation service rule is created, and it appears in the table in the URL Reputation page.
Figure 17. Creating URL Reputation 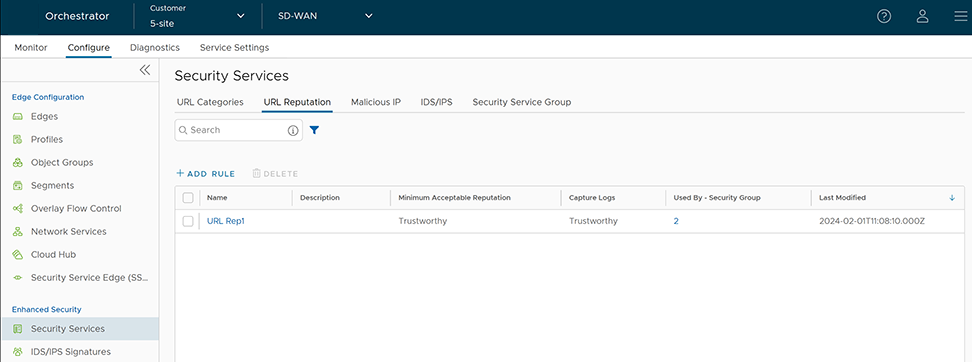
- Select the link to the Security Service to modify the settings. To delete a Security Service, select the checkbox before the group and select Delete.
Configure Malicious IP Service
Blocking IP addresses can be useful for protecting a network or website from malicious activity. IP reputation score assigned by Webroot provides the trustworthiness of IP. Malicious IP service looks up the IP reputation score of destination IPs and blocks the Edge traffic if their scores indicate a malicious activity.
- In the SD-WAN service of the Enterprise portal, to configure Security Services, select . The Security Services page appears.
- Select the Malicious IP tab and select +ADD RULE. The Configure Malicious IP Filtering Service pop-up window appears.
Figure 18. Configuring Malicious IP Filtering Service 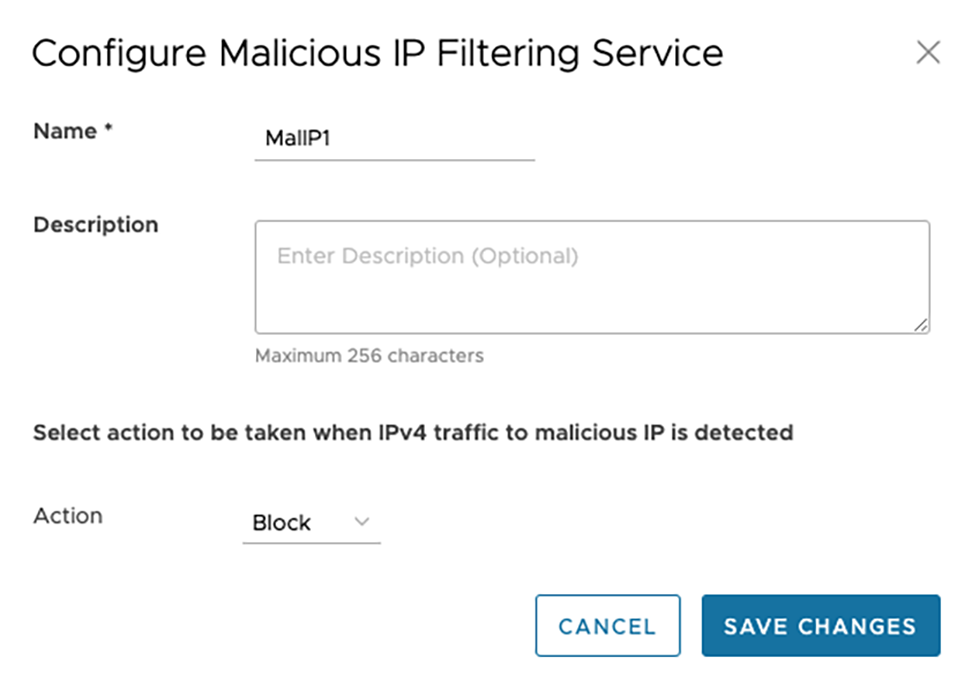
- Enter a unique name for the Malicious IP service and provide a description as needed.
- From the Action drop-down menu, select an action to be taken when IPv4 traffic to/from malicious IP is detected. You can select any one of the following options:
- Monitor- Allows and logs the IPv4 traffic automatically from the Malicious IP service.
- Block- Blocks and logs the IPv4 traffic automatically from the Malicious IP service.
Note: If the IP is not malicious, IPv4 traffic is allowed but not logged. - Select Save Changes. A Malicious IP service rule is created, and it appears in the table in the Malicious IP page.
Figure 19. Saving Malicious IP Filtering Service 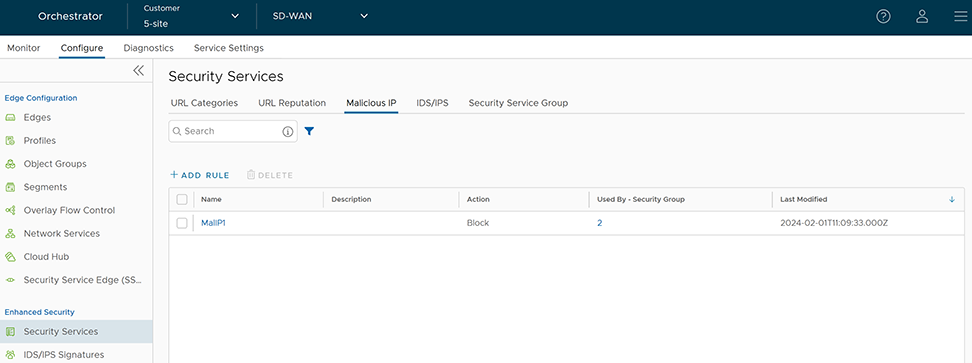
- Select the link to the Security Service to modify the settings. To delete a Security Service, select the checkbox before the group and select Delete.
Configure IDS/IPS Security Service
- In the SD-WAN service of the Enterprise portal, to configure Security Services, select . The Security Services page appears.
- Select the IDS/IPS tab and select +ADD RULE. The Configure IDS/IPS Security Service pop-up window appears.
Figure 20. Configuring IDS/IPS Security Service 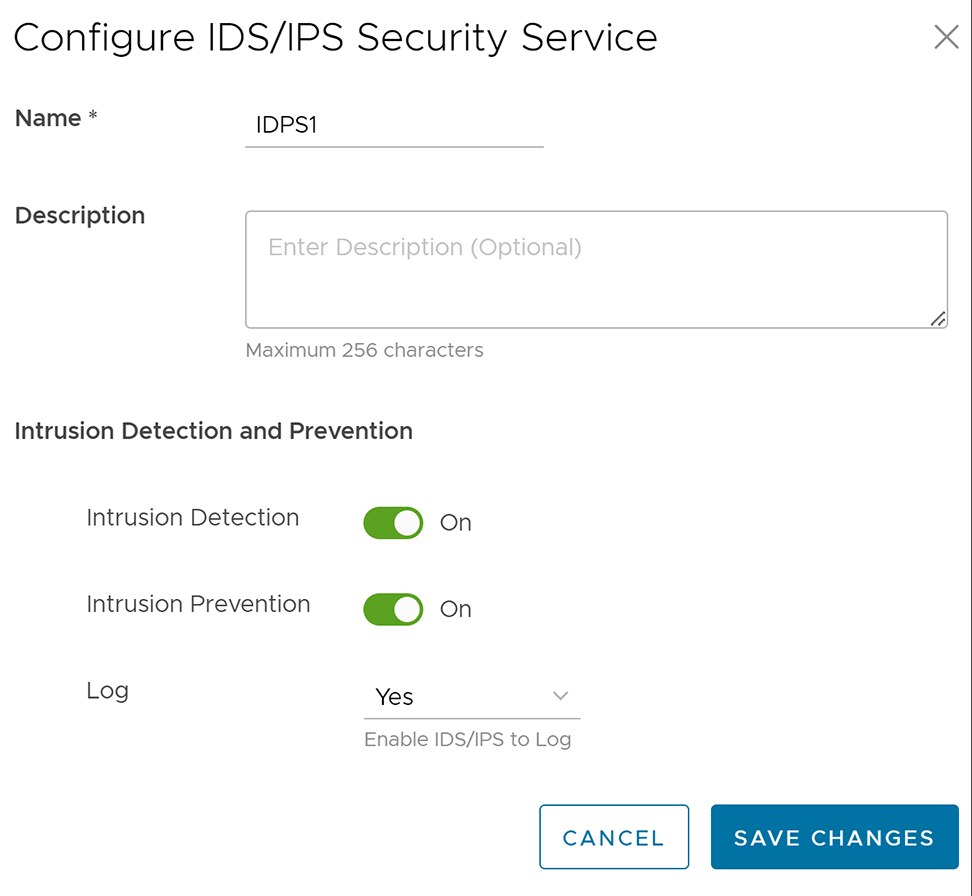
- Enter a unique name for the IDS/IPS service and provide a description as needed.
- Under the Intrusion Detection and Prevention section, activate Intrusion Detection (IDS) and/or Intrusion Prevention (IPS) toggle. When a user activates only IPS, IDS will be automatically activated. EFS engine inspects traffic sent/received through the Edges and matches content against signatures configured in the EFS engine. IDS/IPS Signatures are updated on a continuous basis with a valid EFS license. For more information about EFS, see the topic Enhanced Firewall Services.
- Intrusion Detection- When IDS is activated on Edges, the Edges detect if the traffic flow is malicious or not based on certain signatures configured in the engine. If an attack is detected, the EFS engine generates an alert and sends the alert message to Orchestrator/Syslog Server if Firewall logging is activated in Orchestrator and will not drop any packets.
- Intrusion Prevention- When IPS is activated on Edges, the Edges detect if the traffic flow is malicious or not based on certain signatures configured in the engine. If an attack is detected, the EFS engine generates an alert and blocks the traffic flow to the client if the action in the signature rule is "Reject". If the action in the signature rule is "Alert", the traffic will be allowed without dropping any packets even if you configure IPS.
Note: Arista recommends customers to not activate VNF when IDS/IPS is activated on Edges. - From the Log drop-down menu, select Yes if you want to send the IDS/IPS logs to Orchestrator.
- Select Save Changes. An IDS/IPS service rule is created, and it appears in the table in the IDS/IPS page.
Figure 21. Creating IDS/IPS Service Rule 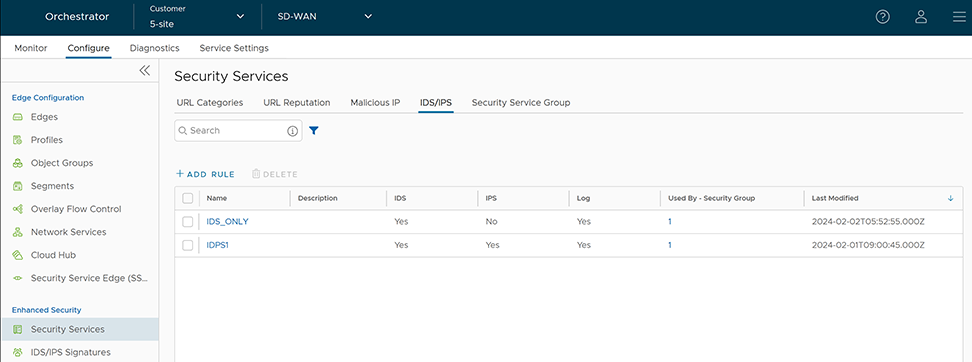
- Select the link to the Security Service to modify the settings. To delete a Security Service, select the checkbox before the group and select Delete.
Configure Security Service Group
- In the SD-WAN service of the Enterprise portal, to configure Security Services, select . The Security Services page appears.
- Select the Security Service Group tab and select + CREATE GROUP. The New Security Service Group page appears.
Figure 22. Configuring New Security Service Group 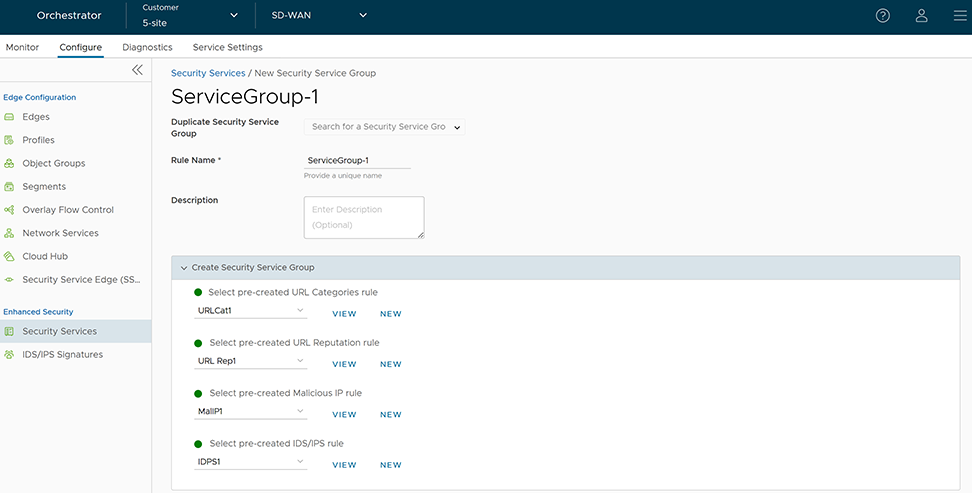
- If you want to create a new Service Group from an existing one, choose an option from the Duplicate Security Service Group drop-down menu and rename the rule name alone. All the other configurations will be automatically applied from the selected Security Service Group.
- To create a new Service Group, enter a unique name for the Security Service Group and provide a description as needed.
- From the Create Security Service Group section, you can select the pre-created security services for URL Categories, URL Reputation, Malicious IP, and IDS/IPS and group them together to create a Security Group. If you do not want to use the pre-created services, you can select the New button and create a new security service to associate it to the Security Group. Select the View button to view the configuration details of the selected security service.
- Select Save Changes. A Security Service Group is created, and it appears in the table in the Security Service Group page.
Figure 23. Saving Security Service Group 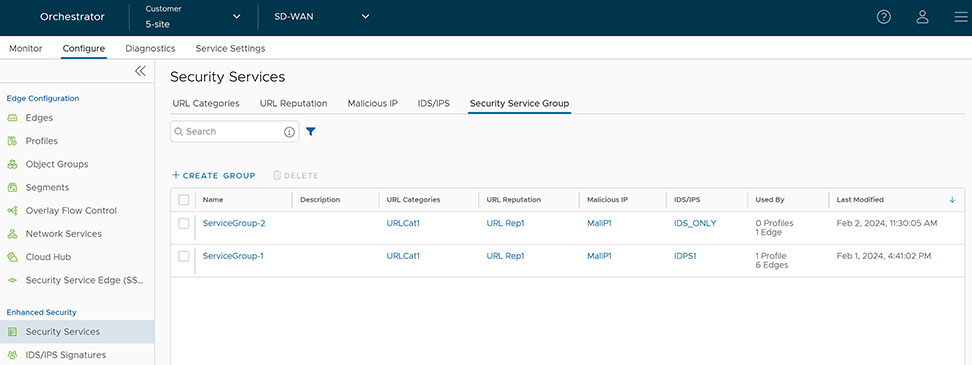
- Select the link to the Security Service Group to modify the settings. To delete a Security Service Group, select the check box before the group and select Delete.
Note: Security Service Group in use cannot be deleted. If you want to delete a Security Service group, it must first be removed from the associated firewall rules.
- You can associate a security service group with multiple firewall rules.
- You cannot associate more than one security service group with a firewall rule.
Associate a Security Service Group to a Firewall Rule at the Profile Level
- In the SD-WAN service of the Enterprise portal, select . The Profiles page displays the existing Profiles.
- To configure a Profiles Firewall, select the link to the Profile and select the Firewalltab.
- Go to the Configure Firewall section and under the Firewall Rules area, select + NEW RULE. The New Rule page appears.
Figure 24. Configuring Firewall at Profile Level - In the Rule Name text box, enter a unique name for the Rule. To create a firewall rule from an existing rule, select the rule to be duplicated from the Duplicate Rule drop-down menu. In the Match and Firewall Action sections, configure the match conditions for the rule and the actions to be performed when the traffic matches the defined criteria, respectively. For more information, see the topic Configure Firewall Rule.
- In the Security Services section, configure the security service for the rule by selecting a Security Service Group from the drop-down menu. A summary of all the security services configured within the Security Service Group will be displayed. You can select the View button against each of the security services to view the configuration details.
Note: Security services can be activated in the rule only if the Firewall action is Allow. If the Firewall action is anything other than Allow, Security services will be deactivated.
- After configuring all the required settings, select Create. A firewall rule is created for the selected Profile, and it appears under the Firewall Rules area of the Profile Firewall page.
- Select Save Changes.
- In the SD-WAN service of the Enterprise portal, select . The Profiles page displays the existing Profiles.
- To configure a Profiles Firewall, select the link to the Profile and select the Firewalltab.
- Go to the Configure Firewall section and under Firewall Rules area, select the rule name for which you want to change the Security service configuration.
- Under the Security Services section, select a different Service Group to associate to the rule and select Edit.
- Select Save Changes.
Associate a Security Service Group to a Firewall Rule at the Edge Level
- In the SD-WAN service of the Enterprise portal, select .
- Select the Edges for which you want to override the inherited Firewall settings and select the Firewall tab.
- Go to the Configure Firewall section and from the Firewall Rules area, you can create a new rule with Security Service configurations or modify the existing rule's Security Service settings.
Figure 25. Configuring Firewall at Edge Level  Note: The rules created at the Profile level cannot be updated at the Edge level. To override the rule, user needs to create the same rule at the Edge level with new parameters to override the Profile level rule.
 - After configuring all the required settings, select Create. A firewall rule is created for the selected Profile, and it appears under the Firewall Rules area of the Edge Firewall page.
- Select Save Changes.
View IDS/IPS Signatures
Once you have the Enhanced Firewall Services (EFS) feature activated at the Enterprise level, now you can view the details of the Intrusion Detection System (IDS) and Intrusion Prevention System (IPS) Signatures that an Edge is using to filter the traffic from the Edge Cloud Orchestrator.
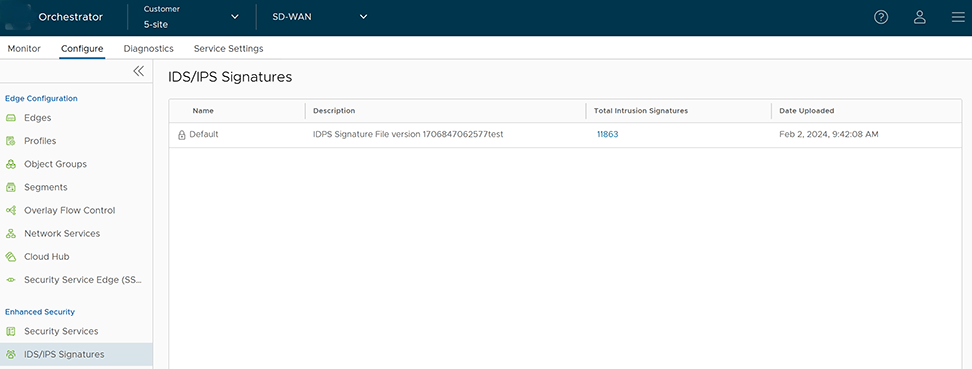
The IDS/IPS Signatures displays the Default signature details such as name and file version of the signature, total number of intrusion signatures present in the downloaded bundle, and the date and time when the signature data is uploaded.
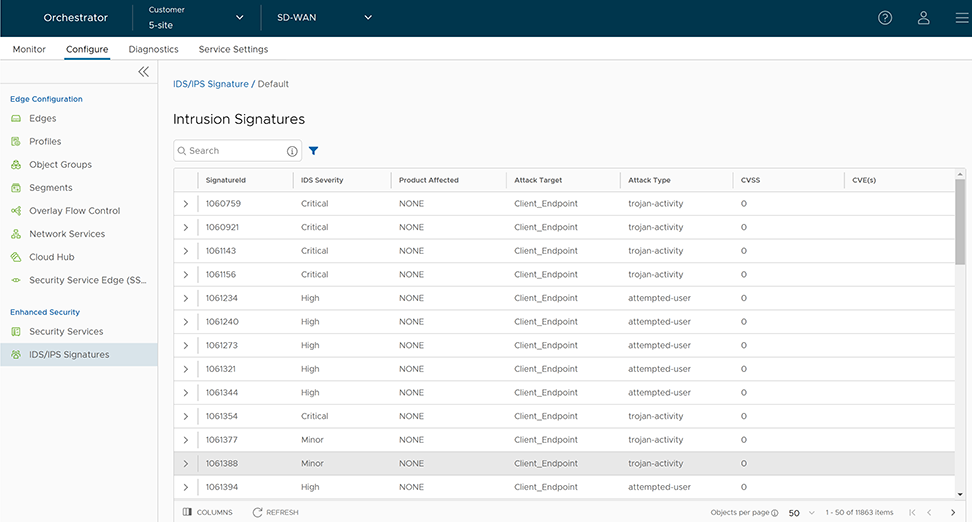
| Field | Description |
|---|---|
| SignatureId | A unique ID of the IDS signature. |
| IDS Severity | Signature severity of the intrusion. The following are the Severity rating:
|
| Product Affected | Illustrates what product is vulnerable to the exploit. |
| Attack Target | Target of the attack. |
| Attack Type | Type of attack, such as trojan horse, or denial of service (DoS). |
| CVSS | Common Vulnerability Score of the vulnerability targeted by the exploit. |
| CVE(s) | CVE reference of the vulnerability targeted by the exploit. |
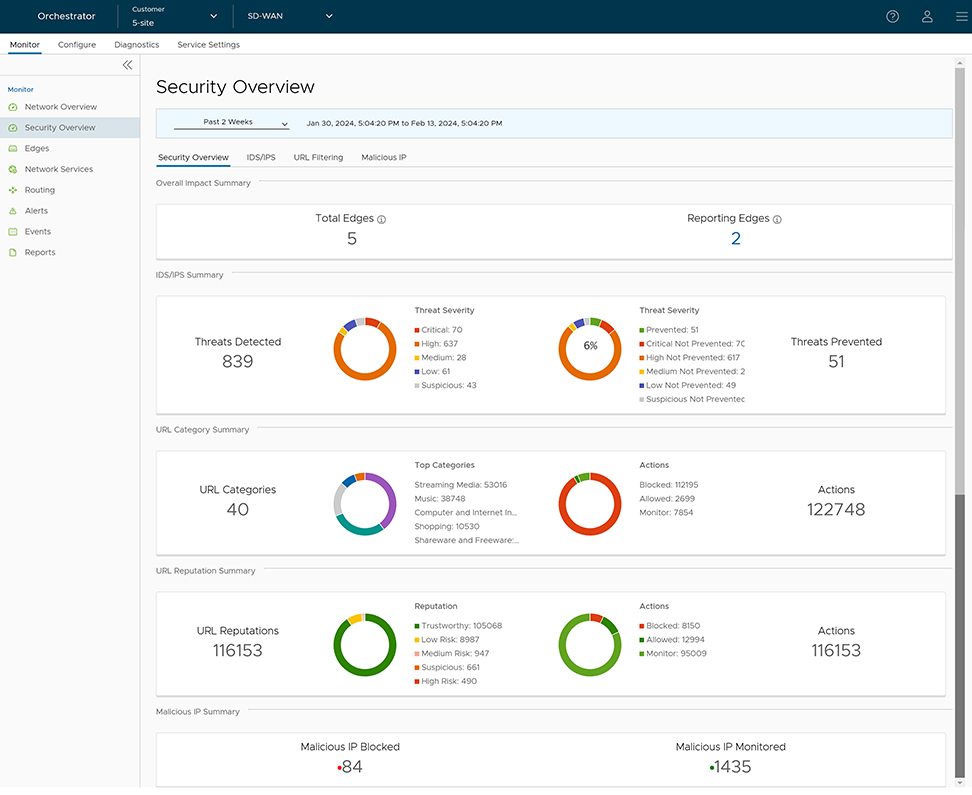
Monitor Security Overview
The Security Overview page displays the overall impact summary of configured Security services, like Intrusion Detection System (IDS)/Intrusion Prevention System (IPS), URL Categories, URL Reputations, and Malicious IP for all Edges within an Enterprise, based on the metrics collected using the various Enhanced Firewall Services (EFS) engines (IDS/IPS/URL Filtering/Malicious IP).
Monitor Security Overview- Enterprise View
| Option | Description |
|---|---|
| Overall Impact Summary | Displays the total count of Edges within the Enterprise and total count of Reporting Edges whose traffic was subjected to at least one of the Enhanced Firewall Engines.
Under Reporting Edges, selecting the link to the number displays a tabular view of all Edges whose traffic hit at least one EFS engine along with the Action count details. Hover the mouse over the Action count to view the split count by supported Action types.
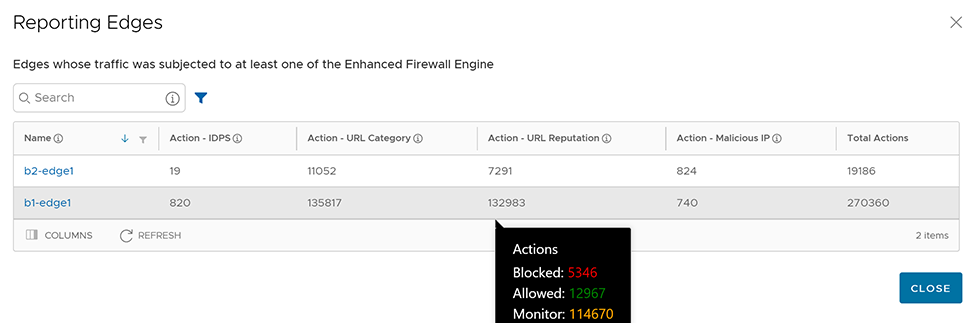 To view the EFS Threats details for a specific Edge, select the link to the Edge name. You will be navigated to the Edge-specific Security Overview page. |
| IDS/IPS Summary | Displays the total count of IDS/IPS Threats Detected and Prevented for all Edges within the Enterprise, along with the Threat Severity and Action details in a graphical representation. Hover the mouse on the graphs to view specific threat details. For detailed information about the IDS/IPS Threat distribution, see the section Figure 30 - Impacted Edge Distribution. |
| URL Category Summary | Displays the total count of URL Categories and Action count details for all Edges within the Enterprise, along with the Top 5 URL Categories details in a graphical representation. For detailed information about the URL Category Threats distribution, see the section Figure 32 - Monitoring URL Filtering. |
| URL Reputation Summary | Displays the total count of URL Reputation risks and Action count details for all Edges within the Enterprise in a graphical representation. For detailed information about the URL Reputation Threats distribution, see the section Figure 32 - Monitoring URL Filtering. |
| Malicious IP Summary | Displays the total count of Malicious IP Blocked and Monitored. For detailed information about the Malicious IP Threats distribution, see the section Figure 33 - NAT ConfigurationMonitoring Malicious IP. |
Monitor IDS/IPS
To view the IDS/IPS specific threats details for an Enterprise, select .
- Impacted Edge Distribution – Represents a map view of all the IDS/IPS Impacted Edges (by severity) and Protected Edges. The page graphically displays the following IDS/IPS Threat details for an Enterprise:
- Total count of Edges Impacted
- Total count of Edges Protected
- Top Threats Detected filtered "By Count" (Default) or "By Impact"
- Top Threat Origins filtered "By Country" (Default) or "By IP Address"
- Top Impacted Edges filtered "By Edge Name"
- Top Impacted Clients filtered "By IP Address"
Figure 30. Impacted Edge Distribution 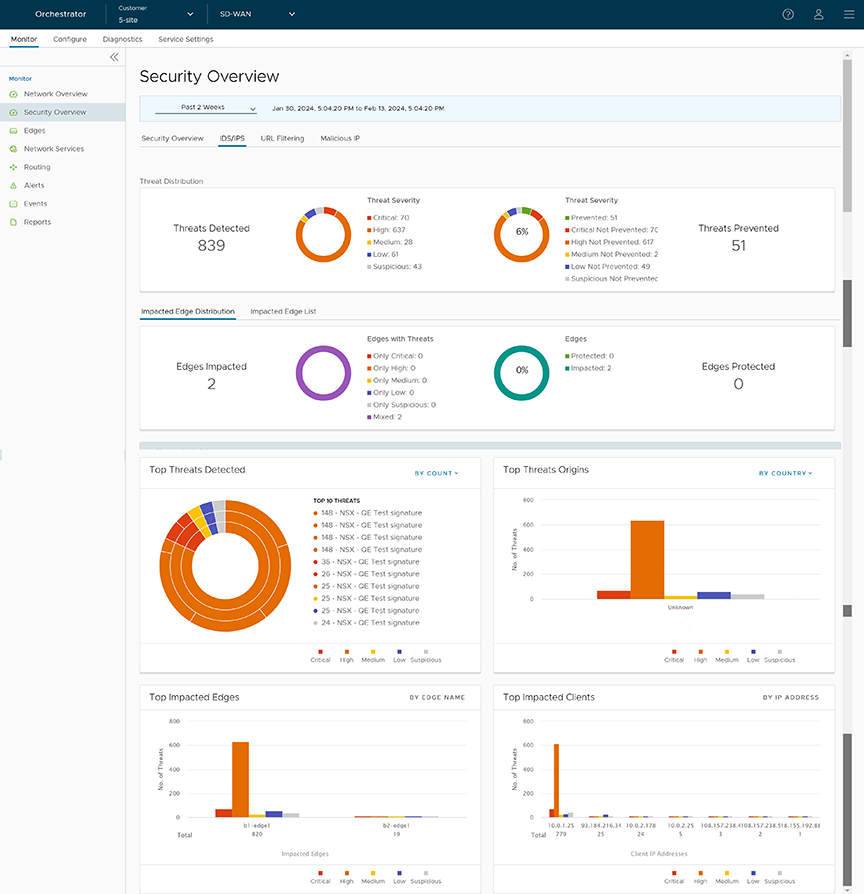
- Impacted Edge List – Represents a tabular view of all the IDS/IPS impacted Edges along with Threat details. The page displays the following details: Name and Description of the impacted Edge, Threat Impact on Edge, and Status of impacted Edge.
Figure 31. Impacted Edge List 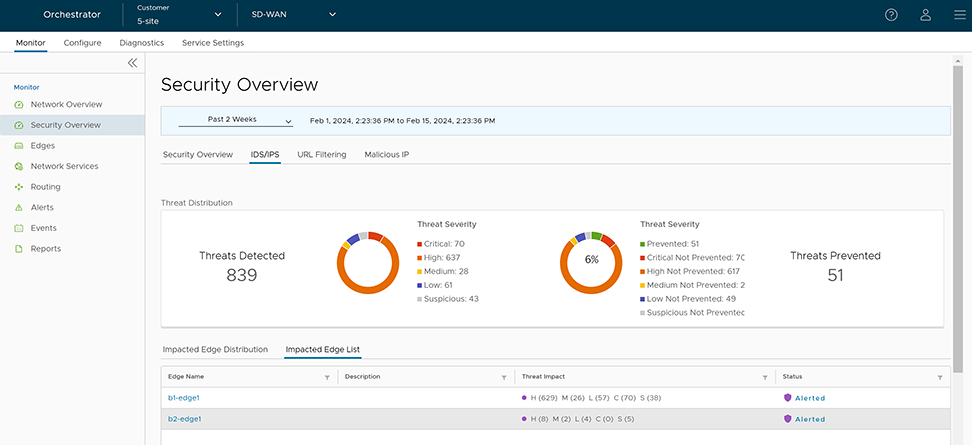
Monitor URL Filtering
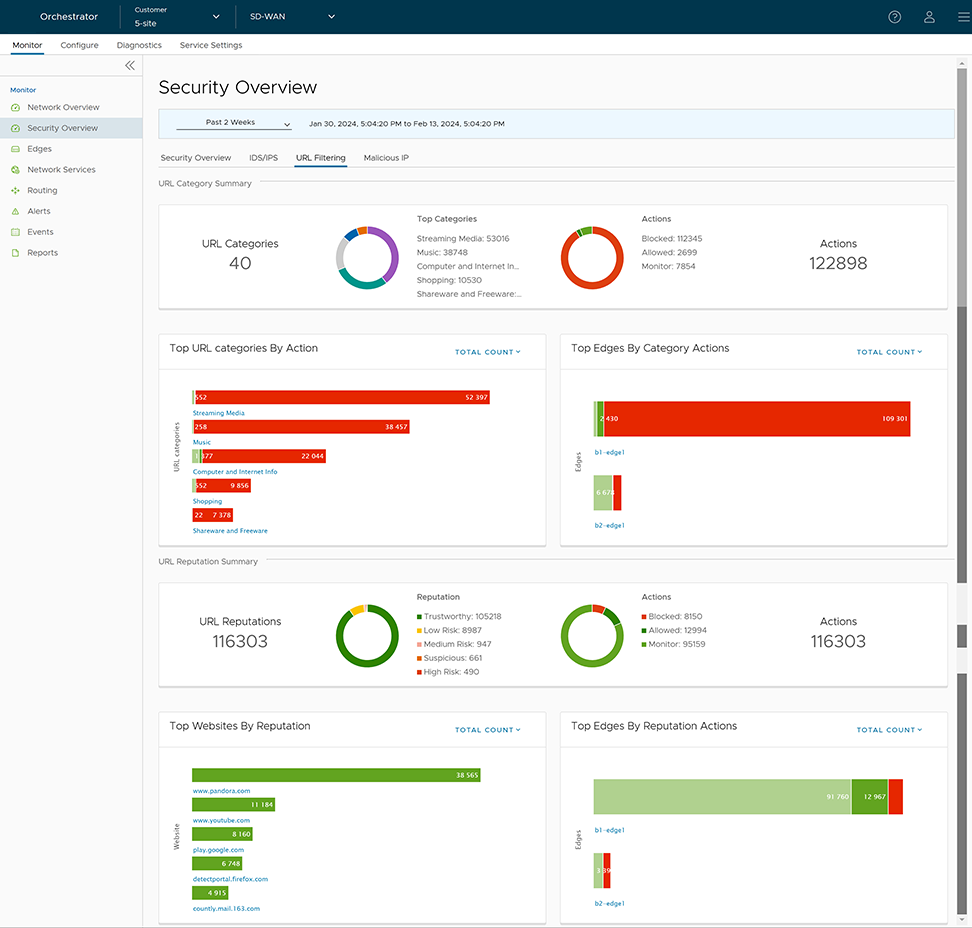
- Total count of URL Categories
- Total count of URL Category Actions
- Top URL Categories
- Top URL categories filtered by "Action" (Blocked, Allowed, and Monitored) or "Total Count" (Default)
- Top Edges filtered by "Category Actions" (Blocked, Allowed, and Monitored) or "Total Count" (Default)
- Total count of URL Reputations
- Total count of URL Reputation Actions
- Top Websites filtered by "URL Reputation" (High Risk, Suspicious, Medium Risk, Low Risk, and Trustworthy) or "Total Count" (Default)
- Top Edges filtered by "Reputation Actions" (Blocked, Allowed, and Monitored) or "Total Count" (Default)
Monitor Malicious IP
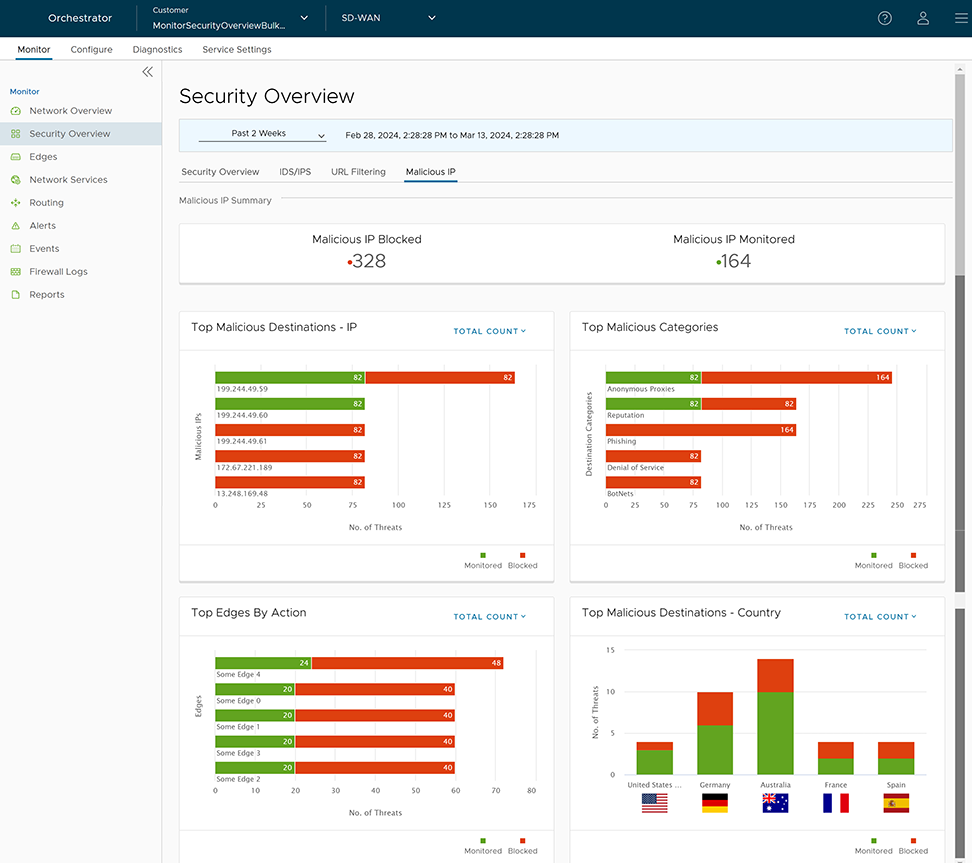
- Total count of Blocked Malicious IP
- Total count of Monitored Malicious IP
- Top Malicious Destination IPs filtered by "Action" (Blocked and Monitored) or "Total Count" (Default)
- Top Malicious Categories filtered by "Action" (Blocked and Monitored) or "Total Count" (Default)
- Top Edges filtered by "Action" (Blocked and Monitored)) or "Total Count" (Default)
- Top Malicious Destination Countries filtered by "Action" (Blocked and Monitored) or "Total Count" (Default)
Monitor Security Overview- Edge View
- In the SD-WAN service of the Enterprise portal, select . The list of Edges associated with the Enterprise appears.
- Select an Edge by selecting the link to an Edge. The Network Overview page (default page view) appears.
- From the Network Overview drop-down menu, select Security Overview. The Security Overview page displays the overall impact summary of configured Security services, like IDS/IPS, URL Categories, URL Reputations, and Malicious IP for the selected Edge.
Figure 34. Security Overview- Edge View 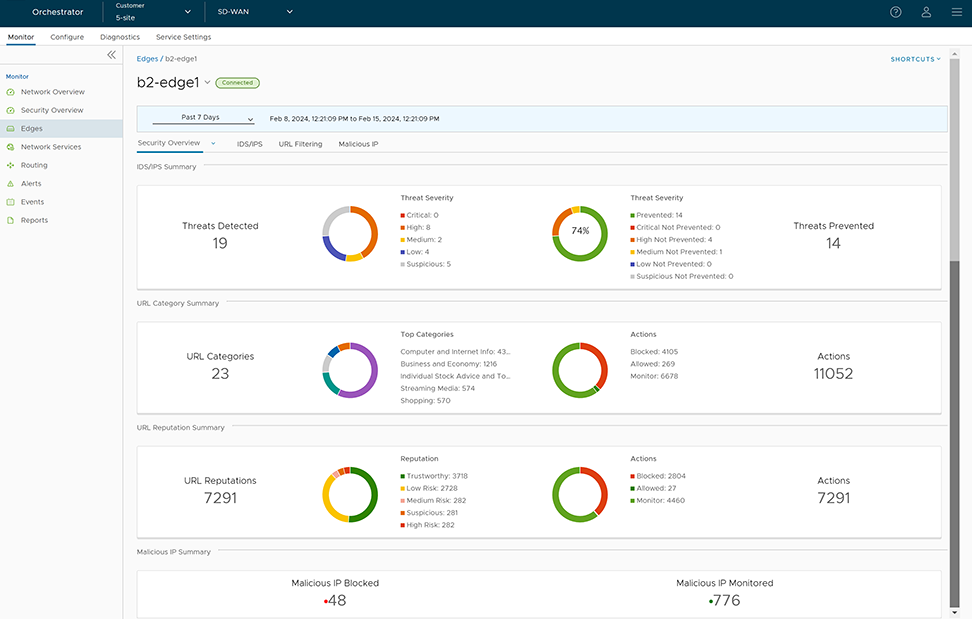
Enhanced Firewall Services Alerts and Events
Describes details about Enhanced Firewall Services (EFS) related Enterprise and Operator Orchestrator events.
Enterprise-level EFS Events
| EVENT | DISPLAYED ON ORCHESTRATOR UI AS | SEVERITY | GENERATED BY | GENERATED WHEN | RELEASE ADDED IN | DEPRECATED |
|---|---|---|---|---|---|---|
| MGD_ATPUP_INVALID _IDPS_SIGNATURE | Invalid IDPS Signature | ERROR | Edge (MGD) | Generated when there is an invalid suricata package. | 5.2.0 | |
| MGD_ATPUP_DOWNLOAD _IDPS_SIGNATURE_FAILED | Download IDPS Signature failed | ERROR | Edge (MGD) | Generated when downloading of suricata package fails. | 5.2.0 | |
| MGD_ATPUP_DECRYPT _IDPS_SIGNATURE_FAILED | Decrypt IDPS Signature failed | ERROR | Edge (MGD) | Generated when unpacking of suricata package fails. | 5.2.0 | |
| MGD_ATPUP_APPLY _IDPS_SIGNATURE_FAILED | Failed to apply IDPS Signature | ERROR | Edge (MGD) | Generated due to error in applying Suricata files. | 5.2.0 | |
| MGD_ATPUP_APPLY _IDPS_SIGNATURE _SUCCEEDED | Successfully applied IDPS Signature | INFO | Edge (MGD) | Generated when suricata files are successfully applied. | 5.2.0 | |
| MGD_ATPUP_STANDBY _UPDATE_START | Standby device IDPS Signature update started | INFO | Edge (MGD) | Generated when HA Standby update with new EFS IDPS Signature version is started. | 5.2.0 | |
| MGD_ATPUP_STANDBY _UPDATE_FAILED | Standby device IDPS Signature update failed | ERROR | Edge (MGD) | Generated when HA Standby update with new EFS IDP Signature version fails. | 5.2.0 | |
| MGD_ATPUP_STANDBY _UPDATED | Standby device IDPS Signature update completed | INFO | Edge (MGD) | Generated when HA Standby update with new EFS IDPS Signature version is successfully applied. | 5.2.0 | |
| EFS_IDPS_NOT_READY | EFS_IDPS_NOT_READY | ALERT | Edge (MGD) | Generated when packets are dropped while on-prem Orchestrator is not connected to GSM and so IDPS signatures are not ready. | 6.0.0 | |
| EFS_IP_DB _VERSION_UPDATE | EFS_IP_DB _VERSION_UPDATE | INFO | Edge (MGD) | Generated when loading of IP database succeeds or fails. | 6.0.0 | |
| EFS_IP_RTU_DB _VERSION_UPDATE | EFS_IP_RTU_DB _VERSION_UPDATE | INFO | Edge (MGD) | Generated when loading of IP RTU database succeeds or fails. | 6.0.0 | |
| EFS_URL_DB _VERSION_UPDATE | EFS_URL_DB _VERSION_UPDATE | INFO | Edge (MGD) | Generated when loading of URL database succeeds or fails. | 6.0.0 | |
| EFS_URLF_MAL _IP_NOT_READY | EFS_URLF_MAL _IP_NOT_READY | ALERT | Edge (MGD) | Generated when packets are dropped while EFS is activated but URLF/MAL-IP filtering is not ready. | 6.0.0 | |
| EFS_URL_RTU _DB_VERSION_UPDATE | EFS_URL_RTU_DB _VERSION_UPDATE | INFO | Edge (MGD) | Generated when loading of URL RTU database succeeds or fails. | 6.0.0 | |
| MGD_EFS_NTICS _REGISTRATION_SUCCEEDED | MGD_EFS_NTICS _REGISTRATION _SUCCEEDED | INFO | Edge (MGD) | Generated when Threat Intelligent Cloud Service (NTICS) registration with Client ID succeeds. | 6.0.0 | |
| MGD_EFS_NTICS _REGISTRATION_FAILED | MGD_EFS_NTICS _REGISTRATION _FAILED | ERROR | Edge (MGD) | Generated when NTICs registration fails with retry count. | 6.0.0 | |
| MGD_EFS_NTICS _AUTHENTICATION _SUCCEEDED | MGD_EFS_NTICS _AUTHENTICATION _SUCCEEDED | INFO | Edge (MGD) | Generated when NTICS authentication succeeds. | 6.0.0 | |
| MGD_EFS_NTICS _AUTHENTICATION _FAILED | MGD_EFS_NTICS _AUTHENTICATION _FAILED | ERROR | Edge (MGD) | Generated when NTICS authentication fails. | 6.0.0 |
Operator-level EFS Events
| EVENT | DISPLAYED ON ORCHESTRATOR UI AS | SEVERITY | GENERATED BY | GENERATED WHEN | RELEASE ADDED IN | DEPRECATED |
|---|---|---|---|---|---|---|
| IDPS_SIGNATURE_VCO _VERSION_CHECK_FAIL | Querying existing signature version from local DB failed | ERROR | Orchestrator | Generated when Orchestrator backend poll job has failed to retrieve existing suricata signature version from Orchestrator's local database. | 5.2.0 | |
| IDPS_SIGNATURE_GSM _VERSION_CHECK_FAIL | Querying signature metadata from GSM failed | ERROR | Orchestrator | Generated when Orchestrator backend poll job has failed to retrieve existing suricata signature metadata (that includes signature version) from GSM. | 5.2.0 | |
| IDPS_SIGNATURE_SKIP _DOWNLOAD_NO _UPDATE | Skipping signature download due to no change in signature version | INFO | Orchestrator | Generated when Orchestrator backend poll job skips downloading suricata signature file due to no change in suricata signature file version. | 5.2.0 | |
| IDPS_SIGNATURE_STORE _FAILURE_NO_PATH | Filestore path not set to store signature file | ERROR | Orchestrator | Generated when Orchestrator backend poll job fails to store suricata signature file due to filestore path not being set. | 5.2.0 | |
| IDPS_SIGNATURE _DOWNLOAD_SUCCESS | Successfully downloaded signature file from GSM | INFO | Orchestrator | Generated when Orchestrator backend poll job successfully downloads suricata signature file from GSM. | 5.2.0 | |
| IDPS_SIGNATURE _DOWNLOAD_FAILURE | Failed to download signature file from GSM | ERROR | Orchestrator | Generated when Orchestrator backend poll job fails to download suricata signature file from GSM. | 5.2.0 | |
| IDPS_SIGNATURE _STORE_SUCCESS | Successfully stored the signature file in filestore | INFO | Orchestrator | Generated when Orchestrator backend poll job successfully stores the suricata signature file in local file store. | 5.2.0 | |
| IDPS_SIGNATURE _STORE_SIGNATURE _FAILURE | Failed to store the signature file in filestore | ERROR | Orchestrator | Generated when Orchestrator backend poll job fails to store the suricata signature file in local file store. | 5.2.0 | |
| IDPS_SIGNATURE _METADATA_INSERT _SUCCESS | Successfully added metadata of the signature file to local DB | INFO | Orchestrator | Generated when Orchestrator backend poll job successfully adds metadata of the suricata signature file to local DB. | 5.2.0 | |
| IDPS_SIGNATURE _METADATA_INSERT _FAILURE | Failure to add metadata of the signature file to local DB | ERROR | Orchestrator | Generated when Orchestrator backend poll job fails to add metadata of the suricata signature file to local DB. | 5.2.0 | |
| POLL_URL _CATEGORIES_FAIL | POLL_URL_CATEGORIES _FAIL | ERROR | Orchestrator | Generated when Orchestrator URL categories poll job fails. | 6.0.0 | |
| URL_CATEGORIES _STORE_SUCCESS | URL_CATEGORIES_STORE _SUCCESS | INFO | Orchestrator | Generated when Orchestrator URL categories are stored successfully. | 6.0.0 | |
| URL_CATEGORIES _STORE_FAILURE | URL_CATEGORIES_STORE _FAILURE | ERROR | Orchestrator | Generated when Orchestrator URL categories storage job fails. | 6.0.0 | |
| VCO_ENTERPRISE_NTICS _LICENSE_REQUEST _FAILED | VCO_ENTERPRISE_NTICS _LICENSE_REQUEST _FAILED | ERROR | Orchestrator | Generated when Orchestrator Enterprise NTICS license request fails. | 6.0.0 | |
| VCO_ENTERPRISE_NTICS _LICENSE_REQUEST _SUCCEEDED | NTICS License request succeeded | INFO | Orchestrator | Generated when Orchestrator Enterprise NTICS license request succeeds. | 6.0.0 |
Monitor Firewall Logs
The Firewall Logs page displays the details of firewall log originating from VeloCloud Edges. Previously the only way a customer could store and view firewall logs was by forwarding them to a Syslog server. With Release 5.2.0 the customer has the option to store firewall logs on the Orchestrator where they can be viewed, sorted, and searched on the Orchestrator UI. By default, Edges cannot send their Firewalls logs to Orchestrator. For an Edge to send the Firewall logs to Orchestrator, ensure that the “Enable Firewall Logging to Orchestrator” customer capability is activated at the Customer level under “Global Settings” UI page. By default, Orchestrator retains the Firewall logs until it reaches the maximum retention time of 7 days or a maximum log size of 15 GB per customer tenant on a rotation basis.
- When a flow is created (on the condition that the flow is accepted)
- When the flow is closed
- When a new flow is denied
- When an existing flow is updated (due to a firewall configuration change)
- If a firewall rule has URL Categories filtering service activated, the URL Category engine looks up the categories of destination URLs and detects if that matches the Blocked or Monitor categories configured. If the URL matches the Blocked categories, the URL Categories engine generates an alert and blocks the Edge traffic. If the URL matches the Monitor categories, the engine allows the Edge traffic and captures the firewall logs.
- If a firewall rule has URL Reputation filtering service activated, the URL Reputation engine looks up the reputation score of the URL and takes action (Allow/Block) based on the minimum reputation configured. If the reputation score of the URL is less than the minimum reputation configured, the Edge blocks the traffic and generates EFS alerts and logs, otherwise allows the traffic. The URL Reputation engine generates EFS logs for the allowed traffic based on the Capture Logs configuration.
- If a firewall rule has Malicious IP filtering service activated, the Malicious IP engine checks if the destination IP is present in the Malicious IP Database (Network Query DB and Local DB). If the engine detects the destination IP in the Malicious IP database, then the engine generates EFS alerts and logs and takes Edge traffic decisions based on the configured action (Block/Monitor).
- If a firewall rule has only the Intrusion Detection System (IDS) activated, the Edges detect if the traffic flow is malicious or not based on certain signatures configured in the engine. If an attack is detected, the EFS engine generates an alert and sends the alert message to Orchestrator/Syslog Server if Firewall logging is activated in Orchestrator and will not drop any packets.
- If a firewall rule has Intrusion Prevention System (IPS) activated, the Edges detect if the traffic flow is malicious or not based on certain signatures configured in the engine. If an attack is detected, the EFS engine generates an alert and blocks the traffic flow to the client only if the signature rule has action as "Reject", matched by the malicious traffic. If the action in the signature rule is "Alert", the engine allows the traffic without dropping any packets even if you configure IPS.
To view the Edge Firewall logs in Orchestrator:
- In the SD-WAN service of the Enterprise portal, select . The Firewall Logs page appears.
Figure 35. Firewall Logs Screen 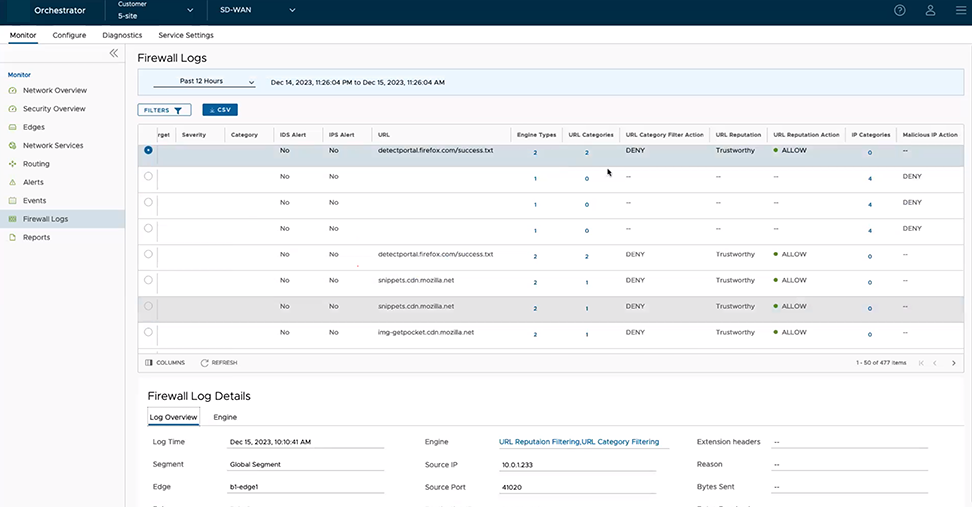
- To view more detailed information about a specific Firewall log, select the Firewall log entry. Under the Firewall Log Details section, you can view the detailed Log Overview and Engine information for the selected log entry.
Note:If the selected Firewall log entry is generated by Engines other than Enhanced Security Services, the Engine tab will not be available.
Figure 36. Firewall Log Details 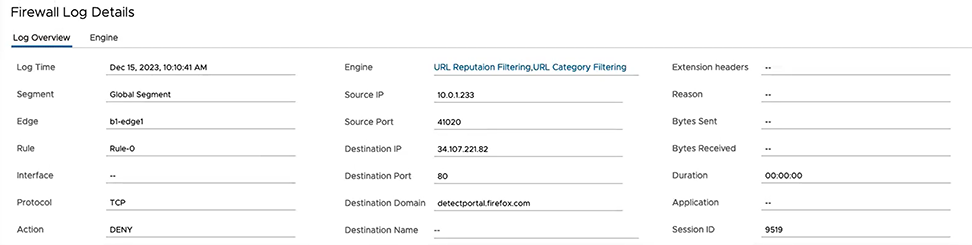
- In the Log Overview tab, select the link next to Engine to view detailed information about the specific Engine that matched the flow along with the Engine-specific filtering action.
Figure 37. Firewall Log Details for a Specific Engine 
Troubleshooting Firewall
You can collect the firewall diagnostic logs by running the remote diagnostic tests on an Edge.
- Flush Firewall Sessions- Run this test on the required Edge by providing the Source and Destination IP addresses to flush the active firewalls session which needs to be reset. This is specifically for the Stateful Firewall. Running this test on an Edge not only flushes the firewall sessions, but actively send a TCP RST for the TCP-based sessions.
- List Active Firewall Sessions- Run this test to view the current state of the active firewall sessions (up to a maximum of 1000 sessions). You can filter by Source and Destination IP and Port as well as Segment to limit the number of sessions returned.
Figure 38. List Active Firewall Sessions 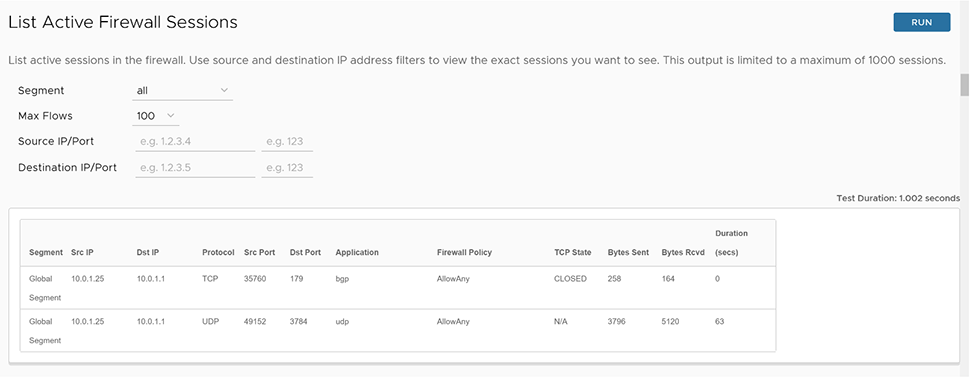 Note:You cannot see sessions that were denied as they are not active sessions. To troubleshoot those sessions, you will need to check the firewall logs.
- Get IP Threat Reputation- Run this test on the required Edge by providing the IP address to view the threat category of the given IP.
Figure 39. Get IP Threat Reputation 
- Get URL Category/Reputation- Run this test on the required Edge by providing the URL to view the category and reputation score of a given URL.
Figure 40. Get URL Category/Reputation 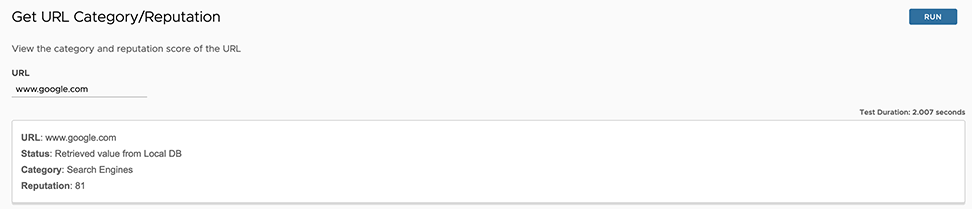
For more information about how and when to run these remote diagnostics on an Edge, see Arista VeloCloud SD-WAN Troubleshooting guide.