Using the Change Control Module
The Change Control module selects and executes a group of tasks that you want to process simultaneously. Selecting tasks and creating Change Controls function similarly in Change Control and Task Management modules.
- Sequencing tasks
- Adding unlimited snapshots to every device impacted by the Change Control execution
- Adding custom actions
- Pushing images via Multi-Chassis Link Aggregation (MLAG) In-Service Software Upgrade (ISSU) or Border Gateway Protocol (BGP) maintenance mode
- Reviewing the entire set of changes to approve Change Controls
Accessing the Change Control Summary Screen
The Change Control summary screen is used to manage Change Controls.
To access the Change Control screen, go to the Provisioning screen, and click Change Control in the left menu.
- Open Change Controls and Executed Change
Controls tables - Lists corresponding Change Controls with the following
information:
- Name - Displays the
Change Control name
Click the Change Control name to go to the appropriate Change Control details screen.
- Devices - Displays
devices used in the Change Control
Click the device name to go to the appropriate Device Overview screen.
- Action - Displays types of actions to be executed by the Change Control
- Last Updated - Displays when the Change Control was last updated
- Status - Displays the Change Control
statusNote:
- Under the Status column of the Open Change Controls table, a pending Change Controls is represented with a doc-edit icon and an approved Change Controls is represented with a user-check icon.
- Under the Status column of the Open Change Controls table, a failed Change Control is represented with a cross mark and a completed Change Control is represented with a tick mark.
- Hover the cursor on the status icon in Open Change Controls table to view how long ago the current approval status was updated. When you hover the cursor on the status icon in Executed Change Controls table, it also displays the approver's name.
- Name - Displays the
Change Control name
- In the Open Change Controls table, click Delete to delete the
appropriate Change Control.Note: After you delete an open Change Control, the system returns any tasks used by the deleted Change Control to the assignable tasks pool for reallocation.
- Recent Activity pane
- Lists most recent activities like updated, executed, and deleted Change
Controls.
Note: Click on the Change Control name to go to the appropriate Change Control details screen.
- + Create Change Control - Click this button to create a Change Control
- Export to CSV - Exports the summary data to a CSV file.
Change Control Drop-Down Menu
Click the Change Control drop-down menu to select another Change Control.
Change Control Stages
- Change Control stage name - Click either the Change Control name or the corresponding edit icon to update the name.
- Add a stage icon - Click the plus icon at the upper right corner of the stage to add a stage.
- Delete a stage icon - Click the appropriate trash icon at the upper right corner of the stage to delete the corresponding stage.
- Edit actions icon - Click the thunder icon within a card to edit or view the appropriate leaf.
- For open Change Controls, the system displays the
actions window to edit the appropriate leaf.
Figure 2. Info Tab in Edit Actions 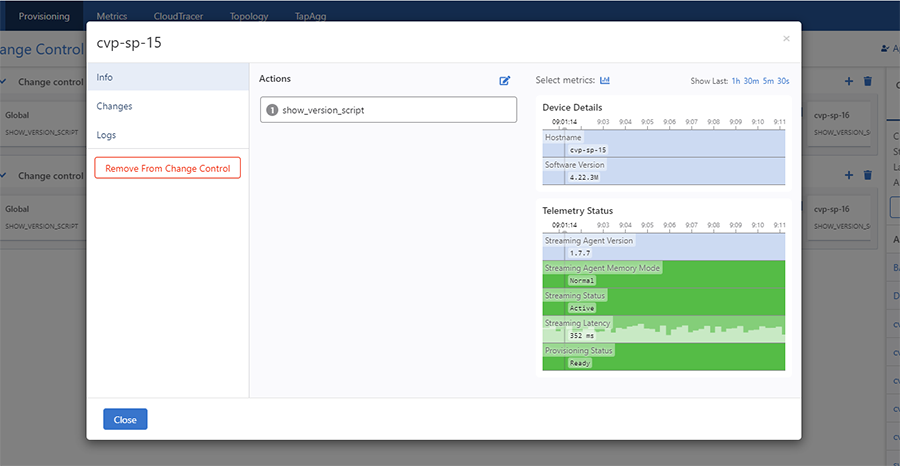 Note: For completed Change Controls, the system displays the actions window to view the appropriate leaf.This window consists of the following entities:
- Info tab - This tab
lists the actions to be run, edits actions, and displays action
details.
Click the edit icon to reorder and edit actions.
Figure 3. Reorder and Edit Actions Screen 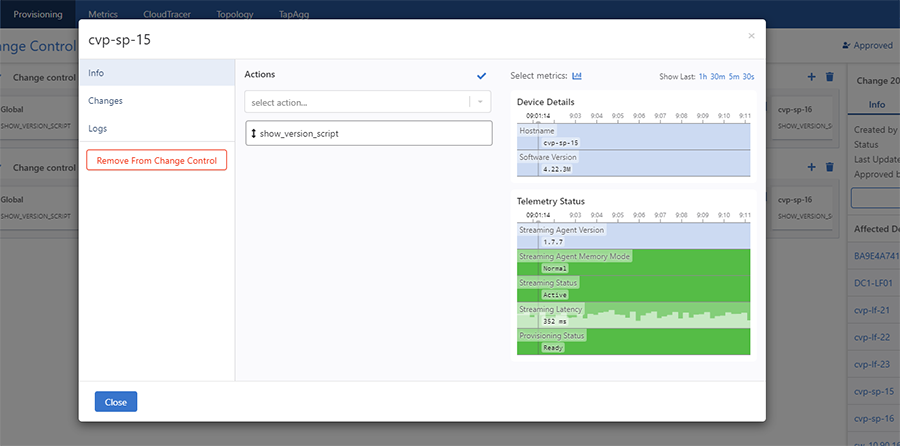
- Click the select
action drop-down menu and select the required action.
Note: The system displays selected actions beneath the select action drop-down menu.
- Click Clear
at the end of a field to delete the appropriate action.
Note: This option is available only for a card with multiple actions. The main action in a card is not available to clear.
- Click the
check-mark to save changes. Note: Here, actions comprise of provisioning, Border Gateway Protocol (BGP) maintenance, health checks, and snapshots.
- Click the select
action drop-down menu and select the required action.
- Configuration Changes tab - For tasks,
this tab displays any configuration or image differences that will
be applied as part of the task.
Figure 4. Configuration Changes Tab in Edit Actions 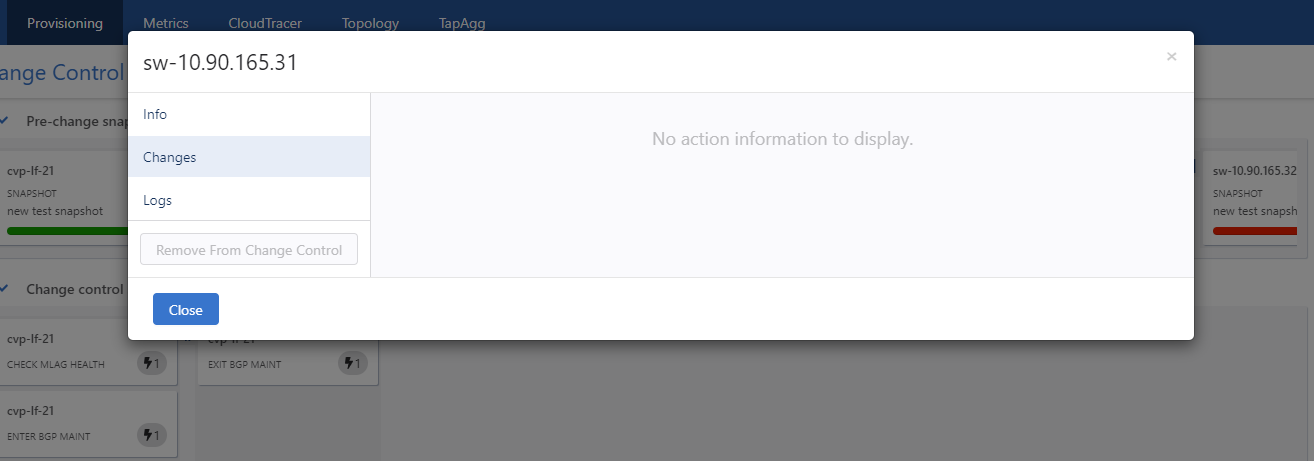
- Logs tab - This tab
displays log information of completed Change Controls.
Figure 5. Logs Tab in Edit Actions
- Info tab - This tab
lists the actions to be run, edits actions, and displays action
details.
- Remove from Change
Control button - Click Remove from Change Control to remove this task from
the stage.
Note: Click Remove on the Confirm pop-up dialog box to confirm the deletion.
- Done button - Click Done to save changes.
- Trashbin icon - Click the trashbin icon at the upper right corner of the pane to delete the stage.
Review and Approve
Click the Review and Approve button at the upper right corner of the Change Control screen to review and approve the Change Control. This button displays the Review and Approve dialog box for the selected Change Control.
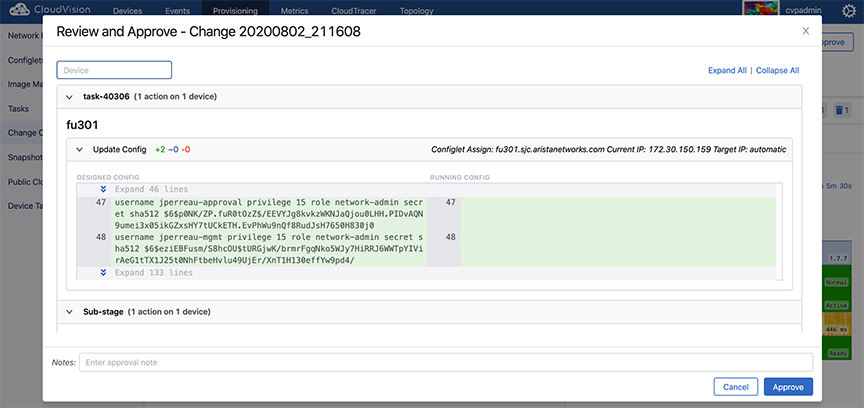
This window consists of a device search field and a list of changes by Change Control stages.
Type the device name in the search field and if available, the system displays the list of changes for the specified device.
The expanded Change Control stage list displays details of the actions to be executed in each stage, grouped by a device.
If you are happy with configuration changes, click the Approve button at the lower right corner of the dialog box to approve the Change Control.
Execute Change Control
After approval, the Review and Approve button is replaced with the Execute Change Control button.
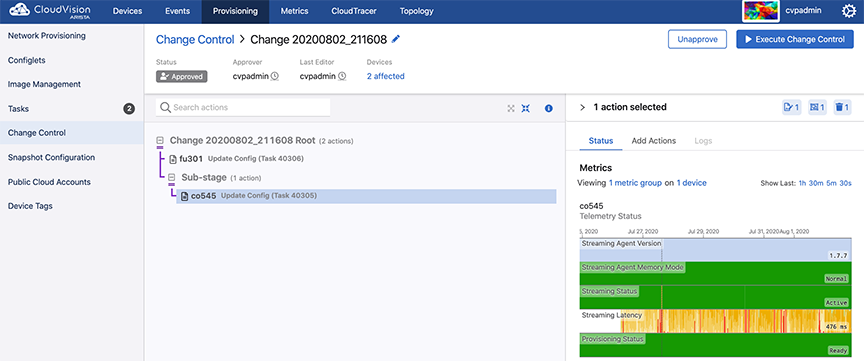
Click the Execute Change Control button to execute the Change Control.
Stop Change Control
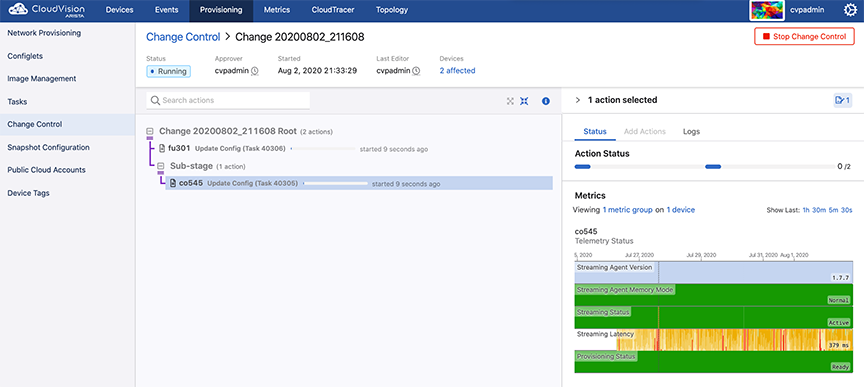
Click the Stop Change Control button to stop the execution of Change Control.
If a Change Control has revertible actions, the system replaces the Stop Change Control button with the Rollback Change button after the execution of all actions.
Click the Rollback Change button to rollback the execution of Change Control.
Accessing the Open Change Control Details Screen
The open Change Control details screen performs the following functions:
- Displays Change Control information
- Adds actions to Change Control
- Adds, edits, and deletes child stages
- Reviews and approves Change Control
Perform the following steps to access the Change Control details screen:
- On the CloudVision Portal, click
Provisioning > Change Control.
The system displays the Change Control summary screen.
- Under the Open Change Controls table, click
one of the listed Change Controls.
The system displays the Change Control details screen.
Figure 10. Change Control Details Screen 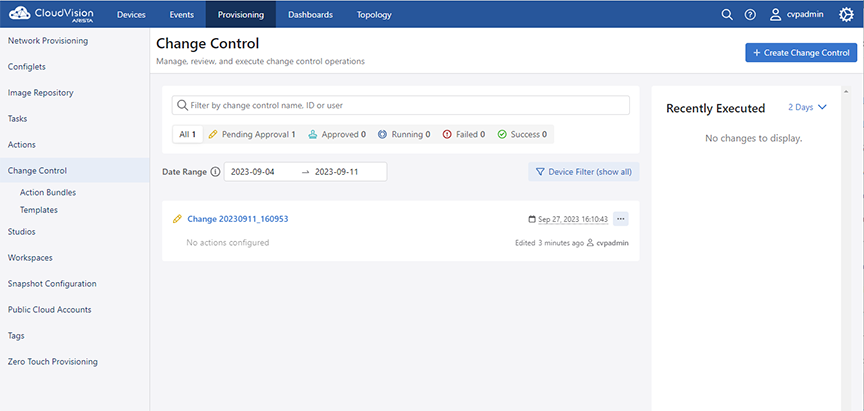
The Change Control details screen consists of the following panels:
Header Panel
This primary panel provides the following basic information on the Change Control:
- Edit icon to update the Change Control name
- Change Control information -
- The open Change Control details screen displays the status, scheduled date, last editor,
count of affected devices, and Universally Unique Identifier (UUID). Note:
- Click the Scheduled for field and select the date to run the Change Control.
- Hover the mouse cursor over the clock icon to view the last time of action.
- Hover the cursor on the count of affected devices to view their list. Clicking on an affected device opens the corresponding Device Overview screen.
- Clicking the copy icon next to the UUID copies the UUID to the clipboard.
- The executed Change Control details screen displays the status,
approver, time of start, last editor, and count of affected devices.Note:
- Click Review next to the status for details on review and approve process.
- The open Change Control details screen displays the status, scheduled date, last editor,
count of affected devices, and Universally Unique Identifier (UUID).
- Review and Approve - Click Review and Approve in open Change Controls for
assessing Change Control updates. These updates include configuration
differences, and image bundle changes when appropriate.
Figure 11. Review and Approve Pop-Up Window 
Click Approve to accept Change Control updates.
Note: (Optional) Approver can leave comments in the Notes: field. - On the approved Change Control details screen, click Unapprove to revert
the approval status and Execute Change Control to run approved Change
Controls.
Figure 12. Approved Change Control 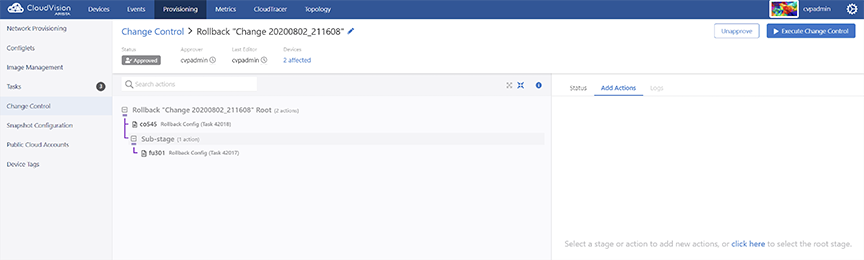 Note: CVP executes Change Controls in the following ways:
- Runs approved Change Controls immediately if sufficient privileges are set for the Change Control Management permission.
- Stops the change automatically if an action fails.
- Runs actions in progress until complete.
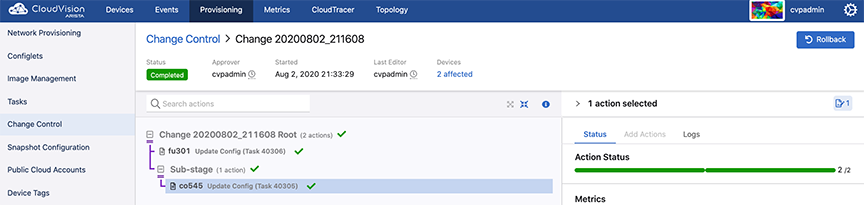
- On the failed Change Control details screen, click Rerun to repeat the
execution of a completed but failed Change Control. This creates a new Change
Control that must be approved again.
Figure 13. Rerun Change Control 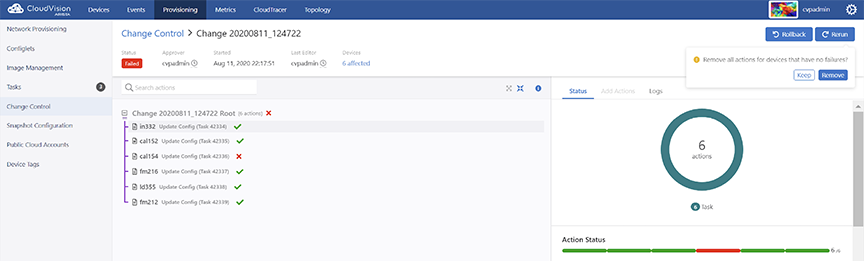 Note: Click Remove when CVP prompts you with Remove all actions for devices that have no failures? for skipping the rerun of completed actions.
 - Click Rollback in executed Change Controls to open the Rollback Change
Control pop-up window. To create a rollback after evaluating the
executed Change Control, select tasks to rollback from the table and click
Create Rollback Change Control.
Figure 14. Rollback Pop-Up Window 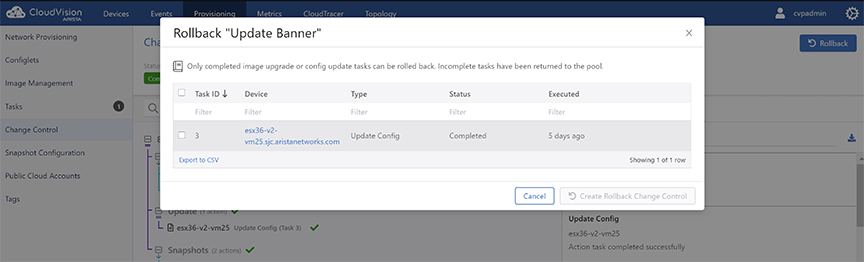 Note: CVP rolls back only completed configuration updates and image upgrade tasks.
Main Panel
This main panel consists of the following entities:
- Search bar - Enter a string to perform a search in the Change Control tree.
- Expand icon - Click to expand all stages.
- Collapse icon - Click to collapse all stages.
- Information icon - Click to get help on Change Control.
- Change Control tree - Change Controls are composed of actions and stages. Action types
include tasks, CLI snapshots, health checks, custom scripts, enter BGP
maintenance mode, and exit BGP maintenance mode, and other custom actions.
Note: Different icons represent various task types like adding a new device, updating configuration on a device, and updating software image bundle on a device. Actions are represented with a bolt symbol.Actions are grouped and nested within stages via drag and drop.Note:
- Tasks being executed in parallel do not block subsequent actions in that branch.
- In a series execution, the Change Control execution starts from the first item and works its way from top to bottom. The next action starts only when the previous action completed successfully.
- You can toggle the option by clicking the stage type dropdown menu in the edit panel.
Edit Panel
This panel edits stages and actions.
- Edit a stage - Click the required stage in the main panel. The edit panel
provides the following options:
- Show details icon - Click to view associated configuration differences, image bundle changes, and action details.
- Remove icon - Click to delete the stage.Note: Select multiple tasks to view details and delete multiple tasks simultaneously. Use command-click or Ctrl-click to select multiple items. To select a range of items, click the first item and then Shift-click the last item.
- Group icon - Select multiple tasks to group them into sub-stages.
- Edit icon - Click to edit the stage name.
- Change Control stage type dropdown menu - Click to select the Change Control stage
type.Note: By default, all tasks and actions execute in series.
- Plus icon - Click to add a child stage.
- Status - Displays telemetry of each device in the stage.Note:
- Hover the cursor on n metric group to view selected
devices.Note: n represents the count of selected metric groups.
- Hover the cursor on n device(s) to view
selected metric groups.Note: n represents the count of selected devices.
- Hover the cursor on n metric group to view selected
devices.
- Add actions - Adds actions to open Change Control. Select the required
action and placement from corresponding dropdown menus; and click Add
to change control to update selected changes.
Figure 15. Add Actions to Change Control 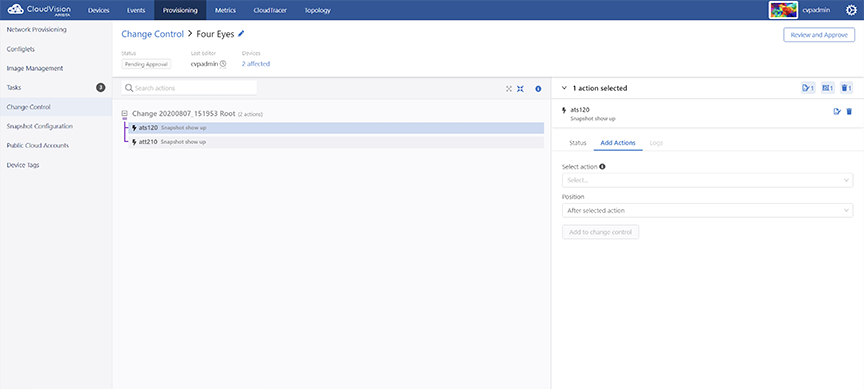
- Logs - Displays logs of each update in the executed Change
Control process.
Figure 16. Change Control Logs 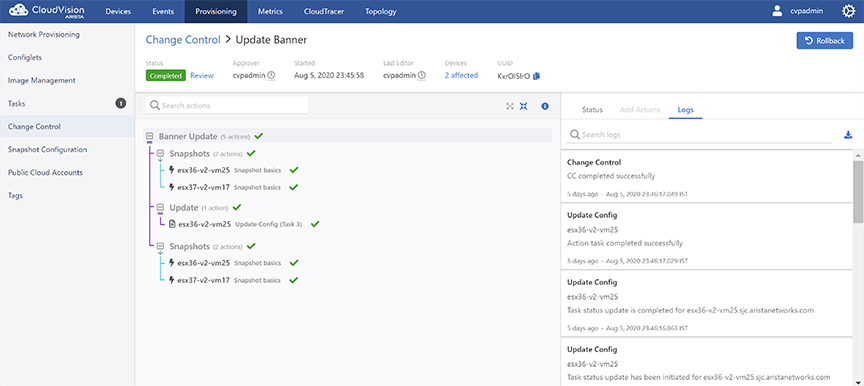 Note:
Note:- Use the search logs bar for filtering logs based on a string.
- Click the download icon to download logs to your local drive.
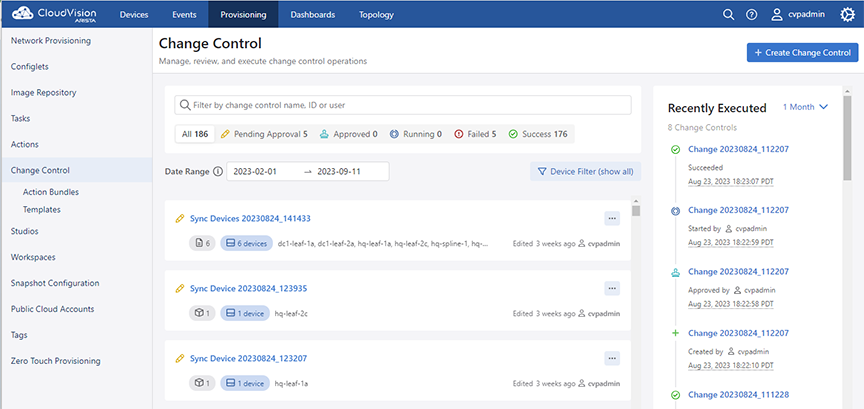
Creating Change Controls from the Change Controls Summary Screen
The first step involved in using the Change Control module to manage tasks is to create a Change Control. While creating a Change Control, you add tasks with pending or failed status to the Change Control. By default, all tasks in the same Change Control are added in parallel. If you want to change the execution order, you can drag and drop the action cards on the Change Control Details screen. You can execute grouped tasks after a Change Control is created, reviewed, and approved.
Complete the following steps to create a Change Control from the Change Control Summary screen:
-
On the CloudVision Portal, click
Provisioning > Change Control.
The system displays the Change Control Summary screen.
Figure 17. Change Control Summary Screen
-
Click
+ Create Change Control button at the upper right corner.
The system displays the Assignable Tasks dialog box.
Figure 18. Assignable Tasks Dialog Box with No Tasks Selected 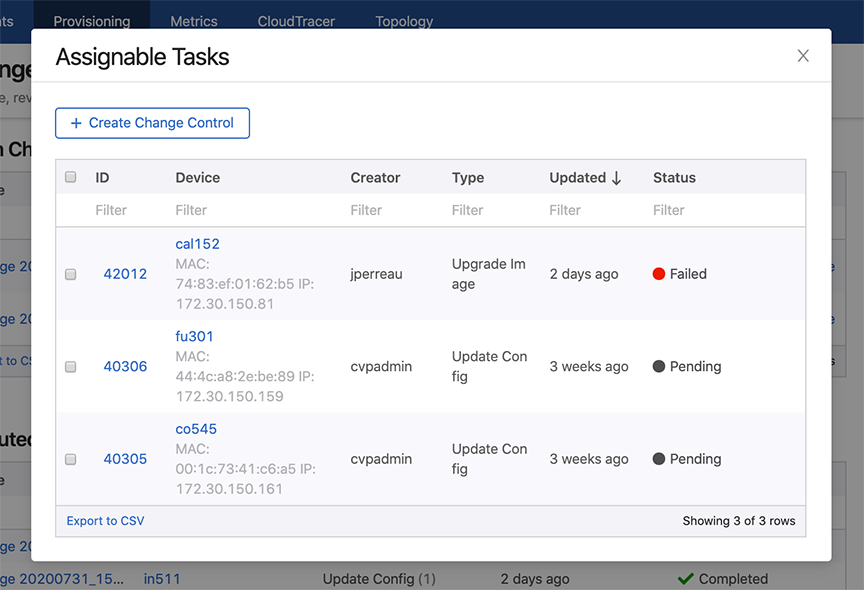
-
Click
+ Create Change Control with n tasks where n is the count of
selected tasks.
Figure 19. Assignable Tasks Dialog Box with Tasks Selected 
The system displays the appropriate Change Control Details screen.