Creating and Managing Custom Actions
The Actions menu in the CloudVision portal enables you to create and manage frequently used actions in the Action Bundles and Change Control operations menu.
Apart from the existing set of actions, a new suite of actions is added to perform additional change control operations on your desired devices. In the Actions menu, you can view the arguments of built-in actions and create and manage custom actions, which you can apply in a change control operation. Creating your own custom actions enable you to execute actions specific to your network, which you or another CloudVision user has defined. Additionally, provisioning devices using a change control operation enables you to have granular control over the actions during the change control operation.
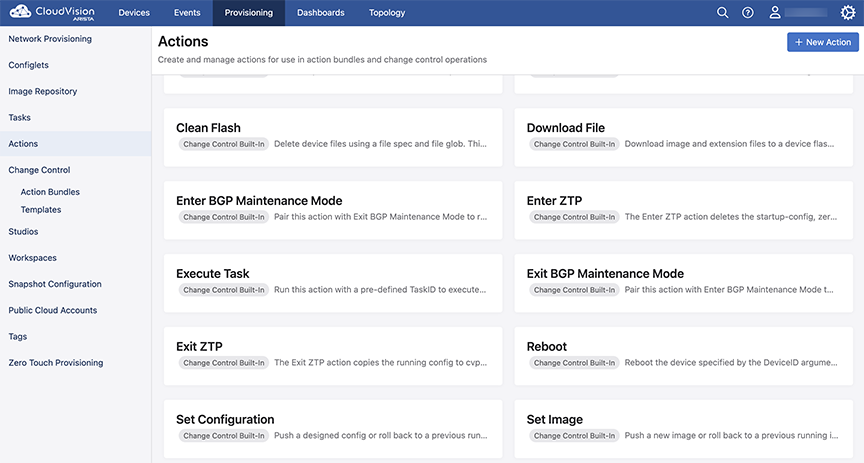
Starting with the 2023.2.0 release, the following new actions are available in the Actions menu.
| Actions | Description |
|---|---|
| Clean Flash | Creates space on a device by deleting files in the flash directory. |
| Download File | Download files from CloudVision to a device. |
| Enter ZTP | Puts the device in zero touch provisioning mode. |
| Exit ZTP | Removes the device from zero touch provisioning mode. |
| Reboot | Reboots the device. |
| Set Configuration | Applies the configuration on the device. |
| Set Image | Installs an image on the device. |
See image below for the newly added actions.
You can use the above actions through the Change Control menu for configuring change control operations as shown in the image below. The new provisioning actions are available under Provisioning Actions or Built-In Actions and function like any pre-existing built-in action.

When you select an action, you must also choose the devices to run the action against. See below sections for details on each action.
Clean Flash Action
The Clean Flash action deletes the files from flash memory on a device. You must define the file specifications and the devices that the action should run against. From the Change Control Actions page,
- Select Clean Flash as in the image below:
Figure 3. Change Control - Clean Flash 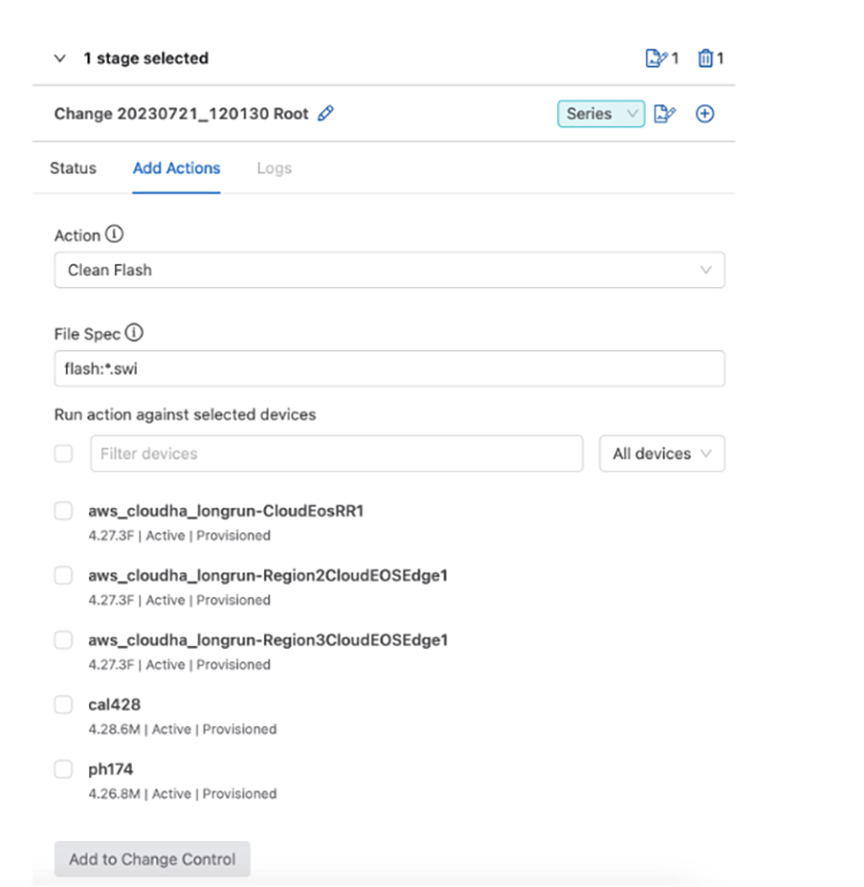
- Enter a File Spec. By default, flash:*swi is populated.
- Select one or more devices to run the action against.
- Click Add to Change Control.
Download File Action
Using the Download File action, you can download images and extensions from the Image Repository onto a device. This enables you to preload files on a device before updating the image or extension and helps in saving time while executing a change control for updating the device.
- From the Change Control page, select the Download File against a device, it downloads the selected file to the flash directory of the device. See image below:
Figure 4. Download File Action 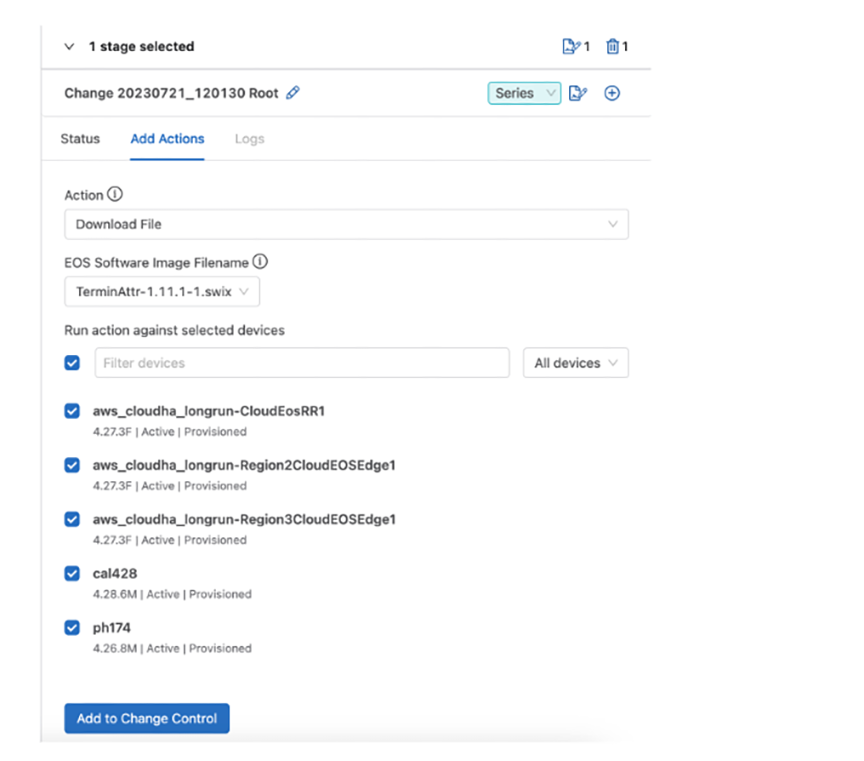
- Select an image or extension from the EOS Software Image Filename drop-down menu. All files added to the Image Repository are available from the drop-down menu. If your desired software file is not available in this list, add it to the Image Repository and try again.
- Select the devices to run the action against from the Run action against selected devices field.
- Click Add to Change Control. The selected file gets downloaded onto the device.
Enter ZTP Action
Choosing this action puts a device in Zero Touch Provisioning (ZTP) mode.
- From the Change Control page, select the Enter ZTP action. See image below:
Figure 5. Enter ZTP Action 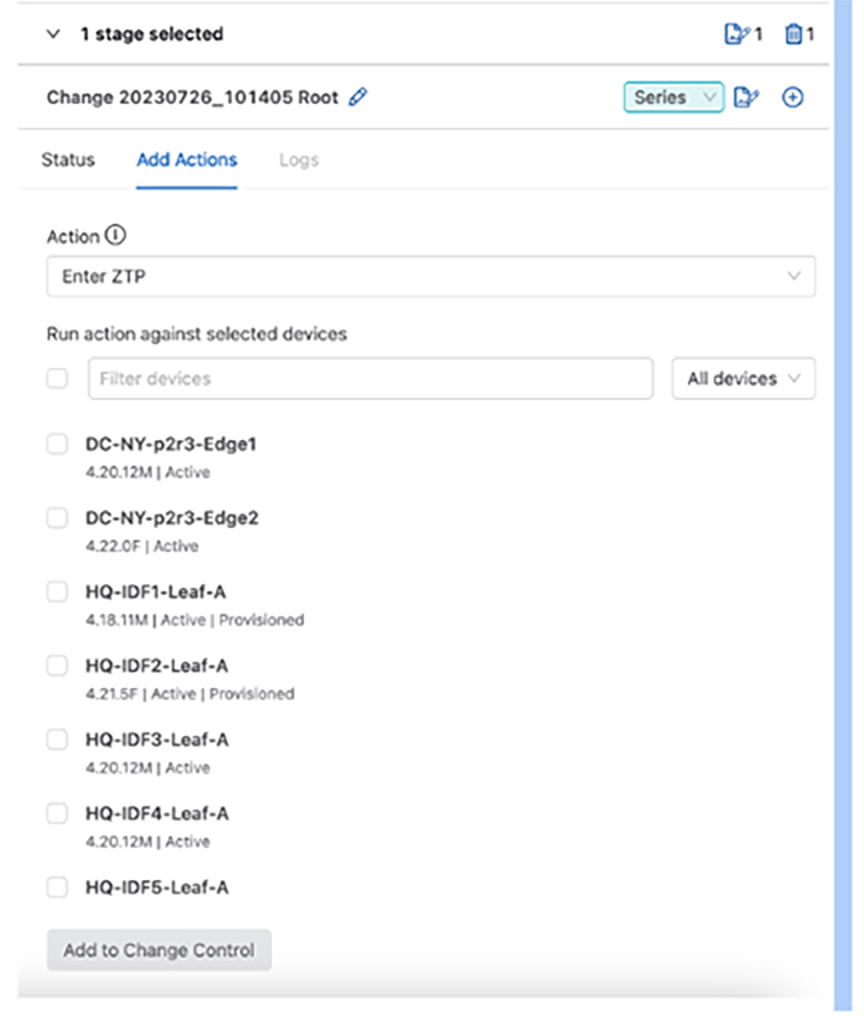
- Select the devices to run the action against from the Run action against selected devices field.
- Click Add to Change Control. The selected devices are now in ZTP mode.
Exit ZTP Action
The Exit ZTP action gets the device out of ZTP mode.
- From the Change Control page, select the Exit ZTP action. See image below:
Figure 6. Exit ZTP Action 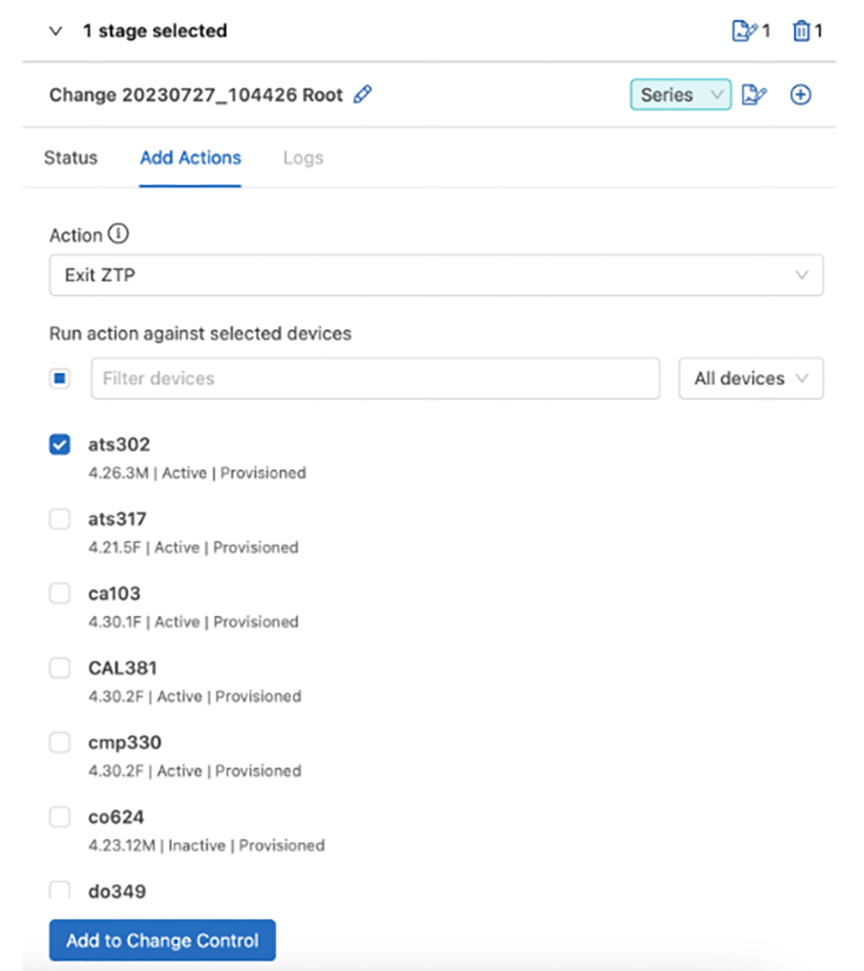
- Select the devices to run the action against from the Run action against selected devices field.
- Click Add to Change Control. The selected devices now exit the ZTP mode.
Reboot Action
You can reboot a device by using the Reboot action. As a result, the selected devices stop forwarding traffic until the devices are completely restarted.
- From the Change Control page, select the Reboot action. See image below:
Figure 7. Reboot Action 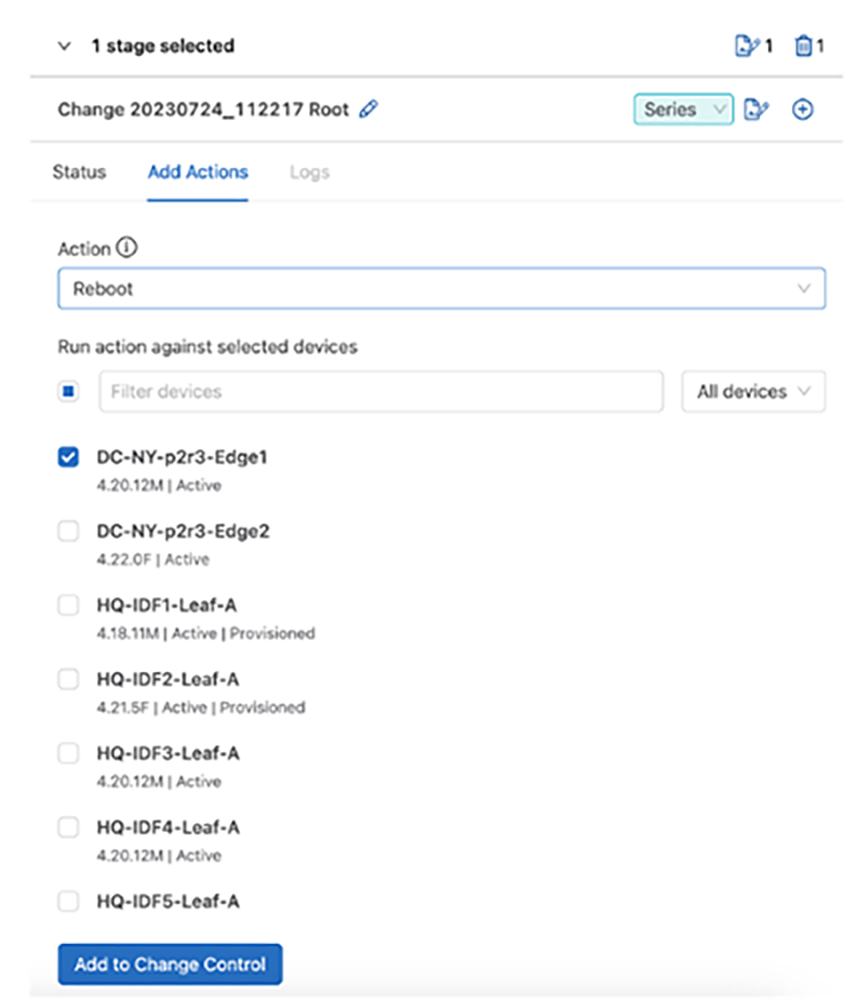
- Select the devices to run the action against from the Run action against selected devices field.
- Click Add to Change Control. The selected devices are rebooted.
Set Configuration Action
The Set Configuration action applies the designed configuration to a device. This action reduces the time required and enhances the device configuration process significantly. This action computes a delta configuration between the designed configuration and the running configuration on the selected device. The delta configuration captures the sequence of commands that should be applied to the running configuration of the selected device so as to transform the configuration into the designed configuration. This configuration push is an atomic transactional process, where only the delta commands are parsed and evaluated by AAA, thereby saving significant time in completing the configuration process (that is, without having to process the entire designed configuration on the selected device).
- Per-command authorization and accounting are enabled on the device.
- The designed configuration is large.
- The difference between the designed configuration and the running configuration is smaller than the designed configuration (that is, the delta is relatively small).
- From the Change Control page, select the Set Configuration action. See image below:
Figure 8. Set Configuration Action 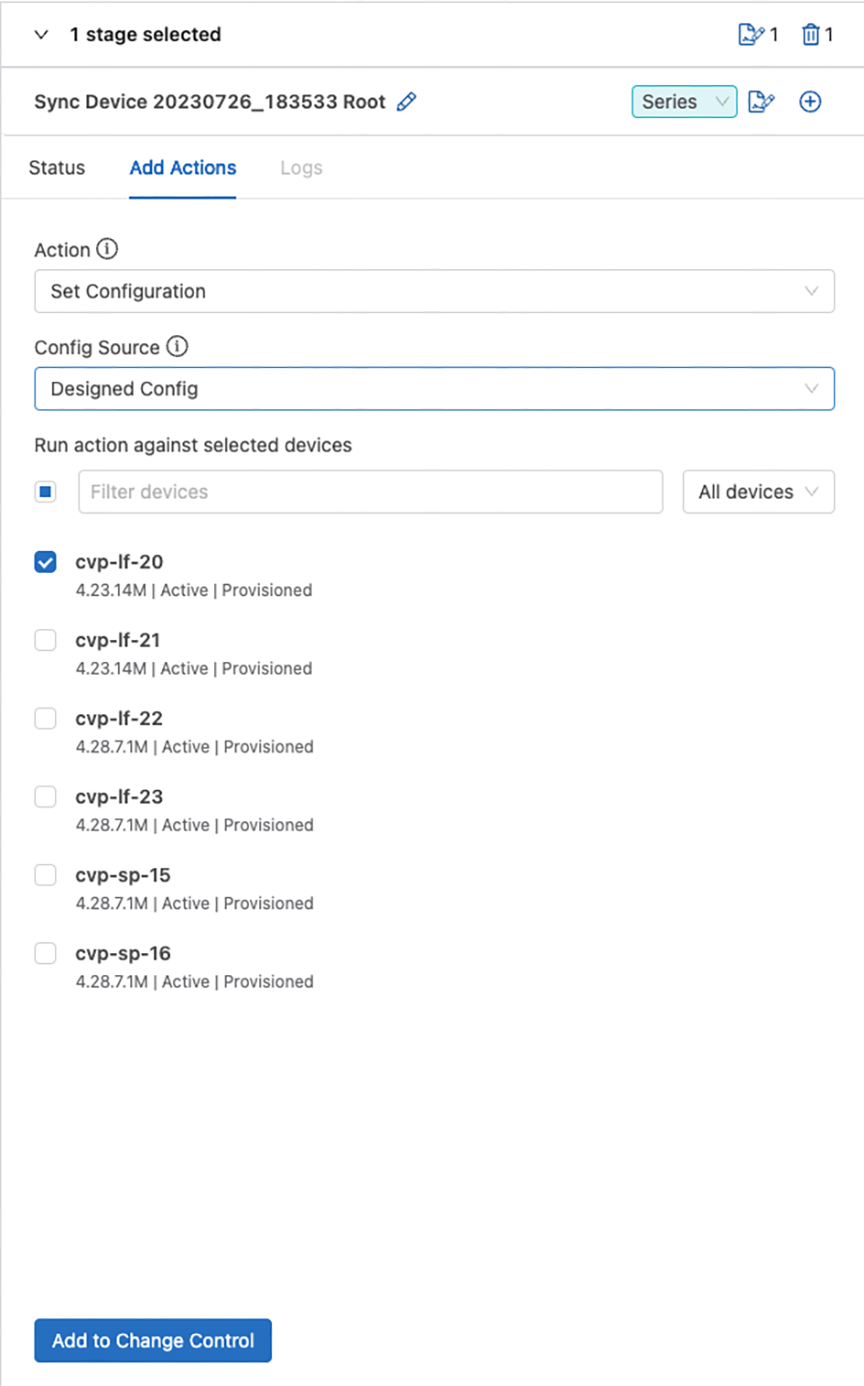
- From the Config Source drop-down menu, select the type of configuration that you want to apply from:
- Designed Configuration: Pushes the designed configuration from CloudVision onto the selected device.
- Running Configuration: Rolls back the configuration to a previous running configuration based on the provided timestamp.
- Select the devices to run the action against from the Run action against selected devices field.
- Click Add to Change Control. The selected devices are updated with the new configuration.
Guidelines to Troubleshoot for Set Configuration Action
- How big is the delta configuration in comparison to the designed configuration?
If the delta configuration is almost as same as the designed configuration, then, there might not be any significant improvement in configuration push time. This is because when the designed configuration is being pushed on a switch for the first time, all the lines in the designed configuration are also added to the switch.
- Is command authorization and accounting enabled on the switch?
When AAA is enabled on the switch, each line in the delta configuration is parsed through AAA. In this case, the performance of the AAA server should be checked to see if that is taking a significant amount of time.
- Was delta configuration successful?
If the delta configuration is unsuccessful, then the entire designed configuration gets pushed, resulting in longer than expected configuration push times. Check the Change Control logs to see if the delta configuration push failed and the reason for the failure.
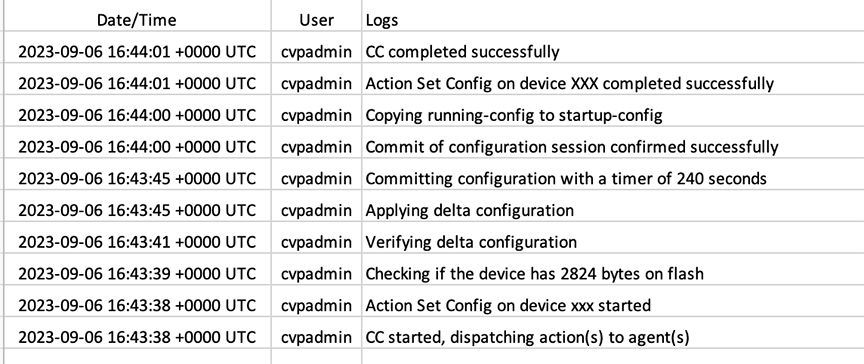
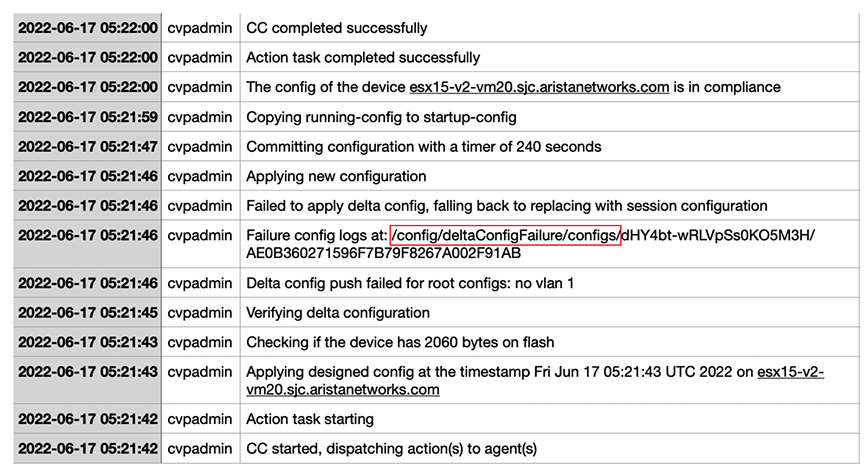
The log file contains the path /config/deltaConfigFailure/configs/<ccID>/<deviceID>, where you can find the failure details. In the log files, you can find three types of messages as below:
- Exceptions: In these types of messages, you can view both the expected configuration (designed config) and the actual config during verification in the form: “EXPECTED:...GOT:…”. This message helps you to determine which configuration lines did not run as expected. See below section for details on Exceptions.
- Errors: If you see an error for a particular command, it means that this command was not added or deleted resulting in the failure of the delta configuration push.
- Warnings: A warning for a particular command on a specific device helps you to debug why the actual configuration after applying the delta configuration is different from the expected configuration. Note that some warnings may be unrelated to the failure.
An exception occurs when the Set Configuration action fails to remove some running configuration from the selected device. This occurs for certain types of EOS commands, where the action may run, but the delta configuration that is pushed by the Set Configuration action fails and CloudVision subsequently pushes the entire designed configuration onto the device. You must configure the Exceptions separately to resolve the issue.
For example, an exception can occur for a command, switchport port-security
violation protect. Without any additional configuration from the user, the Set Configuration action removes the command by using the default switchport port-security violation protect command. As this is an invalid command the configuration does not get removed. As a result, the Set Configuration action fails and pushes the complete designed configuration on the device.
How to View the Exceptions
To view the exceptions occurring due to the Set Configuration action, go to Settings > Telemetry Browser and select cvp under Application Datasets. See image below:
Navigate to path /config/deltaConfigExceptions/
As of the 2023.2.0 release, you may see one exception related to command parameters, that is, the parameters are dropped by prepending default. For example, to delete the command: switchport port-security violation protect, the command should be default switchport
port-security.
How to add custom exceptions
config/deltaConfigExceptions/paramCommands, type:
/cvpi/tools/apish publish --dataset-name cvp --path/config/deltaConfigExceptions/paramCommands/delete --update '{"key": "<Command-Prefix>", "value": "<Delete-Command>"}'Set Image Action
The Set Image action enables you to update a device with a selected image. You can select the images available in the Image Repository only. You can also select the device reload mode that includes the Smart System Upgrade (SSU) options.
- From the Change Control page, select the Set Image action. See image below:
Figure 11. Set Image Action Page1 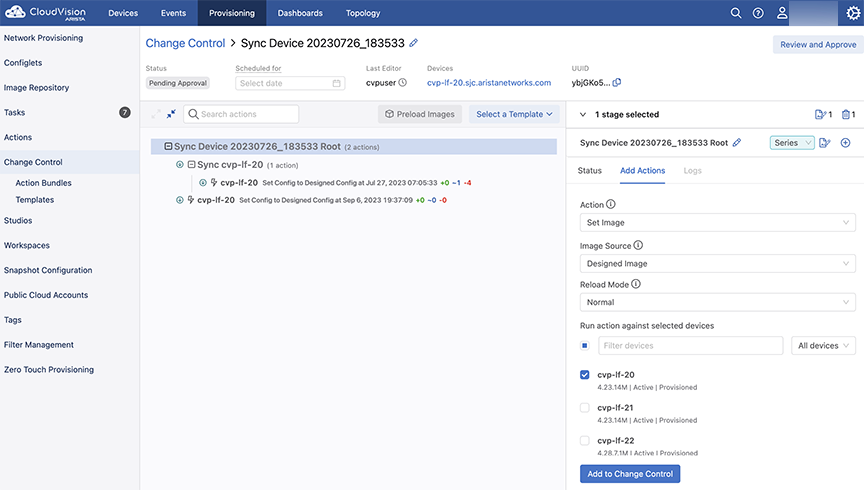
- Select an Image Source (see image below):
- Designed Image: To install the designed image from CloudVision on the selected device (s).
- Running Image: To roll back to a previous running image on the device by using the selected time from timepicker.
Figure 12. Set Image Action - Image Source Options 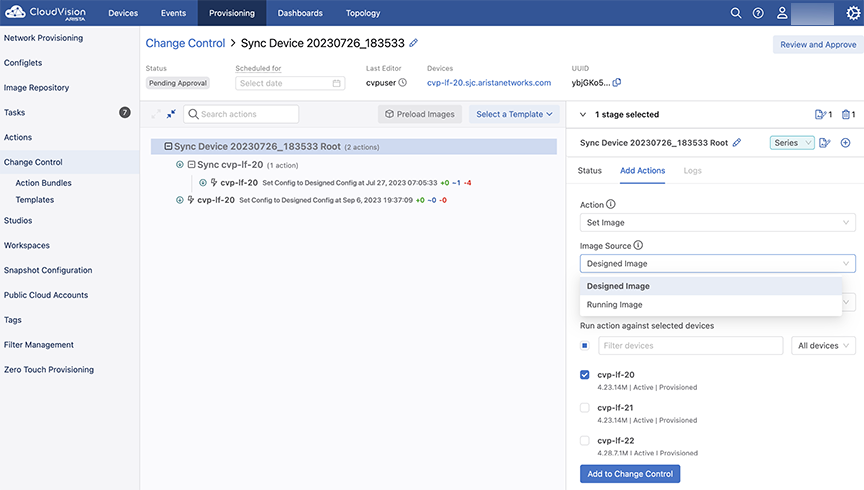
- Select a Reload Mode (see image below):
Figure 13. Set Image Action - Select Reload Mode 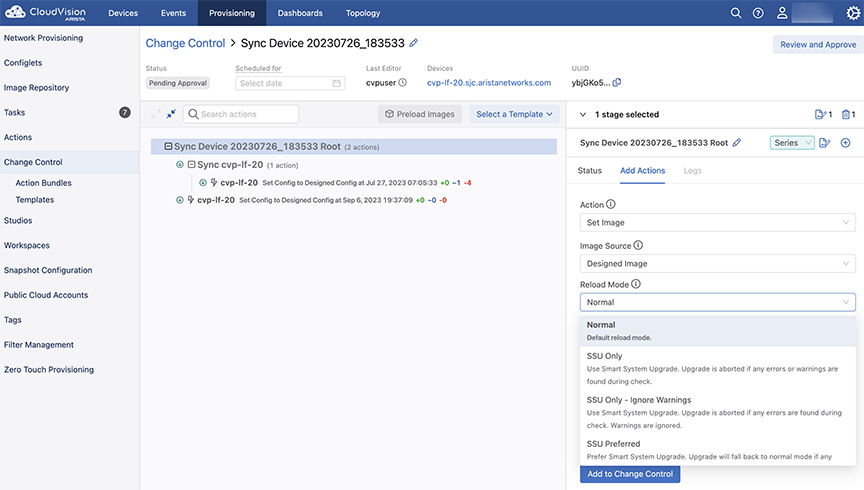
Smart System Upgrade (SSU) minimizes traffic loss during image upgrades. SSU leverages protocols capable of graceful restart and minimizes traffic loss during upgrades. Select one of the Reload Mode options from the drop-down menu:
- Normal: This option does not use SSU. The device reboots and traffic forwarding stops until the device is restarted.
- SSU Only: This option enables CloudVision to first check for any warnings or errors by using the
show reload
fast-boot
command. If there are any errors or warnings, the upgrade attempt fails and the errors and warnings are reported back to the user. If there are no errors or warnings, thenreload fast-boot nowcommand is executed, and the device attempts an SSU. - SSU Only Ignore Warnings: When you select this option, CloudVision first checks for any errors by using
show reload
fast-boot
command. If there are any errors, the upgrade attempt fails and the errors are reported back to the user. If there are only warnings, the SSU upgrade proceeds and CloudVision issues areload fast-boot nowcommand and an SSU is attempted. - SSU Preferred: When you select this option, CloudVision first checks for any warnings or errors using the
show reload
fast-boot
command. If there are any errors or warnings, then CloudVision aborts the SSU and falls back to Normal reload mode. - SSU Preferred Ignore Warnings: When you select this option, CloudVision first checks for any errors or warnings using the
show reload fast-bootcommand. If there are only warnings, then SSU is attempted. If there are any errors, Normal reload is attempted.
- Select the devices to run the action against from the Run action against selected devices field.
- Click Add to Change Control. The selected devices are updated with the new image.