Resource Checks
CloudVision Portal (CVP) enables you to run resource checks on CVP node VMs. You can run checks to determine the current data disk size of VMs that you have upgraded to CVP version 2017.2.0, and to determine the current memory allocation for each CVP node VM.
Performing these resource checks is important to ensure that the CVP node VMs in your deployment have the recommended data disk size and memory allocation for using the Telemetry feature. If the resource checks show that the CVP node VM data disk size or memory allocation (RAM) are below the recommended levels, you can increase the data disk size and memory allocation.
These procedures provide detailed instructions on how to perform the resource checks and if needed, how to increase the CVP node VM data disk size and CVP node VM memory allocation.
Running CVP node VM Resource Checks
CloudVision Portal (CVP) enables you to quickly and easily check the current resources of the primary, secondary, and tertiary nodes of a cluster by running a single command. The command you use is the cvpi resources command.
Use this command to check the following CVP node VM resources:
- Memory allocation
- Data disk size (storage capacity)
- Disk throughput (in MB per second)
- Number of CPUs
Complete the following steps to run the CVP node VM resource check.
- Execute the cvpi resources command.
The output shows the current resources for each CVP node VM
- If the total size of sdb1 (or vdb1) is approximately 120G or less, you can increase the disk size to 1TB (see Increasing Disk Size of VMs Upgraded to CVP Version 2017.2.0 ).
- If the memory allocation is the default of 16GB, you can increase the RAM memory allocation (see Increasing CVP Node VM Memory Allocation).
Figure 1. Using the cvpi resource command to run CVP node VM resource checks 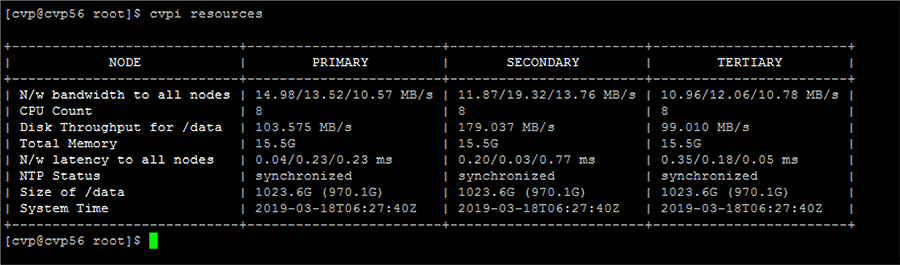
Increasing Disk Size of VMs Upgraded to CVP Version 2017.2.0
If you already upgraded any CVP node VMs running an older version of CVP to version 2017.2.0, you may need to increase the size of the data disk of the VMs so that the data disks have the 1TB disk image that is used on current CVP node VMs
CVP node VM data disks that you upgraded to version 2017.2.0 may still have the original disk image (120GB data image), because the standard upgrade procedure did not upgrade the data disk image. The standard upgrade procedure updated only the root disk, which contains the Centos image along with rpms for CVPI, CVP, and Telemetry.
Pre-requisites
Before you begin the procedure, make sure that you:
- Have upgraded to version 2017.2.0. You cannot increase the data disk size until you have completed the upgrade to version 2017.2.0 (see How to Modify the DNS and NTP Configuration ).
- Have performed the resource check to verify that the CVP node VMs have the data disk size image of previous CVP versions (approximately 120GB or less). See Running CVP node VM Resource Checks.
Procedure
Complete the following steps to increase the data disk size.
- Do the following to increase the size of the data disk to 1TB using the hypervisor:
- ESX: Using vSphere client, do the following:
- Select the Virtual Hardware tab, and then select hard disk 2.
- Change the setting from 120GB to 1TB.
- Click OK.
- KVM: Use the qemu-img resize command to resize the data disk from 120GB to 1TB. Be sure to select disk2.qcow2.
Figure 2. Using vSphere to increase data disk size 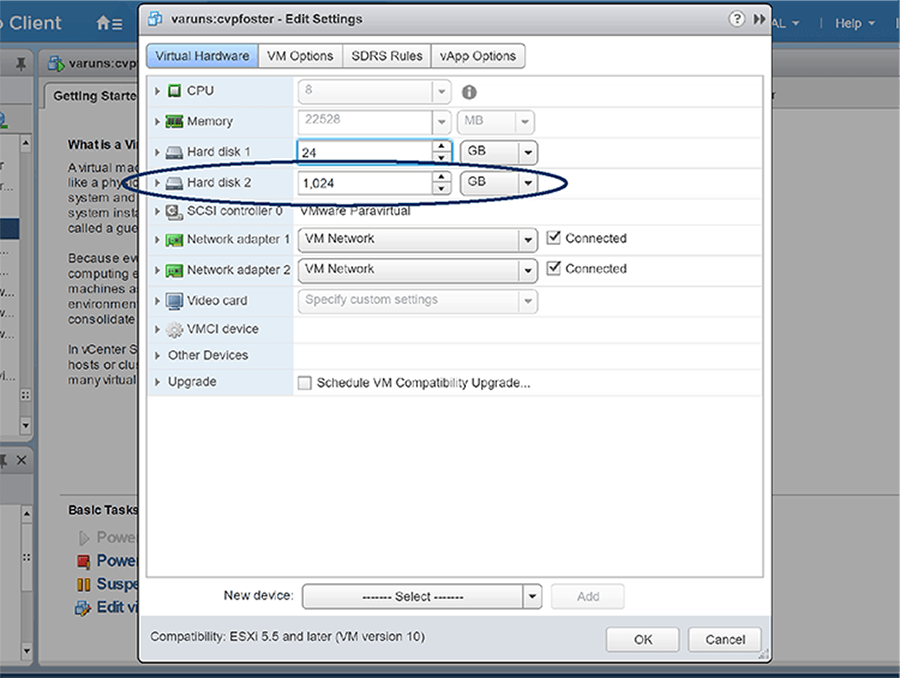
- ESX: Using vSphere client, do the following:
Increasing CVP Node VM Memory Allocation
If the CVP Open Virtual Appliance (OVA) template currently specifies the default of 16GB of memory allocated for the CVP node VMs in the CVP cluster, you need to increase the RAM to ensure that the CVP node VMs have adequate memory allocated for using the Telemetry feature.
You can perform a rolling modification to increase the RAM allocation of every node in the cluster. If you want to keep the service up and available while you are performing the rolling modification, make sure that you perform the procedure on only one CVP node VM at a time.
Once you have completed the procedure on a node, you repeat the procedure on another node in the cluster. You must complete the procedure once for every node in the cluster.
Pre-requisites
Before you begin the procedure, make sure that you:
- Have performed the resource check to verify that the CVP node VMs have the default RAM memory allocation of 16GB (see Running CVP node VM Resource Checks).
- Make sure that you perform a GUI-based backup of the CVP system and copy the backup to a safe location (a location off of the CVP node VMs). The CVP GUI enables you to create a backup you can use to restore CVP data.
Procedure
Complete the following steps to increase the RAM memory allocation of the CVP node VMs.
- Using the cvpi status cvp shell command, make sure that all nodes in the cluster are operational.
Figure 3. cvpi status cvp shell command 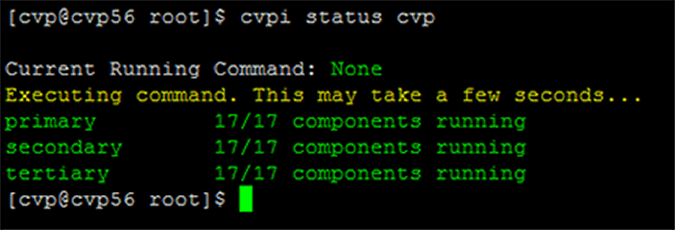
- Using vSphere client, shutdown one CVP node VM by selecting the node in the left pane, and then click the Power off the virtual machine option.
Figure 4. Power off the virtual machine 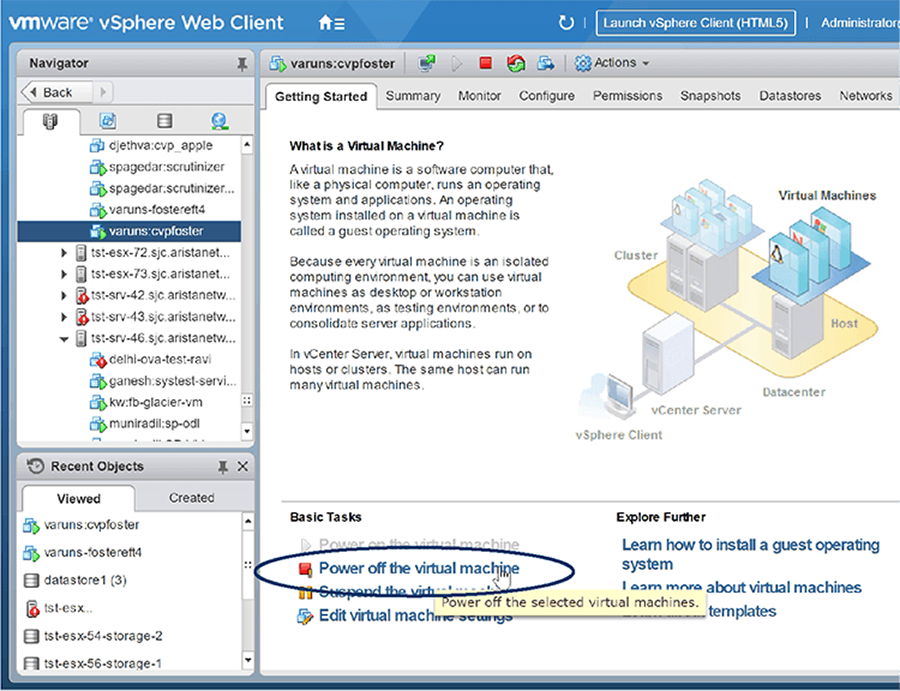
- Click to confirm powering off the virtual machine.
Figure 5. Powering off confirmation 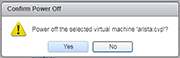
- On the CVP node VM, increase the memory allocation to 32GB by right-clicking the node icon, and then choose Edit Settings.
Figure 6. Edit Settings 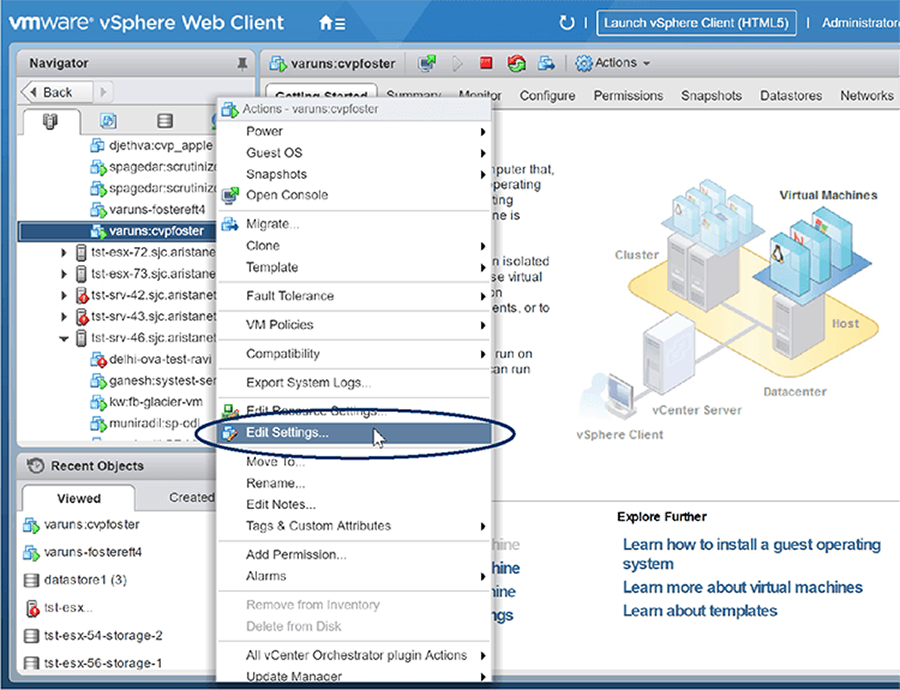
The Edit Resource Settings dialog appears.
Figure 7. Edit Resources Settings 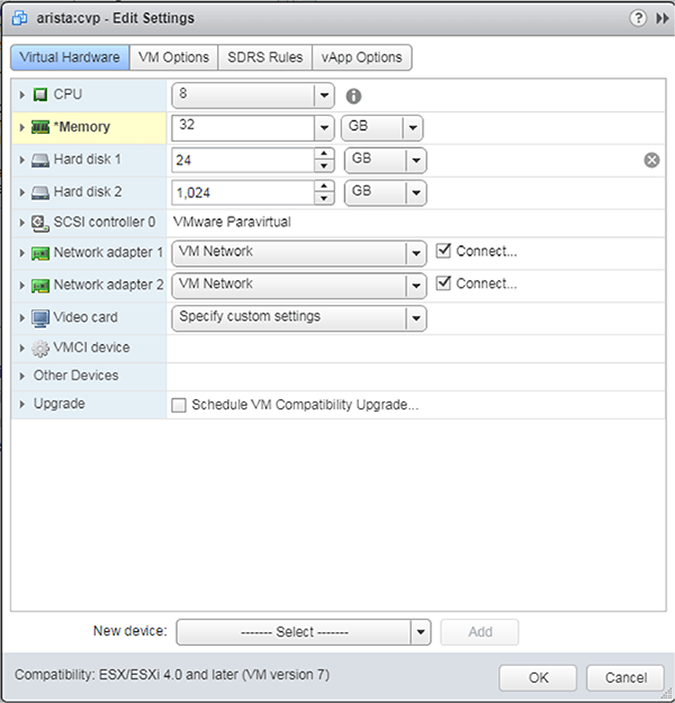
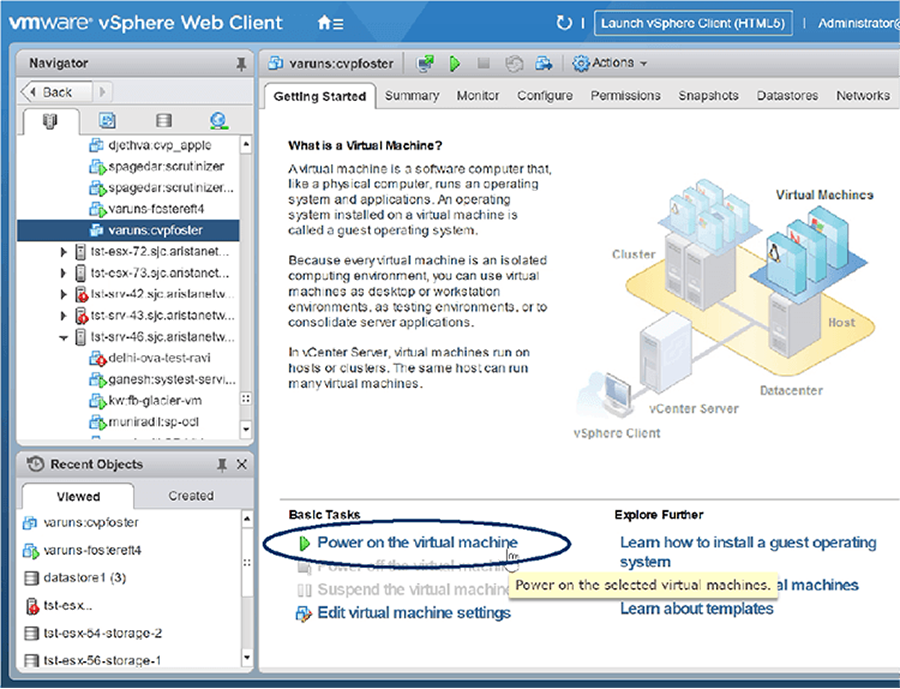
- Click the Power on the virtual machine option.
Figure 8. Power on the virtual machine